background image

5

For fax advantage assistance, call 1-800-435-7329.

Safety instructions

CAUTION:

To reduce the risk of fire or injury to persons,
read and follow these instructions.

1. Use only the battery(ies) specified.

2. Do not dispose of the battery(ies) in a fire.

They may explode. Check with local waste
management codes for special disposal
instructions.

3. Do not open or mutilate the battery(ies).

Released electrolyte is corrosive and may
cause burns or injury to the eyes or skin.
The electrolyte may be toxic if swallowed.

4. Exercise care in handling batteries in order

not to short the battery to conductive
materials such as rings, bracelets, and keys.
The battery and/or conductor may overheat
and cause burns.

5. Charge the battery(ies) provided with or

identified for use with this product only in
accordance with the instructions and
limitations specified in this manual.

INSTALLATION:

Never install telephone wiring during a
lightning storm.

Never install telephone jacks in wet locations
unless the jack is specifically designed for wet
locations. 

Never touch uninsulated telephone wires or
terminals unless the telephone line has been
disconnected at the network interface.

Use caution when installing or modifying
telephone lines.

WARNING:

To prevent the risk of fire or electrical shock,
do not expose this product to rain or any type
of moisture.

OTHER INFORMATION:

Keep the unit away from electrical noise
generating devices, such as fluorescent
lamps and motors.

The unit should be kept free from dust, high
temperature and vibration.

The unit should not be exposed to direct
sunlight.

Do not place heavy objects on top of this unit.

Do not touch the plug with wet hands.

Summary of Contents for KX-FPC165

Page 1: ... U S A FOR FAX ADVANTAGE ASSISTANCE CALL 1 800 HELP FAX 1 800 435 7329 E MAIL TO consumerproducts panasonic com for customers in the U S A or Puerto Rico REFER TO www panasonic com for customers in the U S A or Puerto Rico Compact Plain Paper Fax with 900MHz Cordless and Answering System Operating Instructions Model No KX FPC165 KX FPC166 ...

Page 2: ...en transmitting messages via telephone facsimile date and time of transmission identification of the business entity or person s sending the facsimile and telephone number of the business entity or person s To program this information into your unit complete all the instructions on pages 17 to 20 Note that the images of copied or received documents will remain on the used ink film Use discretion w...

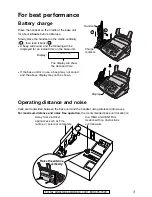
Page 3: ...TRAL location with no obstructions such as walls Raise the antenna vertically For best performance Place the handset on the cradle of the base unit for about 4 hours before initial use Slowly place the handset on the cradle vertically then lean it back A beep will sound and the following will be displayed for an instant time on the base unit Display The display will show the date and time If the b...

Page 4: ...cord Install the unit where no one can step or trip on the cord 10 Do not overload wall outlets and extension cords This can result in the risk of fire or electric shock 11 Never push any objects through slots in this unit This may result in the risk of fire or electric shock Never spill any liquid on the unit 12 To reduce the risk of electric shock do not disassemble this unit Take the unit to an...

Page 5: ...ded with or identified for use with this product only in accordance with the instructions and limitations specified in this manual INSTALLATION Never install telephone wiring during a lightning storm Never install telephone jacks in wet locations unless the jack is specifically designed for wet locations Never touch uninsulated telephone wires or terminals unless the telephone line has been discon...

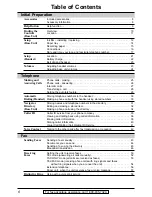
Page 6: ...s faxes 53 TEL FAX mode receiving phone calls with ring signals and faxes without ring signals when you are near the unit 54 Extension telephone 56 Pager call when the unit receives a fax or voice message 57 Distinctive Ring Using with a voice mail service 58 Making and Phone calls making 25 Answering Calls Phone calls answering 26 Intercom calls 27 Transferring a call 28 Setting the auto talk fea...

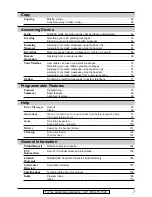
Page 7: ... this product 108 Index Program index 109 Index 110 Programmable Features Answering Device Setup TAD FAX mode receiving phone calls and faxes automatically 62 Greeting Recording your own greeting messages 63 Erasing your own recorded greeting messages 65 Incoming Listening to recorded messages using the base unit 66 Messages Listening to recorded messages using the handset 67 Recording Memo messag...

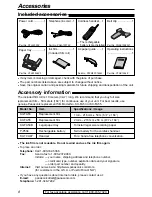
Page 8: ...d telephone number credit card type number expiration date and your signature order part number and quantity Internet Visit our web site http www panasonic com store for customers in the U S A or Puerto Rico ONLY If you have any questions about internet orders please contact us at E mail panasonicdirect panasonic com Telephone 1 201 348 7292 1 roll 216 mm x 50 m 81 2 x 164 2 rolls 216 mm x 50 m 81...

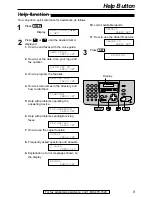
Page 9: ...Help with problems sending receiving faxes 7 How to use the copier function 8 Frequently asked questions and answers 9 Explanation of error messages shown on the display ERRORS PRESS SET Q and A PRESS SET COPIER PRESS SET FAX SND RCV PRESS SET TAD OPERATION PRESS SET DIRECTORY PRESS SET FEATURE LIST PRESS SET QUICK SET UP PRESS SET SEND GUIDE PRESS SET PRESS NAVI I H SET HELP You can print a quick...

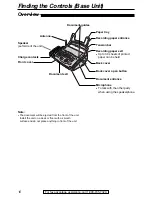
Page 10: ... paper can be held Front cover Back cover open button Microphone To talk with the other party when using the speakerphone Antenna Charge contacts 10 Finding the Controls Base Unit For fax advantage assistance call 1 800 435 7329 Note The document will be ejected from the front of the unit Install the unit on a desk or floor with a smooth surface and do not place anything in front of the unit ...

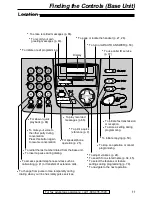
Page 11: ...lumes p 24 To search for a stored name p 34 45 To select the features or feature settings during programming p 79 To navigate to the next operation To initiate fax transmission or reception To store a setting during programming To stop an operation or cancel programming To mute your voice to the other party during conversation Press this button again to resume conversation To turn on off AUTO ANSW...

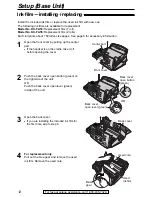
Page 12: ...er open button green Back cover open lever green OR 3 Open the back cover If you are installing the included ink film for the first time skip to step 6 Back cover Install the included ink film or replace the used ink film with new one The following ink films are available for replacement Model No KX FA53 Replacement film 1 roll Model No KX FA55 Replacement film 2 rolls Each roll prints about 150 l...

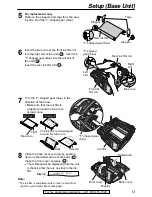
Page 13: ...roll 3 2 1 2 Right slot Blue core 1 T shaped gear blue 3 Left slot Rear ink film roll Front ink film roll 7 Turn the T shaped gear blue in the direction of the arrow Make sure that the ink film is wrapped around the blue core at least once Note The ink film is completely safe to touch and will not rub off on your hands like carbon paper Slack Reverse Tight Correct Blue core The ink film is not wra...

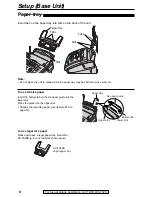
Page 14: ...re the paper tray may be obstructed by a wall etc KX FA50B Legal paper tray To use legal size paper Please purchase a legal paper tray Model No KX FA50B p 8 and install as shown above A4 paper guide Upper slot Lower slot Bottom tab Paper tray To use A4 size paper Insert the bottom tab on the A4 paper guide into the lower slot Press the guide into the upper slot Change the recording paper size feat...

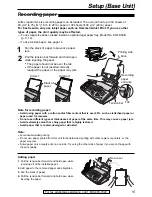
Page 15: ... the tension bar forward and hold open while inserting the paper The paper should not be over the tab If the paper is not inserted correctly readjust the paper or the paper may jam Printing side is back Tab Tension bar Recording paper entrance Stack of paper Correct Incorrect Adding paper 1 Pull the tension bar forward and hold open while removing all of the installed paper 2 Add paper to the remo...

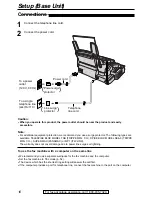
Page 16: ...L TSB TRIPPE MFG CO SPIKE BLOK MODEL SK6 0 TRIPPE MFG CO SUPER MAX PANAMAX or MP1 ITW LINX The warranty does not cover damage due to power line surges or lightning Caution When you operate this product the power outlet should be near the product and easily accessible To use the fax machine with a computer on the same line We recommend you use separate wall jacks for the fax machine and the compute...

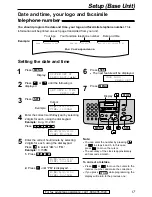
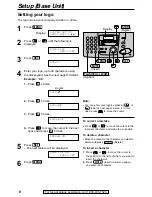
Page 17: ... the previous one STOP Note You can enter the number by pressing or in steps 4 and 5 In this case press to move the cursor The accuracy of the clock is approximately 60 seconds a month 6 Press The next feature will be displayed 7 Press MENU YOUR LOGO PRESS SET SET 1 Press Display 2 Press or until the following is displayed 3 Press Cursor Example 4 Enter the correct month day year by selecting 2 di...

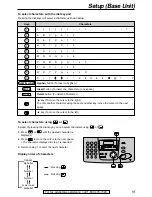
Page 18: ... 18 Setup Base Unit For fax advantage assistance call 1 800 435 7329 Setting your logo Hyphen FLASH CALL WAIT Delete SET Display STOP MUTE Insert MENU To correct a mistake Press or to move the cursor to the incorrect character and make the correction To delete a character Move the cursor to the character you want to delete and press Delete To insert a character 1 Press or to move the cursor to the...

Page 19: ...r 1 Press or until the desired character is displayed 2 Press to move the cursor to the next space The character displayed in step 1 is inserted 3 Return to step 1 to enter the next character Display order of characters Capital alphabet Lower case alphabet Number Symbol Pressing Pressing Hyphen button To insert a hyphen Insert button To insert one character or one space Delete button To delete a c...

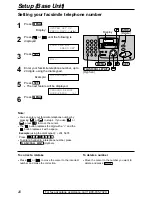
Page 20: ...T SYSTEM SET UP PRESS NAVI I H MENU SET Display MENU Hyphen Delete STOP FLASH CALL WAIT Note You can enter your facsimile telephone number by pressing or in step 4 If you use or press to move the cursor The button replaces the digit with a and the button replaces it with a space Example using the dial keypad 234 5678 Press To enter a hyphen in a telephone number press Hyphen FLASH CALL WAIT 2 4 6 ...

Page 21: ...kerphone on the base unit using the handset To access special telephone services such as call waiting p 41 or transfers of extension calls To listen to recorded messages p 67 To enter programming p 30 For automatic dialing p 30 To page the base unit p 27 28 To adjust volumes p 23 To redial the last number dialed from the handset To insert a pause during dialing To receive a fax p 52 To select a cl...

Page 22: ... handset battery for more than 15 minutes or the display will continue showing the above indication Recharge Automatic security code setting Whenever you place the handset on the base unit the unit will automatically select one of a million security codes These codes help to avoid unauthorized use of your telephone line by another cordless telephone Place the handset on the cradle of the base unit...

Page 23: ...o off When receiving a call the handset will not ring and the TALK indicator will flash LOUD RINGER 12Ringer1off LOUD RINGER Ringer Low High LOUD RINGER LOUD RINGER LOUD RINGER TALK indicator Display Handset receiver volume 3 levels high middle low are available While talking press Loud Low High LOUD RINGER Belt clip To install the belt clip To remove the belt clip Headset optional Plugging the he...

Page 24: ...all is received the unit will not ring and will display the following Speaker volume 8 levels high to low are available While using the speakerphone press or Fax voice guidance volume 9 levels high to off are available While listening to the fax voice guidance press or Answering device volume 9 levels high to off are available While listening to the recorded messages press or INCOMING CALL RINGER ...

Page 25: ...K TALK Note If short beeps sound when you press move towards the base unit or place the handset on the base unit Then try again If is pressed while using the base unit the call will be switched to the handset and the base unit is disconnected TALK TALK With the handset Channel number Phone calls making 1 Press Display 2 Dial the telephone number Example 3 When the other party answers talk into the...

Page 26: ...ressing any dial key 0 to 9 or Any key talk feature Handset is on the base unit Lift the handset when the base unit rings 2 When finished talking press or place the handset on the base unit TALK TALK TALK With the base unit 1 When the base unit rings press and talk into the microphone 2 When finished talking press DIGITAL SP PHONE DIGITAL SP PHONE With the handset DIGITAL SP PHONE Microphone ...

Page 27: ...COM indicator will turn off INTERCOM INTERCOM1CALL Intercom calls Paging the base unit from the handset 1 Handset Press The INTERCOM indicator will flash and the base unit will ring Then the INTERCOM indicator will light and you can talk with the base unit user Handset display Example 2 Base unit Answer through the microphone Base unit display 3 Handset When finished talking press The INTERCOM ind...

Page 28: ...LK INTERCOM From the base unit to the handset 1 Base unit During an outside call press to page the handset The base unit will start paging the handset for 1 minute The outside call will be put on hold Base unit display Handset display 2 Handset Press to answer the page Handset display Example Base unit display INTERCOM1HOLD Intercom1hold 00 01 12 INTERCOM 1111Paging Press1INTERCOM 1234PAGING LOCAT...

Page 29: ...urn this feature off Make sure the TALK indicator is off TALK 1 Press Display The TALK indicator will flash 2 Press repeatedly until the following is displayed 3 Press 4 To select Off Press To select On Press A long beep will sound The TALK indicator will turn off Auto1talk 1111111111111On Auto1talk 111111111111Off Auto1talk On111111 Off Talk1switching Next1111 Yes Save1AUTO 1 Next1111 Yes PROGRAM...

Page 30: ... To change a stored number Follow from step 1 and enter a new number To erase a stored number 1 Press 2 Press 3 Press 4 Press 5 Press the memory station number 0 to 9 you want to erase A beep will sound and erasing will be completed AUTO CLEAR PROGRAM You can store up to 10 telephone numbers in the handset The dial keys 0 to 9 function as memory stations Make sure the TALK indicator is off EXIT CL...

Page 31: ...er the name up to 10 characters see page 19 for instructions Example 4 Press 5 Enter the telephone number up to 30 digits using the dial keypad Example If you want to enter a hyphen press 6 Press To program other items repeat steps 3 to 6 7 Press to exit the program MENU NAME STORE PRESS SET REGISTERED SET FLASH CALL WAIT NO 5552233 NO SET NAME Alice STORE PRESS SET NAME STORE PRESS SET DIRECTORY ...

Page 32: ...ep 6 5 Edit the name see page 19 for instructions 6 Press Example If you do not need to edit the telephone number skip to step 8 7 Edit the telephone number For further details see page 31 8 Press REGISTERED SET NO 0123456 SET NAME Mary STORE PRESS SET NAME Mary EDIT DELETE MENU Mary EDIT PRESS MENU Mary 0123456 DIRECTORY MAILBOX H Editing a stored item Editing and erasing a stored item SET MENU ...

Page 33: ...erasing press 5 Press The stored name and number are deleted DELETED SET STOP DELETE OK YES SET NO STOP NAME Peter EDIT DELETE MENU Peter EDIT PRESS MENU Peter 9876543 DIRECTORY MAILBOX H Erasing a stored item Note You can use the following method to erase 1 Press 2 Press or until the desired item is displayed 3 Press 4 Press SET ERASE SET MENU ERASE STOP ...

Page 34: ...31415 5 Alan EDIT PRESS MENU Alan 7891011 DIRECTORY MAILBOX H 1 Press Display 2 Press or until the desired item is displayed Example If the desired name has not been stored press and dial the number manually 3 Handset is off the base unit Press on the handset Handset is on the base unit Press or lift the handset The unit will start dialing automatically DIGITAL SP PHONE TALK STOP Lisa EDIT PRESS M...

Page 35: ... view the caller information p 36 37 and print the caller ID list p 104 Base unit display Handset display The caller dialed from an area which does not provide Caller ID service The caller requested not to send caller information The caller made a long distance call Long distance LONG1DISTANCE Private caller PRIVATE1CALLER Out of area OUT1OF1AREA Note If the unit is connected to a PBX Private Bran...

Page 36: ...all back Important Calling back will not be possible in the following cases The telephone number includes data other than numbers i e or The caller information does not include a telephone number TALK EDIT EXIT To edit the telephone number for calling back Press repeatedly after step 2 Each time you press the telephone number will change as follows EDIT EDIT 2 Local telephone number area code omit...

Page 37: ... number 1 Local telephone number 4 3 1 added area code omitted 1 added and area code omitted Display while viewing When the unit could not receive a name When no calls have been received NO CALLER DATA NO NAME RCVD This means this call has already been viewed or answered Using the base unit To stop viewing Press after step 2 STOP 2 Press to show the most recent caller s name Press to show the call...

Page 38: ...m neither the handset or the base unit Erasing all caller information using the handset CLEAR EXIT 1 Handset is off the base unit Press or Handset is on the base unit Lift the handset Example 2 Press or repeatedly until the desired item is displayed Example CINDY1TURNER 1 234 456 7890 11 20A1JAN12 131new1calls New11111 Old Erasing specific caller information using the handset 3 Press Example To er...

Page 39: ...NU STOP ALL ERASE OK YES SET NO STOP SET CALL LIST ERASE PRESS SET SET CALLER SET UP PRESS SET MENU Erasing specific caller information using the base unit 1 Press Example 2 Press or until the desired item is displayed Example 3 Press Example To erase other items repeat steps 2 and 3 4 Press to exit the program STOP ALLAN STONE 12 12A Jul20 DELETED ERASE WENDY ROBERTS 12 10A Jul20 2 NEW CALLS PRES...

Page 40: ...4 2 NEW CALLS PRESS NAVI CALLER ID Note You can confirm the stored items on the telephone number list p 104 The unit can only store a name of up to 10 characters long To edit a name and number see page 32 In the directory of the base unit 1 Handset is off the base unit Press or Handset is on the base unit Lift the handset Example 2 Press or until the desired item you want to store is displayed Exa...

Page 41: ...ller press or again CALL WAIT FLASH CALL WAIT FLASH CALL WAIT CALL WAIT FLASH Handset display Example NANCY1BROWN 1 000 222 3333 Waiting Base unit display Example NANCY1BROWN 1 000 222 3333 Note The second caller s information will not be displayed when the answering system is recording an incoming message an extension telephone on the same line is in use or you are sending or receiving a fax docu...

Page 42: ...o the other party after fax transmission or reception You can talk to the other party after a fax message is completed This will save the added expense and time of making another call This feature only works when the other party s fax machine is equipped with a voice contact feature 1 If the other party initiates voice contact your unit will sound a distinctive ring and the following will be displ...

Page 43: ...tting will increase transmission time If the resolution setting is changed during feeding it will be effective from the next sheet Quick scan feature With this feature the unit will scan the document into memory before sending This is helpful when you want to remove the document for other uses To use this feature activate feature 34 on page 83 and make a fax transmission After storing the unit wil...

Page 44: ...ed or torn paper Paper with a coated surface Paper with a faint image To transmit the document s with a width of less than standard letter size 216 mm we recommend using a copy machine to copy the original document on to a letter size paper then transmit the copied document To transmit more than 10 pages at a time Insert the first 10 pages of the document Add the other pages 10 at a time before th...

Page 45: ...ment guides STOP FAX START Before using this feature program the desired names and telephone numbers into the directory p 31 If your unit does not send a fax Confirm the stored telephone number on the display and check that the number dialed is answered by the other party s machine p 34 The connecting tone will be heard during dialing to tell you the status of the other party s machine feature 76 ...

Page 46: ...he following is displayed Display 2 Press to select BROAD 3 Press or until the desired item is displayed Example 4 Press Example To program other items repeat steps 3 and 4 up to 20 items 5 Press to exit the program Note If you enter the wrong item press after step 4 to erase the item Confirm the stored items by printing a broadcast programming list p 104 STOP REGISTERED SET DIR MIKE 01 STORE PRES...

Page 47: ...wing is displayed 3 Press 4 Press to select ADD 5 Press or until the desired item you want to add is displayed Example 6 Press Example To add other items repeat steps 5 and 6 up to 20 items 7 Press to exit the program STOP Nikki 1 385 217 9365 REGISTERED SET Mary 1 584 372 4123 BROADCAST ADD DELETE MENU BROADCAST EDIT PRESS MENU DIRECTORY MAILBOX H SET MENU STOP ...

Page 48: ...ess 4 Press to select DELETE 5 Press or until the desired item you want to erase is displayed Example To cancel erasing press 6 Press 7 Press Example To delete other items repeat steps 5 to 7 8 Press to exit the program STOP Bob 0123456 DELETED SET DELETE OK YES SET NO STOP SET STOP Dick 1 328 143 2968 BROADCAST ADD DELETE MENU BROADCAST EDIT PRESS MENU DIRECTORY MAILBOX H SET MENU STOP ...

Page 49: ...the memory capacity p 108 sending will be canceled If one of the items is busy or does not answer the item will be skipped All skipped items will be redialed up to 2 times after all of the other items have been called To cancel the broadcast setting 1 Press while the unit displays the following Display The display will show the following 2 Press SET SEND CANCELED YES SET NO STOP BROADCASTING STOP ...

Page 50: ...hen receiving calls All incoming calls will be answered as faxes Use only as a fax ATOR INTERCOM You want to receive all phone calls and faxes automatically When receiving phone calls The unit will activate the answering device and record voice messages When receiving faxes The unit will activate the fax function to receive documents is Mike Hi this Use as answering device and or fax TAD FAX mode ...

Page 51: ...the display AUTO ANSWER When receiving calls You have to answer all calls manually To receive a fax document press for each fax receiving FAX START Ring Ring Ring Mostly phone calls TEL FAX mode If you are near the unit and want to use it to receive phone calls yourself and faxes automatically see pages 54 and 55 A AT TOR INTERCOM OR INTERCOM When the fax machine detects a call matching the select...

Page 52: ...unit will temporarily activate the answering device The greeting message will then be played and the other party can send a fax Up to 30 sheets of printed paper can be held Remove the printed paper before it exceeds 30 sheets Fax reception in memory When a printing problem is detected the unit will temporarily store the received document into memory While the document is in memory the display will...

Page 53: ...unit will automatically answer all calls and only receive fax documents PICKUP RCV FAX AFTER 3 RINGS AUTO ANSWER Line 1 Phone calls Line 2 Faxes Only a fax machine is connected Activating FAX ONLY mode Note If the arrow is already shown on the right of the display and you wish to change the ring setting turn the arrow off once then on again by pressing and follow the instructions in step 3 This mo...

Page 54: ...chine will not ring Duration depends on TEL FAX delayed ring setting The call is connected Phone call Fax calling tone A call is received The fax machine will automatically receive documents without ringing Answer the call If the call is not answered this message will be played Then the fax machine will activate the fax function for a case in which the other party s fax machine does not send a fax...

Page 55: ...ling tone A call is received The fax machine will automatically receive documents without ringing Answer the call If the call is not answered this message will be played Then the fax machine will activate the fax function for a case in which the other party s fax machine does not send a fax calling tone The extension telephone will not ring but the fax machine will ring 3 times Duration depends on...

Page 56: ...phone You do not have to press on the fax machine Important Use a touch tone telephone as the extension telephone and enter the fax activation code firmly FAX START 1 When the extension telephone rings lift the handset of the extension telephone 2 When document reception is required a fax calling tone slow beep is heard or no sound is heard press pre selected fax activation code firmly 3 Hang up t...

Page 57: ... to change this message enter your message up to 30 digits 9 Press The unit will dial the stored number PAGER TEST SET MSG 07734 SET PIN 12345678 PIN SET NO 12025551234 NO SET PAGER CALL MODE ON PAGER CALL MODE OFF 7 0 SYSTEM SET UP PRESS NAVI I H MENU SET MENU DIGITAL SP PHONE Note If you have subscribed to a Caller ID service instead of the message you entered in step 8 your pager will display t...

Page 58: ...ed ring pattern 1 Press Display 2 Press then 3 Press or to select the ring pattern assigned by the telephone company A Standard ring one long ring B Double ring two short rings default setting C Triple ring short long short rings D Other triple ring short short long rings OFF Turns off the feature 4 Press 5 Press to exit the program MENU SETUP ITEM SET RING DETECTION MODE B 3 1 SYSTEM SET UP PRESS...

Page 59: ... is helpful when you want to remove the document for other uses To use this feature activate feature 34 on page 83 and make a copy After storing the unit will print the document If the document exceeds the memory capacity p 108 copying will be canceled and this feature will be turned off automatically To stop copying Press STOP To select the resolution Select the desired resolution according to th...

Page 60: ...aper try 92 or 86 To enlarge a document 1 Press in step 3 on page 59 Display 2 Press to select 150 or 200 The unit will only enlarge the center most part of the document printing it on two pages ZOOM 100 COLLATE H To reduce a document 1 Press in step 3 on page 59 Display 2 Press to select 92 86 or 72 See below for the recommended reduction rates ZOOM 100 COLLATE H Convenient way to make a copy Let...

Page 61: ...opies of a 4 page original document Note The unit will store the documents into memory while collating the copies If memory becomes full while storing the unit will only print out the stored pages After copying the collating feature will turn off automatically 1 Press 2 times in step 3 on page 59 Display 2 Press or repeatedly until the following is displayed COLLATE ON RESOLUTION H COLLATE OFF RES...

Page 62: ... on the right of the display turn it on by pressing The unit will play the pre recorded greeting message The display will show the ring setting in TAD FAX mode Display 3 If you wish to change the ring setting press or until the desired setting see below is displayed and press You can change the speaker volume after setting the ring setting Press or while listening to the greeting message The remai...

Page 63: ... or TEL FAX where you want to record a greeting message feature 77 on page 87 2 Press 2 times The display will show the following according to your selection in step 1 TAD FAX mode TEL FAX mode 3 Press A long beep will sound 4 Speak clearly about 20 cm 8 inches away from the microphone The display will show the remaining recording time TAD FAX mode TEL FAX mode 5 When finished recording press The ...

Page 64: ...right of the display turn it on by pressing If the arrow is shown on the right of the display turn it off once then on again The display will show the following according to your selection in step 1 TAD FAX mode TEL FAX mode The unit will play the greeting message TEL FAX MODE PICKUP RCV CALL AFTER 2 RINGS AUTO ANSWER AUTO ANSWER Checking the greeting messages ...

Page 65: ...he following according to your selection in step 1 TAD FAX mode TEL FAX mode 3 Press To cancel erasing press 4 Press When receiving a call the pre recorded greeting message will be played GREETING ERASED SET STOP ERASE GREETING YES SET NO STOP SET TEL FAX GREETING PRESS SET TAD GREETING PRESS SET ERASE Erasing your own recorded greeting messages STOP SET ERASE ...

Page 66: ...he previous message will be played To play back a specific message press or and search for the message you want to listen to To skip a message Press to play the next message To stop playback Press If you press within 1 minute the unit will resume playing the rest of the messages Voice time day stamp During playback a synthesized voice will announce the time and day of the week that each message wa...

Page 67: ...istening to the message If you press within 5 seconds of the beginning of the message the previous message will be played 1 5 3 new messages Voice guide example No new messages Voice guide example TALK indicator PLAYBACK GHI JKL NEW MSG ALL MSG REPEAT SKIP ABC ON AUTO ANSWER OFF AUTO ANSWER Sorry no more memory Please erase unnecessary messages Voice guide example 1 To skip a message Press to play...

Page 68: ...yed back later either directly or remotely 1 Press Display 2 Press A long beep will sound 3 Speak clearly about 20 cm 8 inches away from the microphone 4 When finished recording press STOP MEMO RECORDING SET MEMO MESSAGE PRESS SET RECORD Microphone RECORD STOP SET Memo message leaving a message for others or yourself ...

Page 69: ...te operation card Please cut out and carry this card for assistance when using the remote operation Mailbox Remote Operation Notice of Remote Operation Fold here Recording a message in a mailbox 1 Call your unit 2 Press and the mailbox no or 3 Leave a message Retrieving messages from a mailbox 1 Call your unit 2 Press and the mailbox no or 3 Enter the mailbox password 4 Press the remote command ke...

Page 70: ...ssages Listening to recorded messages When there are new messages The voice guide will tell you the number of new messages and they will be played automatically To repeat a message Press If you press within 5 seconds of the beginning of a message the previous message will be played To skip a message Press To repeat only the new messages Press To listen to all the messages Press 4 2 1 Voice guide e...

Page 71: ... Transfer phone number is not set Skipping the greeting message Press during the greeting message playback The unit will skip the rest of the greeting message 0 Erasing a specific message Press while listening to the message you want to erase A long beep will sound The unit will then play back the next message Erasing all the messages Press to erase all the messages A long beep will sound 5 4 Othe...

Page 72: ...rson who knows the password can retrieve a message from a mailbox This feature is useful when you share this unit with other people To use a mailbox 1 Record your own TAD FAX greeting message p 63 Suggested message This is your name We are unable to answer right now To send a fax start transmission To leave a message speak after the beep To leave a private message press and the desired mailbox num...

Page 73: ...When finished recording press The unit will repeat your message Adjust the volume using or 7 Press MENU STOP BOX1_REC 15s BOX1_REC 16s SET BOX1_GREETING RECORD_______ BOX2_GREETING CHECK________ 5 6 BOX1_GREETING CHECK________ 5 5 SYSTEM_SET_UP PRESS_NAVI I H MENU Microphone SET MENU STOP To check the mailbox greeting message 1 For mailbox 1 Press For mailbox 2 Press 2 Press or to select CHECK 3 P...

Page 74: ...ip a message To stop playback To change the playback speed To erase a specific message To erase all the messages in a mailbox 1 Press 2 times 2 Press or until the desired mailbox number is displayed Example 3 Press 4 Press SET BOX1 ERASE OK YES SET NO STOP ERASE PRESS REC ERASE PLAY MAILBOX1_ _01 SET STOP PLAY MESSAGES ERASE RECORD Listening to recorded messages using the base unit To record a mem...

Page 75: ...4 Press to end the operation The TALK indicator will turn off PLAYBACK 5 4 2 1 Remote operation 11111v11111CH10 PLAYBACK GHI JKL NEW MSG ALL MSG 1 2 TALK indicator PLAYBACK Note The following features can be used during playback See page 67 for details To repeat a message To skip a message To erase a specific message To erase all the messages For the following see page 67 When there are no new rec...

Page 76: ...rd default setting 555 If you have programmed your own mailbox password enter it instead of 555 2 1 To listen to messages in another memory after playback Press and for the common memory then enter the remote operation ID or Press and the desired mailbox number or then enter the mailbox password 2 1 0 Listening to recorded messages from a remote location Note For details on remote operation see pa...

Page 77: ... transferred message during the same call using the remote operation 1 An incoming voice message is recorded in your unit 2 Your unit calls the transfer telephone number 3 Answer the call with the transfer telephone 4 Your unit will play the transfer greeting message This message can be changed p 78 5 Enter the remote operation ID feature 11 on page 81 6 Retrieve the message using the remote opera...

Page 78: ...e 6 When finished recording press The unit will repeat your message Adjust the volume using or 7 Press MENU STOP TRNS__REC 15s TRNS__REC 16s SET TRNS GREETING RECORD_______ TRNS GREETING CHECK________ 6 1 SYSTEM_SET_UP PRESS_NAVI I H MENU Microphone SET MENU STOP To check the transfer greeting message 1 Press 2 Press or to select CHECK 3 Press The unit will play the message 4 Press MENU SET 6 1 ME...

Page 79: ...he 2 digit code number 3 Follow steps 3 to 5 above See programming tables for code numbers p 80 87 MENU To cancel programming Press to exit the program MENU For basic features p 80 81 Press or until the desired feature is displayed For advanced features p 82 87 Press or until the following is displayed then press and press or until the desired feature is displayed The current setting of the featur...

Page 80: ... REPORT MODE ERROR ERROR ON OFF The default setting is in bold type This setting is also available after activating FAX ONLY mode p 53 06 Changing the ring setting in FAX ONLY mode To change the number of rings before the unit answers a call in FAX ONLY mode FAX RING COUNT RINGS 3 1 2 3 4 Changing the ring setting in TAD FAX mode To change the number of rings before the unit answers a call in TAD ...

Page 81: ...ringer pattern will sound while setting 17 Setting the ringer pattern RINGER PATTERN MODE A A B C VOX Unlimited 1 MIN Up to 1 minute ID 111 1 Follow steps 1 and 2 on page 80 2 Enter any 3 digit number except a number using 0 or 7 3 Press 4 Press MENU SET VOX 1 MIN 10 Changing the incoming message recording time RECORDING TIME MODE VOX Setting the remote operation ID REMOTE TAD ID ID 111 11 LETTER ...

Page 82: ...e before starting transmission This feature makes sending documents easier as the transmission speed is slowed down OVERSEAS MODE MODE ERROR Settings How the unit operates 25 Sending a fax at a specified time This feature allows you to take advantage of low cost calling hours offered by your telephone company The setting can be reserved to take place up to 24 hours in advance DELAYED SEND MODE OFF...

Page 83: ...cument exceeds the memory capacity p 108 sending copying will be canceled and this feature will be turned off automatically Setting the quick scan To scan the document into memory before sending copying This is helpful when you want to remove the document for other uses QUICK SCAN MODE OFF 36 Receiving other size documents If the size of the document sent by the other party is as large as or large...

Page 84: ...ps press and listen to recorded messages p 66 The beeps will stop PLAY MESSAGES 42 Setting the message alert To alert you with beeps when a new voice message is recorded MESSAGE ALERT MODE OFF ON OFF If you hear slow beeps erase the recorded messages p 66 67 74 The beeps will stop 43 Setting the recording time alert To alert you with beeps when there is less than 60 seconds of remaining recording ...

Page 85: ...as been received is stored into memory due to some existing problem RECEIVE ALERT MODE ON If you are alerted by a slow beeping sound clear the printing problem and make sure the unit is supplied with paper to print the stored document The beeps will stop 46 Setting the friendly reception To receive a fax automatically when you answer a call and hear a fax calling tone slow beep FRIENDLY RCV MODE O...

Page 86: ...feature See page 79 for more details 1 Press 2 Press or until the following is displayed Display then press and press or until the desired feature is displayed SET ADVANCED MODE PRESS SET MENU 3 Press or until the desired setting is displayed 4 Press 5 Press MENU SET Programming table cont Code Settings How the unit operates 55 Greeting message for mailbox 1 checking recording or erasing BOX1 GREE...

Page 87: ...T SET You can confirm the status of the other party s machine If the ring back tone continues the other party s machine may not be a facsimile or may have run out of paper Check with the other party The connecting tone volume cannot be adjusted 76 Setting the connecting tone If you often have trouble when sending a fax this feature allows you to hear connecting tones fax tone ring back tone and bu...

Page 88: ...her party The document was not received due to memory being full The document was not fed into the unit properly Reinsert the document and try again The other party s fax machine is busy or has run out of recording paper Try again The document was not fed properly Reinsert the document and try again The other party s fax machine rings too many times Send the fax manually dial the number confirm th...

Page 89: ...nstall paper and press to clear the message The recording paper is not fed into the unit properly Reinstall paper p 15 and press to clear the message The recording paper has jammed near the recording paper entrance Clear the jammed paper p 98 and press to clear the message Do not install folded or heavily curled paper SET SET SET CHECK PAPER The unit has a document in memory See the other displaye...

Page 90: ...on error occurred Try again TRANSMIT ERROR The unit is too hot Let the unit cool down UNIT OVERHEATED There is something wrong with the modem circuit Contact our service personnel MODEM ERROR There is no room left in memory to record a voice message Erase unnecessary messages p 66 67 74 MESSAGE FULL Handset Display message Not1available Please1lift1up and1try1again 12Save1error No1link1to1base Pla...

Page 91: ... our service personnel to have the unit repaired If the working telephone does not operate properly contact your telephone company The ringer volume is set to off Adjust it p 23 24 The ring setting of feature 06 is set to RINGER OFF Change to another ring setting p 80 The paper is inserted halfway Insert it correctly p 15 and press to clear the message FAX ONLY mode is set Tell the other party the...

Page 92: ...l be terminated DIGITAL SP PHONE Cause solution TALK Cordless handset Problem Cause solution Make sure that the battery is installed correctly p 101 Charge the battery fully p 22 Clean the charge contacts and charge again p 22 The ringer volume is set to off Press p 23 The handset is too far from the base unit Move closer and try again Place the handset on the base unit and try again The power cor...

Page 93: ...et display goes to the stand by mode while viewing the caller information FAX Recharge Recharge REDIAL PAUSE You cannot store a number while the unit is in the talk or intercom mode Do not pause for over 60 seconds while storing a number To answer a call press The program will be canceled Store the number again If the last number dialed was more than 32 digits long the number will not be redialed ...

Page 94: ...ying the document If the copied image is clear there may be something wrong with the other party s machine The glass or rollers are dirty Clean them p 102 Use the overseas transmission mode of feature 23 p 82 Add two pauses at the end of the telephone number or dial manually FAX START Cause solution I cannot receive documents automatically The display shows the following but faxes are not received...

Page 95: ... 20 such as letterhead or resume paper We recommend smooth paper such as Hammermill Jet Print for clearer printing Press until a single beep is heard The memory is full of received documents due to a lack of recording paper or a recording paper jam Install paper p 15 or clear the jammed paper p 98 FAX Cause solution I cannot select the desired receive mode The other party complains that they canno...

Page 96: ...age is distorted The printing quality is poor ABC Original Copy Answering device Problem Press the remote operation ID correctly and firmly p 70 The mailbox password is wrong Enter the correct password For mailbox 1 password see feature 51 on page 85 For mailbox 2 password see feature 52 on page 85 The memory is full Erase unnecessary messages p 66 67 74 Someone is calling you from outside Press t...

Page 97: ... be made for access to emergency services Fax transmission and reception will be interrupted If delayed transmission of feature 25 p 82 is programmed and the start time has passed during a power failure transmission will be attempted soon after power is restored If fax documents are stored in memory they will be lost When power is restored a power down report will be printed out stating which cont...

Page 98: ...ng paper during fax reception or copying the recording paper has jammed and the display will show the following Display __PAPER1JAMMED Center part Front cover 2 Push the back cover open button green on the right side of the unit OR Push the back cover open lever green inside of the unit Back cover open button green OR Back cover open lever green 4 Remove the jammed recording paper Jammed recording...

Page 99: ...ear blue in the direction of the arrow Make sure that the ink film is wrapped around the blue core at least once 6 Close the back cover securely by pushing down on the dotted area at both ends Close the front cover securely 2 1 Slack Reverse Tight Correct Blue core The ink film is not wrapped around the blue core Incorrect ...

Page 100: ...fully 3 Close the front cover securely Center part Jammed document Front cover Note Do not pull out the jammed paper forcibly before opening the front cover If the unit does not release the document during feeding remove the jammed document as follows 100 Jams For fax advantage assistance call 1 800 435 7329 ...

Page 101: ...ow and slide the handset cover Handset cover 3 Connect the battery connector of the new battery and insert the battery into the handset New battery Battery connector 4 Replace the handset cover on the handset Be sure to charge the new battery for about 4 hours p 22 Handset cover Attention A nickel cadmium battery that is recyclable powers the product you have purchased At the end of its useful lif...

Page 102: ...nt feeder rollers and rubber flap with a cloth moistened with isopropyl rubbing alcohol and let all parts dry thoroughly 4 Clean the glass with a soft dry cloth 5 Close the front cover securely 6 Connect the power cord and the telephone line cord Power cord Telephone line cord If misfeeding occurs frequently or if dirty patterns or black bands appear on a transmitted document or on the original of...

Page 103: ...ch the black sheets on the thermal head 5 Close the back cover securely by pushing down on the dotted area at both ends Close the front cover securely 6 Connect the power cord and the telephone line cord Thermal head Dotted area Center part Back cover open lever green Front cover Back cover Back cover open button green OR Black sheets Thermal head If dirty patterns or black or white bands appear o...

Page 104: ...ou with the current settings of the basic and advanced programming features p 80 87 Telephone number list provides you with names and telephone numbers which are stored in the directory Journal report keeps records of fax transmission and reception This report will be printed automatically after every 30 fax communications p 44 Printer test list allows you to check the print quality of your unit I...

Page 105: ...68 If such changes can be reasonably expected to render any customer terminal equipment incompatible with telephone company communications facilities or require modification or alteration of such terminal equipment or otherwise materially affect its use or performance the customer shall be given adequate notice in writing to allow the customer an opportunity to maintain uninterrupted service CAUTI...

Page 106: ...ndling faulty installation misapplication set up adjustments improper operation or maintenance alteration modification power line surge improper voltage supply lightning damage signal reception problems rental use of the product or service by anyone other than a PASC Factory Servicenter or a PASC authorized Servicenter or damage that is attributable to acts of God LIMITS AND EXCLUSIONS There are n...

Page 107: ... 102 Hollywood FL 33020 GEORGIA 8655 Roswell Road Suite 100 Atlanta GA 30350 ILLINOIS 1709 North Randall Road Elgin IL 60123 MASSACHUSETTS 60 Glacier Drive Suite G Westwood MA 02090 MINNESOTA 7850 12th Avenue South Airport Business Center Bloomington MN 55425 OHIO 2236 Waycross Road Civic Center Plaza Forest Park OH 45240 PENNSYLVANIA 2221 Cabot Blvd West Suite B Langhorne PA 19047 TEXAS 13615 Wel...

Page 108: ...eception Approx 42 W When receiving a 20 black document Copy Approx 42 W When copying a 20 black document Maximum Approx 135 W When copying a 100 black document Power Supply 120 V AC 60 Hz Fax Memory Capacity Approx 25 pages of memory transmission Approx 28 pages of memory reception Based on the ITU T No 1 Test Chart in standard resolution Voice Memory Capacity Approx 18 minutes of recording time ...

Page 109: ...d transmission 25 82 Caller ID list 26 35 82 30 54 55 83 Ring detection 31 58 Quick scan 34 43 59 83 Receiving reduction 36 83 Display contrast 39 84 Remote fax activation code 41 56 84 Message alert 42 84 Feature Code Page Fax receiving alert 44 85 Friendly reception 46 52 85 Mailbox 1 password 51 85 Mailbox 2 password 52 54 85 Greeting time 86 Mailbox 1 greeting 55 73 Fax voice guidance 47 85 Ad...

Page 110: ...unication messages 88 Connecting tone Feature 76 87 Connections 16 Copy 59 Collation 61 Enlarge 60 Reduce 60 D Date and time Feature 01 17 80 Delayed transmission Feature 25 82 Dialing mode Feature 13 81 Directory Making a phone call 34 Selecting characters 19 Sending faxes 45 Storing 31 Display Contrast Feature 39 84 Error messages 89 90 Distinctive ring service Feature 31 58 83 Document size 44 ...

Page 111: ...mote operation ID Feature 11 81 Reports Broadcast programming 104 Broadcast sending 49 Caller ID 35 104 Journal 44 104 Power down 97 Printer test 104 Sending 44 Setup 104 Telephone number 104 Reset Feature 80 87 Resolution 43 59 Ring detection Feature 31 58 83 Ring setting FAX ONLY Feature 06 80 Silent fax Feature 30 83 TAD FAX Feature 06 80 TEL FAX Feature 78 87 Ringer pattern Feature 17 24 81 S ...

Page 112: ...e included with the returned product Any unit that is replaced by Panasonic and not shipped with proper proof of purchase by you will be subject to a minimum 100 00 charge The original unit must be properly packaged in the same manner as the replacement unit utilizing the packing materials provided Damage due to improper or inadequate packing will be charged to you as an out of warranty cost If ou...

Reviews: