background image

Index

-92-

Index

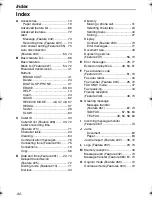
Accessories .....................................13

Paper stacker................................19

Advanced feature list .......................88
Advanced features...........................72
Alert

Message (Feature #42) ................73
Recording time (Feature #43).......73

Auto answer setting (Feature #05) ..70
Auto disconnection 
(Feature #49).............................50, 74

Basic feature list ..............................88
Basic features..................................70
Black list (Feature #27)..............53, 72
Broadcast transmission ...................41
Buttons

BROADCAST ...............................41
Delete ...........................................24
DIGITAL SP-PHONE ....................31
ERASE ...................................60, 63
HELP ............................................14
Insert.............................................24
QUICK ..........................................62
RECEIVE MODE ........46, 47, 48, 57
REDIAL.........................................37
Secret ...........................................28
SLOW ...........................................62

Caller ID ..........................................33
Caller ID list (Feature #26) ........33, 72
Caller’s recording time 
(Feature #10)...................................71
Character table ................................24
Cleaning ..........................................84
Communication messages ..............76
Connecting tone (Feature #76)........75
Connections ....................................19
Copy ................................................56

Date and time (Feature #01) .....22, 70
Delayed transmission 
(Feature #25)...................................72
Dialling mode (Feature #13) ............71
Dial lock ...........................................34

Directory

Making a phone call...................... 31
Selecting characters ..................... 24
Sending faxes ............................... 40
Storing .......................................... 27

Display

Contrast (Feature #39) ................. 73
Error messages ............................ 77

Document size................................. 39
Duplex ring service 
(Feature #31)............................. 55, 73

Error messages ......................... 76, 77
Extension telephone............ 49, 50, 51

Fax activation code 
(Feature #41)............................. 51, 73
Fax auto redial................................. 40
Fax number (Feature #03)......... 25, 70
FAX ONLY mode ............................. 47
Fax receiving ................................... 44
Friendly reception 
(Feature #46)............................. 46, 73

Greeting message

Message transfer 
(Feature #61) .......................... 67, 74
TAD/FAX ........................... 57, 58, 60
TEL/FAX ..................... 49, 50, 58, 60

Incoming message monitor 
(Feature #67)................................... 74

Jams

Document ..................................... 82
Paper ............................................ 83

Journal report (Feature #22) ..... 38, 72

Logo (Feature #02).................... 23, 70

Memory reception ........................... 46
Message alert (Feature #42) ........... 73
Message transfer (Feature #60) 67, 74

Original mode (Feature #58) ........... 74
Overseas mode (Features #23)....... 72

FT74-78HK.book  Page 92  Friday, June 28, 2002  9:45 AM

Summary of Contents for KX-FT74HK

Page 1: ... KX FT74HK This pictured model is KX FT78 Facsimile with Digital Answering System Model No KX FT78HK To get started please read the Quick Start section page 5 Please read these Operating Instructions before using the unit and save for future reference ...

Page 2: ...l be omitted in these instructions L Most figures shown in these operating instructions are based on a KX FT78 Copyright L This manual is copyrighted by Kyushu Matsushita Electric Co Ltd KME and its licensee Under the copyright laws this manual may not be reproduced in any form in whole or part without the prior written consent of KME and its licensee Kyushu Matsushita Electric Co Ltd 2002 Date of...

Page 3: ...cords This can result in the risk of fire or electric shock 11 Never push any objects through slots in this unit This may result in the risk of fire or electric shock Never spill any liquid on the unit 12 To reduce the risk of electric shock do not disassemble this unit Take the unit to an authorised service centre when service is required Opening or removing covers may expose you to dangerous vol...

Page 4: ...ent the risk of fire or electrical shock do not expose this product to rain or any type of moisture OTHER INFORMATION L Keep the unit away from electrical noise generating devices such as fluorescent lamps and motors L The unit should be kept free from dust high temperature and vibration L The unit should not be exposed to direct sunlight L Do not place heavy objects on top of this unit L Do not t...

Page 5: ...age 19 Power cord To the single telephone line jack To the power outlet 220 240 V 50 60 Hz Telephone line cord Handset cord Only the model KX FT74 provides EXT jack To connect the extension telephone remove the stopper Extension telephone not included Paper stacker ...

Page 6: ... roll 2 Insert the leading edge of the paper into the opening above the thermal head and pull it out of the unit 3 Close the cover securely by pushing down on both sides 4 Press FAX START The unit will eject the paper slightly and cut it LFor further details see page 21 Correct Incorrect Cover open button Thermal head FAX START ...

Page 7: ...tray 2 Adjust the document guides and insert the document up to 10 pages 3 To send a fax dial the fax number and press FAX START To make a copy press COPY LFor further details see page 37 56 Document feeder tray FACE DOWN Document guides FACE DOWN FAX START COPY ...

Page 8: ...eiving 1 When the unit rings lift the handset 2 To receive a fax document press FAX START LFor further details see page 46 LYou can select how you want the unit to receive calls according to your needs page 44 45 FAX START ...

Page 9: ...conds 4 When finished recording press STOP LFor further details see page 58 Listening to recorded messages When the PLAY MESSAGES indicator flashes Press PLAY MESSAGES The new recorded messages will be played When the PLAY MESSAGES indicator is on Press PLAY MESSAGES All messages will be played LFor further details see page 62 Microphone FAX START STOP RECORD FLASH LIGHT PLAY MESSAGES ...

Page 10: ... 31 Recording Recording a telephone conversation KX FT78 only 32 Caller ID Caller ID service from your phone company 33 Dial Lock Setting the dial lock 34 Voice Contact Talking to the other party after fax transmission or reception 36 Fax Sending Faxes Sending a fax manually 37 Documents you can send 39 Sending a fax using the directory 40 Broadcast transmission KX FT78 only 41 Transmit polling le...

Page 11: ...eting messages 60 Memo Message KX FT78 only Leaving a message for others or yourself 61 Incoming Messages KX FT78 only Listening to recorded messages 62 Remote Operation KX FT78 only Operating from a remote location 64 Option KX FT78 only Transferring recorded messages to another telephone 67 Programmable Features Features Summary Programming 69 Basic features 70 Advanced features 72 Help Error Me...

Page 12: ...Table of Contents 12 General Information Printed Reports Reference lists and reports 88 Specifications Technical data about this product 89 Index Index Program index 91 Index 92 ...

Page 13: ...packing materials for future shipping and transportation of the unit Accessory information Use the following type of paper for replacement Power cord 1 Telephone line cord 1 Handset 1 Handset cord 1 Recording paper 1 Paper stacker 1 Operating instructions 1 Model No Item Specifications KX A106 Standard thermal recording paper 216 mm 30 m roll with 25 mm core ...

Page 14: ...ectory and how to dial them DIRECTORY 3 Explanation of the receiving modes RECEIVE MODE 2 Press SET PRINTING For KX FT78 1 Press HELP repeatedly until the desired item is displayed 1 How to program your unit HOW TO SET UP 2 How to store names in the directory and how to dial them DIRECTORY 3 Explanation of the receiving modes RECEIVE MODE 4 Help with problems operating the answering device TAD OPE...

Page 15: ...r dialled If the line is busy when you make a phone call using the MONITOR button the unit will automatically redial the number up to 5 times L To insert a pause during dialling G MUTE L To mute your voice to the other party during a conversation Press this button again to resume the conversation H MONITOR L To dial without lifting the handset I MENU L To initiate or exit programming J NAVIGATOR V...

Page 16: ...Finding the Controls 16 L FAX START SET L To initiate fax transmission or reception L To store a setting during programming M COPY L To initiate copying page 56 ...

Page 17: ... STOP L To stop an operation or cancel programming K FLASH L To access special telephone services such as call waiting or for transferring extension calls L REDIAL PAUSE L To redial the last number dialled If the line is busy when you make a phone call using the DIGITAL SP PHONE button the unit will automatically redial the number up to 5 times L To insert a pause during dialling M MUTE L To mute ...

Page 18: ...peration Q HELP L To print a quick reference page 14 R FAX START SET L To initiate fax transmission or reception L To store a setting during programming S COPY L To initiate copying page 56 Overview The pictured model is KX FT78 A Document guides B Speaker C Microphone KX FT78 only L To talk with the other party when using the speakerphone D Document exit E Paper stacker F Document feeder tray G C...

Page 19: ...e near the product and easily accessible L Use the telephone line cord included in this unit L Do not extend the telephone line cord Power cord To the single telephone line jack To the power outlet 220 240 V 50 60 Hz Telephone line cord Handset cord Extension telephone not included Only the model KX FT74 provides EXT jack To connect the extension telephone remove the stopper Paper stacker ...

Page 20: ... computer on the same line L We recommend you use separate wall jacks for the fax machine and the computer L Set the fax machine to TEL mode page 46 L The device which has the shortest ring setting will answer the call first L If the computer provides a port for a telephone line connect the fax machine to this port on the computer ...

Page 21: ... by pushing down on both sides PRESS START 4 Press FAX START L The unit will eject the paper slightly and cut it L If you do not press FAX START within 30 seconds the unit will automatically eject the paper slightly and cut it Note L Only use the included roll of paper or specified recording paper or else the print quality may be affected and or excessive thermal head wear may occur L For accessor...

Page 22: ...s for each using the dial keypad Example August 10 2002 Press 0 8 1 0 0 2 M 08 D 10 Y 02 6 Press SET Example TIME 12 00AM 7 Enter the correct hour minute by selecting 2 digits for each using the dial keypad Press to select AM or PM Example 3 15 PM 1 Press 0 3 1 5 TIME 03 15AM 2 Press until PM is displayed TIME 03 15PM 8 Press SET L The next feature will be displayed 9 Press MENU Note L You can ent...

Page 23: ...e next space and press 5 6 times LOGO Bill 6 Press SET L The next feature will be displayed 7 Press MENU Note L You can enter your logo by pressing or in step 5 In this case press to move the cursor see page 24 for details To correct a mistake Press or to move the cursor to the incorrect character and make the correction To delete a character Press or to move the cursor to the character you want t...

Page 24: ...1 to enter the next character Display order of characters Keys Characters 1 1 _ 2 A B C a b c 2 3 D E F d e f 3 4 G H I g h i 4 5 J K L j k l 5 6 M N O m n o 6 7 P Q R S p q r s 7 8 T U V t u v 8 9 W X Y Z w x y z 9 0 0 FLASH Hyphen button To insert a hyphen MUTE Insert button To insert one character or one space STOP Delete button To delete a character The cursor is moved to the right To enter an...

Page 25: ...ote L You can enter your fax telephone number by pressing or in step 5 In this case press to move the cursor L The button replaces the digit with a and the button replaces it with a space Example 234 5678 Press 2 3 4 5 6 7 8 L To enter a hyphen in a fax number press FLASH To correct a mistake Press or to move the cursor to the incorrect number and make the correction To delete a number Press or to...

Page 26: ...n the ringer back on press While the ringer volume is set to off When a call is received the unit will not ring and will display the following INCOMING CALL Handset receiver volume 3 levels high middle low are available While using the handset press or Monitor Speaker volume 8 levels high to low are available While using the monitor speakerphone press or Voice guidance volume KX FT78 only 9 levels...

Page 27: ...ad Example NO 5552233 L If you want to enter a hyphen press FLASH 6 Press SET REGISTERED u NAME L To program other entries repeat steps 3 to 6 7 Press MENU to exit the program Helpful hint L You can confirm the stored entries on the display page 31 or on the telephone number list page 88 Note L When the following is displayed in step 6 you can store only 5 more entries SPACE 5 DIRS L If there is n...

Page 28: ... delete a character number Press or to move the cursor to the character number you want to delete and press STOP To keep the telephone number secret Press RECEIVE MODE after entering the telephone number in step 5 L A secret number cannot be viewed after this is set L The telephone number will not appear on the telephone number list ...

Page 29: ... MENU EDIT DELETE 4 Press Example NAME Mary L If you do not need to edit the name skip to step 6 5 Edit the name see page 24 for instructions 6 Press SET Example NO 0123456 L If you do not need to edit the telephone number skip to step 8 7 Edit the telephone number For further details see page 27 28 8 Press SET REGISTERED SET MENU ...

Page 30: ...y 1 Press DIRECTORY 2 Press or until the desired name is displayed Example Peter 3 Press MENU EDIT DELETE 4 Press DELETE OK b YES SET NO STOP L To cancel erasing press STOP 5 Press SET DELETED L The stored name and number are erased STOP SET MENU ...

Page 31: ...nfirm the stored telephone number on the display 1 Press 2 Press or until the desired name is displayed 3 Press HELP L To stop the operation press STOP L To make a call press MONITOR DIGITAL SP PHONE or lift the handset To search for a name by initial Example Lisa 1 Press 2 Press or to enter the directory 3 Press 5 repeatedly until any name with the initial L is displayed see the character table o...

Page 32: ...be played back later either directly or remotely page 62 64 1 During a telephone conversation press RECORD 2WAY RECORDING 2 To stop recording press STOP or replace the handset Note L There may be legal restrictions on recording two way telephone conversations Inform the other party that the conversation is being recorded STOP RECORD ...

Page 33: ...forehand TAD ring setting feature 06 on page 70 KX FT78 only FAX ring setting feature 07 on page 70 TEL FAX ring setting feature 09 on page 70 How Caller ID is displayed The calling party s telephone number or name will be displayed after the first ring You then have the option of whether or not to answer the call depending on the caller The unit will automatically store the caller information tel...

Page 34: ... 30 digits using the dial keypad 6 Press SET E02 7 If necessary enter the second emergency telephone number L If you do not need to enter skip to step 8 8 Press SET E03 9 If necessary enter the third emergency telephone number L If you do not need to enter skip to step 10 10Press SET DIAL LOCK Note L You can also enter an emergency telephone number using the directory in steps 5 7 and 9 Press or u...

Page 35: ...ing Example E01 0123456 2 Press or until the desired emergency telephone number is displayed Example E03 6543210 3 Press SET L The unit will start dialling automatically L If any documents are in the document entrance the unit will start fax transmission To cancel the dial lock 1 Press MENU repeatedly until the following is displayed DIAL LOCK 2 Press SET 3 Enter your PIN code 4 Press SET ...

Page 36: ... contact during transmission and the other party answers the unit will call you with a distinctive ring after all of the documents have been transmitted L If you initiate voice contact during reception and the other party answers the unit will call you with a distinctive ring after the current page of the document has been received Receiving a request for voice contact 1 If the other party initiat...

Page 37: ...NNECTING To redial the last number Press REDIAL PAUSE L If the line is busy the unit will automatically redial the number up to 5 times L During redial the following will be displayed WAITING REDIAL L To cancel redialling press STOP To select the resolution Select the desired resolution according to the type of document STANDARD For printed or typewritten originals with normal sized characters FIN...

Page 38: ...port for confirmation This report will provide you with a printed record of transmission results To use this feature activate feature 04 page 70 For the communication message in the result column see page 76 Journal report The unit stores the 35 most recent fax communication results To print manually see page 88 To print automatically after every 35 new fax communications activate feature 22 page ...

Page 39: ...nless duplicating paper Electrostatically charged paper Badly curled creased or torn paper Paper with a coated surface Paper with a faint image Paper with printing on the opposite side that can be seen through the front i e newspaper L To transmit the document with a width of less than A4 size 210 mm we recommend using a copy machine to copy the original document onto A4 or letter sized paper then...

Page 40: ...P L For further details about using the directory see page 31 7 Press FAX START Fax auto redial If the line is busy or if there is no answer the unit will automatically redial the number up to 5 times L This feature is also available for receiving polling page 52 and delayed transmission feature 25 on page 72 L During redial the following will be displayed WAITING REDIAL L To cancel redialling pre...

Page 41: ... Press FAX START after programming all of the desired entries L The document will be fed into the unit and scanned into memory The unit will then transmit the data to each entry calling each number sequentially L After transmission the stored document will be erased automatically and the unit will automatically print a broadcast sending report Note L The record of the selected parties will be save...

Page 42: ...is helpful if you often send the document to the same parties 1 Insert the document FACE DOWN 2 Press BROADCAST until the following is displayed RESEND 3 Press FAX START To cancel the broadcast setting 1 Press STOP while the unit displays the following BROADCASTING L The display will show the following SEND CANCELLED b YES SET NO STOP 2 Press SET ...

Page 43: ...rt the document FACE DOWN L If necessary press or repeatedly to select the desired resolution page 37 2 Press MENU repeatedly until the following is displayed POLLED 3 Press SET OFF 4 Press or to select ON ON 5 Press SET POLLED ON Note L The caller pays for the document transmission L When delayed transmission is set to on feature 25 on page 72 transmit polling is not possible To cancel the transm...

Page 44: ...57 The arrow indicator on the display points to TAD L If the arrow indicator points to TEL press RECEIVE MODE FAX TEL TAD TAD FAX ONLY mode page 47 The arrow indicator on the display points to FAX L If the arrow indicator points to TEL press RECEIVE MODE FAX TEL This is how the unit will operate When receiving phone calls The unit will activate the answering device and record voice messages When r...

Page 45: ...press 9 to receive a fax page 51 TEL FAX mode page 48 The arrow indicators on the display point to both TEL and FAX L If the arrow indicator points to TEL press RECEIVE MODE FAX TEL TEL mode page 46 The arrow indicator on the display points to TEL L If the arrow indicator s point s to TAD FAX or both TEL and FAX press RECEIVE MODE FAX TEL When receiving phone calls The unit will ring When receivin...

Page 46: ...fax For KX FT78 The unit will temporarily activate the answering device The greeting message will then be played and the other party can then send a fax L The received recording paper comes out somewhat longer than the document size To stop receiving Press STOP Friendly reception feature When you answer a call and hear a fax calling tone slow beep the unit will automatically start fax reception L ...

Page 47: ...all calls and only receive fax documents Note L The number of rings before a call is answered in FAX ONLY mode can be changed feature 07 on page 70 L This mode should not be used with a telephone line which is used for both phone calls and faxes Fax communication will be attempted even if someone is trying to call you We recommend the following setup Example RECEIVE MODE FAX ONLY MODE FAX TEL Line...

Page 48: ...ring at this time INCOMING CALL L Duration depends on TEL FAX delayed ring setting 2 When the fax machine detects a fax calling tone it will automatically receive documents without ringing Note L A fax calling tone is automatically generated by the sending fax machine Some fax machines do not have this capability L If the ring detection feature is set page 55 and a different ring pattern is receiv...

Page 49: ... will activate the fax function for a case in which the other party s fax machine does not send a fax calling tone Silent fax recognition ring setting The fax machine generates audible rings to indicate that it is receiving a phone call The number of rings generated depends on the setting of feature 30 on page 73 This signal will not ring on an extension telephone When an extension telephone is co...

Page 50: ... TEL FAX greeting message page 58 it will be played to the calling party KX FT78 only 3 Answer the call You can answer the call with the extension telephone 1 Lift the handset 2 Press 0 while the ring back tone is heard L This code can be changed in feature 49 on page 74 L If the call is not answered the fax machine will activate the fax function for a case in which the other party s fax machine d...

Page 51: ...ion telephone and enter the fax activation code firmly 1 When the extension telephone rings lift the handset of the extension telephone 2 When document reception is required a fax calling tone slow beep is heard or no sound is heard press 9 pre selected fax activation code firmly 3 Hang up the handset L The fax machine will start reception Note L You can change the fax activation code in feature 4...

Page 52: ...nother compatible machine Therefore you pay for the call Make sure that no documents are fed into your unit and that the other party s machine is ready for your call 1 Press MENU repeatedly until the following is displayed POLLING 2 Press SET FAX 3 Dial the fax number 4 Press SET CONNECTING L The unit will start fax reception SET MENU ...

Page 53: ...FF 5 Press SET NO 6 Enter the fax phone number you require as unauthorized number L You can enter a total of 22 digits Example NO 5552233 7 Press SET to store NO L To store other numbers repeat from step 6 8 Press MENU Note L If you make a mistake while programming press STOP then make the correction L To erase a programmed phone number press STOP when the cursor is positioned on the first number ...

Page 54: ...ON L If this feature is not required select OFF 5 Press SET NO 6 Enter your pager number L You can enter a total of 46 digits and or pauses Example 1 202 555 1234PP12345678PP5555 1 202 555 1234 Your pager number PP Pauses 12345678 Your pager access code if required 5555 example Messages you want displayed on your pager 7 Press SET 8 Press MENU When your pager receives a pager call Your pager will ...

Page 55: ...the assigned ring pattern 1 Press MENU SYSTEM SET UP 2 Press then 3 1 RING DETECTION 3 Press SET OFF 4 Press or to select ON L If this feature is not required select OFF 5 Press SET PRINTING L The unit will print an information list 6 Press MENU Note L After programming set the fax machine to TEL mode L In TEL mode the fax machine will recognize incoming faxes on the first ring pattern and answer ...

Page 56: ...pprox 300 mm we recommend you insert one page at a time L Any transmittable document can be copied page 39 L The copied recording paper comes out somewhat longer than the document size To select the resolution Select the desired resolution according to the type of document FINE For printed or typewritten originals with small printing SUPER FINE For originals with very small printing PHOTO For orig...

Page 57: ...he incoming message recording time can be changed feature 10 on page 71 L When the remaining time is low erase unnecessary messages page 63 L While an incoming call is being recorded you can monitor it through the speaker If this feature is not required set feature 67 to off page 74 Ring setting in TAD FAX mode You can choose from 1 2 3 4 TOLL SAVER and RINGER OFF This setting can be changed by fe...

Page 58: ...message for TEL FAX greeting This is your name business and or telephone number We are unable to answer right now Please try again later Thank you 1 Start recording For the TAD FAX greeting Press RECORD 2 times TAD GREETING b PRESS START For the TEL FAX greeting Press RECORD 3 times T F GREETING b PRESS START 2 Press FAX START L A long beep will sound and the display will show the following accord...

Page 59: ...message will be played Checking the TAD FAX greeting 1 Set to TAD FAX mode feature 05 on page 70 2 If the arrow indicator on the display points to TEL press RECEIVE MODE If the arrow indicator on the display points to TAD press RECEIVE MODE 2 times TAD FAX MODE L The unit will play the TAD FAX greeting message Checking the TEL FAX greeting 1 Set to TEL FAX mode feature 05 on page 70 2 If the arrow...

Page 60: ...b PRESS START For the TEL FAX greeting Press ERASE 3 times T F GREETING b PRESS START 2 Press FAX START ERASE GREETING b YES SET NO STOP L To cancel erasing press STOP 3 Press SET GREETING ERASED Note L If you erase your own TAD FAX greeting message the pre recorded greeting message will be played when receiving a call ERASE STOP SET FAX START ...

Page 61: ...r someone else you can record a voice memo This memo can be played back later either directly or remotely page 62 64 1 Press RECORD MEMO MESSAGE b PRESS START 2 Press FAX START L A long beep will sound MEMO RECORDING 3 Speak clearly about 20 cm away from the microphone 4 When finished recording press STOP Microphone FAX START STOP RECORD ...

Page 62: ...ening to the message L If you press within 5 seconds of the beginning of the message the previous message will be played L To play back a specific message press or and search for the message you want to listen to To skip a message Press to play the next message To stop playback Press STOP L If you press PLAY MESSAGES within 1 minute the unit will resume playing the rest of the messages Voice time ...

Page 63: ...ssage Press ERASE while listening to the message you want to erase To erase all the messages Check that you have listened to all of the recorded messages 1 Press ERASE ALL MESSAGES b PRESS START 2 Press FAX START ERASE MESSAGES b YES SET NO STOP 3 Press SET ...

Page 64: ...ed messages 1 Call your unit 2 Press the remote operation ID during the TAD FAX greeting message 3 Start remote operations When there are new recorded messages 1 A long beep will sound 2 Short beep s will sound up to 8 times L This indicates the number of new messages 3 New messages will be played back When there are no new messages A short beep will not sound 1 Wait for 4 seconds or press 5 2 All...

Page 65: ...ave a message Re recording a greeting message You can change the contents of the TAD FAX greeting message 1 Press 7 to start recording L A long beep will sound 2 Speak clearly up to 16 seconds L If you pause for over 2 seconds 6 beeps will sound and the recording will stop Repeat from step 1 within 10 seconds 3 When finished recording press 9 L The new greeting message will be played Answering dev...

Page 66: ...r off You must program a pager number beforehand feature 70 on page 54 Press 8 3 to turn on the pager call Press 8 4 to turn off the pager call L If a pager number is not programmed you cannot turn this feature on 6 beeps will sound Changing the receive mode Press 8 0 to change the receive mode from TAD FAX to TEL L You cannot return to TAD FAX mode in the same call To return to TAD FAX mode see t...

Page 67: ...elephone number 3 Answer the call with the transfer telephone 4 Your unit will play the pre recorded transfer greeting message L You can record your own transfer greeting message 5 Enter the remote operation ID and retrieve the message using the remote operation page 64 Recording your own transfer greeting message The recording time is limited to 16 seconds Suggested message This is a transferred ...

Page 68: ...ansfer greeting message 1 Press MENU 6 1 then SET 2 Press or to select ERASE 3 Press SET L Your own message will be erased 4 Press MENU Note L When transferring a call the pre recorded transfer greeting message will be played L If the voice guidance feature is set to off feature 47 on page 74 and you have erased your own transfer greeting message the message transfer feature will be cancelled ...

Page 69: ...is displayed 4 Press SET L The current setting of the feature will be displayed 5 Press or until the desired setting is displayed L This step may be slightly different depending on the feature 6 Press SET L The setting you selected is set and the next feature will be displayed 7 To exit programming press MENU Programming by entering the program code number directly You can select a feature by dire...

Page 70: ...le mode page 48 Code 05 KX FT78 only Changing the receiving mode in the auto answer mode AUTO ANSWER TAD FAX default Telephone Answering Device Facsimile mode page 57 FAX ONLY Facsimile Only mode page 47 TEL FAX Telephone Facsimile mode page 48 Code 06 KX FT78 only Changing the ring setting in TAD FAX mode TAD RING COUNT To change the number of rings before the unit answers a call in TAD FAX mode ...

Page 71: ...ting the remote operation ID REMOTE TAD ID 1 Follow steps 1 4 on page 69 2 Enter any 3 digit number L The default code is 111 L Do not use 0 and 7 3 Press SET 4 Press MENU Code 13 Setting the dialling mode DIALLING MODE If you cannot dial change this setting depending on your telephone line service TONE default For tone dial service PULSE For rotary pulse dial service ...

Page 72: ... this feature Code 25 Sending a fax at a specific time DELAYED SEND This feature allows you to take advantage of low cost calling hours offered by your telephone company The feature can be set up to 24 hours in advance of the desired time L When the transmit polling page 43 is set to on this feature is not available To send a document 1 Insert the document 2 Follow steps 1 4 on page 69 3 Press or ...

Page 73: ...its using 0 9 and L The default code is 9 L Do not enter 0000 5 Press SET 6 Press MENU Code 42 KX FT78 only Setting the message alert MESSAGE ALERT To alert you with beeps when a new voice message is recorded If you hear slow beeps press PLAY MESSAGES and listen to recorded messages The beeps will stop ON You will hear a beeping sound OFF default Deactivated this feature Code 43 KX FT78 only Setti...

Page 74: ...page 59 for details Code 58 Setting the original mode ORIGINAL To send or copy a document with faint or dark writing set this feature before starting transmission or copying NORMAL default Used for normal writing LIGHT Used for faint writing DARKER Used for dark writing Code 60 KX FT78 only Setting the message transfer MESSAGE TRANS To transfer a recorded incoming message to another telephone page...

Page 75: ...onfirm the status of the other party s machine L If the ring back tone continues the other party s machine may not be a facsimile or may have run out of paper Check with the other party L The connecting tone volume cannot be adjusted ON default You will hear connecting tones OFF Deactivated this feature Code 80 Resetting advanced features to their default settings SET DEFAULT To reset the advanced...

Page 76: ...ENT L The document was not fed into the unit properly Reinsert the document and try again OTHER FAX NOT RESPONDING L The other party s fax machine is busy or has run out of recording paper Try again L The document was not fed properly Reinsert the document and try again L The other party s fax machine rings too many times Send the fax manually page 37 L The other party s machine is not a facsimile...

Page 77: ...The unit has a document in memory See the other displayed message instructions to print out the document MEMORY FULL L There is no room left in memory to record a voice message Erase unnecessary messages page 63 65 NO RESPONSE L The other party s fax machine is busy or has run out of recording paper Try again NO TAD GREETING L Your TAD FAX greeting message is not recorded Record a message page 58 ...

Page 78: ...Error Messages 78 TRANSMIT ERROR L A transmission error occurred Try again UNIT OVERHEATED L The unit is too hot Let the unit cool down ...

Page 79: ...ode KX FT74 TEL mode page 46 or TEL FAX mode page 48 KX FT78 TAD FAX mode page 57 TEL mode page 46 or TEL FAX mode page 48 L If you use a duplex ring service change to TEL mode L If you use a duplex ring service make sure you have set the same ring pattern assigned by the telephone company page 55 The REDIAL PAUSE button does not function properly L If this button is pressed during dialling a paus...

Page 80: ...AX ONLY mode page 47 or TEL FAX mode page 48 KX FT78 TAD FAX mode page 57 FAX ONLY mode page 47 or TEL FAX mode page 48 L The time taken to answer the call is too long Decrease the number of rings feature 06 page 70 07 page 70 09 page 70 and 30 page 73 L The greeting message is too long Shorten the message page 58 KX FT78 only The display shows the following but faxes are not received CONNECTING L...

Page 81: ... page 84 The copied image is distorted L The thermal head is dirty Clean it page 86 The copied document is blank L The recording paper roll is not installed correctly Make sure that the shiny side of the paper is facing down and re install the paper page 21 Answering device KX FT78 only I cannot retrieve recorded messages from a remote location L Press the remote operation ID correctly and firmly ...

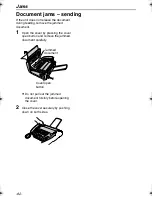
Page 82: ...eding remove the jammed document 1 Open the cover by pressing the cover open button and remove the jammed document carefully L Do not pull out the jammed document forcibly before opening the cover 2 Close the cover securely by pushing down on both sides Cover open button Jammed document ...

Page 83: ...e the thermal head and pull the paper out of the unit L Make sure that there is no slack in the paper roll L If the paper cannot be inserted try lifting the green lever again 4 Close the cover securely by pushing down on both sides PRESS START 5 Press FAX START L The unit will eject the paper slightly and cut it L If you do not press FAX START within 30 seconds the unit will automatically eject th...

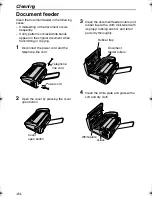
Page 84: ...ng or copying 1 Disconnect the power cord and the telephone line cord 2 Open the cover by pressing the cover open button 3 Clean the document feeder rollers and rubber flap with a cloth moistened with isopropyl rubbing alcohol and let all parts dry thoroughly 4 Clean the white plate and glass with a soft and dry cloth Telephone line cord Power cord Cover open button Rubber flap Document feeder rol...

Page 85: ...over securely by pushing down on both sides 6 Connect the power cord and the telephone line cord Caution L Do not use paper products such as paper towels or tissues to clean the inside of the unit Telephone line cord Power cord ...

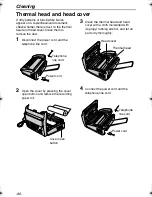
Page 86: ...nect the power cord and the telephone line cord 2 Open the cover by pressing the cover open button and remove the recording paper roll 3 Clean the thermal head and head cover with a cloth moistened with isopropyl rubbing alcohol and let all parts dry thoroughly 4 Connect the power cord and the telephone line cord Telephone line cord Power cord Cover open button Thermal head Head cover Power cord T...

Page 87: ...ing paper and close the cover securely by pushing down on both sides then press FAX START page 21 Caution L To prevent a malfunction due to static electricity do not use a dry cloth and do not touch the thermal head directly FAX START ...

Page 88: ...directory page 27 Journal report keeps records of fax transmission and reception This report will be printed automatically after every 35 fax communications feature 22 on page 72 Caller ID list keeps records of the last 20 callers after subscribing to a Caller ID service This report will be printed automatically after every 20 callers page 33 1 Press MENU repeatedly until the following is displaye...

Page 89: ...ed READ MR Modem speed 9 600 7 200 4 800 2 400 bps Automatic Fallback Operating environment 5 C 35 C 45 85 RH Relative Humidity Dimensions Approx height 117 mm width 347 mm depth 270 mm Mass Weight Approx 2 6 kg Power consumption Standby Approx 4 5 W Transmission Approx 25 W When sending the ITU T No 1 Test Chart Reception Approx 30 W When receiving the ITU T No 1 Test Chart Copy Approx 30 W When ...

Page 90: ...Test Chart and original mode If the capability of the other party s machine is inferior to your unit the transmission time may be longer 3 Recording time may be reduced by the calling party s background noise Note L Any details given in these instructions are subject to change without notice L The pictures and illustrations in these instructions may vary slightly from the actual product ITU T No 1...

Page 91: ...Journal report 38 72 23 Overseas mode 72 25 Delayed transmission 72 26 Caller ID list 72 27 Black list 53 72 30 Silent fax ring setting 49 50 73 31 Ring detection 55 39 Display contrast 73 41 Remote fax activation code 73 42 Message alert 73 43 Recording time alert 73 46 Friendly reception 73 47 Voice guidance 74 49 Auto disconnection 50 74 54 Greeting time 74 58 Original mode 74 60 Message transf...

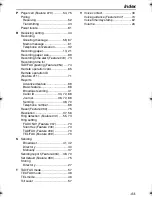
Page 92: ...Date and time Feature 01 22 70 Delayed transmission Feature 25 72 Dialling mode Feature 13 71 Dial lock 34 Directory Making a phone call 31 Selecting characters 24 Sending faxes 40 Storing 27 Display Contrast Feature 39 73 Error messages 77 Document size 39 Duplex ring service Feature 31 55 73 E Error messages 76 77 Extension telephone 49 50 51 F Fax activation code Feature 41 51 73 Fax auto redia...

Page 93: ... Reports Advanced feature 88 Basic feature 88 Broadcast sending 41 Caller ID 33 72 88 Journal 38 72 88 Sending 38 70 Telephone number 88 Reset Feature 80 75 Resolution 37 56 Ring detection Feature 31 55 73 Ring setting FAX ONLY Feature 07 70 Silent fax Feature 30 73 TAD FAX Feature 06 70 TEL FAX Feature 09 70 S Sending Broadcast 41 42 Directory 40 Manually 37 Sending report Feature 04 38 70 Set de...

Page 94: ...PFQX1765ZA CM0602CY0 Kyushu Matsushita Electric Co Ltd 1 62 4 chome Minoshima Hakata ku Fukuoka 812 8531 Japan ...

Reviews: