background image

stored in the product and remove the
microSD card. Use only trusted repair
services authorized by Panasonic.

R

Before disposing of the product, perform a
factory data reset to erase any data stored
in the product. Remove and erase the
microSD card.

R

If your mobile device will no longer be used
with the product, delete your mobile
device’s registration from the product and
delete the corresponding app from your
mobile device.

R

If this product experiences a power outage,
its date and time setting may become
incorrect. In this case, the date and time
setting will be automatically corrected when
your mobile device and this product are
connected to the same wireless network.

Additionally, note the following.

R

Multiple hubs cannot be used on the same
network.

R

Only one mobile device can access this
product while away from home. If a second
mobile device connects to this product
while away from home, the first mobile
device is disconnected.

R

Communications may be interrupted
depending on network conditions and
wireless signal quality.

R

This product may be used in ways that
violate the privacy or publicity rights of
others. You are responsible for the ways in
which this product is used.

For best performance

Hub location/avoiding noise

The hub and other compatible Panasonic
devices use radio waves to communicate with
each other.

R

For maximum coverage and noise-free
communications, place your hub:
– at a convenient, high, and central

location with no obstructions between
the devices and hub in an indoor
environment.

– away from electronic appliances such as

TVs, radios, personal computers,
wireless devices, or other phones.

– facing away from radio frequency

transmitters, such as external antennas
of mobile phone cell stations. (Avoid
putting the hub on a bay window or near
a window.)

R

Coverage and voice quality depends on the
local environmental conditions.

R

If the reception for a hub location is not
satisfactory, move the hub to another
location for better reception.

Environment

R

Keep the product away from electrical noise
generating devices, such as fluorescent
lamps and motors.

R

The product should be kept free from
excessive smoke, dust, high temperature,
and vibration.

R

The product should not be exposed to
direct sunlight.

R

Do not place heavy objects on top of the
product.

R

When you leave the product unused for a
long period of time, unplug the product from
the power outlet.

R

The product should be kept away from heat
sources such as heaters, kitchen stoves,
etc. It should not be placed in rooms where
the temperature is less than 0 °C (32 °F) or
greater than 40 °C (104 °F). Damp
basements should also be avoided.

R

The maximum communication range may
be shortened when the product is used in
the following places: Near obstacles such
as hills, tunnels, underground, near metal
objects such as wire fences, etc.

R

Operating the product near electrical
appliances may cause interference. Move
away from the electrical appliances.

Other information

Routine care

R

Wipe the outer surface of the product with a
soft moist cloth.

8

For assistance, please visit http://shop.panasonic.com/support

Important Information

HNB600_(en_en)_0124_ver.201.pdf   8

2017/01/25   10:22:35

Summary of Contents for KX-HNB600

Page 1: ...n use the system For details about how to use the system refer to the User s Guide page 17 Please read this document before using the unit and save it for future reference For assistance please contact us at 1 800 272 7033 or visit our Web site http shop panasonic com support for customers in the U S A Please register your product http shop panasonic com support Printed in China HNB600_ en_en _012...

Page 2: ...r 10 Connections 11 Wi Fi settings 12 Registering another mobile device 15 Registering other devices to the hub 15 Appendix Wireless communication range DECT 17 Accessing the User s Guide 17 Wall mounting 18 Specifications 20 Open source software notice 20 Software information 20 FCC and other information 21 Customer services 23 Limited Warranty ONLY FOR U S A 24 2 Table of Contents HNB600_ en_en ...

Page 3: ...Logo is a trademark of SD 3C LLC R iPhone and iPad are registered trademarks of Apple Inc R iPad mini is a trademark of Apple Inc R Android and Google Play are registered trademarks or trademarks of Google Inc R Microsoft Windows and Internet Explorer are either registered trademarks or trademarks of Microsoft Corporation in the United States and or other countries R Wi Fi WPA and WPA2 are registe...

Page 4: ...udio sensor and temperature sensor can be used to trigger other actions camera recording turning on a light etc R Built in microphone and speaker for two way communication Outdoor Camera KX HNC600 4 max 2 R Full color camera with built in microphone for live monitoring and recording R Built in visual sensor and infrared sensor can be used to trigger other actions camera recording turning on a ligh...

Page 5: ...g You can look forward to new devices that will make your Home Network System even more useful and convenient For information about the latest devices and bundles visit the website below http shop panasonic com support Mobile devices Your mobile devices 8 max 1 You can expand the system by installing the Home Network app on your mobile devices smartphones tablets etc and registering your mobile de...

Page 6: ...n open Danger of electric shock exists R Never touch the plug with wet hands Danger of electric shock exists R Do not connect non specified devices Installation R To prevent the risk of fire or electrical shock do not expose the product to rain or any type of moisture R Do not place or use this product near automatically controlled devices such as automatic doors and fire alarms Radio waves emitte...

Page 7: ...power cord indicated in this document SAVE THESE INSTRUCTIONS Security cautions Take appropriate measures to avoid the following security breaches when using this product Leaks of private information Unauthorized use of this product Unauthorized interference or suspension of the use of this product Take the following measures to avoid security breaches R Configure the wireless router that connects...

Page 8: ... devices and hub in an indoor environment away from electronic appliances such as TVs radios personal computers wireless devices or other phones facing away from radio frequency transmitters such as external antennas of mobile phone cell stations Avoid putting the hub on a bay window or near a window R Coverage and voice quality depends on the local environmental conditions R If the reception for ...

Page 9: ...ld become corrupted or erased Therefore we recommend backing up important data to a computer or other device Notice for product disposal transfer or return R This product can store your private confidential information To protect your privacy confidentiality we recommend that you erase information such as phonebook or caller list entries from the memory before you dispose of transfer or return the...

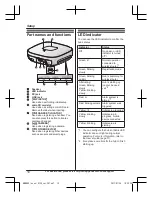
Page 10: ...ormal operation connected to wireless router 1 Green blinking slowly Registration mode Green blinking quickly Hub is searching for wireless router Alternating Green blinking slowly Yellow blinking slowly Hub is starting up cannot be used yet 2 Red lit Alarm system is armed 1 Red blinking quickly Alarm system was triggered Yellow lit Initial setup required Yellow blinking slowly Initial setup in pr...

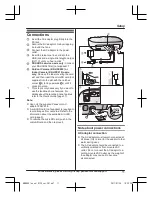
Page 11: ... For details about the landline phone features refer to the User s Guide page 17 Note R Use only the supplied Panasonic AC adaptor PNLV236 R A microSD card not supplied is required to record images from cameras Refer to the information about the available microSD card page 3 R To remove the microSD card push in the microSD card and then remove it 4 5 4 3 2 1 6 1 2 Note about power connections AC a...

Page 12: ...ur mobile device and the apps installed on your mobile device R The following Android devices are not compatible with the Home Network app Android devices that are not supported by Google Play Android devices with limited hardware features Bluetooth Wi Fi and microphone support are required Initial setup Confirm the following before you begin Make sure you have installed the Home Network app on yo...

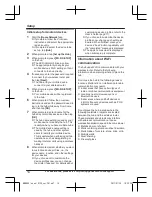
Page 13: ... device and then tap OK R The hub name setting is used by your mobile device to identify the hub This is useful when you have multiple hubs R The mobile device name setting is used by the hub and other system users to identify your mobile device This is useful when performing certain operations such as deregistering or making intercom calls using a cordless handset 10 When prompted select whether ...

Page 14: ...name location and other settings for your devices R If you choose not to customize the device profiles now you can change them later if desired For details about customizing device profiles refer to the User s Guide page 17 R If you choose to customize the device profiles now change each setting as desired When finished press your device s back button repeatedly until the completed message is disp...

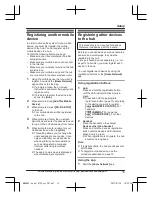
Page 15: ...ions such as deregistering or making intercom calls using a cordless handset R The app s home screen is displayed when initial setup is complete Registering other devices to the hub This procedure is not required for devices that were included as part of a bundle Before you can use devices such as cameras sensors and smart plugs they must be registered to the hub If you purchased devices separatel...

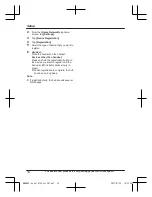
Page 16: ...ces other than handset Press and hold the registration button on the device you want to register until the device s LED indicator blinks slowly in green R When registration is complete the hub sounds one long beep Note R If registration fails the hub sounds several short beeps 16 For assistance please visit http shop panasonic com support Setup HNB600_ en_en _0124_ver 201 pdf 16 2017 01 25 10 22 3...

Page 17: ...arate floors or in different buildings Accessing the User s Guide The User s Guide is a collection of online documentation that helps you get the most out of the Home Network app 1 iPhone iPad Tap in the app s home screen Android devices Tap or press your mobile device s menu button in the app s home screen 2 Tap User s Guide Note R Microsoft Windows Internet Explorer 8 and earlier versions are no...

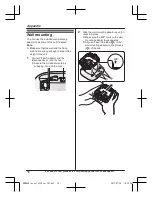
Page 18: ...ne line cord to the hub R Secure the AC adaptor cord by wrapping it around the hook 2 Slide the wall mounting adaptor up until it clicks into place R Make sure the UP mark on the wall mounting adaptor faces upwards R Align and insert the tabs 1 of the wall mounting adaptor to the grooves 2 of the hub UP 1 2 UP UP 18 For assistance please visit http shop panasonic com support Appendix HNB600_ en_en...

Page 19: ...ith the following wall phone plate sizes 2 types 2 83 mm 3 1 4 inches 3 102 mm 4 inches R Fit the slots of the hub onto the corresponding wall phone plate tabs for 4 and 5 respectively 5 2 3 4 5 4 1 Removing the wall mounting adaptor While pushing the release levers A away from the center of the wall mounting adaptor slide the adaptor down B A A B For assistance please visit http shop panasonic co...

Page 20: ... on the relevant conditions of the Free Software Foundation s GPL and or LGPL and other conditions Please read all licence information and copyright notices related to the open source software used by this product This information is available at the following web page www panasonic net pcc support tel homenetwork At least three 3 years from delivery of this product Panasonic Corporation will give...

Page 21: ...lieve it is necessary The telephone company may make changes in its facilities equipment operations or procedures that could affect the operation of the equipment If this happens the telephone company will provide advance notice in order for you to make necessary modifications to maintain uninterrupted service If trouble is experienced with this equipment for repair or warranty information please ...

Page 22: ...quipment off and on the user is encouraged to try to correct the interference by one or more of the following measures Reorient or relocate the receiving antenna Increase the separation between the equipment and receiver Connect the equipment into an outlet on a circuit different from that to which the receiver is connected Consult the dealer or an experienced radio TV technician for help Some dev...

Page 23: ...r Panasonic products Accessories Parts for your Camera Phone A V products TV Computers Networking Personal Care Home Appliances Headphones Ba eries Backup Chargers more For Product Informa on Opera ng Assistance Parts Owner s Manuals Dealer and Service info go to http shop panasonic com support For the hearing or speech impaired TTY 1 877 833 8855 As of June 2015 For assistance please visit http s...

Page 24: ...atteries antennas and cosmetic parts cabinet This warranty only applies to products purchased and serviced in the United States This warranty is extended only to the original purchaser of a new product which was not sold as is Home Network System Products microSD card Included model only 90 days N A When shipping the unit carefully pack include all supplied accessories listed in the Owner s Manual...

Page 25: ...s attributable to acts of God THERE ARE NO EXPRESS WARRANTIES EXCEPT AS LISTED UNDER LIMITED WARRANTY COVERAGE THE WARRANTOR IS NOT LIABLE FOR INCIDENTAL OR CONSEQUENTIAL DAMAGES RESULTING FROM THE USE OF THIS PRODUCT OR ARISING OUT OF ANY BREACH OF THIS WARRANTY ALL EXPRESS AND IMPLIED WARRANTIES INCLUDING THE WARRANTY OF MERCHANTABILITY ARE LIMITED TO THE PERIOD OF THE LIMITED WARRANTY PARTS AND...

Page 26: ...26 Notes HNB600_ en_en _0124_ver 201 pdf 26 2017 01 25 10 22 35 ...

Page 27: ...27 Notes HNB600_ en_en _0124_ver 201 pdf 27 2017 01 25 10 22 35 ...

Page 28: ...e User s Guide and refer to the Troubleshooting section For your future reference We recommend keeping a record of the following information to assist with any repair under warranty Serial No Date of purchase found on the bottom of the unit Name and address of dealer Attach your purchase receipt here Two Riverfront Plaza Newark NJ 07102 5490 Panasonic Corporation 2014 HNB600_ en_en _0124_ver 201 p...

Page 29: ...btener detalles sobre cómo usar el sistema consulte la Guía del usuario pági na 10 Lea este documento antes de usar la unidad y guárdelo para consultarlo en el futuro Para obtener ayuda comuníquese con nosotros llamando al 1 800 272 7033 o visite nuestro sitio web http shop panasonic com support para clientes en los EE UU solo en inglés Por favor registre su producto http shop panasonic com suppor...

Page 30: ...onfiguraciones de Wi Fi 5 Registro de otro dispositivo móvil 8 Registro de otros dispositivos al hub 8 Apéndice Alcance de la comunicación inalámbrica DECT 10 Acceso a la Guía del usuario 10 Montaje en la pared 11 2 Tabla de Contenido HNB600_ es_es _0125_ver201 pdf 2 2017 01 25 17 33 55 ...

Page 31: ...l enru tador inalámbrico 1 Verde parpadeando lentamente Modo de registro Verde parpadeo rápi do El hub está buscando el enrutador inalámbri co Alterna entre Verde parpadeando lentamente Amarillo parpadeo len to El hub se está inician do no se puede usar aún 2 Rojo encendido El sistema de alarma está armado 1 Rojo parpadeo rápido Se disparó el sistema de alarma Amarillo encendido Se debe realizar l...

Page 32: ...tener detalles sobre las funciones de telefonía fija consulte la Guía del usuario página 10 Nota R Use solo el adaptador de corriente alterna Panasonic PNLV236 que se suministra R Se necesita una tarjeta microSD no incluida para grabar imágenes de cámaras R Para extraer la tarjeta microSD presiónela hacia dentro primero y luego extráigala 4 5 4 3 2 1 6 1 2 Nota acerca de las conexiones de alimenta...

Page 33: ...féricos conectados al mismo y las aplicaciones instaladas en él R Los siguientes dispositivos Android no son compatibles con la aplicación Home Network Dispositivos Android que no son compatibles con Google Play Dispositivos con Android con características de hardware limitadas se requiere compatibilidad con Bluetooth Wi Fi y micrófono Configuración inicial Confirme lo siguiente antes de comenzar ...

Page 34: ...eptar R Su dispositivo móvil utiliza la configuración del nombre del hub para identificar el hub Esto resulta útil cuando tiene varios hubs R Los usuarios del hub y otros sistemas utilizan la configuración del nombre del dispositivo móvil para identificar su dispositivo móvil Esto puede ser útil al realizar ciertas operaciones como anular el registro o realizar llamadas de intercomunicador con un ...

Page 35: ...ivos como el nombre del dispositivo ubicación y otros ajustes de configuración para sus dispositivos R Si opta por no personalizar los perfiles del dispositivo en este momento puede cambiarlos más tarde si lo desea Para obtener detalles sobre personalización de perfiles de dispositivos consulte la Guía del usuario página 10 R Si opta por personalizar los perfiles de los dispositivos en este moment...

Page 36: ...omo anular el registro o realizar llamadas de intercomunicación con un auricular inalámbrico R Aparecerá la pantalla de inicio de la aplicación una vez completada la configuración inicial Registro de otros dispositivos al hub Este procedimiento no es necesario para unida des que son parte de un paquete Antes de poder usar dispositivos como cámaras sensores y conectores inteligentes se deben regist...

Page 37: ...ue el auricular en el cargador Dispositivos que no sean auriculares Mantenga presionado el botón de registro del dispositivo que desea registrar hasta que el Led indicador parpadee lentamente en verde R Cuando se ha completado el registro el hub emitirá un pitido largo Nota R Si el registro falla el hub emitirá varios pitidos cortos Para obtener ayuda visite http shop panasonic com support 9 Confi...

Page 38: ...stán en pisos o edificios diferentes Acceso a la Guía del usuario La Guía del usuario es una colección de documentación en línea que lo ayuda a aprovechar al máximo la aplicación Home Network 1 iPhone iPad Toque en la pantalla de inicio de la aplicación Dispositivos Android Toque u oprima el botón menú de su dispositivo en la pantalla de inicio de la aplicación 2 Toque Guía del Usuario Nota R No s...

Page 39: ...e línea telefónica al hub R Asegure el cable del adaptador de corriente alterna enrollándolo en el gancho 2 Deslice el adaptador de instalación en pared hasta que encaje y haga clic R Asegúrese de que la marca UP en el adaptador de instalación en pared mire hacia arriba R Alinee e inserte las pestañas 1 del adaptador de instalación en pared en las ranuras 2 del hub UP 1 2 UP UP Para obtener ayuda ...

Page 40: ...s siguientes tamaños de placas de los teléfonos tipos 2 2 83 mm 3 1 4 pulgadas 3 102 mm 4 pulgadas R Ajuste las ranuras del hub en las pestañas correspondientes de la placa del teléfono 4 y 5 respectivamente 5 2 3 4 5 4 1 Extracción del adaptador de instalación en pared Mientras aleja las palancas de desbloqueo A del adaptador de instalación en pared deslice el adaptador hacia abajo B A A B 12 Par...

Reviews: