background image

Installation Guide

Home Network System

Motion Sensor

Model No.    

KX-HNS102

Thank you for purchasing a Panasonic product.

This document explains how to install the motion sensor properly.
For details about how to use the system, refer to the User’s Guide
(page 14).

Please read this document before using the unit and save it for future
reference.

For assistance, visit our Web site: 

www.panasonic.com/support

for customers in the U.S.A. or Puerto Rico.

Please register your product: www.panasonic.com/prodreg

Printed in China

Summary of Contents for KX-HNS102

Page 1: ... the motion sensor properly For details about how to use the system refer to the User s Guide page 14 Please read this document before using the unit and save it for future reference For assistance visit our Web site www panasonic com support for customers in the U S A or Puerto Rico Please register your product www panasonic com prodreg Printed in China ...

Page 2: ...erview 7 Inserting the batteries 8 Registering the motion sensor 8 Information about sensor features 9 Confirming the usage area 11 Wall mounting 12 Appendix Testing the motion sensor 14 Adjusting the sensor sensitivity 14 Features available when using the Home Network app 14 Accessing the User s Guide 14 Specifications 15 FCC and other information 16 Customer services 18 Warranty For United State...

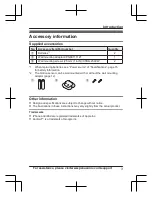
Page 3: ...r battery information 2 The motion sensor can be wall mounted with or without the wall mounting adaptor page 12 A B C Other information R Design and specifications are subject to change without notice R The illustrations in these instructions may vary slightly from the actual product Trademarks R iPhone and iPad are registered trademarks of Apple Inc R Android is a trademark of Google Inc For assi...

Page 4: ...lowed seek medical advice immediately Operating safeguards R Do not disassemble the product Medical R Consult the manufacturer of any personal medical devices such as pacemakers or hearing aids to determine if they are adequately shielded from external RF radio frequency energy DECT features operate between 1 92 GHz and 1 93 GHz with a peak transmission power of 115 mW R Do not use the product in ...

Page 5: ...avoiding noise The hub and other compatible Panasonic devices use radio waves to communicate with each other R For maximum coverage and noise free communications place your hub at a convenient high and central location with no obstructions between the product and hub in an indoor environment away from electronic appliances such as TVs radios personal computers wireless devices or other phones faci...

Page 6: ...sed batteries according to the instructions Routine care R Wipe the outer surface of the product with a soft moist cloth R Do not use benzine thinner or any abrasive powder Information on Disposal in other Countries outside the European Union 1 2 3 These symbols A B C are only valid in the European Union If you wish to discard these items please contact your local authorities or dealer and ask for...

Page 7: ... No battery power Note R The LED indicator does not indicate sensor status if the sensor has not been registered page 8 Setup overview 1 Initial setup Make sure you can access the system using your mobile device For details refer to the System Setup Guide included with your hub 2 Insert the batteries The motion sensor is battery powered 3 Registration Required only if the motion sensor was purchas...

Page 8: ...ce it with the mark facing upwards and slide it Registering the motion sensor This procedure is not required for devices that were included as part of a bundle Before you can use the motion sensor it must be registered to the hub If you purchased devices separately i e not as part of a bundle you must register each device to the hub You can register each device by using the registration buttons or...

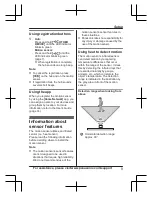
Page 9: ...g information before deciding where to install the motion sensor Note R The motion sensor s sensor features are not designed to be used in situations that require high reliability We do not recommend use of the motion sensor s sensor features in these situations R Panasonic takes no responsibility for any injury or damage caused by the use of the motion sensor Using heat to detect motion The motio...

Page 10: ...nment such as during winter or at night R Detection does not occur when there are obstacles in front of the infrared sensor Remove the obstacles or change the installation location Direction of motion It is easier to detect objects that move sideways in front of the motion sensor and more difficult to detect objects that move directly toward the front of the motion sensor D A B C It is difficult t...

Page 11: ...indicator is lit in green or red the sensor is communicating properly with the hub If the LED indicator blinks in red it is out of range of the hub Usage area cautions Using the motion sensor in the following areas may cause deformation malfunction or operational failure R In direct sunlight R Areas exposed to grease or steam such as kitchens R Near fire or heating devices R Near magnetic fields s...

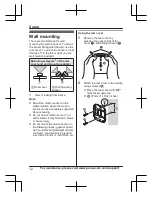
Page 12: ...n sensor can be adequately supported when mounting R Do not mount motion sensor on a soft material It may fall down break or cause injury R Do not mount the motion sensor on the following places gypsum board ALC autoclaved lightweight cellular concrete concrete block plywood less than 25 4 mm 1 inch thick etc Using the rear cover 1 Remove the rear cover by pressing the upper sides of the cover A a...

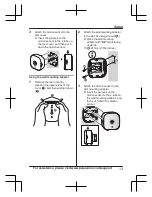
Page 13: ...of the cover A and then sliding it down B A B 2 Attach the wall mounting adaptor to the wall by using screws 1 R Place the wall mounting adaptor with UP mark facing upwards R 2 21 mm 27 32 inches 2 UP 1 1 3 Attach the motion sensor to the wall mounting adaptor R Insert the grooves on the motion sensor to the 4 tabs on the wall mounting adaptor and then push down the motion sensor For assistance pl...

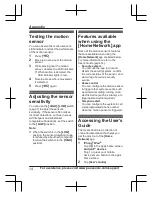
Page 14: ...en using the Home Network app Some of the motion sensor s features that are available when using the Home Network app are listed below For more information refer to the User s Guide page 14 Security system You can use the app to arm and disarm the security system confirm the current status of the sensor and view a log of previous security events Home control You can configure the motion sensor to ...

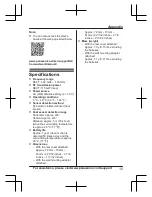
Page 15: ...tance approx 5 m 16 4 feet when the surrounding temperature is approx 25 C 77 F R Battery life Approx 1 year when motion is detected 50 times a day and the surrounding temperature is approx 25 C 77 F R Dimensions With the rear cover attached Approx 72 mm 73 mm 39 mm 2 27 32 inches 2 7 8 inches 1 17 32 inches With the wall mounting adaptor attached Approx 72 mm 73 mm 61 mm 2 27 32 inches 2 7 8 inch...

Page 16: ... equipment off and on the user is encouraged to try to correct the interference by one or more of the following measures Reorient or relocate the receiving antenna Increase the separation between the equipment and receiver Connect the equipment into an outlet on a circuit different from that to which the receiver is connected Consult the dealer or an experienced radio TV technician for help Some c...

Page 17: ...Notice R FCC ID can be found inside the battery compartment For assistance please visit www panasonic com support 17 Appendix ...

Page 18: ...locate your nearest Dealer or Service Center purchase Parts and Accessories or make Customer Service and Literature requests by visiting our Web Site at You may also contact us directly at 1 800 211 PANA 1 800 211 7262 Monday Friday 9 am to 9 pm Saturday Sunday 10 am to 7 pm EST Purchase Parts Accessories and Owner s Manual online for all Panasonic Products by visiting our Web Site at You may also...

Page 19: ...e Limited Warranty period This Limited Warranty excludes both parts and labor for batteries antennas and cosmetic parts cabinet This Limited Warranty only applies to products purchased and serviced in the United States or Puerto Rico This Limited Warranty is extended only to the original purchaser and only covers products purchased as new Home Network System Products microSD card Included model on...

Page 20: ...move or re install an installed unit if applicable travel to and from the servicer The items listed are not exclusive but are for illustration only ALL EXPRESS AND IMPLIED WARRANTIES INCLUDING THE WARRANTY OF MERCHANTABILITY ARE LIMITED TO THE PERIOD OF THE LIMITED WARRANTY Some states do not allow the exclusion or limitation of incidental or consequential damages or limitations on how long an imp...

Page 21: ...21 Notes ...
Page 22: ...sit our Web site www panasonic com support LFAQ and troubleshooting hints are available For your future reference We recommend keeping a record of the following information to assist with any repair under warranty Serial No Date of purchase found inside the battery compartment Name and address of dealer Attach your purchase receipt here Two Riverfront Plaza Newark NJ 07102 5490 Panasonic System Ne...

Page 23: ...forma co rrecta Para obtener detalles sobre cómo usar el sistema consulte la Guía del usua rio página 10 Lea este documento antes de usar la unidad y guárdelo para consultarlo en el futuro Para obtener ayuda visite nuestro sitio web www panasonic com support para clientes en los EE UU o Puerto Rico solo en inglés Por favor registre su producto www panasonic com prodreg PNQX6700ZA CC0714WK0 E ...

Page 24: ...3 Colocación de las baterías 4 Registro del sensor de movimiento 4 Información acerca de las características del sensor 5 Confirmación del área de uso 7 Montaje en la pared 8 Apéndice Prueba del sensor de movimiento 10 Ajuste de sensibilidad del sensor 10 Acceso a la Guía del usuario 10 2 Tabla de Contenido ...

Page 25: ...ó y mantuvo oprimido M N Apagado Sin batería Nota R El Led indicador no indica el estado del sensor si el sensor no se ha registrado página 10 Resumen de configuración 1 Configuración inicial Asegúrese de poder acceder al sistema mediante su dispositivo móvil Para obtener más detalles consulte la Guía de configuración del sistema que viene con su hub 2 Inserte las pilas El sensor de movimiento usa...

Page 26: ... Coloque la tapa posterior R Colóquela con la marca hacia arriba y deslícela Registro del sensor de movimiento Este procedimiento no es necesario para unidades que son parte de un paquete Antes de que pueda usar el sensor de movimiento se debe registrar en el hub Si compró los dispositivos por separado es decir no como parte de un paquete debe registrar cada dispositivo en el hub Puede registrar c...

Page 27: ...siguiente antes de decidir dónde instalar el sensor de movimiento Nota R Las características del sensor de movimiento no están diseñadas para su utilización en situaciones que requieran alta confiabilidad No recomendamos el uso de las características del sensor de movimiento en esas situaciones R Panasonic no asume ninguna responsabilidad por lesiones o daños provocados por el uso del sensor de mo...

Page 28: ...noche R La detección no es posible cuando hay obstáculos frente al sensor infrarrojo Quite los obstáculos o cambie la ubicación de instalación Dirección del movimiento Es más fácil detectar objetos que se mueven de lado frente al sensor de movimiento y más difícil detectar objetos que se mueven de frente hacia el sensor de movimiento D A B C Es difícil detectar movimiento directamente frontal haci...

Page 29: ...d indicador está iluminado en verde o rojo el sensor se está comunicando de forma adecuada con el hub Si el Led indicador parpadea en rojo se encuentra fuera de alcance del hub Precauciones respecto al área de uso Usar el sensor de movimiento en las áreas siguientes puede causar deformación averías o fallas de operación R A la luz del sol R En áreas expuestas a grasa o vapor como en cocinas R Cerc...

Page 30: ...donde el este se pueda colocar con seguridad R No coloque el sensor de movimiento sobre un material blando Podría caerse romperse o provocar lesiones R No monte el sensor de movimiento en las ubicaciones siguientes tablas de yeso hormigón celular bloques de hormigón contrachapados con grosor inferior a 25 4 mm 1 pulgada etc Uso de la tapa posterior 1 Extraiga la tapa posterior ejerciendo presión s...

Page 31: ... de la misma A y deslícela hacia abajo B A B 2 Instale el adaptador de instalación en pared con tornillos 1 R Coloque el adaptador de instalación en pared con la marca UP hacia arriba R 2 21 mm 27 32 pulgadas 2 UP 1 1 3 Coloque el sensor de movimiento en el adaptador de instalación en pared R Inserte las 4 lengüetas del adaptador de instalación en pared en los canales del sensor de movimiento y lu...

Page 32: ...ones de temperatura frecuentes y considerables coloque el interruptor en la posición MLOWN Nota R Cuando el interruptor está en la posición MLOWN se reduce el alcance de detección a casi la mitad en comparación a cuando el interruptor está en la posición MHIGHN Acceso a la Guía del usuario La Guía del usuario es una colección de documentación en línea que lo ayuda a aprovechar al máximo la aplicac...

Reviews: