background image

8.3.5 Network (LAN connection only)

Problem

Cause & Solution

I cannot operate the following
functions.

PC printing

Scanning

Remote Control

Device Monitor

R

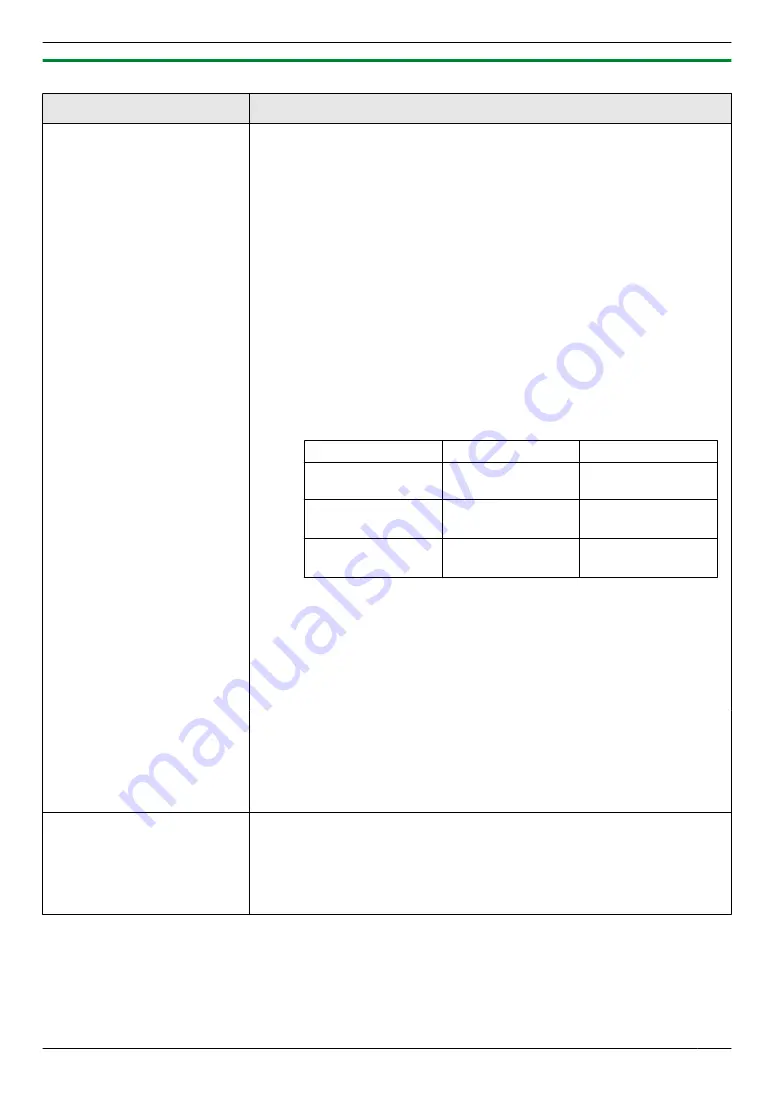
Confirm the LED via the LAN port of the main board. If the LED is glowing
or blinking, network access is working correctly.
If the LED is not glowing or blinking, confirm the LAN cable (Category 5
(Cat-5) Ethernet cable) is connected to the LAN port of the main board
correctly.

R

If the LED is blinking and you cannot perform the desired operation, the IP
address of the unit may have changed.
To detect the IP address, proceed as follows.

[Start]


A


[All Programs]

 or 

[Programs]


A


[Panasonic]


A

 the unit’s

name 

A


[IP Address Checker]

R

The IP address for the unit will be detected.

Note:

R

If the IP address cannot be detected, enter it manually (feature #501 on
page 45). The IP address of the computer and the unit must be in the
same local IP address class as shown below. Set the IP address in the
range of the number specified in the class corresponding to your local
network scale.

Class

Subnet mask

IP address

Class A

255.0.0.0

10.0.0.1 -
10.255.255.254

Class B

255.255.0.0

172.xx.0.1 -
172.xx.255.254

*1

Class C

255.255.255.0

192.168.xx.1 -
192.168.xx.254

*2

*1 “xx” should be the same value for the unit and for the computer,

as shown in the following example.
Example: 172.16.0.1 - 172.16.255.254
(The available range of “xx” is 16 - 31)

*2 “xx” should be the same value for the unit and for the computer,

as shown in the following example.
Example: 192.168.0.1 - 192.168.0.254
(The available range of “xx” is 0 - 255)

R

Your firewall software is blocking the connection. Disable the firewall
software or change the firewall settings to make the Multi-Function Station
work properly.

R

LAN features can be used when the unit and the computer are connected
in same network segment only. Make sure the network is configured
correctly. Consult your network administrator.

The unit does not appear in
the [Select a Network Device]
dialogue box when installing
Multi-Function Station.

R

Your firewall software is blocking the connection and the setup program may
not list any units. Consult your network administrator and temporarily disable
the firewall software.

R

The unit is connected to another network segment and the setup program
may not list any units. Make sure the network is configured correctly. Consult
your network administrator.

61

8. Help

Summary of Contents for KX-MB2001FR

Page 1: ... KX MB2001FR KX MB2001G This pictured model is KX MB2001 Do NOT connect the unit to a computer with the USB cable until prompted to do so during the setup of Multi Function Station CD ROM 1 2 FOR ENGLISH USERS You can select English for the display and report feature 110 page 38 ...

Page 2: ...ea R Most figures shown in these instructions are based on a KX MB2001 Trademarks R Microsoft Windows Windows Vista Internet Explorer and PowerPoint are either registered trademarks or trademarks of Microsoft Corporation in the United States and or other countries R Pentium is a trademark of Intel Corporation in the U S and other countries R Microsoft product screen shot s reprinted with permissio...

Page 3: ...dust water or liquids to come in contact with the drum This may affect print quality R For optimal performance genuine Panasonic toner cartridges and drum cartridges are recommended We cannot be responsible for problems that may be caused by a non Panasonic toner cartridge or drum cartridge Damage to the unit Poor print quality Improper operation Toner cartridge R Do not leave the toner cartridge ...

Page 4: ...d R Do not cover slots or openings on the unit Inspect the air circulation vents regularly and remove any dust build up with a vacuum cleaner A A A Routine care R Wipe the outer surface of the unit with a soft cloth Do not use benzine thinner or any abrasive powder Moving the unit When moving the unit hold by the grips A on both sides A A Illegal copies R It is unlawful to make copies of certain d...

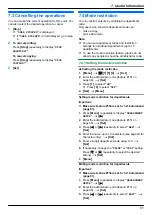
Page 5: ...copy 30 5 2 More copying features 31 6 Programmable Features Features Summary 6 1 Programming 37 6 2 Basic features 38 6 3 Copy features 41 6 4 PC print features 42 6 5 Scan features 43 6 6 LAN features 45 6 7 Network features LAN connection only 48 7 Useful Information Useful Information 7 1 Character entry 49 7 2 Status of the unit 50 7 3 Cancelling the operations 51 7 4 Mode restriction 51 7 5 ...

Page 6: ...product take care of the packing materials and or power plug cap appropriately 1 2 Accessory information To ensure that the unit operates properly we recommend the use of Panasonic toner and drum cartridges n Replacement accessory Toner cartridge R Model No Part No KX FAT411X R Prints about 2 000 pages at ISO IEC 19752 standard page Drum cartridge R Model No Part No KX FAD412X Note R ISO IEC 19752...

Page 7: ...xit programming MStopN R To stop an operation or programming session R To erase a character number MCopyN R To switch to the copy mode page 16 30 Navigator key R To select desired settings MSetN R To store a setting during programming MStartN R To copy a document page 30 R To scan a document push scan page 26 1 4 Overview 1 4 1 Front view A B D C H G I J F E The pictured model is KX MB2011 A D E H...

Page 8: ...nutes Do not touch or scratch the black drum surface inside of the drum cartridge Do not place the drum cartridge near dust or dirt or in a high humidity area Do not expose the drum cartridge to direct sunlight R Do not leave the toner cartridge out of the protective bag for a long time It will affect the printing quality R We cannot be responsible for any damage to the unit or degradation of prin...

Page 9: ... sure that the arrows G match to install the toner cartridge correctly G 6 Open the top cover H by holding the indentations I on both sides of the unit When replacing the toner cartridge R If the unit is in sleep mode press a key to standby the unit for the next process H J I I Note R Do not touch the transfer roller J R If the lower glass K is dirty clean it with a soft and dry cloth K 9 1 Introd...

Page 10: ...cked Caution R To prevent injuries be careful not to put your hands under the top cover When to replace the toner cartridge and the drum cartridge When the display shows the following replace the toner cartridge TONER LOW TONER EMPTY Note R To check the drum life and quality please print the printer test list page 75 and refer to page 77 for information on the drum life If printing quality is stil...

Page 11: ...al method Waste material should be disposed of under conditions which meet all national and local environmental regulations Toner save feature If you want to reduce toner consumption set the toner save setting to ON feature 482 on page 40 The toner cartridge will last approximately 20 longer This feature may lower the print quality 1 6 Output tray Insert the output tray extender A until it clicks ...

Page 12: ...h cotton and or fibre content that is over 20 such as letterhead paper or paper used for resumes Extremely smooth or shiny paper or paper that is highly textured Coated damaged or wrinkled paper Paper with foreign objects attached such as tabs or staples Paper that has dust lint or oil stains Paper that will melt vaporize discolour scorch or emit dangerous fumes near 200 C such as vellum paper The...

Page 13: ...e recording paper guide E then slide it to adjust the width to the size of the recording paper R Make sure that the recording paper is under the paper limit mark F and the paper should not be loaded over the snubbers G G D E F 5 Insert the paper input tray into the unit lifting the front part of the tray Then push it completely into the unit Note R If the paper is not loaded correctly re adjust th...

Page 14: ...s change the recording paper size setting feature 381 on page 39 To use thin paper change the recording paper type setting feature 384 on page 40 1 Adjust the width of the guides A to the size of the recording paper R If the unit is in sleep mode press a key to standby the unit for the next process 2 Insert the paper print side down B until the unit grasps the paper and a single beep is heard A B ...

Page 15: ...TANT NOTICE FOR THE USB CONNECTION R DO NOT CONNECT THE UNIT TO A COMPUTER WITH THE USB CABLE UNTIL PROMPTED TO DO SO DURING THE SETUP OF MULTI FUNCTION STATION page 19 Note R Do not place any objects within 10 cm of the right left and back sides of the unit Using network router network hub R We recommend using network routers network hubs C under secure network environments Consult your network a...

Page 16: ...nt FACE DOWN on the scanner glass B aligning the top left of the document with the corner where the mark is positioned 3 Close the document cover Note R Confirm that there are no documents in the automatic document feeder KX MB2011 only R Place the original onto the scanner glass gently To avoid malfunction do not press down too firmly R If the original is a thick book do not close the document co...

Page 17: ...nt R The total height of the documents when laid flat must be less than 4 mm If the documents exceed the capacity of the automatic document feeder they may fall or cause a jam in the feeder R To set a document with a width of less than 210 mm we recommend using the scanner glass to copy the original document onto A4 or letter size paper then setting the copied document for better results R Do not ...

Page 18: ...administrator when setting the IP address subnet mask and default gateway 2 6 1 Setting up automatically with a DHCP server Your situation When only one unit is connected to the LAN If your network administrator manages the network with a DHCP Dynamic Host Configuration Protocol server it will automatically assign an IP Internet Protocol address subnet mask and default gateway to the unit 1 After ...

Page 19: ...USB connection only Storing editing or erasing items in the email address book using your computer Programming the features using your computer To use Multi Function Station on your computer the following are required Operating System Windows 2000 Windows XP Windows Vista Windows 7 CPU Windows 2000 Pentium P or higher processor Windows XP Pentium Q or higher processor Windows Vista Windows 7 Penti...

Page 20: ...rectly with a USB cable A Next R The Connect Device dialogue box will appear 2 Connect the unit to a computer with the USB cable A then click Next A R If the unit is connected to your computer the model name will be automatically detected R You can change the name of the unit if necessary 3 Click Install then follow the on screen instructions R The files will be copied to your computer For LAN con...

Page 21: ...r to uninstall Multi Function Station Start A All Programs or Programs A Panasonic A the unit s name A Uninstall Then follow the on screen instructions 2 8 Starting Multi Function Station Start A All Programs or Programs A Panasonic A the unit s name A Multi Function Station R Multi Function Station will appear Scan page 28 R To scan and display the scanned images R To scan and create an image fil...

Page 22: ...he folder where the scanned image will be saved Viewer File Email OCR Custom To change scanning settings for Multi Function scan application To select the default Email software The default Email software is used when using scan to email page 26 You can select the default Email software as follows For Windows 2000 1 Start A Settings A Control Panel A Internet Options A Programs A E mail 2 Select t...

Page 23: ...lly and display the error information Setting the printer properties You can change the printer setting in step 3 We recommend that you test paper especially special sizes and types of paper on the unit before purchasing large quantities You can change or display the settings on the following tabs Basic Paper size media type pages per sheet etc Output Number of prints collate etc Job Type Entering...

Page 24: ...t printing Note R When mode restriction feature 154 on page 51 is activated enter the department code in the printer settings using Job Type beforehand page 23 If the department code does not match or the department code restricts the print mode printing will be cancelled Job Type settings cannot be performed from the printer settings of Panasonic Easy Print Utility dialogue 3 2 1 Ecology printing...

Page 25: ... the print toolbar R The Save As dialogue box appears 3 Specify the folder to save enter the file name and then click Save The Save PDF file dialogue appears while PDF files are being created and saved Note R The PDF file created with Easy Print Utility is an image type 25 3 Printer ...

Page 26: ...he scanner glass rather than the automatic document feeder for better results KX MB2011 only R Do not open the document cover when scanning a document with the automatic document feeder KX MB2011 only R You can set the desired scan mode for push scan beforehand feature 493 on page 43 MStopN MScanN MStartN MSetNMCNMDNMEN 1 Set the original page 16 2 If the MScanN light is OFF turn it ON by pressing...

Page 27: ...Image Navigator window after scanning R When scanning to email the email software will automatically start and the scanned image will be attached to a new email message R When scanning to OCR the scanned image will be displayed in the OCR window after scanning R When scanning to email address the scanned image will be sent as an email attachment directly from this unit LAN connection only R When s...

Page 28: ...r KX MB2011 only only the first page will be previewed When you need to refresh the scanned image set the document to preview again 6 Scan R If you preview the scanned image using the automatic document feeder in step 5 set the document again and click Scan KX MB2011 only R The scanned image will be displayed in the Multi Function Viewer Quick Image Navigator window after scanning R To save the sc...

Page 29: ...connection R Depending on the application used the appearance may differ slightly R If the Select button is displayed in Target Device when performing TWAIN scanning click Select to select the unit from the list and then click OK The Select button will not be displayed when there is only one printer driver installed 29 4 Scanner ...

Page 30: ... settings you set in step 3 and 4 Note R To stop copying see page 51 To select the copy size 1 Press MCopy SizeN repeatedly to select ORIGINAL SIZE 2 Press MCN or MDN repeatedly to select the size of your original document A MSetN 3 Press MCN or MDN repeatedly to select the size of recording paper size R When 2 is selected you can change the recording paper size by pressing MEN repeatedly R The ap...

Page 31: ...ON 5 2 1 Zoom copy enlargement reduction 1 Set the original page 16 2 Press MZoomN repeatedly to select the zoom rate that fits the size of your document and recording paper ZOOM 100 1 50 200 1 Press MCN or MDN repeatedly to change the zoom rate by 1 at a time from 25 to 400 You can also enter the desired percentage specifically by using the dial keys 3 MSetN 4 If necessary enter the number of cop...

Page 32: ...iginal document 4 3 2 1 4 3 2 1 4 4 3 3 2 2 1 1 Collated pages Uncollated pages Note R The unit will store the documents into memory while collating the copies If the memory becomes full while storing the unit will only print out the stored pages R You can hold the previous collate setting feature 469 on page 41 Proof set feature KX MB2011 only To make 1 set of a collated copy first press MCN or M...

Page 33: ...APE or PORTRAIT A MSetN 6 If necessary enter the number of copies up to 99 7 Quick ID copy feature 1 MStartN R The unit will scan 1 page 2 Place the next document on the scanner glass and press MSetN Repeat this until all the documents are scanned R The unit will start copying R You can press MStartN anytime to start copying Image repeat feature MStartN 8 After you finish copying press MStopN to r...

Page 34: ...Set the original page 16 R To make a portrait copy set the original in portrait direction To make a landscape copy set the original in landscape direction 2 Press MPage LayoutN repeatedly to select PAGE LAYOUT 3 Press MCN or MDN repeatedly to select N in 1 A MSetN 4 Press MCN or MDN repeatedly to select the number of original documents from 2 in 1 4 in 1 or 8 in 1 A MSetN 5 Press MCN or MDN repeat...

Page 35: ...A MSetN 6 Press MCN or MDN repeatedly to select SHORT EDGE A MSetN 7 Enter the desired edge width of short edge using the dial keypad A MSetN 8 If necessary enter the number of documents up to 99 A MStartN 9 After you finish copying press MStopN to reset this feature Note R You can hold the previous edge setting feature 473 on page 41 5 2 7 Margin feature You can set the unit not to copy a particu...

Page 36: ...necessary settings such as number of copies resolution zoom features and page layout features A MStartN R COPY RESERVED will be displayed The unit will start copying after the current printing job 36 5 Copier ...

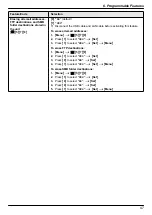
Page 37: ...nfiguration Web Page R You can also access the unit by entering its IP address on the web browser 2 Select the desired category from the menu bar Device features of the unit Network network features 3 Type root as the user name then enter the password feature 155 on page 38 A OK 4 Select the desired feature from the menu 5 Change the settings or edit the information R This step will vary depending...

Page 38: ... R The selected scale will be used when measurements are shown on the unit s display Changing the administrator code for mode restriction settings MBNM1NM5NM1N 1 MMenuN A MBNM1NM5NM1N A MSetN 2 Enter the current administrator code A MSetN R The default administrator code is 0000 3 Enter a new 4 digit administrator code using 0 9 A MSetN 4 Enter the new administrator code again A MSetN A MMenuN Not...

Page 39: ...etting the beep sounds and keytones MBNM1NM6NM5N M0N OFF Deactivate this feature M1N ON default You will hear confirmation error beep sounds and keytones Note R Even if this feature is set to OFF the unit beeps when the top cover is opened Setting the recording paper size in the paper input tray MBNM3NM8NM0N M1N LETTER Letter size paper M2N A4 default A4 size paper M4N B5 ISO B5 ISO size paper M5N...

Page 40: ...minutes M5N 1h 1 hour Note R When in power save mode the unit needs to preheat the fuser unit before it can begin printing Holding the previous contrast setting MBNM4NM6NM2N M0N DISABLED default Deactivates this feature M1N ENABLED The unit will hold the previous setting Note R The previous setting will be held individually for copying Viewing the counter for departments MBNM4NM7NM9N See page 52 f...

Page 41: ... MBNM4NM6NM7N M0N DISABLED default Deactivates this feature M1N ENABLED The unit will hold the previous setting Holding the previous zoom setting MBNM4NM6NM8N M0N DISABLED default Deactivates this feature M1N ENABLED The unit will hold the previous setting Holding the previous collate setting MBNM4NM6NM9N M0N DISABLED default Deactivates this feature M1N ENABLED The unit will hold the previous set...

Page 42: ...4N A MSetN 2 Enter the desired data timeout setting from 005 seconds to 600 seconds using the dial keypad R The default setting is 060 seconds 3 MSetN A MMenuN Setting mutual A4 letter print MBNM7NM7NM6N This feature allows printing in A4 size even if letter size recording paper is loaded in the paper input tray and vice versa M0N OFF Deactivates this feature M1N ON default Printing is possible be...

Page 43: ...e 43 FTP SERVER will be displayed when the FTP server setting is programmed page 44 SMB FOLDER will be displayed when the SMB folder setting is programmed page 44 Holding the previous scanning parameter for Push Scan MBNM4NM9NM4N M0N DISABLED default Deactivates this feature M1N ENABLED The unit will hold the previous scan settings for each mode of push scan Setting the information for scan to ema...

Page 44: ...eb Page A Device 3 Type root as the user name then enter the password feature 155 on page 38 A OK 4 Select the SCAN FEATURE from the menu 5 Click Edit next to FTP SERVER 6 Click Edit next to the desired FTP server 7 Enter the server name IP address folder path etc A Submit 8 Close the web browser Note R If you do not enter a folder path in step 7 the scanned image will be saved in the root folder ...

Page 45: ...n feature 500 is deactivated 1 MMenuN A MBNM5NM0NM4N A MSetN 2 Enter the primary DNS server of the network on the LAN using the dial keypad A MSetN A MMenuN Setting the secondary DNS server for the LAN connection MBNM5NM0NM5N This feature is available when feature 500 is deactivated 1 MMenuN A MBNM5NM0NM5N A MSetN 2 Enter the secondary DNS server of the network on the LAN using the dial keypad A M...

Page 46: ...located automatically without using a DHCP Dynamic Host Configuration Protocol server Setting HTTPD for the LAN connection MBNM5NM3NM4N M0N DISABLED Denies access to the web server M1N ENABLED default Allows access to the web server IPv6 protocol MBNM5NM3NM5N M0N DISABLED default Deactivates this feature M1N ENABLED IPv6 protocol can be used After installing the printer driver be sure to change th...

Page 47: ...M7NM8N 2 Press M1N to select YES A MSetN 3 Press M1N to select YES A MSetN A MMenuN To erase FTP destinations 1 MMenuN A MBNM5NM7NM8N 2 Press M1N to select YES A MSetN 3 Press M0N to select NO A MSetN 4 Press M1N to select YES A MSetN A MMenuN To erase SMB folder destinations 1 MMenuN A MBNM5NM7NM8N 2 Press M1N to select YES A MSetN 3 Press M0N to select NO A MSetN 4 Press M0N to select NO A MSetN...

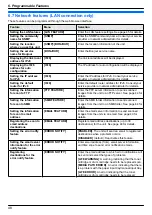
Page 48: ...ee page 44 for details Setting the information for scan to SMB SMB FEATURE Enter the SMB folder information to send scanned images from the unit to an SMB folder See page 44 for details Setting the information for scan to email address EMAIL FEATURE Enter the email server information to send scanned images from the unit via an email See page 43 for details Registering the scan to email address des...

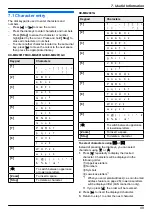
Page 49: ...haracter KX MB2001G Keypad Characters M1N 1 _ M2N A C 2 B Ä À a b c 2 à ä M3N D E F 3 È d e f 3 è M4N G H I 4 Ì g h i 4 ì M5N J K L 5 j k l 5 M6N M N O 6 Ò Ö m n o 6 ò ö M7N P Q R S 7 p q r s 7 ß M8N T U V 8 Ù Ü t u v 8 ù ü M9N W X Y Z 9 w x y z 9 M0N 0 H MGN To switch between uppercase or lowercase letters MZoomN To insert a space MStopN To delete a character To select characters using MCN or MDN...

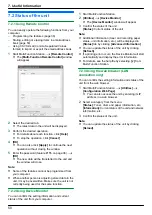
Page 50: ...tion 7 2 2 Using Device Monitor You can confirm the setting information and current status of the unit from your computer 1 Start Multi Function Station 2 Utilities A Device Monitor R The Device Monitor window will appear 3 Confirm the status of the unit Status Current status of the unit Note R Additional information toner and recording paper status unit information etc will be displayed in Status...

Page 51: ...enuN A MBNM1NM5NM4N A MSetN 2 Enter the administrator code feature 151 on page 38 A MSetN 3 Press M1N to select ON R Press M0N to select OFF 4 MSetN A MMenuN Setting mode restriction for departments Important R Make sure feature 154 is set to ON beforehand page 51 1 Press MMenuN repeatedly to display DEPARTMENT SETUP A MEN 2 Enter the administrator code feature 151 on page 38 A MSetN 3 Press MFN o...

Page 52: ...opN 5 MSetN A MMenuN 7 4 2 Counter view and print for departments Viewing the count number of copies prints for departments 1 MMenuN A MBNM4NM7NM9N A MSetN 2 Enter the administrator code feature 151 on page 38 A MSetN 3 Press MCN MDN MFN or MEN repeatedly to select the desired item A MMenuN Printing the reports of the count number of copies prints for departments 1 Press MMenuN repeatedly to displ...

Page 53: ... to 4 5 MMenuN 7 5 2 Editing a stored item 1 Press MMenuN repeatedly to display E ADDRESS SETUP 2 Press MFN or MEN repeatedly to select EDIT A MSetN 3 Press MCN or MDN repeatedly to display the desired item A MMenuN A MGN 4 Edit the name if necessary A MSetN 5 Edit the email address if necessary A MSetN A MMenuN 7 5 3 Erasing a stored item 1 Press MMenuN repeatedly to display E ADDRESS SETUP 2 Pre...

Page 54: ...paper size setting feature 380 on page 39 R 2 Check the manual input tray The displayed paper size depends on the recording paper size setting feature 381 on page 39 CHECK PICK UP INPUT TRAY 2 R Recording paper was not fed into the unit properly Load the paper again page 68 CHECK REAR COVER R The manual input tray rear cover is open Close it R A recording paper jam occurred near the manual input t...

Page 55: ...ed Remove the jammed paper page 64 PC FAIL OR BUSY R The cable between the unit and the computer is not connected correctly Check the connections page 15 20 R The computer has some kind of problem Example Make sure that the computer is turned ON R The Multi Function station s scan application is not running correctly on the computer Restart your computer and try again PLEASE WAIT R The unit is war...

Page 56: ...me or password of the server is incorrect or you don t have permission to login to the server Consult your network administrator NAME ERROR R The server name is incorrect Consult your network administrator R The server is down Consult your network administrator to activate the server OFFLINE R The cable between the unit and the computer is not connected correctly Check the connections page 15 20 R...

Page 57: ...o IP 210 Online The network is online by configuring the IP address manually 220 Online The network is online by allocating the IP address using a DHCP 230 Online The network is online by allocating the IP address using an Auto IP 342 Online NetBIOS is not working because NetBIOS name is not correct Correct the machine name feature 507 on page 45 343 Online NetBIOS is not working because NetBIOS n...

Page 58: ...nstall or uninstall Multi Function Station may be corrupted Use the MfsCleaner utility found on the supplied CD ROM to solve the problem 1 Insert the supplied CD ROM into your CD ROM drive R The setup program will start automatically 2 Tools A Cleanup Tool R The MfsCleaner window will appear 3 Click Clean and then click Yes to restart the computer Note R To install Multi Function Station again see...

Page 59: ...d has dried completely R The toner save mode of feature 482 is ON page 40 R The remaining toner is low Replace the toner cartridge R To check the drum life and quality please print the printer test list page 75 If printing quality is still poor replace the toner cartridge and drum cartridge A blank sheet is ejected R You placed the document facing the wrong way when using the copier Coloured and g...

Page 60: ...est to be accepted The name of the desired computer is not displayed on the unit when scanning documents from the unit LAN connection only R The printer driver has not been installed Install it on your computer page 19 R The PC name list up feature has been set to Off Set PC name list up on device to On page 22 R The maximum number of computers on the LAN is connected to the unit up to 30 computer...

Page 61: ...10 255 255 254 Class B 255 255 0 0 172 xx 0 1 172 xx 255 254 1 Class C 255 255 255 0 192 168 xx 1 192 168 xx 254 2 1 xx should be the same value for the unit and for the computer as shown in the following example Example 172 16 0 1 172 16 255 254 The available range of xx is 16 31 2 xx should be the same value for the unit and for the computer as shown in the following example Example 192 168 0 1 ...

Page 62: ...ewall security settings and to use the above functions properly 1 Insert the CD ROM that is supplied with the unit into your CD ROM drive R If the Select Language dialogue box appears select the desired language that you want to use with this software Click OK 2 Tools A Windows Firewall Setting R The Windows Firewall Setting Tool window will appear 3 Add to the exceptions list A OK A OK To confirm...

Page 63: ...instructions to modify or add the printer driver which changes after installing the KX MB2000 series Multi Function Station You can modify or add a printer driver as follows 1 Start Windows and insert the KX MB200 KX MB700 KX FLB880 series CD ROM into your CD ROM drive R If the Select Language dialogue box appears select the desired language that you want to use with this software Click OK 2 Modif...

Page 64: ... recording paper has jammed inside of the unit The display will show the following PAPER JAMMED L OPEN TOP COVER CHECK REAR COVER Case 1 When the recording paper has jammed near the manual input tray 1 Pull open the paper input tray A A 2 Open the manual input tray B and remove the jammed paper C carefully by pulling it upwards Then close the manual input tray C B 64 9 Paper Jams 9 Paper Jams ...

Page 65: ...he recording paper has jammed near the drum and toner cartridge 1 Pull open the paper input tray A A 2 Open the top cover B by holding the indentations C on both sides of the unit D E B C C Caution R The fuser unit D gets hot Do not touch it Note R Do not touch the transfer roller E 65 9 Paper Jams ...

Page 66: ...carefully by pulling it upwards F Remove the jammed paper G carefully by pulling it toward you G 4 Close the paper input tray 5 Close the top cover by holding the indentations on both sides of the unit until locked 66 9 Paper Jams ...

Page 67: ...s B on both sides of the unit D A B B C Caution R The fuser unit C gets hot Do not touch it Note R Do not touch the transfer roller D 2 Lift both green levers E until they stop E 3 Remove the jammed paper F carefully by pulling it upwards F 4 Push back the green levers G to the original position G 67 9 Paper Jams ...

Page 68: ...ecording paper and straighten 2 Re load the recording paper 3 Insert the paper input tray into the unit lifting the front part of the tray Then push it completely into the unit Note R If the message is still displayed check the recording paper specifications and load the recording paper again See page 12 for details 9 1 3 When the recording paper in the manual input tray is not fed into the unit p...

Page 69: ...ons and re install recording paper See page 14 for details 9 2 Document jams Automatic document feeder KX MB2011 only Caution R Do not pull out the jammed document forcibly before lifting the ADF cover 1 Open the ADF cover A while holding the document cover B A B 69 9 Paper Jams ...

Page 70: ...2 Remove the jammed document C carefully When the document has jammed near the document entrance C When the document has jammed near the document exit C 3 Close the ADF cover 70 9 Paper Jams ...

Page 71: ...ion R Be careful when handling the drum and toner cartridge See the caution for the drum cartridge on page 8 for details R Do not use paper products such as paper towels or tissues for cleaning 10 1 1 White plate and scanner glass 1 Open the document cover A A 2 Hold the document cover while cleaning the white plate B and the scanner glass C B C 3 Close the document cover 71 10 Cleaning 10 Cleanin...

Page 72: ...ng the indentations B on both sides of the unit D A B B C Caution The fuser unit C gets hot Do not touch it Note R Do not touch the transfer roller D 3 Remove the drum and toner cartridge E by holding the tabs E 4 Clean the lower glass F with a soft and dry cloth F 72 10 Cleaning ...

Page 73: ...the arrows H match to install the drum and toner cartridge correctly H 6 Close the top cover by holding the indentations on both sides of the unit until locked Caution R To prevent injuries be careful not to put your hands under the top cover 7 Turn the power switch ON 73 10 Cleaning ...

Page 74: ...t use paper products such as paper towels or tissues for cleaning 1 Turn the power switch OFF 2 Open the ADF cover A while holding the document cover B A B 3 Clean the document feeder rollers C with a cloth moistened with water and let all parts dry thoroughly C 4 Close the ADF cover 5 Turn the power switch ON 74 10 Cleaning ...

Page 75: ...200 dpi Interpolated Copy resolution Up to 600 600 dpi n Photo resolution 64 level n Scanner type Colour Contact Image Sensor n Printer type Laser Printer n Operating environment 10 C 32 5 C 20 70 RH Relative Humidity n Dimensions KX MB2001 Approx width depth height 420 mm 432 mm 255 mm KX MB2011 Approx width depth height 420 mm 432 mm 305 mm n Mass Weight KX MB2001 Approx 11 kg KX MB2011 Approx 1...

Page 76: ...erRemote Control 4 6 Operating the unit from your computer 4 7 Fax sending receiving using Multi Function Station 4 8 Registering the computer in the LANnetwork with the optional LAN board 4 9 Confirming the status of the unit 5 Case Setup 5 1 Selecting the way to use your unit 5 2 Case 1 FAX ONLY Table of Contents2 1 Table of Contents 1 1 Included accessories 1 2 Accessory information Finding the...

Page 77: ...e are various factors that determine the actual drum cartridge life such as temperature humidity type of paper and how much toner you use for the number of pages per print job The actual number of pages your drum cartridge will print may be significantly less than this estimate if your unit is often used for printing small number of pages per job Because many of the factors that determine the actu...

Page 78: ...art 2 Networks Associates Technology Inc copyright notice BSD Copyright c 2001 2003 Networks Associates Technology Inc All rights reserved Redistribution and use in source and binary forms with or without modification are permitted provided that the following conditions are met Redistributions of source code must retain the above copyright notice this list of conditions and the following disclaime...

Page 79: ... INCLUDING NEGLIGENCE OR OTHERWISE ARISING IN ANY WAY OUT OF THE USE OF THIS SOFTWARE EVEN IF ADVISED OF THE POSSIBILITY OF SUCH DAMAGE Part 4 Sun Microsystems Inc copyright notice BSD Copyright 2003 Sun Microsystems Inc 4150 Network Circle Santa Clara California 95054 U S A All rights reserved Use is subject to licence terms below This distribution may include materials developed by third parties...

Page 80: ...ITS WHETHER IN AN ACTION OF CONTRACT NEGLIGENCE OR OTHER TORTIOUS ACTION ARISING OUT OF OR IN CONNECTION WITH THE USE OR PERFORMANCE OF THIS SOFTWARE R This product contains thttpd software that ACMELabs developed and is using it based on the following licence conditions Copyright 1995 1998 1999 2000 by Jef Poskanzer jef acme com All rights reserved Redistribution and use in source and binary form...

Page 81: ...ions of the OpenSSL Licence and the original SSLeay licence apply to the toolkit See below for the actual licence texts Actually both licences are BSD style Open Source licences In case of any licence issues related to OpenSSL please contact openssl core openssl org OpenSSL Licence Copyright c 1998 2000 The OpenSSL Project All rights reserved Redistribution and use in source and binary forms with ...

Page 82: ...udes software developed by the OpenSSL Project for use in the OpenSSL Toolkit http www openssl org THIS SOFTWARE IS PROVIDED BY THE OpenSSL PROJECT AS IS AND ANY EXPRESSED OR IMPLIED WARRANTIES INCLUDING BUT NOT LIMITED TO THE IMPLIED WARRANTIES OF MERCHANTABILITY AND FITNESS FOR A PARTICULAR PURPOSE ARE DISCLAIMED IN NO EVENT SHALL THE OpenSSL PROJECT OR ITS CONTRIBUTORS BE LIABLE FOR ANY DIRECT ...

Page 83: ...display the following acknowledgement This product includes cryptographic software written by Eric Young eay cryptsoft com The word cryptographic can be left out if the rouines from the library being used are not cryptographic related 4 If you include any Windows specific code or a derivative thereof from the apps directory application code you must include an acknowledgement This product includes...

Page 84: ...4 HTTPD 46 535 IPv6 protocol 46 538 WINS server 1 46 539 WINS server 2 46 578 All email address erase 47 774 Data timeout 42 776 Mutual A4 letter print 42 A Address list 75 Auto IP Feature 533 46 Automatic document feeder 17 31 B Basic features 38 Beep sound Feature 165 39 Bonjour Feature 513 45 C Character entry 49 Cleaning 71 74 Collate hold Feature 469 41 Connections 15 LAN 15 USB 20 Contrast 3...

Page 85: ... input tray Feature 381 39 Paper input tray Feature 380 39 Paper type Manual input tray Feature 384 40 Paper input tray Feature 383 39 Password Feature 155 38 PC print features 42 Power failure 62 Power save Feature 403 40 Power switch 15 Printer test 75 Programming 37 Pull scan 28 Scan application 28 Viewer 28 Push scan 26 R Recording paper 12 Recording paper size 76 Reports Address 75 Count numb...

Page 86: ...86 Notes ...

Page 87: ...87 Notes ...

Page 88: ...PNQX5741ZA D0912AT0 CD ...

Reviews: