3.1 [1-1] Slot
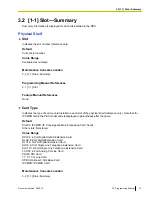
The operating characteristics associated with each service card can be programmed.
Move the mouse pointer over an installed card to display the menu of options for that card. To view a summary
of status and MPR versions for all cards installed in the PBX, click the
Summary
To install a new card to the PBX
1.
Click on the name of the card to install in the list on the right.
An image of the card will be displayed to the left of the list, and information about the card will be shown
below.
2.
Click and drag the image of the card to the free slot it is to be installed in, and release it.
The card will move into the slot space.
3.
Click
Yes
to confirm.
To switch between physical and virtual shelves of the PBX
1.
Move the mouse pointer over the PBX image at the top of the screen you wish to select.
Select Shelf
will be shown under the mouse pointer.
2.
Click
Select Shelf
.
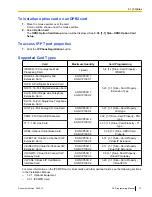
To access card properties
1.
Move the mouse pointer over a card.
A menu will be shown under the mouse pointer.
2.
Select
Card Property
.
The property screen for that card will be displayed.
To access port properties
1.
Move the mouse pointer over a card.
A menu will be shown under the mouse pointer.
2.
Select
Port Property
.
The property screen for that card’s port or ports will be displayed.
To remove a card from the PBX
1.
Move the mouse pointer over the card to remove.
A menu will be shown under the mouse pointer.
2.
Select
Delete
.
3.
Click
Yes
to confirm.
The card will be removed.
To change the status (INS/OUS) of a card (Interactive mode only)
1.
Move the mouse pointer over the card.
A menu will be shown under the mouse pointer.
2.
Select the desired status:
•
Click
INS
to set the card to in-service status.
•
Click
OUS
to set the card to out-of-service status.
72
PC Programming Manual
Document Version 2009-12
3.1 [1-1] Slot
Summary of Contents for KX-NCP500
Page 71: ...Section 3 1 Configuration Document Version 2009 12 PC Programming Manual 71 ...
Page 74: ... 3 4 1 Virtual Cards 74 PC Programming Manual Document Version 2009 12 3 1 1 1 Slot ...
Page 313: ...Section 4 2 System Document Version 2009 12 PC Programming Manual 313 ...
Page 450: ...450 PC Programming Manual Document Version 2009 12 4 21 2 11 2 Audio Gain Card ...
Page 451: ...Section 5 3 Group Document Version 2009 12 PC Programming Manual 451 ...
Page 533: ...Section 6 4 Extension Document Version 2009 12 PC Programming Manual 533 ...
Page 701: ...Section 7 5 Optional Device Document Version 2009 12 PC Programming Manual 701 ...
Page 731: ...Section 8 6 Feature Document Version 2009 12 PC Programming Manual 731 ...
Page 744: ...744 PC Programming Manual Document Version 2009 12 8 6 6 6 Tenant ...
Page 745: ...Section 9 7 TRS Document Version 2009 12 PC Programming Manual 745 ...
Page 753: ...Section 10 8 ARS Document Version 2009 12 PC Programming Manual 753 ...
Page 766: ...766 PC Programming Manual Document Version 2009 12 10 8 8 7 Authorization Code for TRG ...
Page 767: ...Section 11 9 Private Network Document Version 2009 12 PC Programming Manual 767 ...
Page 780: ...780 PC Programming Manual Document Version 2009 12 11 4 9 4 NDSS Key Table ...
Page 781: ...Section 12 10 CO Incoming Call Document Version 2009 12 PC Programming Manual 781 ...
Page 807: ...Section 13 11 Maintenance Document Version 2009 12 PC Programming Manual 807 ...
Page 847: ...Section 14 Appendix Document Version 2009 12 PC Programming Manual 847 ...

