1.
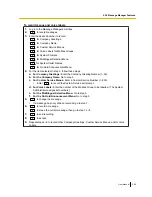
Log in to the Message Manager’s mailbox.
2.
2
3.
3
to assign a telephone number.
4.
Enter the desired number.
1
to change the first telephone number.
2
to change the second telephone number.
3
to change the third telephone number.
5.
1
to accept.
6.
Dial the telephone number.
7.
2
to accept.
8.
1
to change the telephone number.
2
to accept.
3
to review.
4
to add more digits.
5
to insert a pause.
6
to insert a wait for dial tone.
To set device status
For each device, the notification is enabled or disabled according to a preset schedule. The Message Manager
can
enable
a device according to a schedule. However, the System Administrator must first assign a
destination number to the desired device.
1.
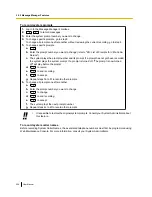
Log in to the Message Manager’s mailbox.
2.
2
2
3.
Enter the device number (1–6).
•
Device number 4, 5, or 6 is used to specify a device number that is "Device No. 1, 2, or 3" for
"E-mail/Text Message Device" in Web Maintenance Console.
•
If a telephone number has not been assigned to the selected device number 1, 2, or 3, you
cannot set the device status. Refer to "To assign notification numbers" to assign a telephone
number.
4.
Select the desired message type.
1
to notify all messages.
2
to notify urgent messages.
5.
Select when the device will be used for message notification.
1
for schedule (a notification is sent each time a message is received, but only during the
times programmed by the System Administrator).
2
for continuously.
3
for disable (notifications are not sent).
Customising the Message Manager’s Mailbox
The Message Manager can customise the Message Manager’s mailbox by changing the following parameters.
–
The Message Manager’s mailbox password
–
The extension numbers of Operator 1, 2, and 3
User Manual
285
2.2.2 Message Manager Features
Summary of Contents for KX-NS1000
Page 12: ...12 User Manual Table of Contents...
Page 244: ...Table 1 Standard mode for RU model 244 User Manual 1 14 2 Using the Directories...
Page 245: ...Table 2 Option mode User Manual 245 1 14 2 Using the Directories...
Page 246: ...Table 2 Option mode for CE model 246 User Manual 1 14 2 Using the Directories...
Page 247: ...Table 2 Option mode for GR model User Manual 247 1 14 2 Using the Directories...
Page 248: ...Table 2 Option mode for RU model 248 User Manual 1 14 2 Using the Directories...
Page 256: ...256 User Manual 1 15 1 Cellular Phone Features...
Page 372: ...372 User Manual 5 5 1 PCMPR Software File Version 002 0xxxx...
Page 373: ...Index User Manual 373...
Page 381: ...User Manual 381 Notes...


