1.
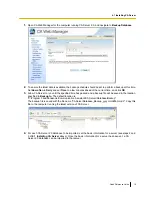
Open CA Web Manager for the computer running CA Server 2.0, and navigate to
Backup Database
.
2.
To ensure the latest data is available, the backup schedule should be set to perform a backup at this time.
Set
How often
to
Daily
and set
Time
to a few minutes ahead of the current time, and click
OK
.
3.
Allow CA Server to run until the specified time has passed and a backup file will be saved in the location
specified in
Backup to
. The default location is:
"C:\Program Files\Panasonic\Communication Assistant\CA Server\Database\Backup".
The backup file is saved with the file name "CAServerDatabase_Backup_yyyymmddhhmm.db". Copy this
file to the computer running the latest version of CA Server.
4.
For each CA Server 2.0 database to be imported, set the basic information for a server (see steps 2 and
3 of
4.1 Installing CA Server
above). Once the basic information for a server has been set, a CA
Server 2.0 database can be imported to that server.
Quick Reference Guide
19
4.1 Installing CA Server


