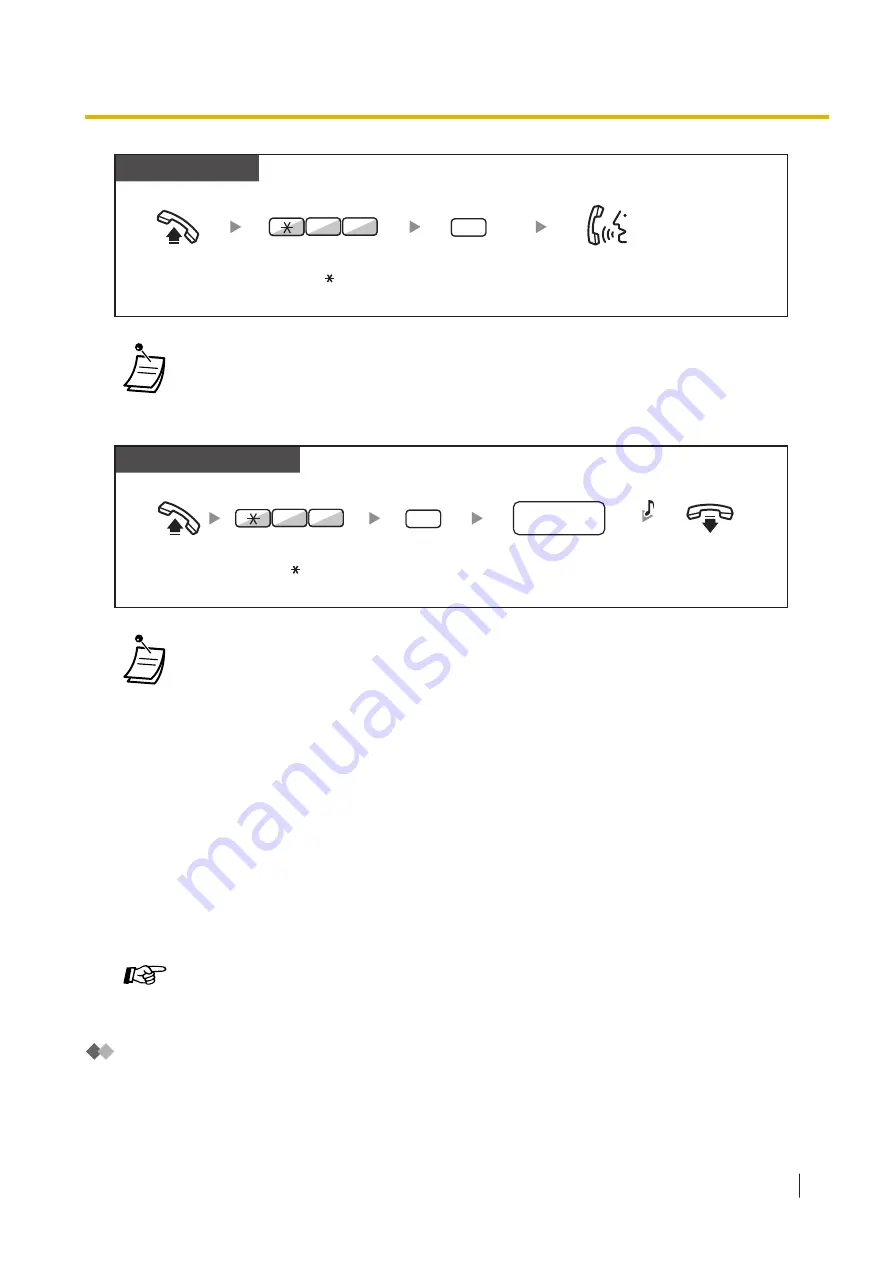
SIP Extn.
Off-hook.
Enter
2
.
2
Enter
70
.
0
7
Talk.
•
Performing this operation after receiving multiple waiting indications will call back the
extension that left the most recent message waiting indication.
To clear message waiting indications left on your extension
PT/SLT/PS/SIP Extn.
Off-hook.
Enter
0
.
On-hook.
Dial
your
extension number
.
0
0
7
Enter
70
.
your
extension no.
C.Tone
•
The Message button light or Message/Ringer Lamp shows the current status as follows:
Off
: No message
Red on
: You have a message.
•
The display shows the messages starting with the most recent call.
•
At a called extension, the MESSAGE button allows you to clear message waiting indications
if you do not want to call the callers back. To clear, press the MESSAGE button and then
press the soft button.
•
On your PT, you can establish one or more Message for Another Extension buttons. These
buttons can accept the message waiting notification of other extensions or various incoming
call distribution groups.
In other words, you can monitor the message waiting notifications of other telephones.
•
A single line telephone extension user will receive a special dial tone as message waiting
notification when going off-hook.
•
The message waiting lamp of a single line telephone can also let you know that you have a
message in the same way as the Message button.
Customising Your Phone
•
3.1.3 Customising the Buttons
Create or edit a Message button or Message for Another Extension button.
Joining an Existing Call (Executive Busy Override)
The preprogrammed extension can call someone who is busy on the telephone and establish a three-party
conversation. After pressing a DSS button, you can check the caller information of the call to another
extension on the display before establishing a three-party conversation.
1.2.4 When the Dialled Line is Busy or There is No Answer
Operating Manual
37
Summary of Contents for KX-NSX1000
Page 10: ...Table of Contents 10 Operating Manual ...
Page 203: ...Table 1 Standard mode 1 14 2 Using the Directories Operating Manual 203 ...
Page 204: ...Table 1 Standard mode for RU model 1 14 2 Using the Directories 204 Operating Manual ...
Page 205: ...Table 2 Option mode 1 14 2 Using the Directories Operating Manual 205 ...
Page 206: ...Table 2 Option mode for CE model 1 14 2 Using the Directories 206 Operating Manual ...
Page 207: ...Table 2 Option mode for GR model 1 14 2 Using the Directories Operating Manual 207 ...
Page 250: ...2 2 2 Message Manager Features 250 Operating Manual ...
Page 288: ...4 1 3 Supervisory Monitor ACD Control 288 Operating Manual ...
Page 314: ...Note 314 Operating Manual ...


