background image

22

Finding the controls

Main unit

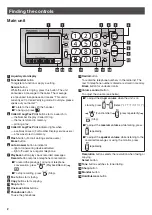
1


Liquid crystal display

2


Function/Set button
To register a function or apply a setting. 
Secure button
 While the unit is ringing, press this button. The unit 
announces a message to the caller. The message 
is announced in Japanese and means “This unit is 
currently set to Caller Verifying mode. Could you please 
speak out your name?”.

  To talk to the caller, lift the handset.

  To hang up, press 

.

3


Caller ID Log/Fax Print button starts a search in
— the Number Display (Caller ID) log. 
— the fax list stored in memory. 
— printing a fax.

4


Caller ID Log/Fax Print indicator lights when
—  a call was missed. (For Number Display service users.)

— a fax was stored in memory.

5


Flash button (For call waiting service users.)
Erase button

6


Auto Answer button & indicator
—  light on: answering device activated.

— light off: used as a regular telephone.

7


Playback button plays back recorded messages.
Record button records a telephone conversation.

   To record the previous 1 minute of telephone 

conversation, press 

 (Playback/Record) 


.

   To stop recording, press 

 (Stop).

8


Fax button starts faxing.

9


Copy button starts copying.

10


Stop button

11


One-touch Dial buttons

12


 Phonebook button
To use the phonebook.

13

  Redial button

To redial the telephone numbers in the redial list. The 
last 10 telephone numbers dialed are stored in memory. 
Block button for undesired calls

14


Volume control button
To adjust the volume (see below).

  To adjust the 

ringer volume when the unit is on 

standby, press 


 (Select “ 

ヨビダシオンリョウ ヘンコウ

 ”) 


 (Function/Set)   

 (press repeatedly)   

 (Stop).

  To adjust the 

receiver volume while talking, press 

 repeatedly.

  To adjust the 

speaker volume while listening to the 

recorded messages or using the monitor, press  

 repeatedly.

Resolution button selects the resolution when faxing or 
copying. 
Select button

15


Tone button switches to tone dialing.

16


Sharp button

17


Monitor button

18


Hold/Intercom button

Summary of Contents for KX-PD303DL

Page 1: ...s given in this guide are subject to change without notice This unit is equipped with the voice guide features Japanese only For details about voice guide please see page 10 Table of Contents Finding the controls 2 Installations and connections 4 Setting your fax telephone number 7 Setting your logo to the main unit 8 Character input and command key table 9 Voice guide 10 Automatic dialing on the ...

Page 2: ...elephone 7 Playback button plays back recorded messages Record button records a telephone conversation To record the previous 1 minute of telephone conversation press Playback Record To stop recording press Stop 8 Fax button starts faxing 9 Copy button starts copying 10 Stop button 11 One touch Dial buttons 12 Phonebook button To use the phonebook 13 Redial button To redial the telephone numbers i...

Page 3: ...nswer calls To put a call on hold To page the main unit and or portable handset s To end a call To end or exit from editing or other operations To use the speakerphone Sharp button Key lock button To lock the portable handset so that no calls or settings can be made To turn key lock on press this button for about 3 seconds until a single beep is heard To turn key lock off press this button for abo...

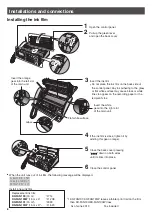
Page 4: ...191W 15 m x 2 1 1 523 As of June 2013 Tax included 1 KX FAN191 KX FAN191W leaves a fainter print trail on the film than KX FAN190 KX FAN190W does Do not place the ink film on the back side of the control panel Any ink adhering to the glass or flat white surface may cause black or white lines to appear on the recording paper or the recipient s fax フィルムノコウカンガ ヒツヨウ フィルム KX FAN190 ヲ オカイモトメクダサイ U23 4...

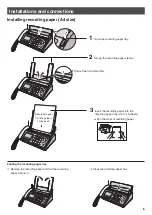
Page 5: ...stand first Recording paper Printing side is on the back 3 Insert the recording paper into the recording paper tray Up to 15 sheets Fan the stack of recording paper Remove the recording paper and fold the recording paper stands in Close the recording paper tray Folding the recording paper tray 1 Open the recording paper tray ...

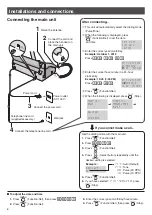
Page 6: ... 3 45 PM Press Press Function Set When the following is displayed press Stop If you cannot make a call Set the dialing mode with the main unit 1 Press Function Set 2 Press 3 Press Function Set 4 Press Select button repeatedly until the desired setting is selected Example ジドウ Auto Default プッシュ Tone 20 Pulse 20 PPS 10 Pulse 10 PPS カイセン シュベツ 20 5 Press Function Set 6 If you have selected プッシュ 20...

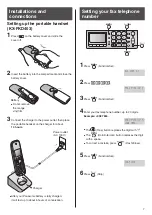
Page 7: ...ery into the compartment and close the battery cover After your Panasonic battery is fully charged it will last up to about 5 hours of conversation Battery Power outlet AC 100 V Charger 3 Connect the charger to the power outlet then place the portable handset on the charger for about 10 hours トウロク シマシタ The Tone button replaces the digit with The Hold Intercom button replaces the digit with a space...

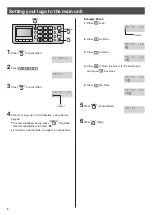
Page 8: ...our logo to the main unit 1 Press Function Set 3 Press Function Set 6 Press Stop Example Micah 1 Press once 2 Press six times 3 Press six times 4 Press to move the cursor to the next space and press four times 5 Press five times 5 Press Function Set 2 Press アナタノ ナマエ AB Mi c アナタノ ナマエ AB Micah アナタノ ナマエ AB Mic a アナタノ ナマエ AB Mi アナタノ ナマエ AB M トウロク シマシタ Cursor キノウ トウロク モード アナタノ ナマエ アナタノ ナマエ カナ Cursor ...

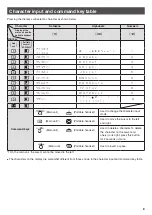
Page 9: ... ヤユヨャュョ T U V t u v 8 ラリルレロ W X Y Z w x y z 9 ワヲンー ー 0 Command keys Main unit Portable handset Used to change the character input mode Main unit 1 Portable handset Used to move the cursor to the left and right Main unit Portable handset Used to delete a character To delete the character on the cursor and one s to its right press this button for 2 seconds or more Main unit Portable handset Used to ...

Page 10: ...lephone numbers in the one touch dialers Select ナシ Make a call using the phonebook redial one touch dialer caller ID log Print fax documents from the memory Change the ink film The operation guide for changing the ink film cannot be prevented from starting Reading out dial The unit announces the dialed number in Japanese To cancel the reading out dial Select ナシ Voice guide ...

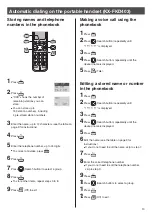
Page 11: ... phonebook of the portable handset to the main unit For storing the phonebook entries of the portable handset see page 13 To transfer a phonebook entries from the portable handset to the main unit 1 Press 2 Press 3 Press Search button repeatedly until オヤキ is displayed then press Example テンソウサキ オヤキ コキ2 4 To transfer a stored phonebook entry individually Press Press Search button repeatedly until th...

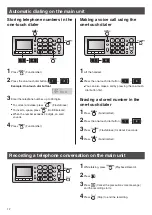
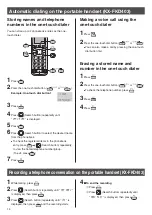
Page 12: ...rcom When the number exceeds 24 digits an alert sounds 4 Press Function Set 1 Lift the handset 2 Press the one touch dial button You can also make a call by pressing the one touch dial button first Erasing a stored number in the one touch dialer 1 Press Function Set 2 Press the one touch dial button 3 Press Flash Erase for about 2 seconds 4 Press Function Set Recording a telephone conversation on ...

Page 13: ...book 1 Press 2 Press Search button repeatedly until イチラン ケンサク is displayed 3 Press 4 Press Search button repeatedly until the desired name is displayed 5 Press 6 Edit the name see the table on page 9 for instructions If you do not need to edit the name skip to step 7 7 Press 8Enter the correct telephone number If you do not need to edit the telephone number skip to step 9 9 Press 10 Press Search b...

Page 14: ...mber group To exit press 7 Press 1 Press 2 Press the one touch dial button or You can also make a call by pressing the one touch dial button first Erasing a stored name and number in the one touch dialer 1 Press 2 Press the one touch dial button or To check the telephone number press 3 Press 4 Press You can store up to 2 phonebook entries as the one touch dialer Recording a telephone conversation ...

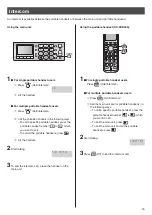
Page 15: ...et number to which you want to call To call the main unit press To call the main unit and all the portable handsets press 3 Press Off to end the intercom call 1 For single portable handset users Press Hold Intercom Lift the handset For multiple portable handsets users Press Hold Intercom Call the portable handsets in the following ways To call a specific portable handset press the portable handset...

Page 16: ...cters ガシツ チイサイジ Fine for originals with minute printing ガシツ シャシン Photo for originals containing photographs 1 Insert the document up to 5 pages FACE UP until a single beep is heard 3 Press Select button repeatedly until the desired name is displayed 1 Insert the document up to 5 pages FACE UP until a single beep is heard Sending a fax using automatic dialing Using the phonebook Using the one to...

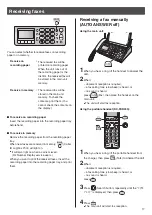
Page 17: ... to answer the call You can select whether to receive faxes on recording paper or in memory The received fax will be printed on recording paper When the unit runs out of the recording paper or the ink film the received fax will be stored in the main unit memory The received fax will be stored in the main unit memory To check the contents print them You cannot check the contents on the display To r...

Page 18: ...D Log Fax Print When using Number Display Service Press Caller ID Log Fax Print then press Select button When new faxes are received in memory the following will be displayed You can print all the new faxes 2 Press Copy 3 After printing the following will be displayed If you want to delete the faxes press If you want to save the faxes press light on ファクスガ トドイテイマス チャクシンリレキ ファクスイン サツ オス ファクス 10ケン ...

Page 19: ...ntents インサツシタ ナイヨウヲ ショウキョ シマスカ ハイ イイエ If you want to delete the fax press If you want to save the fax press 1 When not using Number Display Service Press Caller ID Log Fax Print When using Number Display Service Press Caller ID Log Fax Print then press Select button ファクス 10ケン シンキ マーク 3 ケン ケンサクハ ケッテイ オス 2 Press Function Set 3 Press Select button to select the desired fax to delete 4Press Flash Eras...

Page 20: ...message You can record your own greeting message When receiving a call it will be played to callers instead of the pre recorded Japanese greeting message 1 Press Function Set 2 Press ジサク オウトウ ロクオン 3 Press Function Set 4 Press or to select a message number to record to You can record different greeting messages to ジサク 1 and ジサク 2 5 Lift the handset 6 Press Function Set and speak your greeting me...

Page 21: ... the answering device from a remote location Operation Listening to a recorded message from a remote location Turn the Auto Answer light on before you go out Remote operations are available only from a touch tone telephone 1 Call your unit 2 Enter the remote operation ID during the greeting message 3 Press 4 or wait 4 seconds Only the new recorded messages will be played back To listen to all the ...

Page 22: ...nected Using the portable handset KX FKD403 To block the call press To cancel blocking press When the following is displayed press to cancel 3 Explain to the caller that a visitor came and hang up For Number Display service subscribers If you subscribe to Number Display service the message heard by the caller will change according to the caller s situation Example If the caller requested not to se...

Page 23: ... Effective printing size 202 mm A4 size plain paper Transmission time Approx 15 s page Original mode 2 Modem speed 9 600 7 200 4 800 2 400 bps Automatic fallback Halftone level 64 level Scanning density Horizontal 8 pels mm Vertical 7 7 lines mm Fine Photo 3 85 lines mm Standard Scanner type Contact image sensor Printer type Thermal transfer printing on plain paper Data compression system Modified...

Page 24: ...PNQX6293ZA F0613KM0 Panasonic System Networks Co Ltd 2013 C ...

Reviews: