background image

Cordless Phone

Model No.  

KX-TC1170ALN

Operating lnstructions

Preparation

Basic Operation

Advanced Operation

Useful Information

Charge the battery for about 10 hours before initial use.

Caller ID Compatible

PLEASE READ BEFORE USE

AND SAVE.

Summary of Contents for KX-TC1170ALN

Page 1: ...del No KX TC1170ALN Operating lnstructions Preparation Basic Operation Advanced Operation Useful Information Charge the battery for about 10 hours before initial use Caller ID Compatible PLEASE READ BEFORE USE AND SAVE ...

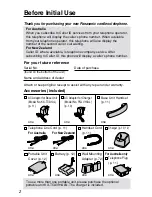
Page 2: ...p 11 one Battery p 12 one Charger p 10 12 one To use more than one portable unit please purchase the optional portable unit KX TCA391ALN The charger is included For Australia only Telephone Plug p 11 one Wall Mounting Adapter p 72 one Portable Unit Cover p 12 one For Australia When you subscribe to Caller ID services from your telephone operator this telephone will display the caller s phone numbe...

Page 3: ...ften if the unit is subject to grease dust or high humidity Otherwise the battery may not charge properly Base Unit Location Calls are transmitted between the base unit and the portable unit using wireless radio waves For maximum distance and noise free operation the recommended base unit location is Extend the antenna fully Away from electrical appliances such as a TV personal computer cellular p...

Page 4: ...ber 33 Storing Caller List Information in the Directory 35 Storing Caller List Information in the One Touch Dialler Memory 36 Storing Caller List Information in the Speed Dialler Memory 37 Erasing Caller List Information 38 Using the Directory 40 Storing Names and Numbers in the Directory 40 Steps for Entering Names and Symbols 42 Finding Items in the Directory 44 Dialling from the Directory 45 Ed...

Page 5: ... Base Unit 68 Transferring Calls Using the Intercom 70 Transferring Calls from One Portable Unit to Another 71 Useful Information Wall Mounting 72 Battery Replacement 74 Before Requesting Help 75 Safety Instructions 79 Important Information 81 Important Must be carried out with the portable unit Must be carried out with the base unit Must be carried out by both the base unit and portable unit toge...

Page 6: ...Buttons p 24 AUTO Button p 50 RECALL Button p 62 HOLD RINGER Button p 15 24 SP PHONE Speakerphone Button and Indicator p 23 25 MIC Microphone p 23 58 IN USE Indicator p 21 66 One Touch Auto Dial Buttons p 48 CLEAR Button p 38 39 EXIT Button p 17 20 Display p 8 CALLER ID Button and Indicator p 26 30 Antenna p 3 11 LOCATOR INTERCOM Button p 59 68 70 REDIAL PAUSE Button p 24 48 62 Navigator Key OK p ...

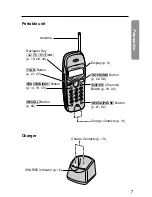
Page 7: ... Contacts p 13 Portable unit TALK Button p 21 25 Antenna Navigator Key OK p 19 28 44 Display p 9 FUNCTION EDIT Button p 14 19 33 RECALL Button p 62 Charge Contacts p 13 EXIT CH Channel Button p 19 22 REDIAL PAUSE Button p 21 62 INTERCOM Button p 22 58 ...

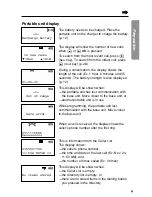
Page 8: ...number If the display continuously shows 12 00AM 1 1 or 0 00 1 1 the clock needs adjusting p 16 During a conversation the display shows the length of the call Ex 1 hour 6 minutes and 35 seconds The dial lock mode is set To cancel the mode see page 56 When the restricted number 0 or 00 is dialled it is displayed To cancel the mode see page 57 While the portable unit is engaged in an outside call it...

Page 9: ...t Move closer to the base unit or another portable unit is in use While programming the portable unit lost communication with the base unit Move closer to the base unit When a call is received the display shows the caller s phone number after the first ring This is information from the Caller List The display shows the caller s phone number the time and date of the last call Ex Nov 24 11 50 AM and...

Page 10: ...ase unit is displayed Ex 2 minutes 5 seconds TALK was pressed while the base unit was in use Memory is full 1 Not available Ann 1234567890 00 02 05 Settings Connections Charger To Power Outlet AC 230 V 240 V 50 Hz AC Adaptor PQLV13AL Bottom of the charger Fasten the AC adaptor cord to prevent it from being disconnected USE ONLY WITH Panasonic AC ADAPTOR PQLV13AL The AC adaptor must remain connecte...

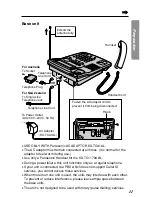
Page 11: ...cannot access those services When more than one unit is used the units may interfere with each other To prevent or reduce interference please leave ample space between the base units The unit is not designed to be used with rotary pulse dialling services Base unit Hook Extend the antenna fully Handset Handset Cord To Socket For Australia OR For New Zealand To Power Outlet AC 230 V 240 V 50 Hz AC A...

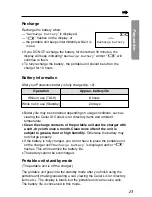
Page 12: ...arger The CHARGE indicator lights The portable unit number is displayed Battery strength You can check the preset battery strength on the display The battery strength is as shown in the chart below CHARGE Indicator Installing the Battery Install the battery and close the portable unit cover locking it into place Display prompt Battery strength Fully charged Medium Low Needs to be recharged flashin...

Page 13: ...rectory items etc The display is blank but the portable unit can receive calls The battery life is conserved in this mode Battery life may be shortened depending on usage conditions such as viewing the Caller ID Caller List or directory items and ambient temperature Clean the charge contacts of the portable unit and the charger with a soft dry cloth once a month Clean more often if the unit is sub...

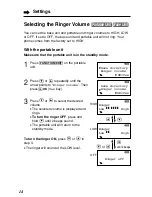
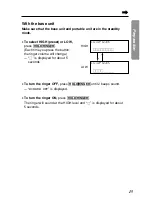
Page 14: ...N EDIT on the portable unit 2 Press or repeatedly until the arrow points to Ringer volume Then press OK Yes key 3 Press or to select the desired volume The selected volume is displayed and rings To turn the ringer OFF press and hold until 2 beeps sound The portable unit will return to the standby mode To turn the ringer ON press or in step 3 The ringer will sound at the LOW level LOW HIGH Ringer L...

Page 15: ...OLD RINGER Each time you press the button the ringer volume will change is displayed for about 5 seconds HIGH LOW To turn the ringer ON press HOLD RINGER The ringer will sound at the HIGH level and is displayed for about 5 seconds To turn the ringer OFF press HOLD RINGER until 2 beeps sound RINGER OFF is displayed 11 34AM 12 25 11 34AM 12 25 ...

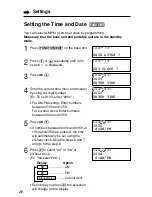
Page 16: ... numbers between 0100 and 1259 For 24 hour clock Enter numbers between 0000 and 2359 12 00AM 1 1 SAVE AUTO 12 00AM 1 1 SET CLOCK 12 00AM 01 01 2000 ENTER TIME 09 30AM 01 01 2000 ENTER TIME 5 Press OK If numbers between 0000 and 0059 or 1300 and 2359 are entered the time will automatically be set using the 24 hour clock Skip the steps 6 and 7 and go to the step 8 6 Press to select AM or PM or 24 ho...

Page 17: ...us display by pressing when setting the time and date If 6 beeps sound when entering the time and date a wrong number was entered Enter the correct time and date For Caller ID service users p 26 The Caller ID information will re set the clock after the first ring if the adjusted time and or date is incorrect However if the time has not previously been set the Caller ID information will not adjust ...

Page 18: ...s FUNCTION EDIT on the base unit 2 Press or repeatedly until LCD CONTRAST is displayed 3 Press OK The current setting is displayed 4 Press or to select the desired LCD contrast level Each time you press or the level will change on the display 5 Press OK A beep sounds To return to the standby mode press EXIT 11 34AM 12 25 SAVE AUTO 11 34AM 12 25 LCD CONTRAST 11 34AM 12 25 You can exit the programmi...

Page 19: ...call time Unit option HSave directory Ringer volume Program Press FUNCTION EDIT on the portable unit Function menu To use the directory p 41 To select the ringer volume p 14 To select the recall time p 62 To register each optional portable units p 66 Function menu During programming To select a desired function item press or repeatedly until the arrow points to the item Then press OK to go to the ...

Page 20: ...me day p 16 To set the call restriction p 56 To select the contrast of the display p 18 To set the dial lock p 55 Press or FUNCTION EDIT Press or FUNCTION EDIT Press or FUNCTION EDIT To set the alarm clock time p 52 To change the password p 64 11 34AM 12 25 SAVE AUTO SET CLOCK SET ALARM CHANGE PASSWORD DIAL LOCK CALL RESTRICT LCD CONTRAST Press or FUNCTION EDIT Press or FUNCTION EDIT Press or FUNC...

Page 21: ...ghts If Out of range is displayed and an alarm tone sounds in step 1 move closer to the base unit or place the portable unit on the charger and try again or another portable unit is in use If Not available is displayed and busy tones sound when you press TALK the base unit is in use When the base unit is in use the portable unit user cannot hear join the base unit conversation and vice versa Conve...

Page 22: ...OM twice on the portable unit display flashes HOLD is displayed on the base unit and the SP PHONE indicator flashes During the hold the caller will hear music To release the hold From the portable unit press TALK From the base unit press SP PHONE or lift the handset If noise interferes with the conversation Press EXIT CH to select a clearer channel or move closer to the base unit 1112222 To select...

Page 23: ...ndicator light goes out SP PHONE and Indicator VOLUME HOLD RINGER REDIAL PAUSE MIC Backlit LCD display The backlit portable unit display will stay on for about 10 seconds after pressing a portable unit button or lifting the portable unit off the charger Backlit keypad on the portable unit The dialling buttons on the portable unit will light when you press a button or lift the portable unit off the...

Page 24: ...speakerphone volume will increase the microphone sensitivity You can switch to the handset by lifting it up To switch back to the speakerphone press SP PHONE To put a call on hold Press HOLD RINGER The SP PHONE indicator flashes During the hold the caller and the base unit speakerphone user will hear music To release the hold From the base unit handset press HOLD RINGER From the base unit speakerp...

Page 25: ...ling button 0 to 9 or Any Key Talk TALK When the base unit and portable unit ringer volumes are set to OFF they will not ring p 14 15 TALK When a call is received the unit rings and the CALLER ID indicator on the base unit flashes quickly If you subscribe to a Caller ID service the calling party s information will be displayed after the first ring p 26 In order to view the CALLER ID information pl...

Page 26: ...Using the list you can automatically call back a caller You can store the callers names and numbers from the Caller List in the directory one touch dialler or speed dialler The callers names cannot be stored in the one touch dialler and speed dialler When a second call is received while talking the new caller s phone number will be displayed p 62 For Australia only The displays show the caller s p...

Page 27: ... show Private caller portable unit PRIVATE CALLER base unit If a long distance call cannot be identified the display will show Long distance portable unit base unit If your unit is connected to a PBX which does not support Caller ID services you cannot access those services If the name display service is available in your area the display will show caller s names For further information please con...

Page 28: ...s press or 3 To exit the list press EXIT CH The portable unit will return to the standby mode Once new calls have been checked will be added If No items stored is displayed in step 1 the Caller List is empty If more than one call is received from the same caller the date and time of the most recent call will be recorded If the same caller calls again the call entry with will be deleted If the base...

Page 29: ...caller 2 9 The number of times the same caller called up to 9 After checking 2 9 will be replaced with 2 new calls G New F Old 02223334444 3 10P JUN10 NANCY BROWN 0244448888 1 54P JUN 9 2 0123456789012345 10 38A JUN 9 If you receive a call from one of the same phone numbers stored in the directory the caller s name will be displayed Private name display If an arrow is displayed after the number th...

Page 30: ...by mode Once new calls have been checked NEW will disappear from the display If NO ITEM STORED is displayed in step 1 the Caller List is empty If more than one call is received from the same caller the date and time of the most recent call will be recorded If the same caller calls again the call entry without NEW will be deleted If the portable unit user makes a call when the base unit user is vie...

Page 31: ...Caller List press EXIT The base unit will return to the standby mode Display meaning NEW You have not yet checked this caller information answered the call or called back the caller 1 50 The memory number of each caller up to 50 The largest number is the most recent caller 2 9 The number of times the same caller called up to 9 If an arrow H is displayed below the number the whole phone number has ...

Page 32: ...e unit 2 Press or repeatedly to find the desired caller 3 Lift the handset or press SP PHONE The displayed phone number is dialled automatically After a few seconds the display will show the length of the call If you need to edit a phone number see page 34 If a phone number is not displayed in the caller information you cannot call back that caller With the portable unit With the base unit 11 50AM...

Page 33: ...step 3 5 new calls G New F Old 0276543210 11 20A JAN12 3 Editing the Caller s Phone Number You can edit a phone number in the Caller List After editing the number you can continue with calling back or storing procedures Make sure that the base unit and portable unit are in the standby mode For New Zealand Users Your telephone service provider may charge you for a local call when it is dialled with...

Page 34: ...r press CLEAR then the correct number 5 After editing the number you can continue with calling back or storing procedures To call back lift the handset or press SP PHONE p 32 To store the number in the one touch dialler press one of the one touch auto dial buttons M1 M2 or M3 To store the number in the speed dialler press AUTO then enter a memory station number 0 to 9 The number edited in step 4 w...

Page 35: ...Yes key When the caller s name is not displayed in the Caller List a If a name is not required press OK Save key b If a name is required enter the name p 42 When finished press OK Save key A beep sounds To store other numbers repeat steps 2 and 3 To return to the standby mode press EXIT CH You can exit the programming mode any time by pressing EXIT CH If the display shows Memory is full in step 3 ...

Page 36: ...he base unit 2 Press or repeatedly to find the caller you want to store in memory If the number requires editing see page 34 3 Press one of the one touch auto dial buttons M1 M2 or M3 Ex M1 is pressed A beep sounds To store other numbers repeat steps 2 and 3 To return to the standby mode press EXIT You can exit the programming mode any time by pressing EXIT You cannot store caller information in t...

Page 37: ...nd the caller you want to store in memory If the number requires editing see page 34 3 Press AUTO 4 Enter a memory station number 0 to 9 Ex 1 is pressed as a memory station number A beep sounds To store other numbers repeat steps 2 through 4 To return to the standby mode press EXIT You can exit the programming mode any time by pressing EXIT You cannot store caller information in the Speed Dialler ...

Page 38: ...r to select Clear 4 Press OK Yes key A beep sounds and the information is erased After a few seconds the display will show the previous caller information To return to the standby mode press EXIT CH 10 new calls G New F Old Clear 0355556666 11 20A JAN12 Save directory HClear G F HOK Yes With the portable unit 1 Press CALLER ID to enter the Caller List You can also enter the Caller List by pressing...

Page 39: ...re erased The portable unit will return to the standby mode HExit All clear G F HOK Yes 0 new call G New F Old All clear Exit HAll clear G F HOK Yes With the portable unit 1 Make sure that 0 NEW CALL is displayed then press CLEAR 2 Press OK A beep sounds and all entries are erased The base unit will return to the standby mode and NO ITEM STORED is displayed With the base unit 11 55AM 1 12 ALL CLEA...

Page 40: ... directory you can make a call by selecting a name on the portable unit display You cannot access numbers stored in another portable unit or the base unit from a portable unit Storing Names and Numbers in the Directory Make sure that the portable unit is in the standby mode Display FUNCTION EDIT OK The dialling buttons can be used to enter letters and symbols EXIT CH REDIAL PAUSE ...

Page 41: ...ber of stored items in the directory 3 Enter a name up to 15 characters with the dialling buttons or See the steps for entering names and symbols p 42 If a name is not required press OK Next key and go to step 5 4 Press OK Next key 5 Enter a phone number up to 22 digits Each time you press the digit to the left of the cursor is erased 6 Press OK Save key A beep sounds The display will return to st...

Page 42: ... a mistake while entering a name Use or to move the cursor to the incorrect character press to delete and enter the correct character Each time you press a character is erased from the right 1 2 3 4 5 6 7 8 9 10 11 1 A B C a b c 2 D E F d e f 3 G H I g h i 4 J K L j k l 5 M N O m n o 6 P Q R S p q r s 7 T U V t u v 8 W X Y Z w x y z 9 0 Blank Number of times key is pressed Keys To move the cursor ...

Page 43: ...ress 6 six times then press to move the cursor to the right 9 Press 6 five times 10 Press 3 five times 11 Press 7 eight times 12 When finished press OK Next key To enter a phone number see page 41 from step 5 For example to enter Tom Jones While entering names the cursor will flash on the display To enter another character using the same dialling button press to move the cursor to the next space T...

Page 44: ...ne number Number Press Press If no name is stored EXIT CH TALK To search for a name by initial 1 Press or on the portable unit to enter the directory 2 Press the dialling button for the first letter of the desired name until any name with the same initial is displayed see the Index table on page 45 Ex To find Frank press 3 until the first item under F is displayed 3 Press repeatedly until the desi...

Page 45: ... page 44 To exit the directory press EXIT CH 2 Press TALK The number is dialled automatically 3 To hang up press TALK or place the portable unit on the charger Keys Keys Index Index 1 2 3 4 5 Other symbols 1 A B C 2 D E F 3 G H I 4 J K L 5 M N O 6 P Q R S 7 T U V 8 W X Y Z 9 0 6 7 8 9 0 You can leave the directory list any time by pressing EXIT CH Numbers stored in the portable unit can only be di...

Page 46: ...e name go to step 4 4 Press OK Next key If you do not need to change the number press OK Save key 5 Add a number to the current number Each time you press the digit to the left of the cursor is erased 6 When finished press OK Save key The display will return to step 1 You can continue editing other items To return to the standby mode press EXIT CH Editing an Item in the Directory Make sure that th...

Page 47: ...ress OK 3 Press or to select Clear 4 Press OK Yes key The display will show the next item To return to the standby mode press EXIT CH Erasing an Item from the Directory Make sure that the portable unit is in the standby mode You can exit the programming mode any time by pressing EXIT CH Helen 1234567890 HEdit Clear G F HOK Yes Edit HClear G F HOK Yes Clear ...

Page 48: ...o store other numbers repeat steps 2 through 4 To return to the standby mode press EXIT You cannot access any numbers stored in a portable unit from the base unit Make sure that the base unit and portable unit are in the standby mode To erase a stored number 1 Press FUNCTION EDIT on the base unit 2 Press OK 3 Press one of the one touch auto dial buttons M1 M2 or M3 required A beep sounds If a paus...

Page 49: ...NE EXIT CLEAR FUNCTION EDIT REDIAL PAUSE OK Dialling a Stored Number 1 Lift the handset or press SP PHONE 2 Press the required one touch auto dial button M1 M2 or M3 The stored number is dialled Numbers stored in the base unit can only be dialled by the base unit ...

Page 50: ... phone number up to 22 digits If you enter a wrong number press CLEAR and enter the correct number 4 Press AUTO 5 Enter a memory station number 0 to 9 Ex 1 is pressed A beep sounds To store other numbers repeat steps 2 through 5 To return to the standby mode press EXIT If a pause is required for dialling REDIAL PAUSE can be stored in a phone number counting as one digit p 62 in step 3 You can exit...

Page 51: ... 1 to 9 for the phone number to be erased A beep sounds Dialling a Stored Number 1 Lift the handset or press SP PHONE 2 Press AUTO 3 Press a memory station number 0 to 9 The stored number is dialled Numbers stored in the base unit can only be dialled by the base unit Memory Station Numbers 0 9 SP PHONE AUTO FUNCTION EDIT CLEAR EXIT REDIAL PAUSE OK ...

Page 52: ...rrent time before setting the time for the alarm clock p 16 1 Press FUNCTION EDIT on the base unit 2 Press or repeatedly until SET ALARM is displayed 3 Press OK 4 Enter the desired time hour and minute using a 4 digit number Ex To set 6 30 enter 0630 For AM PM setting Enter numbers between 0100 and 1259 For 24 hour clock Enter numbers between 0000 and 2359 5 Press OK If numbers between 0000 and 00...

Page 53: ...he display 7 Press OK 8 Enter the desired portable unit numbers 1 to 4 OR Enter 0 for the base unit The selected unit no is displayed A portable unit number which has not been registered cannot be selected To register a portable unit see page 66 9 Press OK A beep sounds To return to the standby mode press EXIT The alarm clock is turned on and is displayed on the base unit If 6 beeps sound in step ...

Page 54: ...change to the talk mode When you press INTERCOM or INTERCOM LOCATOR the unit will change to the intercom mode If the unit is in the talk speakerphone or intercom mode during the alarm time the alarm will not sound and the alarm clock will turn off Turning off the alarm clock 1 Press FUNCTION EDIT on the base unit 2 Press or repeatedly until SET ALARM is displayed 3 Press OK 4 Press CLEAR will disa...

Page 55: ... the dial lock any numbers programmed into the One Touch Dialler can be accessed 1 Press FUNCTION EDIT on the base unit 2 Press or repeatedly until DIAL LOCK is displayed 3 Press OK If you have not set a new password p 64 you will not be prompted to enter one Go to step 5 4 Enter the password p 64 then press OK If the wrong password is entered 6 beeps will sound Enter the correct password then pre...

Page 56: ...he One Touch Dialling are not affected by the call restriction setting Before using this feature we recommend storing emergency numbers in the memory of one touch auto dial buttons p 48 Even if the phone numbers buttons are restricted the numbers stored in these buttons can be dialled If you choose not to program emergency numbers but plan to use the call restriction any numbers programmed into th...

Page 57: ... press 0 the restricted no will change 6 Press OK SAVE key A beep sounds To return to the standby mode press EXIT 11 34AM 12 25 H SAVE 11 34AM 12 25 0 H SAVE Cancelling the call restriction Follow steps 1 through 4 In step 5 press CLEAR When dialling a phone number beginning with the restricted no CALL RESTRICTED is displayed on the base unit and not dialled out If your unit is connected to a PBX ...

Page 58: ...lashes The base unit beeps for 1 minute To stop paging press INTERCOM again 2 Base unit Lift the handset then talk 3 To end the intercom Place the handset on the cradle OR Press INTERCOM on the portable unit In step 2 the base unit user can also answer by pressing LOCATOR INTERCOM Then talk into the MIC To end the intercom from the base unit press LOCATOR INTERCOM INTERCOM LOCATOR INTERCOM MIC ...

Page 59: ...If the portable unit user does not answer press LOCATOR INTERCOM to stop paging If the portable unit user answers talk into the MIC To end the intercom from the base unit press LOCATOR INTERCOM When using two or more portable units see pages 68 69 During the intercom If the portable unit user has difficulty hearing the base unit user when the base unit user is using the speakerphone decrease the s...

Page 60: ...t to the base unit In step 2 the base unit user can also answer the page by pressing LOCATOR INTERCOM To answer the call press SP PHONE 1 Portable unit During a call press INTERCOM The call is put on hold If the base unit user does not answer press TALK 2 Base unit Lift the handset to answer the page 3 Base unit To answer the call press HOLD RINGER The transfer is completed INTERCOM TALK LOCATOR I...

Page 61: ...he handset press HOLD RINGER for the speakerphone press SP PHONE 2 Portable unit Press INTERCOM to answer the page 3 Portable unit To answer the call press TALK The transfer is completed If a portable unit is not registered the base unit will not beep in step 1 To register a portable unit see page 66 When using two or more portable units see pages 70 71 INTERCOM TALK LOCATOR INTERCOM SP PHONE HOLD...

Page 62: ... REDIAL PAUSE more than once increases the length of the pause between the numbers Call Waiting and Caller ID Compatible For Australia only If you subscribe to Caller ID services the display shows a second caller s information while talking After you hear a call waiting tone the caller s phone number will be displayed You can answer the second call keeping the first call on hold Follow Telstra s i...

Page 63: ...rtable unit 2 Press or repeatedly until the arrow points to Program 3 Press OK Yes key 4 Press or repeatedly until the arrow points to Set recall time 5 Press OK Yes key 6 Press or repeatedly until the desired time is displayed 7 Press OK Save key A beep sounds To return to the standby mode press EXIT CH HProgram G F HOK Yes HSet recall time Unit option G F HOK Yes Recall time 100ms G F HOK Save F...

Page 64: ... beeps will sound Enter the correct password then press OK 6 Enter a new password using a 4 digit number 0000 9999 Ex 1234 is entered 7 Press OK A beep sounds To return to the standby mode press EXIT Please write down your password If you forget your password consult your nearest Panasonic service centre 11 34AM 12 25 SAVE AUTO 11 34AM 12 25 CHANGE PASSWORD 11 34AM 12 25 CURRENT PASSWORD 11 34AM 1...

Page 65: ...r is KX TCA391ALN When using two or more portable units the following operation s features will be different For details see pages 68 to 71 Intercom between the portable unit and base unit Transferring outside calls All of the portable units ring when calls are received When one of the portable units is in use or in the intercom mode other portable units can not be used Intercom between two portab...

Page 66: ...he portable unit on the charger Make sure that the portable unit and base unit are in the standby mode Registration must be completed within 1 minute Base Unit Portable Unit For Optional Multi Portable Unit Users 1 Base unit Press FUNCTION EDIT until 2 beeps sound 2 Press The IN USE indicator flashes 3 Portable unit Press FUNCTION EDIT 4 Press or repeatedly until the arrow points to Program then p...

Page 67: ...arrow points to Unit option then press OK Yes key 4 Press or repeatedly until the arrow points to Erase then press OK Yes key The selected number is displayed 5 Press OK Yes key A beep sounds To return to the standby mode press EXIT CH You can exit the programming mode any time by pressing EXIT CH 7 Press or repeatedly until the desired portable unit number 1 to 4 is displayed Ex 2 is selected The...

Page 68: ...handset and press LOCATOR INTERCOM Then enter the desired portable unit number 1 to 4 within 2 seconds To page all the portable units Lift the handset and press LOCATOR INTERCOM The paged portable unit s beeps for 1 minute To stop paging place the handset on the cradle 2 Portable unit Press INTERCOM to answer 3 Base unit Talk into the handset 4 To end the intercom Place the handset on the cradle O...

Page 69: ...t need to lift the handset If the portable unit user does not answer press LOCATOR INTERCOM to stop paging If the portable unit user answers talk into the MIC To end the intercom from the base unit press LOCATOR INTERCOM In step 1 if you do not enter the portable unit number after pressing LOCATOR INTERCOM within 2 seconds all of the portable units will be paged If 6 beeps sound and paging stops i...

Page 70: ... after pressing LOCATOR INTERCOM within 2 seconds all of the portable units will be paged If 6 beeps sound then paging stops in step 1 the entered number has not been registered 1 Base unit During a call press HOLD RINGER and LOCATOR INTERCOM Then enter the desired portable unit number 1 to 4 within 2 seconds To page all the portable units Press LOCATOR INTERCOM The call is put on hold and the pag...

Page 71: ...nswer press TALK 2 Portable unit 2 When the unit beeps press TALK to answer the call The transfer is completed The paged portable unit beeps softly for 30 seconds Then it will beep loudly for another 30 seconds In step 1 if you do not enter the portable unit number after pressing INTERCOM within 2 seconds the base unit will be paged When paging a portable unit if you decide you want to page anothe...

Page 72: ... unit The base unit can be mounted on a wall 1 Pull down the handset hook until it locks so the tab holds the handset 2 Connect the AC adaptor 3 Tuck the telephone line cord inside the wall mounting adaptor To Power Outlet ...

Page 73: ...ce upward 5 Install screws using the wall template below Connect the telephone line cord Mount the unit then slide down Extend the antenna fully To temporarily set the handset down during a conversation place it as shown here Wall Template 8 5 cm 8 5 cm Screws For New Zealand To Single Line Telephone Jack For Australia To Telephone Plug connected to Socket ...

Page 74: ...cover by sliding while pressing the arrow 2 Replace the battery and close the cover 3 Make sure to charge the new battery for about 10 hours in order to display the battery strength prompt correctly p 12 Battery Replacement Charger The charger can be wall mounted Install screws using the wall template below Connect the AC adaptor Mount the charger then slide it down To Power Outlet 3 cm Screws Wal...

Page 75: ... 3 minutes to avoid memory loss and place the portable unit on the charger Then try again The portable unit number has been cleared or has not been registered Register the portable unit p 66 This unit is not designed to be used with rotary pulse dialling services The portable unit is too far from the base unit Move closer and try again Place the portable unit on the charger and try again Plug in t...

Page 76: ...CH to select a clearer channel The ringer volume is set to OFF Set to HIGH or LOW p 14 The ringer volume is set to OFF Press HOLD RINGER while the unit is in the standby mode p 15 Programming is not possible while the unit is in the talk speakerphone intercom mode or when viewing the Caller List directory list Do not pause for over 60 seconds while storing Move closer to the base unit If a power f...

Page 77: ...n Other electrical appliances connected to the same outlet may be interfering with the Caller ID information Telephone line noise may be affecting the Caller ID information Some PABX do not support Caller ID services The portable unit is too far from the base unit The portable unit is engaged in an outside call Wait until the IN USE indicator light goes out The portable unit number has been cleare...

Page 78: ...tional portable unit on the charger for about 10 hours before initial use Another portable unit is in use Charge the battery fully p 12 Clean the charge contacts and charge again p 13 Install a new battery p 74 This is normal If a power failure occurs while using the portable unit or speakerphone the call is disconnected You can continue the call while using the base unit handset Before Requesting...

Page 79: ...C or greater than 40 C 3 The AC adaptor is used as the main disconnect device ensure that the AC outlet is located installed near the unit and is easily accessible Placement 1 Do not place heavy objects on top of this unit 2 Care should be taken so that objects do not fall onto and liquids are not spilled into the unit Do not subject this unit to excessive smoke dust mechanical vibration or shock ...

Page 80: ...g phone operates properly do not reconnect the unit to the telephone line until the trouble has been repaired If the known working phone does not operate properly consult your telephone company This equipment has been tested and found to comply with AS NZS 3548 1995 limits for electromagnetic interference Any modifications to any part of the system or to any peripherals may void the EMC compliance...

Page 81: ... line socket of any regular telephone You may connect it in place of your existing telephone or to any spare telephone socket installed in your premises To disconnect your existing telephone you must first remove its plug from the line socket You can then insert the plug of your Permitted Attachment into the socket and use your equipment If the plug of your existing telephone cannot be readily rem...

Page 82: ...ice Disconnect the Permitted Attachment and try using the service with the normal telephone If the telephone service then operates satisfactorily the fault is in your Permitted Attachment Leave the Permitted Attachment disconnected and report the fault to its supplier or agent to arrange for repair If when using the telephone the service is still faulty report the fault to Service Difficulties and...

Page 83: ...equipment of a different make or model nor does it imply that any product is compatible with all of Telecom s network services This equipment shall not be set to make automatic calls to the Telecom 111 Emergency Service WARNING NOTICE No 111 or other calls can be made from the portable unit this devices during a mains power failure This cordless telephone system does not incorporate provision for ...

Page 84: ...Kyushu Matsushita Electric Co Ltd 1 62 4 chome Minoshima Hakata ku Fukuoka 812 8531 Japan Printed in Malaysia PQQX12814ZA BM SM0800MK0 ...

Reviews: