background image

Making Calls

15

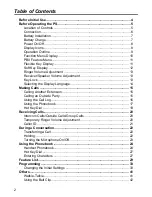
Making Calls

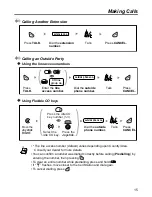
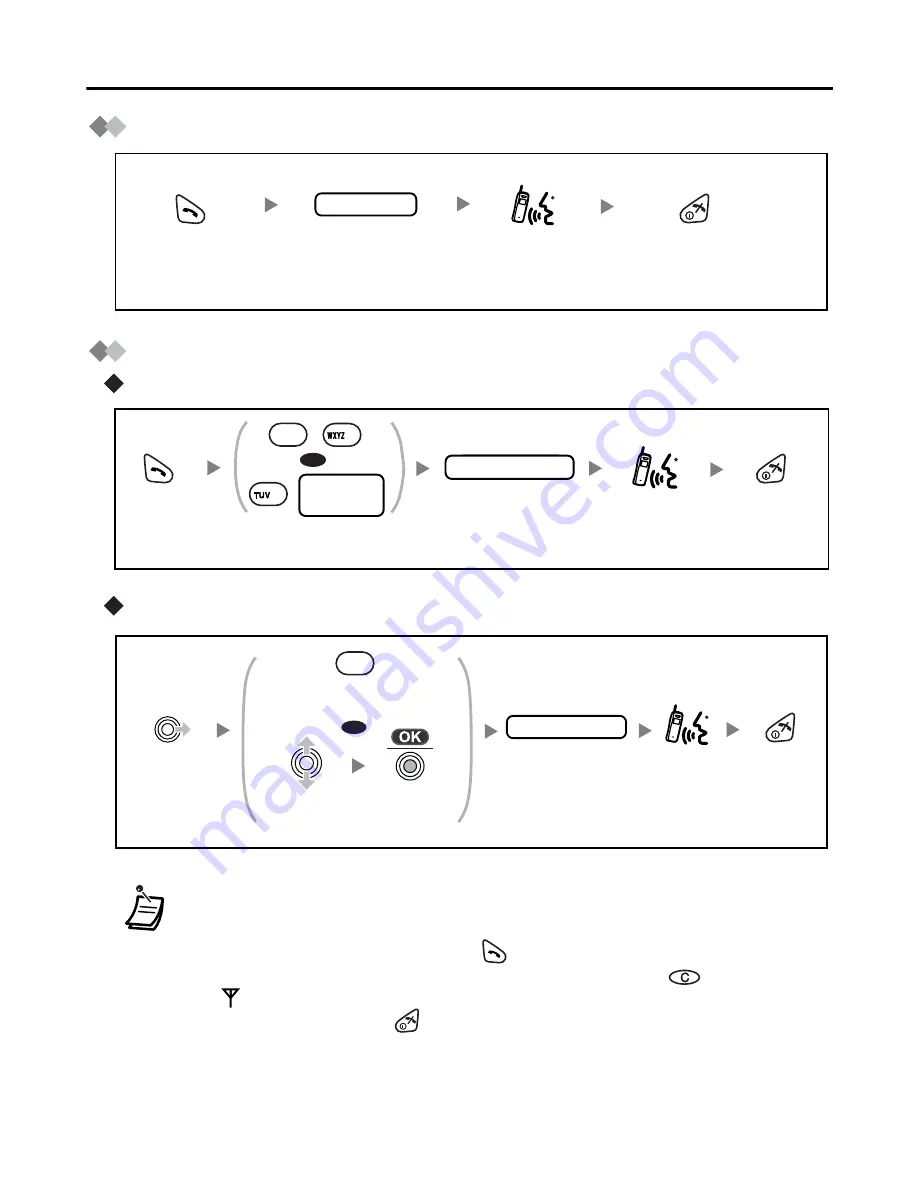
Calling Another Extension

Calling an Outside Party

Using the line access numbers

Using Flexible CO keys

• * The line access number (default) varies depending upon Country/Area. 

Consult your dealer for more details.

• You can confirm a number was dialled correctly before calling (

Predialling

) by 

entering the number, then pressing 

.

• To clear an entire number while predialling, press and hold 

.

• If “

” flashes, move closer to the Cell Station and dial again.

• To cancel dialling, press 

.

extension no.

Dial the extension

number. 

Press CANCEL. 

Talk.

Press 

TALK.


Dial the outside
phone number.

phone no.

outside phone no.

Press
CANCEL. 

Talk.

Press

TALK.


OR

Enter the line 
access number.

8

CO line 

group no.

9

0

/

*

Press 
CANCEL .

Move the
Joystick
RIGHT.

Select the 

idle CO key.  

Press the idle CO
key number (1-3).

OR

Talk.

outside phone no.

Dial the outside
phone number.

X

Press the
Joystick.

Summary of Contents for KX-TCA155

Page 1: ...Portable Station Please read this manual carefully before using this product and save this manual for future use This manual is designed to be used with the KX TCA155 DECT Portable Station and a Panasonic KX TDA series Business Telephone System Charge the battery for about 7 hours before initial use 7 1 0 3 6 2 4 8 9 5 ...

Page 2: ...cting the Display Language 14 Making Calls 15 Calling Another Extension 15 Calling an Outside Party 15 Using the Call Log 16 Using the Phonebook 17 Hot Key Dial 19 Receiving Calls 20 Intercom Calls Outside Calls Group Calls 20 Temporary Ringer Volume Adjustment 20 Caller ID 21 During a Conversation 22 Transferring a Call 22 Holding 22 Turning the Microphone On Off 23 Using the Phonebook 24 Handset...

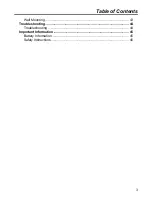
Page 3: ...Table of Contents 3 Wall Mounting 43 Troubleshooting 44 Troubleshooting 44 Important Information 45 Battery Information 45 Safety Instructions 46 ...

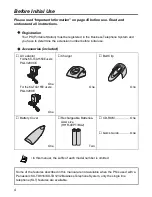
Page 4: ...ries included j AC adaptor For the KX TCA155CE users PQLV200CE One For the KX TCA155E users PQLV200E One j Charger One j Belt Clip One j Battery Cover One j Rechargeable Batteries AAA size HHR 4EPT BA2 Two j CD ROM One j Quick Guide One In this manual the suffix of each model number is omitted Some of the features described in this manual are not available when the PS is used with a Panasonic KX T...

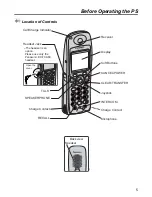
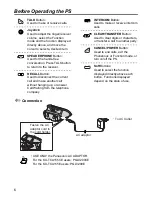
Page 5: ...8 9 5 Receiver Display TALK SPEAKERPHONE Charge Contact Soft Buttons CANCEL POWER Charge Contact CLEAR TRANSFER Joystick INTERCOM Call Charge Indicator Headset Jack RECALL Microphone Back view Speaker The headset is an option Please use only the Panasonic KX TCA89 headset Open the cover ...

Page 6: ...hanging up or answer Call Waiting from the telephone company INTERCOM Button Used to make or receive intercom calls CLEAR TRANSFER Button Used to clear digits or characters or transfer a call to another party CANCEL POWER Button Used to end calls exit the Phonebook or Function mode or turn on off the PS Soft Buttons Used to select the function displayed directly above each button Functions display...

Page 7: ...charged Please charge the batteries for about 7 hours before initial use When you replace the batteries the positive end should be removed first When the battery has been completely charged the charge indicator will change from red to green Refer to Battery Information on page 45 It is normal for the PS and charger to feel warm while the battery is charging Keep devices sensitive to magnetic field...

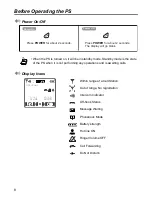
Page 8: ...ny operations and is awaiting calls Within range of a Cell Station Out of range No registration Intercom Indicator Off hook Status Message Waiting Phonebook Mode Battery strength Hot line ON Ringer Volume OFF Call Forwarding Do Not Disturb Press POWER for about 2 seconds Press POWER for about 2 seconds The display will go blank Power On Power Off 3 Jul 10 08 301 Paul ...

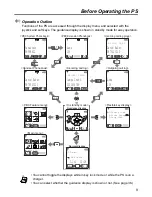
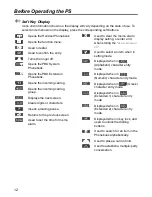
Page 9: ...elect whether the guidance display is shown or not See page 36 1 Single line 2 Trunk Group 3 Loop line 02 JUL 14 59 James Smith 0123456789 David Baker 9876543210 Anne 103 01 JUL 15 03 David Baker 9876543210 Main menu PBX Feature menu Flexible key display Outgoing call log Incoming call log Handset Phonebook Incoming call log group Guidance display In standby mode Normal display 301 Paul New Calls ...

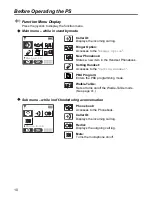
Page 10: ... Option Accesses to the Ringer Option New Phonebook Stores a new item in the Handset Phonebook Setting Handset Accesses to the Setting Handset PBX Program Enters the PBX programming mode Walkie Talkie Sets or turns on off the Walkie Talkie mode See page 41 Phone book Accesses to the Phonebook Caller ID Displays the incoming call log Redial Displays the outgoing call log Mute Turns the microphone o...

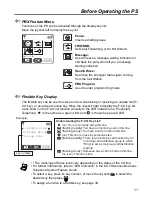
Page 11: ...dio signal coming from the Cell Station PBX Program Used to enter programming mode The meanings of these icons vary depending on the status of the CO line For further information refer to LED Indication in the KX TDA series Business Telephone System Feature Guide To select a key press its key number or move the Joystick to select the desired key then press To assign a function to a flexible key se...

Page 12: ...or characters Inserts a dialling pause Returns to the previous screen Used to set the time for memo alarm Used to clear the memo alarm display setting or enter an X when storing the Line Access CD Used to select an item when in setting mode Displayed when in Alphabetic character entry mode Displayed when in Numeric character entry mode Displayed when in Greek character entry mode Displayed when in...

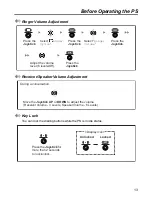
Page 13: ...Press the Joystick Select Ringer Option Press the Joystick Select Ringer Volume Adjust the volume level 6 levels Off Press the Joystick Press the Joystick During a conversation Move the Joystick UP or DOWN to adjust the volume Receiver Volume 3 Levels Speaker Volume 6 Levels Press the Joystick for more than 2 seconds to lock unlock Unlocked Display icon Locked ...

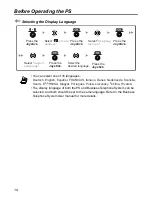
Page 14: ... same language Refer to the Business Telephone System User manual for more details Press the Joystick Select Setting Handset Press the Joystick Press the Joystick Select Display Option Select Select Language Press the Joystick Press the Joystick Select the desired language Deutsch English Español FRANCAIS Italiano Dansk Nederlands Svenska Suomi E HNIKA Magyar Português Polski slovensky eština Hrva...

Page 15: ... then pressing To clear an entire number while predialling press and hold If flashes move closer to the Cell Station and dial again To cancel dialling press extension no Dial the extension number Press CANCEL Talk Press TALK Dial the outside phone number phone no outside phone no Press CANCEL Talk Press TALK OR Enter the line access number 8 CO line group no 9 0 Press CANCEL Move the Joystick RIGH...

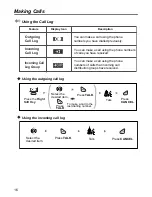
Page 16: ...a call using the phone numbers of calls you have received Outgoing Call Log Incoming Call Log You can make a call using the phone numbers of calls that incoming call distribution groups have received Incoming Call Log Group To make a call to the last dialling number Select the desired item Press TALK Press TALK Press the Right Soft Key Press CANCEL Talk OR Talk Select the desired item Press TALK P...

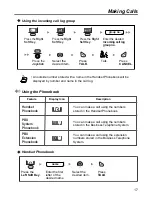
Page 17: ...ft Key Press the Right Soft Key Select the desired item Press the Joystick group no Description Feature Display Icon Handset Phonebook PBX System Phonebook PBX Extension Phonebook You can make a call using the extension numbers stored in the Business Telephone System You can make a call using the numbers stored in the Handset Phonebook You can make a call using the numbers stored in the Business T...

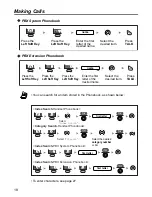
Page 18: ...d name Select the desired item Press TALK name Press the Left Soft Key Press the Left Soft Key Enter the first letter of the desired name Select the desired item Press TALK Press the Left Soft Key Index Search PBX System Phonebook first letter Index Search Handset Phonebook first letter Select Index Search Category Search Handset Phonebook Select Category Index Search PBX Extension Phonebook first...

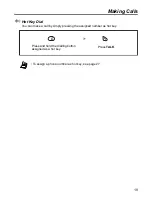
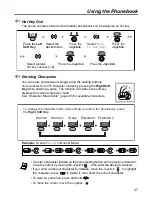
Page 19: ...Calls 19 Hot Key Dial You can make a call by simply pressing the assigned number as hot key To assign a phone number as hot key see page 27 Press and hold the dialling button assigned as a hot key Press TALK X ...

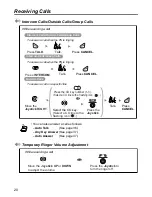
Page 20: ...e Joystick RIGHT Talk Press the CO key number 1 3 OR Intercom Calls Outside Calls Group Calls Intercom Calls Group Calls Outside Calls While receiving a call Select a CO line with a flashing icon To answer a call when the PS is ringing To answer a call on a specific line To answer a call when the PS is ringing Select the CO key Select a CO line with a flashing icon Press the Joystick X Press the J...

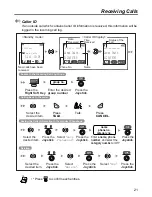
Page 21: ...ame Phone No Access to the Incoming Call Log Group group no Select the desired item Press the Joystick Select Save Phonebook Press the Joystick Press the Joystick Press the Joystick Select the desired item Select the desired item Select Delete Press the Joystick Select Yes Calling back to the caller Saving the Caller Information in the Handset Phonebook Deleting Talk Press TALK Press CANCEL 301 Pa...

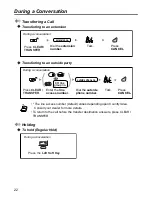
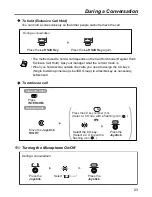
Page 22: ...onsult your dealer for more details To return to the call before the transfer destination answers press CLEAR TRANSFER extension no Dial the extension number During a conversation Talk Press CANCEL Press CLEAR TRANSFER outside phone no Dial the outside phone number Talk During a conversation Enter the line access number OR Press CANCEL Press CLEAR TRANSFER 8 CO line group no 9 0 Press the Left Sof...

Page 23: ...When you hold several outside line calls you need to assign the CO keys Single line Group line Loop Line ICD Group to a flexible key as necessary beforehand Press the Left Soft Key again Press the Left Soft Key During a conversation Move the Joystick RIGHT Select the CO key Select a CO line with a flashing icon Press the CO key number 1 3 Select a CO line with a flashing icon OR Press INTERCOM Int...

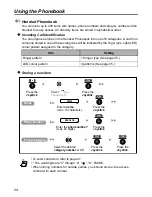
Page 24: ...ED colour pattern assigned to the category Storing a new item Item Setting Ringer pattern 15 ringer type See page 35 LED colour pattern 3 patterns See page 35 To enter characters refer to page 27 The valid digits are 0 through 9 PAUSE When storing numbers for outside parties you should store a line access number with each number Press the Joystick Press the Joystick Press the Joystick name Press t...

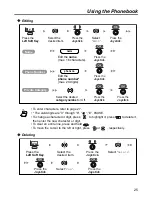
Page 25: ...t or right press or respectively name phone no Select the desired category number or Off Edit the phone number max 24 digits Edit the name max 16 characters Select the desired item Press the Left Soft Key Press the Joystick Press the Joystick Press the Joystick Press the Joystick Press the Joystick Press the Joystick Select Edit Name Phone Number Private Category Press the Left Soft Key Select Yes...

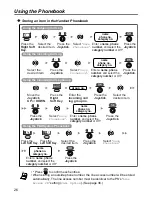
Page 26: ...ncoming Call Log Press the Joystick Press the Joystick Press the Right Soft Key Using the Incoming Call Log Group Move the Joystick UP or DOWN Enter the incoming call log group no Press the Joystick Press the Joystick Select Save Phonebook Select Save Phonebook group no Press the Left Soft Key Using the PBX System Phonebook Press the Left Soft Key Press the Joystick Select the desired item name ph...

Page 27: ...on the same dialling button as the previous character move the cursor by moving the Joystick then enter the desired character If you enter a different character by mistake move the Joystick to highlight the character press to delete it then enter the correct character To clear an entire line press and hold To move the cursor move the Joystick Press the Left Soft Key Press the Joystick Press the Jo...

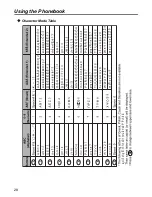
Page 28: ...Using the Phonebook 28 Character Mode Table ...

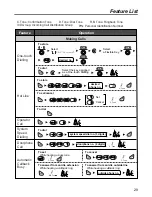
Page 29: ...callback ring While hearing a callback ring To answer from an idle extension To answer from an idle outside line outside phone no system speed dial no 3 digits To dial To store desired no Select PBX Program Select a Flexible Key desired phone no To set cancel To dial To store Set Cancel C Tone C Tone C Tone C Tone R B Tone C Tone Confirmation Tone PIN Personal Identification Number D Tone Dial Ton...

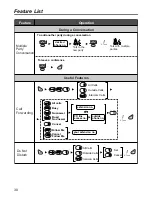
Page 30: ... extension no Cancel Follow Me All Calls Outside Calls Intercom Calls Do Not Disturb All Calls Outside Calls Intercom Calls Set Cancel OR C Tone C Tone 0 1 2 0 0 2 2 3 4 5 7 8 0 During a Conversation Multiple Party Conversation desired phone no To leave a conference To add another party during a conversation Talk to the new party Talk with multiple parties C Tone 1 1 1 7 1 7 ...

Page 31: ... digits To page To answer Wait for an answer Announce OR C Tone C Tone Set To set cancel for outside calls To set cancel for intercom calls No call No tone Tone Call Pickup Group Directed extension no group no 2 digits Sending a Call Waiting Tone While hearing a busy tone Wait for an answer C Tone C Tone C Tone 1 1 4 1 0 0 1 0 1 4 3 7 3 3 3 3 7 2 4 ...

Page 32: ...waiting indication extension no When the called extension is busy or does not answer To call back OR OR For Log in For Log out Log in Log out ICD Group extension no Extension Setting Clear All Specified Absent Message message no 1 9 To set To cancel parameter if required Extension Lock To lock extension PIN max 10 digits To unlock C Tone C Tone C Tone C Tone C Tone C Tone C Tone C Tone 0 1 1 3 5 6...

Page 33: ... list as follows To return to the previous menu press To cancel press at any time The unit will beep to indicate that the new settings have been saved Press the Joystick Press the Joystick Select Setting Handset Select the desired main item Select the desired sub item Press the Joystick Follow the setting setting Press the Joystick Press the Joystick ...

Page 34: ...e INT Ringer Type Group Ring Type Select Language LED Colour Private Colour Category Name Hot Line Mode Line Access CD Registration Select Base Register H set Cancel Base Caller ID Disp Other Option Change H S PIN Auto Talk Reset Handset Any Key Answer Auto Answer Auto Ans Delay Flex Key Edit Private Ring Memo Alarm Setting Handset Charger LCD Contrast Guidance ...

Page 35: ...uages Call Type Ext Ring Int Ring Group Ring Select a Category Select a Category Colour Green Red Orange Colour Green Red Orange 4 Display Type Base Number Handset Number Handset Name Base H S No Off 15 Ringer Types Adjusts the ringer volume Turns the key tone off or on Selects the display in standby mode Selects the display language Selects the LED colour for each type of call intercom call outsi...

Page 36: ...d Caller ID Disp Register H set Display Option Call Option Registration Hot Line Mode Line Access CD Select Base H S Phonebook PBX Setting Stores a phone number to make a call by pressing TALK Not stored Hot Line No Enter Phone no Base no Base PIN Personal Identification Number Auto Base no Select a number Enter the code On Off Registers a Handset with a base unit 0000 Change H S PIN Other Option ...

Page 37: ...When set to ON allows you to answer a call by pressing any dial button 6 sec Auto Ans Delay 5 20 sec Selects the number of seconds before a call is automatically answered when Auto Answer is turned on Auto Answer 2 Call Type Internal Only Int External Off Selects the type of calls to be answered by AUTO ANSWER Flex Key Edit See page 39 Allows you to assign a function to a flexible key and use the ...

Page 38: ...rm Press the Joystick Press the Joystick Select the Alarm mode Off Once Daily Select Setting Handset Select the alarm number 1 3 Press the Joystick date time Press the Joystick Press the Joystick Enter memo Once Enter date and time Daily Enter time When Once Daily is selected memo Press the Joystick Press the Joystick Select the ringer type 1 15 Press the Joystick When Off is selected Press CANCEL...

Page 39: ... has already been used first set the key to Not stored as shown below Press the Joystick Press the Joystick Select Other Option Select Flex Key Edit Press the Joystick Select the desired flexible key Press the Joystick Press the Right Soft Key Select the desired item Select Setting Handset Press the Joystick Press the Joystick OR Select PBX Program Select a Flexible Key 2 ...

Page 40: ...on Ringer Volume EXT Ringer Type INT Ringer Type Group Ring Type Private Ring Charger Display Option Standby Display Select Language LED Colour Private Colour Category Name Caller ID Disp LCD Contrast Guidance Other Option Change H S PIN Auto Talk Reset Handset Any Key Answer Auto Answer Auto Ans Delay Flex Key Edit Call Option Hot Line No Hot Line Mode Line Access CD Select Base PBX setting Ringe...

Page 41: ...de and have the same Walkie Talkie group number In Walkie Talkie mode you cannot make or receive a call through the PBX Turning the Walkie Talkie mode on Turning the Walkie Talkie mode off To exit the operation press any time When the Walkie Talkie mode is ON the handset number is displayed followed by Walkie Talkie Press the Joystick Press the Joystick Select Walkie Talkie Select On Press the Joy...

Page 42: ...own unique number To exit the operation press any time A caller can press to call all handsets in the same Walkie Talkie mode group no Press the Joystick Press the Joystick Select Setting Enter the group number 3 digits Press the Joystick handset no Enter the handset number 1 9 Press the Joystick Select Walkie Talkie Press the Joystick Press the Joystick Press INTERCOM Enter the desired handset nu...

Page 43: ...Mounting 1 Connect the AC adaptor to the charger 2 Drive the screws into the wall using the wall template below 3 Mount the charger securely on the screws Cord holder To AC Outlet AC adaptor Charger Screws 28 mm 28 mm ...

Page 44: ...cannot dial The number which you dialled is restricted by the Business Telephone System Consult your dealer The key lock mode is ON To cancel the mode press the Joystick for about 2 seconds See Key Lock on page 13 The radio channel is busy or a radio communication error occurred Try again later Noise is frequently heard Set the PS and CS away from other electrical appliances Move closer to the CS ...

Page 45: ...nversation you can continue the call for one minute then the call will be disconnected automatically Replacing the Batteries If flashes after a few telephone calls even when the batteries have been fully charged it is time to replace the batteries with new ones Before replacing the batteries turn the power off to prevent memory loss Replace the batteries Charge the new batteries for at least 7 hou...

Page 46: ... to maintain the life of the battery as long as possible Ni MH batteries have a kind of memory the memory effect If fully charged batteries are used several times only for 15 minutes in the handset and then recharged the capacity of the batteries will be reduced to 15 minutes due to the memory effect Therefore you should discharge the batteries completely i e use them in the handset until on the d...

Page 47: ...bration or shock 3 Surface Place the charger on a flat surface If the charger is mounted on the wall install it straight For best performance Operating Range 1 The range of operation depends on the topography of your office weather or usage conditions because signals are transmitted between the Cell Station CS and the PS by radio waves 2 Normally you get greater range outdoors than indoors If ther...

Page 48: ...Voice Coding 32 kbps ADPCM CCITT G 721 Transmission Output Max 250 mW The following regulations are applied to the KX TCA155E users only 999 and 112 can be dialled on the apparatus after accessing the CO line for the purpose of making outgoing calls to the BT emergency 999 and 112 services The apparatus is designed to be installed and operated under controlled conditions of ambient temperature and...

Page 49: ...Memo 49 Memo ...
Page 50: ...copy of the original Declaration of Conformity of our products which relates to the R TTE please contact to our web address http doc panasonic tc de Copyright This manual is copyrighted by Panasonic Communications Co Ltd PCC You may print out this manual solely for internal use with this model Except above you may not reproduce this manual in any form in whole or part without the prior written con...

Reviews: