background image

Helpline Tel.No. :U.K. 08700 100 076  R.O.I. 01289 8333

37

Cor

d

less Tel

e

phone

Base Unit Settings

Changing Base Unit PIN

The factory preset is 0000. 

Once you have programmed the base unit PIN, you 

cannot confirm it. We recommend you write down the base unit PIN. If you forget 
it, please consult our Panasonic Customer Care Helpline.  U.K. 08700 100 076 
R.O.I. 01289 8333

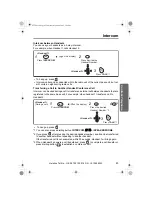
Call Restriction

You can restrict selected handset(s) from dialling selected phone numbers. You can 
assign up to 10 call restriction numbers (up to 8 digits). If you dial a restricted number, 
the call does not connect and the restricted number flashes.

Cancelling Call Restricted Handset(s)

To exit the operation, press 

 any time.

*1 The factory preset is 0000.
*2 The selected handset number flashes.
*3 The selected handset(s) will stop flashing.

Before programming, please follow steps 1 to 2.

Press 

MENU

.

Search/Select 

"Setting Base"

.

"Input Command"

1

2

Current 4-digit Base Unit PIN

New 4-digit Base Unit PIN

New 4-digit Base Unit PIN again to verify

5

3
6

4

5

4-digit Base Unit PIN

*1

Select desired handset.*2

Handset Number

Phone Number

Press 

OFF

.

To continue entering call
restriction numbers, repeat
steps 

7

 and 

8

.

(up to 10 numbers)

OR

Press 

RIGHT

.

6

3

7

8

9

4

5

6

Enter phone 
number to be 
restricted. 
(up to 8 digits)

Press 

RIGHT

.

4-digit Base 
Unit PIN

*1

Select desired handset.*3

Handset Number

6

3

4

5

6

7

Press 

OFF

.

Press 

RIGHT

.

455E.book  Page 37  Thursday, March 20, 2003  7:44 PM

Summary of Contents for KX-TCD455E

Page 1: ...ation Contents Preparation Before Initial Use 2 Important Information 3 Setting up 4 Cordless Telephone Using the Telephone 8 Making Calls 11 Caller ID 12 Phonebook 14 SMS Feature Text Messaging 22 Handset Settings 31 Base Unit Settings 37 Initial Settings 39 Multi unit User Operation 41 Intercom 45 Walkie Talkie 46 Useful Information Before Requesting Help 49 Technical Information 52 Index 53 Gua...

Page 2: ...erceptions as well as high quality digital transmission This telephone was designed for a wide range of applications For example this telephone can be used within a network of base units and handsets constituting a telephone system which operates up to 6 handsets at one base unit allows an intercom between 2 handsets allows the operation of a handset at up to 4 base units expanding the communicati...

Page 3: ...d in rooms where the temperature is less than 5 C or greater than 40 C The AC Adaptor is used as the main disconnect device Ensure that the AC outlet is located installed near the unit and is accessible Battery Caution Use only specified batteries Only use rechargeable batteries Do not mix old and new batteries Do not dispose of batteries in a fire as they may explode Check local waste management ...

Page 4: ...s part should be removed first Do not connect the telephone line cord to the phone socket 4 until the handset is fully charged The AC adaptor must remain connected at all times It is normal for the adaptor to feel warm during use 1 4 3 2 Fasten the AC adaptor cord to prevent it from being disconnected Hook LINE To replace the batteries Press the notch on the cover firmly and slide it as indicated ...

Page 5: ...nt on use and conditions but in general when using fully charged Ni MH batteries 700 mAh Talk time 10hrs approx Standby time 120hrs approx When using Ni Cd batteries 250 mAh Talk time 4hrs approx Standby time 40hrs approx Times indicated are for peak performance The batteries reach peak performance after several full charge discharge cycles The batteries cannot be overcharged unless they are repea...

Page 6: ...ime Do not use non rechargeable batteries If non rechargeable batteries are fitted and start charging it may cause the leakage of the battery electrolyte Please use only Panasonic P03P Ni MH or P03H Ni Cd batteries Symbol Meaning To search for the desired item press UP or DOWN To select the desired item press RIGHT To search for and then select the desired item press UP or DOWN then RIGHT To move ...

Page 7: ...L Button R INT 2 1 3 4 5 6 7 8 9 0 C 5 2 3 4 Charge Contact Charge Contact 7 8 9 10 1 6 11 Display Receiver Microphone Rear side Speaker INT R LINE PAGE Button and Indicator Within range of a base unit Out of range No registration No power on base unit Paging Making or answering calls Battery strength is low Battery strength is high Call Bar On p 34 Direct Call On p 35 Key Lock On p 36 SMS mail ic...

Page 8: ...r clock even if the time has been entered in 12 hour clock 3 For example to set the 16th of February 2003 press Making a Call Pre dialling Post dialling 1 If you need to make a correction press CLEAR The digit is cleared to the left then you can enter numbers All digits are cleared if you press and hold CLEAR 2 You can also press SPEAKERPHONE to make a call Press for more than 2 seconds 2 Press fo...

Page 9: ...g you can temporarily turn off the handset ringer This function will not work when the handset is on the base unit or if an internal call is ringing Receiver Volume Speaker Volume During a call press UP or DOWN to change the receiver speaker volume setting There are 6 levels for speaker volume and 3 levels for receiver volume Press TALK 1 During a call Press OFF Search Select ON or OFF Search Sele...

Page 10: ... and 6 levels for speakerphone volume During a conversation you can switch to hands free by pressing SPEAKERPHONE To switch back to the receiver press TALK or SPEAKERPHONE Turning the Mic On Off During a telephone conversation you can mute the mic When the mic is turned off it disables the caller from hearing your conversation This feature is useful if you want to say something to someone in the s...

Page 11: ... Redial press SPEAKERPHONE again after pressing REDIAL if the muting has not be cancelled 4 Digits are cleared to the left of the flashing digit 5 Digits are added to the left of the flashing digit If you need to clear and or add more than one number repeat from step 4 Press REDIAL 1 Search for the desired dialled item Press TALK 2 Press TALK 3 Press REDIAL 1 1 2 2 3 Press REDIAL 1 Search Select t...

Page 12: ... You can answer the second call keeping the first call on hold Please consult your Network provider for details of this service Caller ID Display When receiving a call the display shows the caller s phone number For example a caller whose phone number is 0123456789 has been received If you store a phone number with a name in the phonebook the display also shows caller s name when receiving a call ...

Page 13: ...call the caller information is stored in the list with a next to it A will also be displayed next to an item after you have viewed it in the caller list 2 You can also press SPEAKERPHONE to make a call 3 Digits are cleared to the left of the flashing digit 4 Digits are added to the left of the flashing digit If you need to clear and or add more than one number repeat from step 3 Press TALK 2 Searc...

Page 14: ...space available If Memory Full is displayed the phonebook is full To store clear other stored items in the phonebook 2 If you need to make a correction press RIGHT or LEFT to move cursor then clear the character digit by pressing CLEAR and or enter characters digits Characters digits are cleared or added to the left of the flashing character digit To enter characters see page 17 3 To continue stor...

Page 15: ...nter letters numbers Items are added to the left of the cursor If the cursor is at the beginning of a line the item is added over the cursor Press to delete characters Characters are deleted to the left of the cursor If the cursor is at the beginning of a line the first character will be deleted Press and hold to delete all characters Press to change between upper and lower case Press to insert a ...

Page 16: ...or a Name by Initial For example Felix The first item is displayed Search for the desired item 1 Press PHONEBOOK 1 2 Alphabet Letter Press Press Symbol Number Telephone number When a name is not stored The first item is displayed Press dialling button repeatedly until the first item under F is displayed Press PHONEBOOK 1 2 Press DOWN until Felix is displayed 3 3 455E book Page 16 Thursday March 20...

Page 17: ...elpline Tel No U K 08700 100 076 R O I 01289 8333 17 Cordless Telephone Phonebook Phonebook Character Table ABC DEF GHI JKL MNO PQRS TUV WXYZ x x x x x á 455E 02 fm Page 17 Tuesday March 25 2003 7 46 PM ...

Page 18: ... to clear or add more than one digit repeat from step 7 6 To continue clearing another caller information repeat from step 2 7 You can also press SPEAKERPHONE to make a call Edit the name 3 Number Edit the phone number 5 Move the cursor Phone Number Name Press OK Press CLEAR 4 Press OK Name Move the cursor Press CLEAR 2 Search Select desired item Press PHONEBOOK 1 Select Edit The 1st character of ...

Page 19: ...LEFT to move cursor then clear a character by pressing CLEAR and or enter characters Characters are cleared or added to the left of the flashing character To enter characters see Phonebook Character Table on page 17 Press REDIAL 2 Pre dialling Redial List Caller ID List Press RIGHT Search Select the desired dialled number Select Save Phonebook Search Select Private Category number 1 9 or OFF 1 2 S...

Page 20: ... the left of the key number If a hot key number with is selected press RIGHT to select Overwrite 3 You can also press SPEAKERPHONE to make a call 4 Phonebook registration will not be erased when hot key registration is cleared Press PHONEBOOK 1 Search Select desired item Search Select Reg To Hot Key Select Save Search Select desired dialling button number 2 1 5 2 3 4 Press and hold the dialling bu...

Page 21: ...ull When copying is completed a beep sounds and Copy Complete is displayed After a few seconds the display will return to the intercom call Copy Incomplete will display if the link is disconnected or if the receiver handset memory is full If Copy Failure is displayed the receiver and or sender did not prepare for copying within 60 seconds Press MENU Press RIGHT Search Select desired item to copy S...

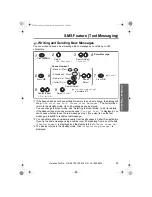
Page 22: ... mobile sender is unaware of the fixed line SMS providers requirements for sending a text message to a fixed line please inform them of the following procedures Example A Mobile is Replying to a Fixed Line Text Message Select reply to message Input your text message Within the text message enter the fixed line phone number The number can be added anywhere within the message but it must be entered ...

Page 23: ... can choose whether to use the last message or not If you want to use the last message press UP to recall the last message 2 You can enter a phone number manually from the phonebook Caller ID or redial lists If you try to send a message using a number over 20 digits long from one of the lists Invalid Number is displayed and the display returns to Enter Phone No 3 The display returns to the standby...

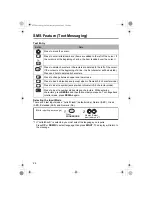
Page 24: ...over the cursor Press to delete characters Characters are deleted to the left of the cursor If the cursor is at the beginning of a line the first character will be deleted Press and hold to delete all characters Press to change between upper and lower case Press to insert a blank space except when in Numeric 0 9 character mode Press to insert a symbol except when in Numeric 0 9 character mode Pres...

Page 25: ...n you sent the message to is over 16 digits long you can view the remaining digits by pressing dialling button Inserting Text in LetterWise Mode Enter the letters of the word you want by pressing dialling button to If the letter displayed is not correct change the letter by pressing possibly several times Continue writing the word always checking that the letters displayed are correct and change t...

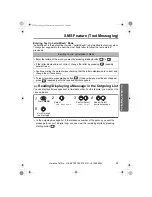
Page 26: ...ng When this message is displayed and any button is pressed the display returns to the standby mode and the icon displayed When the SMS message memory is full the icon will flash quickly No messages can be received if the memory is full Press RIGHT Search Select Send Clear or Edit 7 6 CLEARED Send Follow the steps from 6 on page 23 Clear Edit Follow the steps from 4 on page 23 Press MENU Scroll th...

Page 27: ...ow SMS Lists are full Please clear Messages The most recent sender s details are displayed If the name and number have been stored in the phonebook the name is displayed also As SMS service provider may attach 1 digit number to the sender s phone number the name may not be displayed even if the name and number have been stored in the phonebook 3 If there is a icon placed against the time this mean...

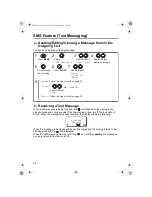
Page 28: ...e programming please follow steps 1 to 2 Press MENU Press MAIL 1 Select Receive List Select SMS Messages 2 OR Search Select desired message Search Select Clear Reply or Edit 4 Press RIGHT 3 CLEARED 1 Reply Follow from step 4 on page 23 Clear Edit Follow from step 4 on page 23 Search Select YES 5 Search Select Save Phonebook Press RIGHT 4 3 5 Then follow from step 3 of Pre dialling or Redial List o...

Page 29: ...number is required to be saved for Message Centre 3 Store the number by following the procedure listed above When the number is saved you then have to select Message Centre 3 in your base unit settings Message Centre 1 is the default To select Message Centre 3 please see below 1 The factory preset is 0000 For your reference these are the numbers that have been preset in your phone Message Centre 1...

Page 30: ...ž Buttons Character Displayed x _ ABC abc DEF def GHI ghi JKL jkl MNO mno PQRS pqrs TUV tuv WXYZ wxyz Buttons Normal ABC Greek ΑΒΓ Extended AÄÅ Numeric 0 9 x _ 1 ABC abc ΑΒΓ A À Á Â Ã Ä Å Æ B C Ç a à á â ã ä å æ b c ç 2 DEF def ΕΖ D E È É Ê Ë V F d e è é ê ë W f 3 GHI ghi ΗΘΙ G A H I Ì Í Î ÏCE g B h i ì í î ï F 4 JKL jkl ΚΛΜ J K L j k l 5 MNO mno Ν Ο M N Ñ O Ò Ó Ô Õ Ö G m n ñ o ò ó ô õ ö ø 6 PQRS ...

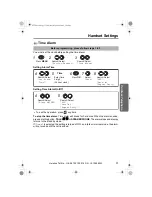
Page 31: ...RPHONE The alarm stops and display returns to the standby mode If Once is selected the setting is turned off When in talk or intercom mode the alarm will not sound until the call is ended Before programming please follow steps 1 to 3 Press MENU Search Select Time Alarm Search Select Setting Handset 1 2 3 Search Select Set Alarm Time Time Enter time 4 digit 24 hour clock Press OK Search Select OFF ...

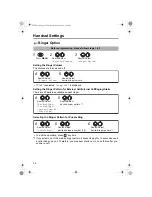
Page 32: ...ps ringing for 10 seconds even if a caller hang up a call Therefore you may hear dial tone or no one there after you answer a call Before programming please follow steps 1 to 3 Press MENU Search Select Ringer Option Search Select Setting Handset 1 2 3 Search Select Ringer Volume Search Select desired ringer volume 4 5 Search Select Ext Ring Type Int Ring Type Paging Type or Alarm Type Search Selec...

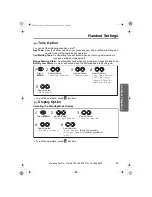
Page 33: ...e out of range of a base unit Battery Low Alarm An alarm will sound when the batteries need to be charged To exit the operation press any time Display Option Selecting the Standby Mode Display To exit the operation press any time Search Select ON or OFF Search Select Key Tone ON OFF Call Waiting Range Alarm or Battery Alarm Press MENU Search Select Tone Option Search Select Setting Handset 1 5 2 3...

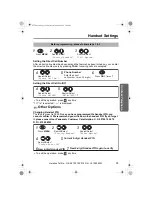
Page 34: ...k data will be saved Call Option Call Bar On Off This allows you to make emergency and internal calls To exit the operation press any time 1 The factory preset is 0000 2 If ON is selected is displayed Before programming please follow steps 1 to 3 Press MENU Search Select Display Option Search Select Setting Handset 1 2 3 Search Select Talk Display Search Select Talk Time Length of the call or Phon...

Page 35: ...mmend you write down the handset PIN If you forget it please consult our Panasonic Customer Care Helpline U K 08700 100 076 R O I 01289 8333 To exit the operation press any time Before programming please follow steps 1 to 3 Press MENU Search Select Call Option Search Select Setting Handset 1 2 3 Search Select Direct Call No Phone Number Enter the direct call number max 24 digits Press OK 3 times 1...

Page 36: ...X such as transferring an extension call Dialling Pause for PBX line long distance service users A dialling pause is used when a pause in the dialling of the phone number is necessary using a PBX or accessing a long distance service EXAMPLE When 9 line access number is dialled followed by a pause to access an outside line through a PBX Entering a pause prevents misdialling when you redial or dial ...

Page 37: ...ancelling Call Restricted Handset s To exit the operation press any time 1 The factory preset is 0000 2 The selected handset number flashes 3 The selected handset s will stop flashing Before programming please follow steps 1 to 2 Press MENU Search Select Setting Base Input Command 1 2 Current 4 digit Base Unit PIN New 4 digit Base Unit PIN New 4 digit Base Unit PIN again to verify 5 3 6 4 5 4 digi...

Page 38: ...ts To exit the operation press any time The factory preset is in shade 1 The factory preset is 0000 2 1 2 stands for 80 msec Before programming please follow steps 1 to 2 Press MENU Search Select Setting Base Input Command 1 2 4 digit Base Unit PIN 1 Press CLEAR Press RIGHT repeatedly until desired call restriction number is displayed Press RIGHT to continue Repeat the steps 5 to 7 to finish 6 3 8...

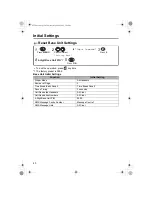
Page 39: ...ern 1 Handset Alarm Tone Pattern 1 Key Tone ON Call Waiting Tone ON Range Warning Alarm OFF Battery Low Alarm ON Standby Mode Display Base unit number Talk Mode Display Length of the Call Display Language English Call Bar OFF Direct Call Mode OFF Direct Call Number Clear 4 Digit Handset PIN 0000 Auto Talk OFF Base Unit Access Automatic Base Unit Access Redial Memory All Clear Handset Receiver Volu...

Page 40: ...of Rings 3 Time Break Earth Recall Time Break Recall Pause Timing 3 seconds Call Restricted Handsets All Clear Call Restriction Numbers All Clear 4 Digit Base Unit PIN 0000 SMS Message Centre Number Message Centre 1 SMS Message Lists All Clear Press OK 4 digit Base Unit PIN 1 Press MENU Press 0 Search Select Setting Base Input Command 0 1 4 5 2 3 455E book Page 40 Thursday March 20 2003 7 44 PM ...

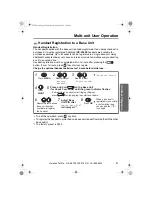
Page 41: ...ss then start over again Charge the optional handset batteries for 7 hours before initial use To exit the operation press any time To register the handset to more than one base unit repeat from step 5 with the other base unit s 1 The factory preset is 0000 Search Select desired base unit number available to register the handset If all registered handsets start ringing Paging press to stop paging t...

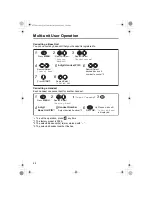
Page 42: ... with 3 The selected handset number flashes Search Select Cancel Base 4 digit Handset PIN 1 Search Select YES or NO Press RIGHT Search Select desired base unit number to cancel 2 4 7 8 5 6 Press MENU Search Select Registration Search Select Setting Handset 1 2 3 4 digit Base Unit PIN 1 Select desired handset 3 Please wait until Setting Base is displayed Handset Number Press OK Press MENU Search Se...

Page 43: ...he factory preset is 0000 2 The selected handset number flashes 3 Press dialling button through to enter the number of rings Before programming please follow steps 1 to 4 Press MENU Search Select Setting Base Input Command 4 digit Base Unit PIN 1 1 1 2 3 4 All handsets mode Press OK 1 5 6 Press desired handset numbers Selected handsets mode Handset Numbers 2 Press OK 2 5 6 7 Selected then all hand...

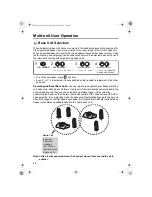
Page 44: ...ndset with up to 4 base units Each base unit forms 1 radio cell If the individual bases are linked to the same telephone line then you can extend the operating range of the system by positioning the bases so that the two radio cells overlap If the handset is set to AUTO base selection then in standby mode the handset will automatically swap to the second base if the range on the first base is exce...

Page 45: ...ers a call to Handset 2 To hang up press 1 You can also press a dialling button INTERCOM t x or SPEAKERPHONE 2 If you press after pressing the desired handset number a call can be transferred to another handset without speaking to another handset If the transferred call is not answered within 30 seconds Handset 1 will ring again 3 When Handset 2 answers a call transferred press to complete a call ...

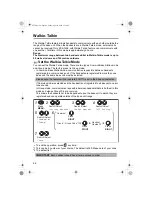
Page 46: ...se unit the same base unit must be selected If Common mode is selected and the handset is not registered to a base unit an error tone sounds In Group mode communication is possible between handsets that are both set to this mode and whose Group ID s are common This allows the handsets not to be dependent upon the base unit to which they are registered and can operate outside of the base unit range...

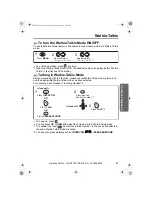
Page 47: ...lkie Talkie mode is turned on and the appropriate Walkie Talkie mode has been selected For example when Handset 1 is calling Handset 2 To hang up press You can press UP or DOWN to adjust the volume while in Walkie Talkie mode 1 The sender can input as a remote internal number In this case all handsets in the same Walkie Talkie mode are called 2 You can also press a dialling button INTERCOM t x or ...

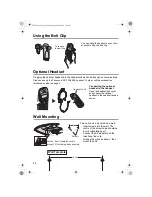
Page 48: ...tional headset to the handset Open the headset jack cover and connect the optional headset to the headset jack as shown This unit can be mounted on a wall Insert screws into the wall The centre of the screw holes should be 8 cm horizontally apart Connect the AC adaptor and the telephone line cord Arrange the wires as shown then mount the unit To remove the belt clip Headset Jack 8 cm Screws Fasten...

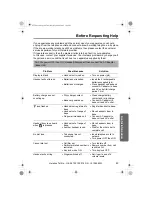
Page 49: ...s not charged Insert the 2 rechargeable batteries supplied p 4 Place handset on base and connect AC adaptor to base and AC outlet full charge period 7 hrs Battery charge icon not counting up Dirty charge contact Base not powered up Clean charge battery contact and retry charge Connect AC adaptor to base unit and AC outlet icon flashes Handset not registered to base Handset out of range of base No ...

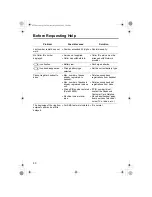
Page 50: ...not register handset to base Max number of bases already registered to handset Max number of handsets already registered to base unit Wrong PIN number entered Default 0000 Electrical noise in local area Delete unused base registrations from handset Delete unused handset registrations from base If PIN number is lost contact the Panasonic Customer Care Helpline Move base handset away from sources of...

Page 51: ... be arranged with Network provider Store the number Wait until the message has been sent before using any other telephone functions Cannot send or receive a message Memory is full Clear messages in the Outgoing Incoming lists Error Code Description FD Could not connect to the SMS Centre Check that you have the correct SMS Centre numbers FE There was a problem sending the message EO Your number is ...

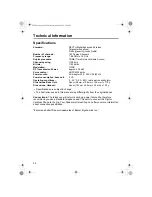
Page 52: ... of Eatoni Ergonomics Inc Standard DECT Digital Enhanced Cordless Telecommunications GAP Generic Access Profile Number of channels 120 Duplex Channels Frequency range 1 88 GHz to 1 9 GHz Duplex procedure TDMA Time Division Multiple Access Channel spacing 1728 kHz Bit rate 1152 kbit s Modulation GFSK RF Transmission Power approx 250 mW Voice coding ADPCM 32 kbit s Power source AC Adaptor 220 240 V ...

Page 53: ...ng a Handset 42 Clock Date 8 Conference Call 45 Dialling Pause 36 Direct Call Number 35 Display Standby Mode 33 Talk Mode 34 Guarantee 54 Handset Display 7 Initial Settings 39 Locator 10 Paging 10 PIN 35 Registration 41 Reset 39 Ringer 32 Intercom 45 Key Lock 36 Tone 33 Making Calls Calling Back 13 Redialling 11 with the Phonebook 18 Phonebook Hot Key 20 Storing 14 19 Power On Off 8 Range Warning ...

Page 54: ...onsistent with the technical and or safety standards required in the country where this appliance is used or to damage occurred during transit to or from the purchaser 4 If at any time during the guarantee period any part or parts of the appliance are replaced with a part or parts not supplied or approved by us or of an objective quality safe and suitable for the appliance or the appliance has bee...

Page 55: ...455E book Page 55 Thursday March 20 2003 7 44 PM ...

Page 56: ... Name and address of dealer Attach or keep original receipt to assist with any repair under warranty Customer Care Helpline Tel No U K 08700 100 076 R O I 01289 8333 1999 5 EC This equipment is designed for use on the United Kingdom only In the event of problem you should contact your equipment supplier in the first instance Technical specifications are subject to change Sales Department Panasonic...

Reviews: