1.6
Programming Example
Programming Instructions
23
1.6
Programming Example
Programming Example
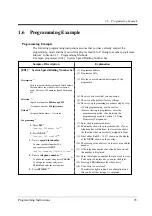
The following programming instructions assume that you have already entered the
programming mode and that you will employ method (b) of "Going to another programme
address" in Section 1.3
Example: programme [001]
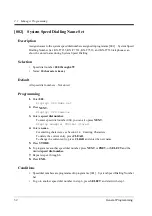
System Speed Dialling Number Set
Description
Used to program the System Speed Dial numbers.
These numbers are available to all extension
users. There are 500 numbers from 000 through
499.
Selection
•
Speed dial number: 000 through 499
•
Telephone number: 24 digits (max.)
Default
All speed dial numbers – Not stored
Programming
1. Enter 001.
Display: SPD Number Set
2. Press NEXT.
Display: SPD Code?
→
3. Enter a speed dial number.
To enter speed dial number 000,
you can also press NEXT.
Display example: 000:Not Stored
4. Enter a telephone number.
To delete the current entry, press CLEAR.
To change the current entry, press
CLEAR and enter the new number.
5. Press STORE.
System Speed Dialling Number Set
(2)
(3)
(4)
(5)
(6)
(7)
(8)
(9)
(10)
(11)
(12)
(13)
(14)
[001]
(1)
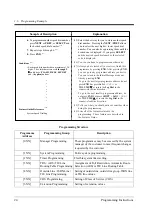
(1) Programme address.
(2) Programme title.
(3) Provides a more detailed description of the
programme.
(4) Shows you choices that you can assign.
(5) Shows you the default (factory setting).
(6) Shows you programming procedures step by step.
•
While programming, use the overlay.
•
Before starting to programme, enter the
programming mode. (See Entering the
programming mode in Section 1.2 Using
Proprietary Telephones.)
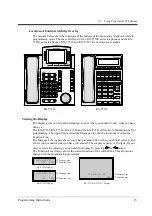
Sample of Description
Explanation
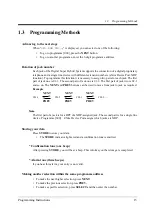
(7) Enter the programme address.
(8)
(9)
The display shows the programme title. If your
telephone has soft buttons, the lower line shows
the functions that are currently assigned to them.
Press either Soft 3
(NEXT)
shown on the display
or the NEXT shown on the overlay.
(10) The message line advises you to enter a speed dial
number.
(11) If the telephone number has already been stored,
the number is displayed.
(12) Enter the telephone number that you want to store.
Your entry is displayed as you enter the digits.
(13) Pressing CLEAR erases the whole entry.
(14) Your entry is now stored.
The indicator lights red and a confirmation tone
lets you know that storage is completed.
Summary of Contents for KX-TD1232JT
Page 2: ...2...
Page 9: ...Programming Instructions 9 Section 1 Programming Instructions...
Page 26: ...1 6 Programming Example 26 Programming Instructions...
Page 27: ...General Programming 27 Section 2 General Programming...
Page 48: ...2 1 Manager Programming 48 GeneralProgramming Features Guide References Emergency Call...
Page 62: ...2 2 System Programming 62 GeneralProgramming Features Guide References Quick Dialling...
Page 194: ...2 8 Resource Programming 194 GeneralProgramming Features Guide References Background Music BGM...
Page 221: ...ISDN Programming 221 Section 3 ISDN Programming...
Page 270: ...3 3 ISDN Line Programming 270 ISDN Programming Multiple Subscriber Numbers MSN Ringing Service...
Page 289: ...E M Programming 289 Section 4 E M Programming...
Page 304: ...4 4 TIE Line Programming 304 E M Programming Features Guide References E M TIE Line Service...
Page 307: ...4 4 TIE Line Programming E M Programming 307 Features Guide References E M TIE Line Service...
Page 311: ...4 4 TIE Line Programming E M Programming 311 Features Guide References E M TIE Line Service...
Page 332: ...4 6 Optional Programming 332 E M Programming...
Page 333: ...DECT Programming 333 Section 5 DECT Programming...
Page 356: ...5 3 Extension Programming 356 DECT Programming Extension Group...
Page 367: ...5 3 Extension Programming DECT Programming 367 Connected Line Identification Presentation COLP...
Page 383: ...Default Values 383 Section 6 Default Values...
Page 395: ...Index 395 Section 7 Index...
Page 401: ......

