background image

2.11  Starting the PBX

2.11.1  Starting the PBX

Before Starting the PBX

Before starting the PBX, please pay attention to the following:

Notice

The SD Memory Card must be inserted in the SD Memory Card slot of the DMPR card before startup.

Starting the PBX

CAUTION

Use only the AC power cord included with the PBX for the PSU.

Before touching the System Initialise Switch, discharge static electricity by touching ground or wearing
an earthing strap.

Once you have started the PBX and if you unplug the PBX, do not perform the following procedures
to start the PBX again. Otherwise, your programmed data is cleared. To restart the PBX, refer to
"4.1.4  Using the Reset Button".

The power supply cord is used as the main disconnect device. Ensure that the AC outlet is located
near the equipment and is easily accessible.

Note

The PBX will continue to be powered even if the power switch is turned "OFF".

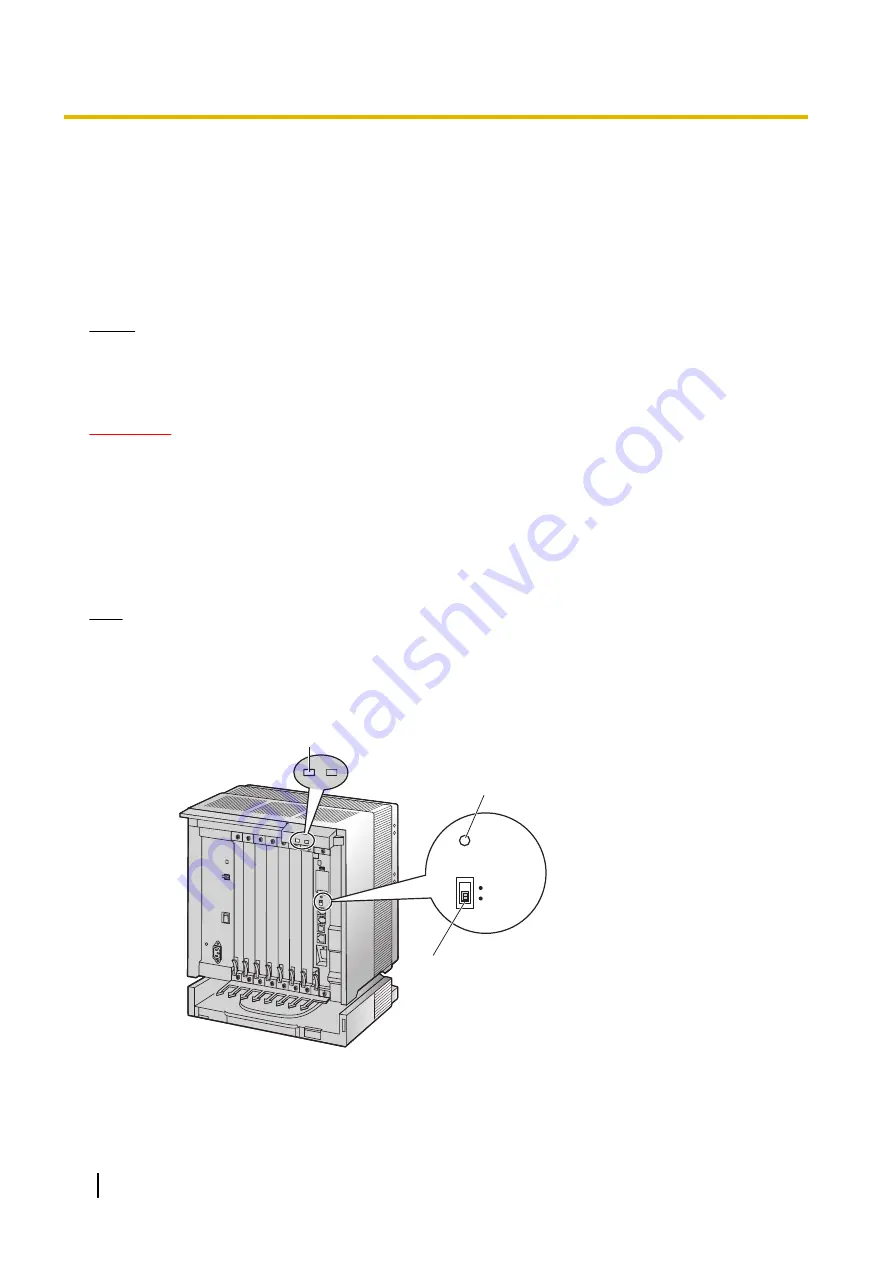
System Initialisation Procedure

1.

Slide the System Initialise Switch to the "INIT" position.

RESET

INIT

NORMAL

System Initialise Switch

Reset Button

RUN Indicator

134

Installation Manual

2.11.1 Starting the PBX

Summary of Contents for KX-TDA150

Page 1: ...n Manual Thank you for purchasing a Panasonic Hybrid IP PBX Please read this manual carefully before using this product and save this manual for future use KX TDA150 PDMPR Software File Version 5 1000 or later SD Logo is a trademark of SD 3C LLC ...

Page 2: ...TDA0288 8 Port BRI Card BRI8 KX TDA0290CE CJ PRI Card PRI30 KX TDA0290 PRI Card PRI23 KX TDA0484 4 Channel VoIP Gateway Card IP GW4E KX TDA0490 16 Channel VoIP Gateway Card IP GW16 KX TDA1180 8 Port Analogue Trunk Card with CID CLCOT8 KX TDA1186 8 Port Analogue Trunk with Caller ID Daughter Card CLCOT8E Extension Cards KX TDA0143 4 Cell Station Interface Card CSIF4 KX TDA0144 8 Cell Station Interf...

Page 3: ...ortable Station KX TDA0156CE 4 Channel Cell Station Unit Using a CSIF Card for DECT Portable Station KX TDA0158CE 8 Channel High density Cell Station Unit Using a DLC Card PT interface CS for DECT Portable Station Proprietary Equipment KX A228 Back up Battery Cable KX A258 Blank Slot Cover KX T30865 Doorphone KX T7765 Equipment Compatibility Compatible Panasonic Proprietary Telephones The PBX supp...

Page 4: ...d systems connected to this product proper operation and compatibility with services provided by telecommunications companies over connected networks Note Some optional hardware software and features are not available in some countries areas Please consult your certified Panasonic dealer for more information In this manual the suffix of each model number e g KX TDA150BR is omitted unless necessary...

Page 5: ...ng Do not use the product near water for example near a bathtub wash bowl kitchen sink or laundry tub in a wet basement or near a swimming pool Avoid using wired telephones during an electrical storm There is a remote risk of electric shock from lightning Do not use a telephone in the vicinity of a gas leak to report the leak SAVE THESE INSTRUCTIONS Installation Manual 5 Important Safety Instructi...

Page 6: ...ables used If outlets power strips extension cords etc are used in a manner that exceeds their rated capacity they emit large amounts of heat which could cause a fire Unplug the product from the wall outlet and have it serviced by qualified service personnel in the following cases a When the power supply cord or plug is damaged or frayed b If liquid has been spilled into the product c If the produ...

Page 7: ...so may cause the PBX to malfunction due to static electricity When driving the screws into the wall be careful to avoid touching any metal laths wire laths or metal plates in the wall When relocating the equipment first disconnect the telecom connection before disconnecting the power connection When the unit is installed in the new location reconnect the power first and then reconnect the telecom ...

Page 8: ...be retrieved from it 6 To prevent data leakage render the SD Memory Card physically unusable before disposal 7 When user information is sent from the PBX to a PC or other external device the confidentiality of that information becomes the responsibility of the customer Before disposing of the PC or other external device ensure that data cannot be retrieved from it by formatting the hard disk and o...

Page 9: ...wiring code as shown below If in any doubt please consult a qualified electrician WARNING This appliance must be earthed IMPORTANT The wires in the mains lead are coloured as follows Green and yellow Earth Blue Neutral Brown Live As the colours of the wires in the mains lead of this apparatus may not correspond with the coloured markings identifying the terminals in your plug proceed as follows Th...

Page 10: ...te in accordance with national legislation For business users in the European Union If you wish to discard electrical and electronic equipment please contact your dealer or supplier for further information Information on Disposal in other Countries outside the European Union These symbols are only valid in the European Union If you wish to discard these items please contact your local authorities ...

Page 11: ...st be removed Follow the applicable laws regulations and guidelines in your country area regarding disposal of batteries When replacing a battery use only the same battery type or an equivalent recommended by the battery manufacturer Installation Manual 11 Precaution ...

Page 12: ... all basic optional and programmable features of the PBX PC Programming Manual Provides step by step instructions for performing system programming using a PC PT Programming Manual Provides step by step instructions for performing system programming using a PT User Manual Provides operating instructions for end users using a PT SLT PS or DSS Console About the software version of your PBX The conte...

Page 13: ...rocessing Card 60 2 3 1 DMPR Card 60 2 3 2 RMT Card KX TDA0196 62 2 4 Information about the Trunk Cards 63 2 4 1 LCOT4 Card KX TDA0183 LCOT8 Card KX TDA0180 LCOT16 Card KX TDA0181 and CLCOT8 Card KX TDA1180 63 2 4 2 DID8 Card KX TDA0182 65 2 4 3 CID PAY8 Card KX TDA0189 67 2 4 4 CID8 Card KX TDA0193 68 2 4 5 CLCOT8E Card KX TDA1186 69 2 4 6 E M8 Card KX TDA0184 70 2 4 7 T1 Card KX TDA0187 72 2 4 8...

Page 14: ... 122 2 8 1 Connection of Doorphones Door Openers External Sensors and External Relays 122 2 9 Connection of Peripherals 125 2 9 1 Connection of Peripherals 125 2 10 Power Failure Connections 130 2 10 1 Power Failure Connections 130 2 11 Starting the PBX 134 2 11 1 Starting the PBX 134 3 Guide for the Maintenance Console 137 3 1 Overview 138 3 1 1 Overview 138 3 2 PC Connection 139 3 2 1 PC Connect...

Page 15: ...Section 1 System Outline This section provides general information on the PBX including the system capacity and specifications Installation Manual 15 ...

Page 16: ...tains a power supply unit PSU and a DMPR card for starting and controlling the PBX To use the system install optional service cards in the basic shelf Construction of the Basic Shelf A PSU B Slots for Expansion C DMPR Card C B A 16 Installation Manual 1 1 1 Basic Shelf ...

Page 17: ...unk Telephone Company Lines Analogue BRI PRI T1 E1 PBX SLT CS PS Wireless Phone Fax Machine PC USB DPT ISDN Telephone Amplifier SLT DPT DSS Console KX T7600 KX T7600 External Sensor External Relay Device Router Private IP Network PC IP Softphone CTI Server PC PC IP PT PC USB KX DT346 KX DT343 KX DT300 KX DT300 Installation Manual 17 1 1 2 System Connection Diagram ...

Page 18: ...k E1 Line E1 Line Digital Trunk Digital Trunk E1 Line Digital Trunk E1 KX TDA0188 T1 KX TDA0187 E M Line E M Line E M Line E M8 KX TDA0184 DID8 KX TDA0182 PSU Installed by default LCOT4 KX TDA0183 OPB3 KX TDA0190 DPH4 KX TDA0161 DPH2 KX TDA0162 ECHO16 KX TDA0166 MSG4 KX TDA0191 ESVM2 KX TDA0192 ESVM4 KX TDA0194 EIO4 KX TDA0164 Voice Processing System CS PS CSIF4 KX TDA0143 CSIF8 KX TDA0144 PC LAN ...

Page 19: ...6 16 port digital extension card for DPTs DSS consoles and PT interface CSs KX TDA0180 8 Port Analogue Trunk Card LCOT8 8 port analogue trunk card with 2 power failure transfer PFT ports KX TDA0181 16 Port Analogue Trunk Card LCOT16 16 port analogue trunk card with 4 power failure transfer PFT ports KX TDA0182 8 Port DID Card DID8 8 port DID trunk card KX TDA0183 4 Port Analogue Trunk Card LCOT4 4...

Page 20: ...8 port ISDN Basic Rate Interface card with 1 power failure transfer port EURO ISDN ETSI compliant KX TDA0290CE KX TDA0290CJ PRI Card PRI30 1 port ISDN Primary Rate Interface card 30B channels EURO ISDN ETSI compliant KX TDA0290 PRI Card PRI23 1 port ISDN Primary Rate Interface card 23B channels NI North American standard ISDN protocol compliant KX TDA0410 CTI Link Card CTI LINK Ethernet card for C...

Page 21: ...fer PFT ports Maximum power output of 90 V for Message Waiting Lamp control KX TDA1180 8 Port Analogue Trunk Card with CID CLCOT8 8 port analogue trunk card with Caller ID and 2 power failure transfer PFT ports Caller ID signal type FSK FSK with Call Waiting Caller ID Visual Caller ID DTMF compatible KX TDA1186 8 Port Analogue Trunk with Caller ID Daughter Card CLCOT8E 8 port analogue trunk daught...

Page 22: ...k Loop Limit 1600 W maximum Operating Environment Temperature 0 C to 40 C Humidity 10 to 90 non condensing Conference Call Trunk From 10 3 party conference call to 4 8 party conference call Music on Hold MOH 2 ports Level Control 11 dB to 11 dB in 1 dB steps MOH1 External Music Source port MOH2 Selectable Internal External Music Source port Paging Internal Level Control 15 dB to 6 dB in 3 dB steps...

Page 23: ...Weight when fully mounted Under 12 kg Installation Manual 23 1 3 1 General Description ...

Page 24: ... Internal ISDN Mode Supply Voltage 40 V Power Supply BRI4 4 5 W per 1 line 9 W per 4 lines Power Supply BRI8 4 5 W per 1 line 9 W per 8 lines Power Supply Method Phantom Power Supply Door Opener Current Limit 24 V DC 30 V AC 1 A maximum External Relay Current Limit 24 V DC 30 V AC 1 A maximum External Sensor Current Limit Power to the external sensor is provided from the EIO4 card and must be grou...

Page 25: ...xceeds the capacity of the PBX will be ignored When the PBX starts up with an invalid configuration some cards will be ignored Cards Installed in the Slots of the PBX A B A Free Slots 1 to 7 from the left B DMPR Card Slot The following number of optional service cards can be installed in the various slots of the PBX Card Type Maximum Number Installed in DMPR 1 DMPR Card Slot Installation Manual 25...

Page 26: ...3 PRI30 IP GW4E 4 IP GW16 Extension Card Total 7 Free Slots 1 to 7 DLC8 7 DLC16 MCSLC16 IP EXT16 MCSLC24 5 CSIF4 4 CSIF8 OPB3 4 CTI LINK 1 1 When installing T1 E1 PRI30 or PRI23 cards make sure that the number of these cards 2 the number of other cards including IP GW4E cards does not exceed 8 26 Installation Manual 1 3 3 System Capacity ...

Page 27: ...e specified other optional service cards Card Type Maximum Number Mounted on RMT 1 DMPR Card CID PAY8 14 LCOT8 Card LCOT16 Card CID8 CLCOT8E 7 CLCOT8 Card DPH4 4 OPB3 Card DPH2 8 ECHO16 2 1 MSG4 4 ESVM2 ESVM4 EIO4 4 1 Only 1 ECHO16 card can be mounted on each OPB3 card Installation Manual 27 1 3 3 System Capacity ...

Page 28: ...wer Supply Unit Capacity Terminal Equipment Type Maximum Number Telephone 176 1 SLT 128 KX DT300 KX T7600 series DPT 104 IP PT 112 DSS console 8 CS 26 High density CS 13 PS 128 Voice Processing System VPS 2 Doorphone 16 Door Opener 16 External Sensor 16 External Relay 16 1 When the PBX is equipped with 104 DPTs Digital XDP 48 IP PTs and 24 SLTs 28 Installation Manual 1 3 3 System Capacity ...

Page 29: ... High density 1 unit 8 ISDN Extension 2 VPS 1 port 1 1 Only the extension cards that can support SLTs count for the load figures Maximum Load Figure The pre installed power supply unit PSU supports the following load figures System Equipment Maximum Load Figure Any Equipment 104 Additional Load Capacity for a MCSLC16 MCSLC24 Card 24 Total 128 In addition to any combination of equipment totalling a...

Page 30: ...Calculation Example Equipment Type Load Figure KX DT300 KX T7600 series DPT 4 units 4 MCSLC24 4 cards 96 VPS 8 ports 8 Total 108 30 Installation Manual 1 3 3 System Capacity ...

Page 31: ...he PBX Detailed instructions for planning the installation site installing the shelves and optional service cards and cabling of peripheral equipment are provided Further information on system expansion and peripheral equipment installation is included Installation Manual 31 ...

Page 32: ...ons Areas where shocks or vibrations are frequent or strong Such activity may lead to the product falling over and causing injury or may impair the product s performance Areas with high amounts of dust High amounts of dust can lead to fire or electric shock and impair the performance of the product CAUTION Do not install the system in the following locations In direct sunlight and hot cold or humi...

Page 33: ...ng SLTs data terminals answering machines computers Voice Processing Systems etc Mis wiring may cause the PBX to operate improperly Refer to Section 2 Installation when wiring the system If an extension does not operate properly disconnect the telephone from the extension line and connect it again or turn off the PBX using the power switch then turn it on again Use twisted pair cable for trunk con...

Page 34: ...nit 1 AC Cord 1 Metal Bracket 1 Screw A 3 Screw B Black 2 Anchor Plug 3 SD Memory Card 1 Ferrite Core for the DMPR card 2 1 1 The larger of the two ferrite cores is used for the RJ45 cable The smaller of the two ferrite cores is used for the RJ11 cable s 34 Installation Manual 2 2 1 Unpacking ...

Page 35: ...w D C A B F E G A RUN Indicator B ALARM Indicator C USB Port D RS 232C Port E PSU F Free Slots 1 to 7 from the left G DMPR Card Slot PSU View A B C D E A Battery Switch B Battery Connector Installation Manual 35 2 2 2 Names and Locations ...

Page 36: ...C Power Switch D Earth Terminal E AC Inlet 36 Installation Manual 2 2 2 Names and Locations ...

Page 37: ...d screwdriver into the opening on the left of the screw cover and unlatch the screw cover Screw Cover 2 Turn the screw anticlockwise to loosen 3 Slide the front cover to the right until it stops then lift the front cover Installation Manual 37 2 2 3 Opening Closing the Front Cover ...

Page 38: ...slide the front cover to the left until it locks 2 Turn the screw clockwise to tighten 3 Secure the screw cover 1 2 CAUTION For safety reasons close the front cover and tighten the screw before operating the PBX Do not forget to tighten the screw before securing the screw cover 38 Installation Manual 2 2 3 Opening Closing the Front Cover ...

Page 39: ...noise in the case of a lightning strike The earthing wire of the AC cable has an effect against external noise and lightning strikes but it may not be enough to protect the PBX A permanent connection between earth and the earth terminal of the PBX must be made CAUTION For earthing wire green and yellow insulation is required and the cross sectional area of the conductor must be more than 0 75 mm2 ...

Page 40: ...Notice Be sure to comply with applicable local regulations e g laws guidelines Note Turn on the battery switch on the PSU only after the installation of the PBX is finished and AC power is available The recommended maximum capacity is 28 Ah to maintain effective battery charge Make sure that the type and capacity of the 3 backup batteries are identical The Back up Battery Cable should not be expos...

Page 41: ...p Battery Cable to a set of 3 identical backup batteries Back up Battery Cable Backup Batteries VRLA 12 V DC x 3 Red Black Battery Connector Battery Switch ON OFF Fuse Installation Manual 41 2 2 5 Backup Battery Connection ...

Page 42: ...oving the DMPR card the DC power supply must be turned off Note The optional service cards can be installed or removed while the DC power is supplied Installing Optional Service Cards 1 Insert the card along the guide rails Guide Rail 2 Holding the card as shown below push the release lever in the direction of the arrow so that the card engages securely with the connector on the back board Release...

Page 43: ... Turn the 2 screws clockwise to fix the card in place Screws Note Make sure the screws are tightened to earth the card securely Installation Manual 43 2 2 6 Installing Removing the Optional Service Cards ...

Page 44: ...ch slot in which no optional service card is installed by using a Blank Slot Cover CAUTION Failure to install the Blank Slot Cover may cause electromagnetic interference 44 Installation Manual 2 2 6 Installing Removing the Optional Service Cards ...

Page 45: ...BX run the cables to either the right or the left and then towards the back of the shelf as shown below 3 4 1 2 Note For safety reasons do not stretch bend or pinch the AC power cord Installation Manual 45 2 2 6 Installing Removing the Optional Service Cards ...

Page 46: ...wise to loosen them Screws 2 Pull the release lever in the direction of the arrow to disconnect the card from the back board Pull the card from the shelf to remove it Release Lever Back Board 46 Installation Manual 2 2 6 Installing Removing the Optional Service Cards ...

Page 47: ...A0188 BRI4 KX TDA0284 BRI8 KX TDA0288 PRI30 KX TDA0290CE CJ PRI23 KX TDA0290 CTI LINK KX TDA0410 IP EXT16 KX TDA0470 IP GW4E KX TDA0484 IP GW16 KX TDA0490 DMPR BNC 1 2 E1 KX TDA0188 PRI30 KX TDA0290CE CJ Amphenol Type A Type B Shielded twisted pair cable 50 25 26 1 DLC8 KX TDA0171 DLC16 KX TDA0172 MCSLC16 KX TDA1176 MCSLC24 KX TDA1178 CLCOT8 KX TDA1180 CLCOT8E KX TDA1186 LCOT8 KX TDA0180 LCOT16 KX...

Page 48: ...n Number Used for 10 pin Terminal Block 8 pin Terminal Block 8 1 10 1 DPH4 KX TDA0161 DPH2 KX TDA0162 EIO4 KX TDA0164 RS 232C Shielded cable 9 5 6 1 DMPR USB 2 1 3 4 DMPR 48 Installation Manual 2 2 7 Types of Connectors ...

Page 49: ...or For T1 E1 PRI IP GW16 IP EXT16 Cards Wrap the cable once around the ferrite core then close the case of the ferrite core Attach the ferrite core 5 cm away from the connector The ferrite core is included with the card 5 cm For the DMPR Card Wrap the cable once around the ferrite core then close the case of the ferrite core Attach the ferrite core 3 cm away from the connector The ferrite core is ...

Page 50: ...te core is included with the card When only 1 or 2 cables are used for connection wrap the cable s once around the ferrite core When 3 or 4 cables are used for connection simply pass the cables through the ferrite core Note For every 4 cables use 1 ferrite core a ferrite core holds a maximum of 4 cables 50 Installation Manual 2 2 8 Attaching a Ferrite Core ...

Page 51: ...connector The ferrite core is included with the PBX 3 cm When 2 cables are used for connection wrap only one of the cables once around the ferrite core Then simply pass the other cable through the ferrite core 3 cm 3 cm When only 1 cable is used for connection wrap the cable once around the ferrite core Installation Manual 51 2 2 8 Attaching a Ferrite Core ...

Page 52: ...hen close the case of the ferrite core Attach the ferrite core 3 cm away from the connector The ferrite core is included with the card 3 cm If you need to open the ferrite core use a flathead screwdriver to unlatch the case of the ferrite core 52 Installation Manual 2 2 8 Attaching a Ferrite Core ...

Page 53: ...ew to fix the upper part and use Velcro tape to fix the lower part of the connector Type A Spring Latch Velcro Tape Type B Screw Velcro Tape Velcro Tape Velcro Tape 2 1 2 2 1 Spring Latch 1 Spring Latch Remove the screw on the optional service card Insert the screw included with the Amphenol or optional service card Installation Manual 53 2 2 9 Fastening Amphenol Connector ...

Page 54: ...A T1A R1A EA MA SGA SGB TB RB T1B R1B EB MB TC RC T1C R1C EC MC TD RD T1D R1D ED MD TE RE T1E R1E EE ME TF RF T1F R1F EF MF TG RG T1G R1G EG MG TH RH T1H R1H EH MH DLC8 D2A D1A D2B D1B D2C D1C D2D D1D D2E D1E D2F D1F D2G D1G D2H D1H DLC16 D2A D1A D2B D1B D2C D1C D2D D1D D2E D1E D2F D1F D2G D1G D2H D1H D2I D1I D2J D1J D2K D1K D2L D1L D2M D1M D2N D1N D2O D1O D2P D1P MCSLC16 RA TA RB TB RC TC RD TD R...

Page 55: ...les so that the openings on the back of the shelf will not be blocked Make sure that the surface behind the shelf is not made of wood When driving the screws into the wall be careful to avoid touching any metal laths wire laths or metal plates in the wall When this product is no longer in use make sure to detach it from the wall Notice When placing the metal bracket make sure that the TOP arrow is...

Page 56: ...Anchor Plug Wall Note The pull out strength of the installation area must be at least 294 N 30 kgf per screw 2 Hook the shelf onto the metal bracket making sure that the shelf slides down and onto the hooked parts of the metal bracket Use 2 screws B to fix both sides of the shelf Recommended torque 0 8 N m 8 2 kgf cm to 1 0 N m 10 2 kgf cm TOP Screw B 56 Installation Manual 2 2 10 Wall Mounting ...

Page 57: ...gly recommend connecting the system to a surge protector that meets the following specifications Surge arrestor type 3 electrode arrestor DC spark over voltage 230 V Maximum peak current at least 10 kA Additionally proper earthing is very important for the protection of the system refer to 2 2 4 Frame Earth Connection Many countries areas have regulations requiring surge protection Be sure to comp...

Page 58: ...e CS If you install an extension outside of the building the following precautions are recommended a Install the extension wire underground b Use a conduit to protect the wire Note The surge protector for an extension and CS is different from that for a trunk Installation of an Earth Rod Trunk PBX Earthing Wire Earth Rod Underground Surge Protector 58 Installation Manual 2 2 11 Surge Protector Ins...

Page 59: ...wire should be as short as possible 3 The earthing wire should run straight to the earth rod Do not run the wire around other objects 4 Bury the earth rod at least 50 cm underground Note The above figures are recommendations only The length of earth rod and the required depth depend on the composition of the soil Installation Manual 59 2 2 11 Surge Protector Installation ...

Page 60: ...risk of explosion if the battery is replaced with the incorrect type Dispose of used batteries according to the manufacturer s instructions CAUTION The SD Memory Card contains software for all the processes of the PBX and all the customer data It can be easily removed and taken away from the PBX by a third party Therefore do not allow unauthorised access to prevent data leakage Do not remove the S...

Page 61: ... Reserved Pin Assignments RJ11 Connector No Signal Name Function 4 1 1 D2A Data port 1 Low 2 D2B Data port 2 Low 3 D1B Data port 2 High 4 D1A Data port 1 High RJ45 Connector No Signal Name Level V Function 1 8 1 MOH1 Nonpolar Music on Hold Jack Port 1 2 MOH1 Nonpolar Music on Hold Jack Port 1 3 PAG2 Nonpolar External Paging Jack Port 2 4 PAG1 Nonpolar External Paging Jack Port 1 5 PAG1 Nonpolar Ex...

Page 62: ...for remote communication with the PBX ITU T V 90 support To be mounted on the DMPR card RMT Card Screw inside Accessories and User supplied Items Accessories included Screws 2 User supplied not included none 62 Installation Manual 2 3 2 RMT Card KX TDA0196 ...

Page 63: ...0189 and 2 4 4 CID8 Card KX TDA0193 CLCOT8 8 port analogue trunk card with Caller ID and 2 power failure transfer PFT ports Caller ID signal type FSK FSK with Call Waiting Caller ID Visual Caller ID DTMF compatible One CLCOT8E card can be mounted on the CLCOT8 card refer to 2 4 5 CLCOT8E Card KX TDA1186 Amphenol To trunk LED Accessories and User supplied Items Accessories included Screws 2 User su...

Page 64: ...ing port 14 39 TN Tip port 14 15 RO Ring port 15 40 TO Tip port 15 16 RP Ring port 16 41 TP Tip port 16 17 25 Reserved 42 50 Reserved Note Pin assignments for the pins 5 to 8 and 30 to 33 are only for the LCOT8 LCOT16 and CLCOT8 cards Pin assignments for the pins 9 to 16 and 34 to 41 are only for the LCOT16 card or a CLCOT8 card with a CLCOT8E card mounted LED Indications Indication Colour Descrip...

Page 65: ...refer to Confirming the Trunk Connection in 2 11 1 Starting the PBX Pin Assignments Amphenol Connector No Signal Name Function No Signal Name Function 50 25 26 1 1 RA Ring port 1 26 TA Tip port 1 2 RB Ring port 2 27 TB Tip port 2 3 RC Ring port 3 28 TC Tip port 3 4 RD Ring port 4 29 TD Tip port 4 5 RE Ring port 5 30 TE Tip port 5 6 RF Ring port 6 31 TF Tip port 6 7 RG Ring port 7 32 TG Tip port 7 ...

Page 66: ...en Red Card status indication OFF Power Off Green ON Normal all ports are idle Green Flashing 60 times per minute Normal a port is in use Red ON Fault includes reset Red Flashing 60 times per minute Out of Service 66 Installation Manual 2 4 2 DID8 Card KX TDA0182 ...

Page 67: ...itches for ports 09 16 at OFF positions LCOT16 card only OFF ON OFF ON ON OFF ON OFF SW2 SW2 Ports 09 16 Ports 01 08 SW1 SW1 Accessories and User supplied Items Accessories included Screws 2 User supplied not included none Note Only 1 CID PAY8 card can be mounted on the LCOT8 card Switch Settings on LCOT8 LCOT16 cards Switch Type Usage and Status Definition Port Setting DIP Set all DIP switches at...

Page 68: ...Accessories and User supplied Items Accessories included Screws 2 User supplied not included none Note Only 1 CID8 card can be mounted on the LCOT8 card Switch Settings on LCOT8 LCOT16 cards Switch Type Usage and Status Definition Port Setting DIP Keep all DIP switches at default ON positions Do not change the positions of these switches Note SW2 is for the LCOT16 card only 68 Installation Manual ...

Page 69: ...aller ID signal type FSK FSK with Call Waiting Caller ID Visual Caller ID DTMF compatible To be mounted on the CLCOT8 card inside inside Screw Accessories and User supplied Items Accessories included Screws 3 User supplied not included none Installation Manual 69 2 4 5 CLCOT8E Card KX TDA1186 ...

Page 70: ... connector refer to 2 2 9 Fastening Amphenol Connector To confirm the trunk connection refer to Confirming the Trunk Connection in 2 11 1 Starting the PBX Pin Assignments Amphenol Connector No Signal Name Function No Signal Name Function 50 25 26 1 1 TA Tip port 1 26 RA Ring port 1 2 T1A Tip 1 port 1 27 R1A Ring 1 port 1 3 EA E line port 1 28 MA M line port 1 4 SGA SG line port 1 29 SGB SG line po...

Page 71: ...43 R1F Ring 1 port 6 19 EF E line port 6 44 MF M line port 6 20 TG Tip port 7 45 RG Ring port 7 21 T1G Tip 1 port 7 46 R1G Ring 1 port 7 22 EG E line port 7 47 MG M line port 7 23 TH Tip port 8 48 RH Ring port 8 24 T1H Tip 1 port 8 49 R1H Ring 1 port 8 25 EH E line port 8 50 MH M line port 8 LED Indications Indication Colour Description CARD STATUS Green Red Card status indication OFF Power Off Gr...

Page 72: ...d only be connected to SELV services Notice When connecting the RJ45 connector attach the included ferrite core Refer to 2 2 8 Attaching a Ferrite Core Note This optional service card can be used for either trunk or extension connection by setting the A B switch or using the connector with appropriate pin assignments To confirm the trunk connection refer to Confirming the Trunk Connection in 2 11 ...

Page 73: ... Indication Colour Description CARD STATUS Green Red Card status indication OFF Power Off Green ON Normal all ports are idle Green Flashing 60 times per minute Normal a port is in use Red ON Fault includes reset Red Flashing 60 times per minute Out of Service SYNC ERR Red Non synchronisation status indication OFF Normal ON Out of synchronisation RAI Red RAI signal status indication OFF Normal ON A...

Page 74: ...sed ON Synchronised Flashing 60 times per minute Synchronised Clock Master Maximum Cabling Distance of Extension Connection The maximum length of the extension cable that connects the T1 cards is shown below Diameter Maximum Distance 0 5 mm 200 m 74 Installation Manual 2 4 7 T1 Card KX TDA0187 ...

Page 75: ...ect to the trunk directly E1 ports are SELV ports and should only be connected to SELV services Notice When connecting the RJ45 connector attach the included ferrite core Refer to 2 2 8 Attaching a Ferrite Core Note In some countries areas this optional service card must not be connected to the Public Switched Telephone Network Use only 1 type of connector RJ45 or BNC for connection RJ45 and BNC c...

Page 76: ...X outer conductor Connection of 1 and 2 Open default Connection of 2 and 3 Short Pin Assignments RJ45 Connector for Trunk Use No Signal Name Level V Function 8 1 1 RX Receive data 2 RX Receive data 3 Reserved 4 TX Transmit data 5 TX Transmit data 6 8 Reserved RJ45 Connector for Extension use No Signal Name Level V Function 8 1 1 TX Transmit data 2 TX Transmit data 3 Reserved 4 RX Receive data 5 RX...

Page 77: ...nchronisation status indication OFF Normal ON Out of synchronisation RAI Red RAI signal status indication OFF Normal ON Alarm Clock Slave Flashing 60 times per minute Alarm Clock Master AIS Red AIS status indication OFF Normal ON Alarm SYNC Green Synchronisation status indication OFF Not synchronised ON Synchronised Flashing 60 times per minute Synchronised Clock Master Maximum Cabling Distance of...

Page 78: ...lure to do so may cause damage to the power supply circuit of the BRI4 BRI8 card or the terminal When connecting these optional service cards to the trunk connect through an NT1 do not connect to the U interface of the trunk directly Notice When connecting the RJ45 connector attach the included ferrite core Refer to 2 2 8 Attaching a Ferrite Core Note LINE 5 to LINE 8 are for BRI8 card only These ...

Page 79: ...ctor for Extension Use No Signal Name Level V Function 8 1 1 2 Reserved 3 RX2 Receive data 2 4 TX1 Transmit data 1 5 TX2 Transmit data 2 6 RX1 Receive data 1 7 8 Reserved LED Indications Indication Colour Description CARD STATUS Green Red Card status indication OFF Power Off Green ON Normal all ports are idle Green Flashing 60 times per minute Normal a port is in use Red ON Fault includes reset Re...

Page 80: ...r details Note LINE 5 to LINE 8 are for BRI8 card only LINE LED Pattern Layer 1 Layer 2 Master Clock LED Pattern OFF OFF OFF 1 s ON OFF OFF 1 s ON ON OFF 1 s ON OFF ON 1 s ON ON ON 1 s Layer 1 ON Synchronous Layer 2 ON Link established OFF Link not established Master Clock ON Master OFF Slave 80 Installation Manual 2 4 9 BRI4 Card KX TDA0284 and BRI8 Card KX TDA0288 ...

Page 81: ...nects the PBX and the ISDN terminal equipment TE is shown below CAT 5 Under 1000 m TE Point to Point Expansion Point to Multipoint Point to Multipoint TE 1 TE 8 TE 8 TE 1 CAT 5 Under 150 m CAT 5 Under 500 m CAT 5 Under 50 m Installation Manual 81 2 4 9 BRI4 Card KX TDA0284 and BRI8 Card KX TDA0288 ...

Page 82: ... ports and should only be connected to SELV services Notice When connecting the RJ45 connector attach the included ferrite core Refer to 2 2 8 Attaching a Ferrite Core Note In some countries areas this optional service card must not be connected to the Public Switched Telephone Network Use only 1 type of connector RJ45 or BNC for connection RJ45 and BNC cannot be used simultaneously This optional ...

Page 83: ...Level V Function 8 1 1 RX Receive data 2 RX Receive data 3 Reserved 4 TX Transmit data 5 TX Transmit data 6 8 Reserved RJ45 Connector for Extension Use No Signal Name Level V Function 8 1 1 TX Transmit data 2 TX Transmit data 3 Reserved 4 RX Receive data 5 RX Receive data 6 8 Reserved BNC coaxial Connector TX No Signal Name Level V Function 1 2 1 TX Transmit data 2 TX Transmit data BNC coaxial Con...

Page 84: ...dication OFF Normal ON Alarm Clock Slave Flashing 60 times per minute Alarm Clock Master AIS Red AIS status indication OFF Normal ON Alarm SYNC Green Synchronisation status indication OFF Not synchronised ON Synchronised Flashing 60 times per minute Synchronised Clock Master D LINK Green Data link status indication OFF Not established ON Established Maximum Cabling Distance of Extension Connection...

Page 85: ...ectly PRI ports are SELV ports and should only be connected to SELV services Notice When connecting the RJ45 connector attach the included ferrite core Refer to 2 2 8 Attaching a Ferrite Core Note This optional service card can be used for either trunk or extension connection by setting the A B switch or using the connector with appropriate pin assignments To confirm the trunk connection refer to ...

Page 86: ...ndication Colour Description CARD STATUS Green Red Card status indication OFF Power Off Green ON Normal all ports are idle Green Flashing 60 times per minute Normal a port is in use Red ON Fault includes reset Red Flashing 60 times per minute Out of Service SYNC ERR Red Non synchronisation status indication OFF Normal ON Out of synchronisation RAI Red RAI signal status indication OFF Normal ON Ala...

Page 87: ...minute Synchronised Clock Master D LINK Green Data link status indication OFF Not established ON Established Maximum Cabling Distance of Extension Connection The maximum length of the extension cable that connects the PRI23 cards is shown below Diameter Maximum Distance 0 5 mm 200 m Installation Manual 87 2 4 11 PRI23 Card KX TDA0290 ...

Page 88: ... slot when it is installed in the PBX For programming instructions and other information about the IP GW4E card refer to the documentation for the IP GW4E card When referring to the IP GW4E documentation information for the KX TDA100 applies to the KX TDA150 To programme the IP GW4E card use the web programming designed for the IP GW4E card To confirm the trunk connection refer to Confirming the T...

Page 89: ...us indication ON On line mode OFF Off line mode Flashing Maintenance mode Note If the LINK indicator is OFF the ONLINE indicator will also be OFF ALARM Red Alarm indication OFF Normal ON Alarm VoIP BUSY Green VoIP H 323 process indication OFF VoIP process inactive ON VoIP process active LINK Green Link status indication OFF Connection error ON Normal connection DATA Green Data transmission indicat...

Page 90: ...included ferrite core Refer to 2 2 8 Attaching a Ferrite Core For programming instructions and other information about the IP GW16 card refer to the documentation for the IP GW16 card When referring to the IP GW16 documentation information for the KX TDA100 applies to the KX TDA150 To programme the IP GW16 card use the web programming designed for the IP GW16 card To confirm the trunk connection r...

Page 91: ...us indication ON On line mode OFF Off line mode Flashing Maintenance mode Note If the LINK indicator is OFF the ONLINE indicator will also be OFF ALARM Red Alarm indication OFF Normal ON Alarm VoIP BUSY Green VoIP H 323 process indication OFF VoIP process inactive ON VoIP process active LINK Green Link status indication OFF Connection error ON Normal connection DATA Green Data transmission indicat...

Page 92: ...tion in the PC Programming Manual If there is a CS in out of service OUS status make sure that it is securely connected to the CSIF card If the CS remains in OUS status there may be a fault with the connection Do not leave the connected CS in OUS status since it may cause severe damage to the CSIF card Note LINE 5 to LINE 8 are for CSIF8 card only When using the CSIF4 card please note that the PBX...

Page 93: ...rved LED Indications Indication Colour Description CARD STATUS Green Red Card status indication OFF Power Off Green ON Normal all ports are idle Green Flashing 60 times per minute Normal a port is in use Red ON Fault includes reset Red Flashing 60 times per minute Out of Service Installation Manual 93 2 5 1 CSIF4 Card KX TDA0143 and CSIF8 Card KX TDA0144 ...

Page 94: ...re 1 User supplied not included Amphenol connector Note Attach the included ferrite core to the cable Refer to 2 2 8 Attaching a Ferrite Core To connect the Amphenol connector refer to 2 2 9 Fastening Amphenol Connector To use a DLC8 card with DSS consoles or Voice Processing System VPS the Local Processor LPR software of the card must be version 7 000 or later 94 Installation Manual 2 5 2 DLC8 Ca...

Page 95: ...rved 40 41 Reserved 17 D2F Data port 6 Low 42 D1F Data port 6 High 18 19 Reserved 43 44 Reserved 20 D2G Data port 7 Low 45 D1G Data port 7 High 21 22 Reserved 46 47 Reserved 23 D2H Data port 8 Low 48 D1H Data port 8 High 24 25 Reserved 49 50 Reserved LED Indications Indication Colour Description CARD STATUS Green Orange Red Card status indication OFF Power Off Green ON Normal all ports are idle Gr...

Page 96: ...re 1 User supplied not included Amphenol connector Note Attach the included ferrite core to the cable Refer to 2 2 8 Attaching a Ferrite Core To connect the Amphenol connector refer to 2 2 9 Fastening Amphenol Connector To use a DLC16 card with DSS consoles or Voice Processing System VPS the Local Processor LPR software of the card must be version 7 000 or later 96 Installation Manual 2 5 3 DLC16 ...

Page 97: ...High 11 D2K Data port 11 Low 36 D1K Data port 11 High 12 D2L Data port 12 Low 37 D1L Data port 12 High 13 D2M Data port 13 Low 38 D1M Data port 13 High 14 D2N Data port 14 Low 39 D1N Data port 14 High 15 D2O Data port 15 Low 40 D1O Data port 15 High 16 D2P Data port 16 Low 41 D1P Data port 16 High 17 25 Reserved 42 50 Reserved LED Indications Indication Colour Description CARD STATUS Green Orange ...

Page 98: ...ransfer PFT ports Maximum power output of 90 V for Message Waiting Lamp control LED Amphenol To extensions Accessories and User supplied Items Accessories included Screws 2 Ferrite core 1 User supplied not included Amphenol connector Note Attach the included ferrite core to the cable Refer to 2 2 8 Attaching a Ferrite Core To connect the Amphenol connector refer to 2 2 9 Fastening Amphenol Connect...

Page 99: ...port 10 11 RK Ring port 11 36 TK Tip port 11 12 RL Ring port 12 37 TL Tip port 12 13 RM Ring port 13 38 TM Tip port 13 14 RN Ring port 14 39 TN Tip port 14 15 RO Ring port 15 40 TO Tip port 15 16 RP Ring port 16 41 TP Tip port 16 17 RQ Ring port 17 42 TQ Tip port 17 18 RR Ring port 18 43 TR Tip port 18 19 RS Ring port 19 44 TS Tip port 19 20 RT Ring port 20 45 TT Tip port 20 21 RU Ring port 21 46 ...

Page 100: ...us indication OFF Power Off Green ON Normal all ports are idle Green Flashing 60 times per minute Normal a port is in use Red ON Fault includes reset Red Flashing 60 times per minute Out of Service 100 Installation Manual 2 5 4 MCSLC16 Card KX TDA1176 and MCSLC24 Card KX TDA1178 ...

Page 101: ...the cable to be connected to this optional service card is 100 m When connecting the RJ45 connector attach the included ferrite core Refer to 2 2 8 Attaching a Ferrite Core Portions of this product contains software of Datalight Inc Copyright 1993 2000 Datalight Inc All Rights Reserved Pin Assignments RJ45 Connector 10BASE T 100BASE TX No Signal Name Input I Output O Function 8 1 1 TPO O Transmit ...

Page 102: ... is in use an IP PT is connected OFF No ports are in use no IP PTs are connected Note If the LINK indicator is OFF the ONLINE indicator will also be OFF ALARM Red Alarm indication OFF Normal ON Alarm VoIP BUSY Green Panasonic proprietary VoIP protocol process indication OFF VoIP process inactive ON VoIP process active LINK Green Link status indication OFF Connection error ON Normal connection DATA...

Page 103: ...none WARNING A lithium battery is used in OPB3 card There is a risk of explosion if the battery is replaced with the incorrect type Dispose of used batteries according to the manufacturer s instructions LED Indications Indication Colour Description CARD STATUS Green Red Card status indication OFF Power Off Green ON Normal all ports are idle Green Flashing 60 times per minute Normal a port is in us...

Page 104: ...pin 10 pin Screw To doorphones To door openers Accessories and User supplied Items Accessories included Screws 3 10 pin terminal block 1 8 pin terminal block 1 User supplied not included Copper wire Note For details about connection to doorphones and door openers refer to 2 8 1 Connection of Doorphones Door Openers External Sensors and External Relays 104 Installation Manual 2 6 2 DPH4 Card KX TDA...

Page 105: ...2 transmit 6 com2 Doorphone 2 receive 7 DP1 Doorphone 1 transmit 8 com1 Doorphone 1 receive 10 pin Terminal Block No Signal Name Function 10 1 1 2 Reserved 3 OP4b Door opener 4 4 OP4a Door opener 4 com 5 OP3b Door opener 3 6 OP3a Door opener 3 com 7 OP2b Door opener 2 8 OP2a Door opener 2 com 9 OP1b Door opener 1 10 OP1a Door opener 1 com Installation Manual 105 2 6 2 DPH4 Card KX TDA0161 ...

Page 106: ...Card 8 pin 10 pin Screw To doorphones door openers Accessories and User supplied Items Accessories included Screws 3 10 pin terminal block 1 8 pin terminal block 1 User supplied not included Copper wire Note For details about connection to doorphones and door openers refer to 2 8 1 Connection of Doorphones Door Openers External Sensors and External Relays 106 Installation Manual 2 6 3 DPH2 Card KX...

Page 107: ...receive 7 Call_1b RT b 1 Doorphone 1 call button 8 Call_1a RT a 1 Doorphone 1 call button com 10 pin Terminal Block No Proprietary Signal Name Standard Signal Name Function 10 1 1 2 Reserved Reserved 3 OP2b TO b 2 Door opener 2 4 OP2a TO a 2 Door opener 2 com 5 OP1b TO b 1 Door opener 1 6 OP1a TO a 1 Door opener 1 com 7 DC2b TS b 2 Doorphone control 2 8 DC2a TS a 2 Doorphone control 2 com 9 DC1b T...

Page 108: ...a Path_1b DC1b DC1a OP1b OP1a 8 7 6 5 4 3 2 1 L O U B 12V 8V TO 0 V BL Light RT Call Button OP Door Opener Connection Terminal DC Doorphone Current Supply Control Terminal Path Doorphone Call Path Speaker Microphone Shield Call_2b Call_1a Call_2a Call_1b Doorphone 1 Adaptor 220 V BL Door Opener 1 RT L O U B L O U B 12V 8V TO 0 V German type Doorphone 1 108 Installation Manual 2 6 3 DPH2 Card KX TD...

Page 109: ...rd To external relays 8 pin 10 pin Accessories and User supplied Items Accessories included Screws 3 10 pin terminal block 1 8 pin terminal block 1 User supplied not included Copper wire Note For details about connection to external sensors and external relays refer to 2 8 1 Connection of Doorphones Door Openers External Sensors and External Relays Installation Manual 109 2 6 4 EIO4 Card KX TDA016...

Page 110: ...com 5 C2b Control 2 6 C2a Control 2 com 7 C1b Control 1 8 C1a Control 1 com 10 pin Terminal Block No Signal Name Function 10 1 1 2 Reserved 3 OP4b Opener 4 4 OP4a Opener 4 com 5 OP3b Opener 3 6 OP3a Opener 3 com 7 OP2b Opener 2 8 OP2a Opener 2 com 9 OP1b Opener 1 10 OP1a Opener 1 com 110 Installation Manual 2 6 4 EIO4 Card KX TDA0164 ...

Page 111: ...pair of sensor and common lines are connected to the EIO4 card for each external sensor The PBX detects input from the sensor when the signal is under 100 W Connection Diagram External Sensor sensor common I O EIO4 OPB3 PBX 5V 5V 10K 33 33 4 7K 4 7K External Relay Current Limit 24 V DC 30 V AC 1 A maximum Installation Manual 111 2 6 4 EIO4 Card KX TDA0164 ...

Page 112: ...pplied Items Accessories included Screws 3 User supplied not included none Note To establish a conference call involving 6 to 8 parties install an ECHO16 card and enable echo cancellation for conferences using the Maintenance Console For details refer to Echo Cancel Conference in 4 17 2 9 System Options of the PC Programming Manual 112 Installation Manual 2 6 5 ECHO16 Card KX TDA0166 ...

Page 113: ... 4 channel message card To be mounted on the OPB3 card OPB3 Card MSG4 Card Screw inside Accessories and User supplied Items Accessories included Screws 3 User supplied not included none Installation Manual 113 2 6 6 MSG4 Card KX TDA0191 ...

Page 114: ... may cause severe damage to the ESVM card Notice When replacing an ESVM card ensure that the status of the OPB3 card is In Service INS and then initialise the ESVM card For details about the initialisation procedure refer to 2 5 5 Tool Simplified Voice Message Delete All Recording in the PC Programming Manual When installing an ESVM card for the first time on an OPB3 card that is already installed...

Page 115: ... LAN via a CTI server to provide third party call control CTI The operating system of the PC or CTI server required for third party call control depends on your CTI application software For details refer to the manual for your CTI application software Portions of this product contains software of Datalight Inc Copyright 1993 2000 Datalight Inc All Rights Reserved Pin Assignments RJ45 Connector 10B...

Page 116: ...Card status indication OFF Power Off Green ON Normal Red ON Fault includes reset Red Flashing 60 times per minute Out of Service LINK STATUS Green Link status indication Flashing In communication ON Linked normally 116 Installation Manual 2 6 8 CTI LINK Card KX TDA0410 ...

Page 117: ...CAT 5 229 m Cable Maximum Distance ø 0 4 mm 698 m ø 0 5 mm 1128 m ø 0 6 mm 1798 m CAT 5 1128 m DSS Console SLT KX T7600 Series DPT Cable Maximum Distance ø 0 4 mm 222 m ø 0 5 mm 347 m ø 0 6 mm 500 m CAT 5 347 m PT interface CS KX DT300 Series DPT Notice The maximum cabling distance may vary depending on the conditions PT interface CS DPT DSS Console SLT MCSLC24 MCSLC16 Cards ü DLC16 DLC8 Cards ü ü...

Page 118: ... ü indicates that the extension card or port supports the terminal 118 Installation Manual 2 7 1 Maximum Cabling Distances of the Extension Wiring Twisted Cable ...

Page 119: ...tal XDP connection With KX DT300 Series DPT Using an EXtra Device Port Master DPT Slave DPT 4 conductor wiring cord Connect pins T R D1 and D2 4 conductor wiring cord Connect pins T R D1 and D2 To DLC8 DLC16 card To DLC4 port on the DMPR card Slave DPT Master DPT Cable Maximum Distance ø 0 4 mm 30 m ø 0 5 mm 50 m ø 0 6 mm 60 m CAT 5 50 m Back View of DPTs To DLC8 DLC16 card To DLC4 port on the DMP...

Page 120: ...t pins T R D1 and D2 To DLC8 DLC16 card To DLC4 port on the DMPR card Slave DPT Master DPT TO MAIN UNIT PABX TO TEL TO MAIN UNIT PABX Cable Maximum Distance ø 0 4 mm 30 m ø 0 5 mm 50 m ø 0 6 mm 60 m CAT 5 50 m Back View of DPTs To DLC8 DLC16 card To DLC4 port on the DMPR card 120 Installation Manual 2 7 2 Digital EXtra Device Port Digital XDP Connection ...

Page 121: ... Module must be connected to the DPTs Note The operating system of the PC required for first party call control depends on your CTI application software For details refer to the manual for your CTI application software KX DT343 KX DT346 USB Port USB Cable USB Module To PC KX T7633 KX T7636 USB Cable To PC U L L USB Port USB Module Note The maximum length of the USB cable is 3 m Installation Manual...

Page 122: ...r openers external sensors and external relays are user supplied Maximum Cabling Distance Cable Maximum Distance ø 0 4 mm 70 m ø 0 5 mm 113 m ø 0 6 mm 180 m CAT 5 113 m Doorphone Door Opener External Sensor External Relay Device Installing the Doorphone KX T30865 KX T7765 Note The illustrations shown in the installation procedure are based on the KX T30865 1 Loosen the screw to separate the doorph...

Page 123: ...nds of screws are included with the doorphone Please choose the appropriate kind for your wall type when a doorphone plate has been fixed to the wall when you wish to install the doorphone directly onto the wall 3 Connect the wires to the screws located in the back cover To 8 pin terminal block 4 Re attach the 2 halves and re insert the screw Installation Manual 123 2 8 1 Connection of Doorphones ...

Page 124: ...r openers external sensors and external relays Refer to 2 6 2 DPH4 Card KX TDA0161 2 6 3 DPH2 Card KX TDA0162 and 2 6 4 EIO4 Card KX TDA0164 for pin assignments Doorphone Door Opener External Sensor External Relay Device 2 Attach the terminal blocks to the connectors of the DPH4 DPH2 EIO4 card on the PBX To doorphones door openers external sensors external relays 124 Installation Manual 2 8 1 Conn...

Page 125: ...an be connected to the PBX CAUTION Wiring should be done carefully to prevent undue force being exerted on the plug Otherwise sound may only be heard intermittently External Music Jacks are SELV ports and should only be connected to approved SELV devices or in Australia via the Line Isolation Unit with the Telecommunications Compliance Label Note When the PBX and external music sources are not con...

Page 126: ...d Jack Port 1 2 MOH1 Nonpolar Music on Hold Jack Port 1 3 PAG2 Nonpolar External Paging Jack Port 2 4 PAG1 Nonpolar External Paging Jack Port 1 5 PAG1 Nonpolar External Paging Jack Port 1 6 PAG2 Nonpolar External Paging Jack Port 2 7 MOH2 Nonpolar Music on Hold Jack Port 2 8 MOH2 Nonpolar Music on Hold Jack Port 2 PC Printer via RS 232C The PBX is equipped with an RS 232C interface This interface ...

Page 127: ...g a printer PC with a 9 pin RS 232C connector PBX 9 pin Printer PC 9 pin Circuit Type EIA Signal Name Pin No Pin No Signal Name Circuit Type EIA BB RD RXD 2 BA SD TXD 3 CD ER DTR 4 AB SG 5 CC DR DSR 6 CA RS RTS 7 CB CS CTS 8 2 RD RXD BB 3 SD TXD BA 4 ER DTR CD 5 SG AB 6 DR DSR CC 7 RS RTS CA 8 CS CTS CB For connecting a printer PC with a 25 pin RS 232C connector PBX 9 pin Printer PC 25 pin Circuit...

Page 128: ... Connects to the DC ground of the unit for all interface signals Data Set Ready DSR input An ON condition of circuit DR DSR indicates the printer or the PC is ready Circuit DR DSR ON does not indicate that communication has been established with the printer or the PC Request To Send RTS output This lead is held ON whenever DR DSR is ON Clear To Send CTS input An ON condition of circuit CS CTS indi...

Page 129: ...ed for third party call control depends on your CTI application software For details refer to the manual for your CTI application software CAUTION To protect the system keep the following in mind 1 Make sure that both connector cases frame ground of the USB cable are conductive If they are not conductive make sure that both connector cases of the cable are firmly connected 2 If this is not possibl...

Page 130: ...ions Analogue trunk cards LCOT16 4 PFT ports LCOT8 2 PFT ports LCOT4 2 PFT ports and CLCOT8 2 PFT ports Extension cards MCSLC24 2 PFT ports and MCSLC16 2 PFT ports To 1 analogue trunk card connect only 1 extension card Note By programming the PBX a trunk conversation established during power failure can be maintained even when the power returns and the connection is switched back to the normal con...

Page 131: ... card only No Signal Name Function 1 4 1 R4 Ring port 4 2 R3 Ring port 3 3 T3 Tip port 3 4 T4 Tip port 4 RJ11 Connector Pin Assignments for Extension Card PFT Ports 1 and 2 No Signal Name Function 1 4 1 T2 Tip port 2 2 T1 Tip port 1 3 R1 Ring port 1 4 R2 Ring port 2 Installation Manual 131 2 10 1 Power Failure Connections ...

Page 132: ... at ON positions Accessories and User supplied Items Accessories included none User supplied not included RJ45 connectors Switch Settings Switch Type Usage and Status Definition PFT Setting DIP Set all DIP switches to ON positions to use LINE 1 and LINE 2 as a PFT port LINE 1 Power Failure LINE NT1 LINE 2 Power Failure EXTN extension RJ45 Connector LINE 1 Pin Assignments No Signal Name Level V Fun...

Page 133: ...2 Pin Assignments No Signal Name Level V Function 8 1 1 2 Reserved 3 RX2 Receive data 2 4 TX1 Transmit data 1 5 TX2 Transmit data 2 6 RX1 Receive data 1 7 8 Reserved Installation Manual 133 2 10 1 Power Failure Connections ...

Page 134: ...nce you have started the PBX and if you unplug the PBX do not perform the following procedures to start the PBX again Otherwise your programmed data is cleared To restart the PBX refer to 4 1 4 Using the Reset Button The power supply cord is used as the main disconnect device Ensure that the AC outlet is located near the equipment and is easily accessible Note The PBX will continue to be powered e...

Page 135: ...ll not be initialised LED Indications Indication Colour Description RUN Green PBX status indication OFF Power Off includes normal reset ON Power On and running on line Flashing 60 times per minute Starting up Flashing 120 times per minute Starting up or resetting with the System Initialise Switch in INIT position the SD Memory Card not inserted ALARM Red Alarm indication OFF Normal ON Alarm CPU st...

Page 136: ...136 Installation Manual 2 11 1 Starting the PBX ...

Page 137: ...Section 3 Guide for the Maintenance Console Explains the installation procedure structure and basic information of the Maintenance Console Installation Manual 137 ...

Page 138: ... PBX To programme and administer the PBX by PC you need to install the Maintenance Console onto the PC This section describes overview and installation of the Maintenance Console only System Menu Menu Bar Note The contents and design of the software are subject to change without notice 138 Installation Manual 3 1 1 Overview ...

Page 139: ...re conductive If they are not conductive make sure that both connector cases of the cable are firmly connected 2 If this is not possible connect the frame of the PBX to the frame of the PC using an earthing wire in order to prevent difference in the electrical potentials Note For pin assignments and maximum cabling distance refer to 2 9 1 Connection of Peripherals LAN Connection via CTI LINK Card ...

Page 140: ...ot possible connect the frame of the PBX to the frame of the PC using an earthing wire in order to prevent difference in the electrical potentials After connecting the PBX and the external modem set the power switch of the external modem to ON then the external modem will be initialised with the default values The following AT command settings may be required for the modem The Data Terminal Ready ...

Page 141: ...s to the customer 2 To avoid unauthorised access and possible abuse of the PBX keep the passwords secret and inform the customer of the importance of the passwords and the possible dangers if they become known to others 3 The PBX has default passwords preset For security change these passwords the first time that you programme the PBX 4 Change the passwords periodically 5 It is strongly recommende...

Page 142: ... Maintenance Console and Assigning the Basic Items Quick Setup When you start the Maintenance Console with the Installer Level Programmer Code and connect to the PBX for the first time after initialisation with the factory default setting Quick Setup will launch automatically During Quick Setup you will set up the basic items For details about the basic items refer to 2 3 4 Quick Setup in the Feat...

Page 143: ...ign the basic items Quick Setup The system menu appears You may now begin programming the PBX Notice 1 During a long programming session it is highly recommended that you periodically save the system data to the SD Memory Card If the PBX undergoes a sudden power failure or if the system is reset for some reason all the system data in RAM will be lost However if system data has been saved to the SD...

Page 144: ...remove the SD Memory Card while power is supplied to the PBX Doing so may cause the PBX to fail to start when you try to restart the system 144 Installation Manual 3 3 1 Installing and Starting the Maintenance Console ...

Page 145: ...Section 4 Troubleshooting This section provides information on the PBX and telephone troubleshooting Installation Manual 145 ...

Page 146: ...t Button refer to 4 1 4 Using the Reset Button Turn off the power switch and then turn it back on Turn off the power switch and then unplug the PBX After 5 minutes plug the PBX back in and turn the power switch back on Distorted external music Excessive input level from external music source Decrease the output level of the external music source by using the volume control on the music source Alte...

Page 147: ... D2 D1 T R D2 D1 T R D2 PBX PBX PBX Extension CAUSE The T R is connected to the D1 D2 SOLUTION Use the correct cord the inner 2 wires are for T R D1 T R D2 T R Extension CAUSE The T is connected to the R SOLUTION Reverse the connections of the T R D1 T R D2 T R Extension Can you dial an extension Continued on the next page No Yes If a telephone equipped with an A A1 relay is connected to the PBX s...

Page 148: ... Trunk is connected to the T2 R1 SOLUTION Reconnect the trunk to the T1 R1 or T2 R2 of the telephone jack using 2 conductor wiring T2 R1 T1 R2 Trunk PBX PBX Trunk T2 R1 T1 R2 Continued from the previous page Can you dial out on a trunk No 148 Installation Manual 4 1 2 Connection ...

Page 149: ...the ringer volume During a power failure extensions connected to ports 1 to 2 of MCSLC16 MCSLC24 do not operate A DPT is connected to the extension port Disconnect the DPT and connect an SLT The dialling mode tone or pulse is incorrect Set the Tone Pulse switch to the other position Originating an outside call call transfer or conference cannot be performed The corresponding CO button does not exi...

Page 150: ...on hold are terminated Calls on exclusive hold are terminated Calls in progress are terminated Call park is cleared Other data stored in memory except the above are not cleared Be aware that pressing the Reset Button with the System Initialise Switch in the INIT position clears all data stored in the PBX Do not perform this operation unless you intend to delete all data from the PBX Operation If t...

Page 151: ...ple Station Message Detail Recording SMDR 04 01 01 10 37AM MJ ALM 000 10000 MPR WDT overflow 04 01 01 11 07AM MN ALM 010 10000 AC power down 04 01 01 03 55PM MN ALM 301 10501 Digital trunk RAI reception 1 2 3 4 5 6 Description Item Description 1 Date The date of the error detection 2 Time The time of the error detection 3 Level Minor MN ALM Displays minor errors which affect only a certain part of...

Page 152: ...splayed For OPB3 card Sub slot number 1 to 3 port number 1 to 4 will be displayed as follows Sub slot 1 of OPB3 11 to 14 Sub slot 2 of OPB3 21 to 24 Sub slot 3 of OPB3 31 to 34 Note When there are no parameters for the slot and physical port numbers XX and YY will be displayed as 00 Example Sub code for DMPR card 10000 6 Error Message A description of the error 7 Log Information Displays probable ...

Page 153: ...Index Installation Manual 153 ...

Page 154: ...onstruction 16 Basic Shelf Names and Locations 35 BGM 125 Blank Slot Cover 44 BRI4 Card KX TDA0284 78 BRI8 Card KX TDA0288 78 C Cable Distance 117 Cable Handling 45 Characteristics 24 CID PAY8 Card KX TDA0189 67 CID8 Card KX TDA0193 68 CLCOT8 Card KX TDA1180 63 CLCOT8E Card KX TDA1186 69 Components System 2 Connecting Backup Batteries 40 Connection Diagram System 17 Connector Types 47 Cover for Bl...

Page 155: ...tion 29 M Main Processing Card DMPR Card 60 Maintenance Console 138 Maintenance Console Connection 139 Maintenance Console Installation 142 Maintenance Console Overview 138 Maintenance Console Password Security 141 Maintenance Console Quick Setup 142 Maintenance Console System Requirements 141 Master DPT Digital XDP 119 Maximum Optional Service Cards 25 Maximum Terminal Equipment 28 MCSLC16 Card K...

Page 156: ...umber 28 Troubleshooting by Error Log 151 Troubleshooting Connection 147 Troubleshooting Installation 146 Troubleshooting Operation 149 Troubleshooting Using the Reset Button 150 Trunk Connection 135 U Unpacking 34 W Wall Mounting 55 Wiring Precautions 33 156 Installation Manual Index ...

Page 157: ...Installation Manual 157 Notes ...

Page 158: ...uture Reference Please print record and retain the following information for future reference The serial number of this product can be found on the label affixed to the unit You should record the model number and the serial number of this unit as a permanent record of your purchase to aid in identification in the event of theft Note MODEL NO SERIAL NO DATE OF PURCHASE NAME OF DEALER DEALER S ADDRE...

Reviews: