background image

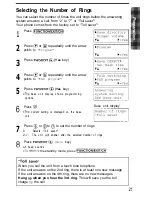
Selecting the Number of Rings

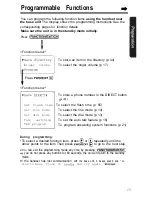
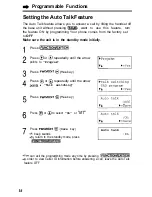
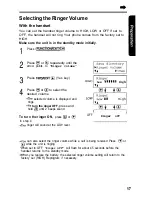
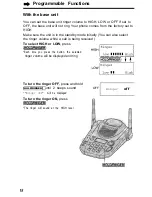
You can select the number of times the unit rings before the answering
system answers a call, from “2” to “7” or “Toll saver”*
Your phone comes from the factory set to “Toll saver”*

1

Press 

2

Press 

 or 

 repeatedly until the arrow

points to 

"Program"

3

Press 


 (Yes 

key)

4

Press 

 or 

 repeatedly until the arrow

points to 

"TAD program"

5

Press 


 (Yes 

key)

  b a s e   u n i t   d i s p l a y   s h o w s   p r o g r a m m i n g

options

Press 

 current setting is displayed on the base

unit

Base unit display

7

Press 

 or 

 to 

 to set the number of rings

0:

Selects “Toll saver”*

2-i’:

The unit 

 answer after the selected number of rings

Press 


(Save 

key)

 beep sounds


the standby mode, press 


When you call the unit from a touch tone telephone
If the unit answers on the 2nd ring, there is at least one new message
If the unit answers on the 4th ring, there are no new messages

Hang 

 when you hear the 3rd ring. 

This will save you the toll

charge 

 the call

Summary of Contents for KX- TG2583B

Page 1: ...Panasonic World Wide Web address http www Panasonic corn for customers in the USA or Puerto Rico ...

Page 2: ... a second caller s name and phone number while the user is on another call requires a subscription to both Caller ID and Call Waiting r ll ll llll 1 I Attach your purchase receipt here I I I For your future reference Serial No found on the bottom of the unit Date of purchase Name and address of dealer Accessories included For extra orders call l 800 332 5368 0 AC Adaptor p 10 Order No PQLVIOZ i Wa...

Page 3: ...unit location is Away from electrical appliances such as a TV personal computer or another cordless phone In a HIGH and CENTRAL location Note While using the handset If you are near a microwave oven which is being used noise may be heard from the receiver Move away from the microwave oven and closer to the base unit If more than one cordless phone is being used and your handset is near another cor...

Page 4: ...nit Digital Duplex Speakerphone Simultaneous Keypad Dialing Answering Calls With the Handset With the Base Unit Digital Duplex Speakerphone Caller ID Service Using the Caller List Viewing the Caller List Calling Back from the Caller List Editing the Caller s Phone Number Storing Caller List Information in the Directory Erasing Caller List Information One Touch Dialer Storing a Phone Number in the ...

Page 5: ...r Pulse Service Users 50 51 52 53 54 54 54 54 Wall Mounting Using the Belt Clip Using an Optional Headset Battery Replacement If the Following Appear Before Requesting Help Adding Another Phone Important Safety Instructions FCC and Other Information 68 70 70 71 72 74 79 80 82 FLASH Butt Setting the Unit to Answer Calls Listening to Messages From the Handset Erasing Messages Remote Operation from a...

Page 6: ...Location of Controls Base unit Antennas p 3 10 Button p 52 IN USEKHARG REDIAUPALBE Button Button p 54 55 HOLD RINGER Button p 18 29 blC Microphone p 19 28 31 52 ...

Page 7: ...LER ID indicator P 31 33 ANSWER ON Indicator p 56 57 59 ANSWER ON Button P 56 Ii Button p 55 GREETING EDIT Buttoti P 19 37 STOP EXIT B u t t o n p 19 34 48 56 57 eriAae Button p 20 39 5 Navigator Key uzmml m p 20 29 34 48 57 1 591 ...

Page 8: ...CT Button P 41 42 m Button p 26 31 INTERCOM CLEAR Button p 39 45 51 52 Navigator Key uxmml Q P 15 21 27 34 44 Charge Contact p 12 Channel Button p 15 21 26 34 44 47 m Button p 55 Charge Contact p 12 FLASH CALL WAIT PLAYBACK REDIAUPAUSE Button P 27 54 Button p 54 55 66 I ...

Page 9: ...the Caller List or directory list etc The handset can receive calls The battery life is conserved in this state While the handset is on the base unit the battery icon and the number of new Caller ID calls are displayed in the standby mode p 33 Base unit 23 LJb The day and time and the number of incoming messages are displayed while the unit is not in use Standby mode The display shows the dialed n...

Page 10: ...ONLY WITH Panasonic AC ADAPTOR PQLVlO Order No PQLVl OZ The AC adaptor must remain connected at all times It is normal for the adaptor to feel warm during use To connect a standard telephone on the same line see page 79 If your unit is connected to a PBX which does not support Caller ID services you cannot access those services 10 ...

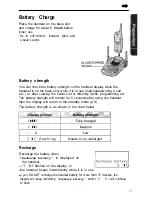
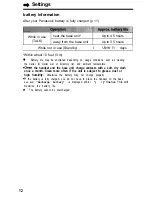
Page 11: ...tory items programming etc The battery strength will remain for 5 seconds after using the handset then the display will return to the standby mode p 9 The battery strength is as shown in the chart below 1 II Low I 11 flashing Needs to be recharged Recharge Recharge the battery when Recharge battery is displayed on the handset I I flashes on the display or the handset beeps intermittently while it ...

Page 12: ...uch as viewing the Caller ID Caller List or directory list and ambient temperature Clean the handset and the base unit charge contacts with a soft dry cloth once a month Clean more often if the unit is subject to grease dust or high humidity Otherwise the battery may not charge properly If the battery is fully charged you do not have to place the handset on the base Unit Until Recharge battery is ...

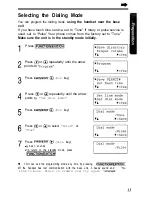
Page 13: ...TI N EXIT CH Press or J repeatedly until the arrow points to L ProgramV Press FWD EDIT Yes key Press or I repeatedly until the arrow points to Set dial mode Press FWD EDIT Yes key Press or Q to select Pulse or Tone Press FWD EDIT Save key A beet sounds To return to the standby mode press FUNCTI N EXIT H l YOU can exit the programming mode any time by pressing FUNCTIONIEXITICH If the handset has lo...

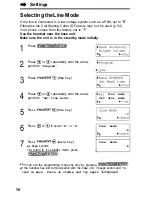
Page 14: ...edly until the arrow points to Program Press FWD EDIT Yes key Press or I repeatedly until the arrow points to Set line mode Press FWD EDIT Yes key Press Q or Q to select B or A Press FWD EDIT Save key A beep sounds To return to the standby mode press FUNCTI N EX T C 1 ogram yes 1 Set line mode Set dial mode TA b Yes Line mode B VA F Save Line mode B YOU can exit the programming mode any time by pr...

Page 15: ...To select the flash time p 55 Set line mode To select the line mode p 14 Set dial mode To select the dial mode p 13 Talk switching To set the auto talk feature p 16 TAD program L To program answering system functions p 21 During programming To select a desired function item press or repeatedly until the arrow points to the item Then press FWD EDIT to go to the next step YOU can exit the programmin...

Page 16: ... 1 2 3 4 5 6 7 Press FuNCTI N EX T CH Press Q or repeatedly until the arrow points to Program Press FWD EDIT Yes key Press Q or J repeatedly until the arrow points to Talk switching Press FWD EDIT Yes key Press Q or Q to select On or off Press FWD EDIT Save key A beep sounds To return to the standby mode press FUNCTION EXIT CH FProgram b Yes Auto talk On I I YOU can exit the programming mode any t...

Page 17: ...he desired volume The selected volume is displayed and rings To turn the ringer OFF press and hold until 2 beeps sound To turn the ringer ON press I or in step 4 The ringer will sound at the LOW level Low 111111 High I I w OFF Ringer off I You can also select the ringer volume while a call is being received Press 0 or while the unit is ringing When set to OFF Ringer off will flash for about 45 sec...

Page 18: ...ly You can also select the ringer volume while a call is being received To select HIGH or LOW press HOLD RINGER Each time you press the button the selected ringer volume will be displayed and ring HIGH tr IYIIIII Highi HOLD RINGER 4 To turn the ringer OFF press and hold HOLD RINGER until 2 beeps sound Ringer off will be displayed To turn the ringer ON press HOLD RINGER The ringer will sound at the...

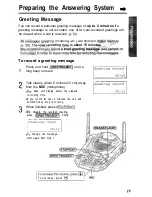
Page 19: ...ding time is about 15 minu To record a greeting message 1 Press and hold GREETING EDIT until a long beep is heard I 2 Talk clearly about 8 inches 20 cm away from the MIC microphone The base unit display shows the elapsed recording time If you record for over 2 minutes the unit will automatically stop recording 3 When finished press STOP EXIT To check the recorded greeting press GREETING EDIT brief...

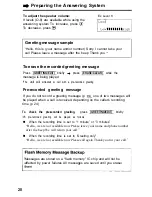
Page 20: ...greeting message If you do not record a greeting message p 19 one of two messages will be played when a call is received depending on the caller s recording time p 24 To check the pre recorded greeting press GREETING EDIT briefly A pre recorded greeting will be played as follows n When the recording time is set to 1 minute or 3 minutes Hello we are not available now Please leave your name and phon...

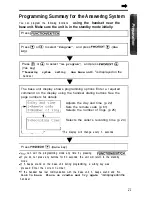
Page 21: ...he handset dialing buttons See the page numbers for details Adjusts the day and time p 22 Sets the remote code p 61 Selects the number of rings p 25 yzizzy Selects the caller s recording time p 24 L I The display will change every 3 seconds Press FWD EDIT Save key You can exit the programming mode any time by pressing FUNCTION EXIT CH If you do not press any buttons for 60 seconds the unit will re...

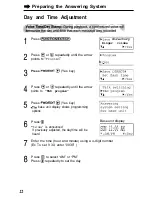
Page 22: ...il the arrow points to TAD program Press FWD EDIT I Yes key The base unit display shows programming options Press l5J Set time is announced If previously adjusted the day time will be heard bSave directory Ringer volume VA b Yes 1 f yes Base unit display m Enter the time hour and minute using a 4 digit number Ex To set 9 30 enter 0930 Press Q to select AM or PM Press 8 repeatedly to set the day 22...

Page 23: ...s working If 6 beeps sound the setting is not correct Start again from step 5 To return to the standby mode press FUNCTION EXIT CH In step 7 you cannot enter numbers greater than 12 Do not use military time To set 13 00 hours enter 01 00 and select PM by pressing ime will 23 ...

Page 24: ...oints to TAD program 5 Press FWDlEDlT Yes key The base unit display shows programming options 6 Press The current setting is displayed on the base unit 7 Press or I to select the recording time 1 1 minute 2 3 minutes 3 Greeting only R Press FWDlEDlT Save key Base unit display r i Base unit display u A beep sounds To return to the standby mode press FUN TI N EXIT H select Greeting only the unit wil...

Page 25: ...isplay shows programming options 6 Press The current setting is displayed on the base unit Base unit display 7 Press a or to J to set the number of rings 0 Selects Toll saver 2 i The unit nlill answer after the selected number of rings Press FWDlEDlT Save key A beep sounds e i 0 returri to the standby mode press FUNCTIONIEXITI H Toll saver When you call the unit from a touch tone telephone If the ...

Page 26: ...attery strength fl 3 To hang up press TALK or place the handset on the base unit I i If the handset has lost communication with the base unit 3 beeps sound and NO link to base Place on cradle and try again isdisplayed If noise interferes with the conversation Press FUNCTION EXIT CH to select a clearer channel or move closer to the base unit To redial the last number dialed on the handset Press WKK...

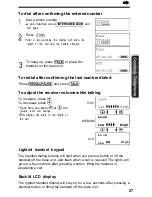
Page 27: ... press Loud To decrease press HIGH Each time you press or the Low 111iIfl High volume level will change The display will return to the length of the call MEDIUM R Q El Loud Low 1111 High Loud L O W Low Ii High Lighted handset keypad The handset dialing buttons will light when you press a button or lift the handset off the base unit and flash when a call is received The lights will go out a few sec...
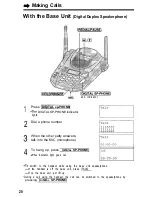
Page 28: ...hen the other patty answers talk into the MIC microphone To hang up press DIGITAL SP PHONE The indicator light goes out Off 00 00 00 To switch to the handset while using the base unit speakerphone If the handset is off the base unit press TALK If on the base unit just lift up During a call using the handset the call can be switched to the speakerphone by pressing DIGITAL SP PHONE 28 ...

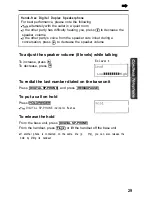
Page 29: ...ker volume To adjust the speaker volume 8 levels while talking To increase press I Ex Level 8 To decrease press To redial the last number dialed on the base unit Press DIGITAL SP PHONE and press REDIAUPAUSE To put a call on hold Press H LD RINGER The DIGITAL SP PHONE indicator flashes H31d To release the hold From the base unit press DIGITAL SP PHONE From the handset press TALK or lift the handset...

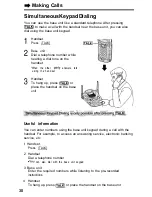
Page 30: ...y answers talk using the handset Handset To hang up press m or place the handset on the base unit Useful information You can enter numbers using the base unit keypad during a call with the handset For example to access an answering service electronic banking service etc 1 Handset Press TALK 2 Handset Dial a telephone number YOU can also dial with the base unit keypad 3 Base unit Enter the required...

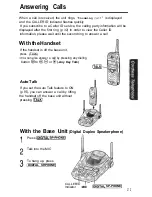
Page 31: ...t until the second ring to answer a call With the Handset If the handset is off the base unit press TALK You can also answer a call by pressing any dialing button to or Any Key Talk Tiiii Auto Talk If you set the Auto Talk feature to ON p 16 you can answer a call by lifting the handset off the base unit without pressing TALKJ With the Base UtIit Digital Duplex Speakerphone 1 Press DIGITAL sP PHONE...

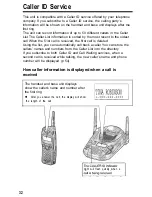
Page 32: ...51st call is received the first call is deleted Using the list you can automatically call back a caller You can store the callers names and numbers from the Caller List into the directory If you subscribe to both Caller ID and Call Waiting services when a second call is received while talking the new caller s name and phone number will be displayed p 54 How caller information is displayed when a c...

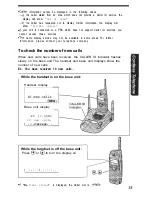
Page 33: ...me display service may not be available in some areas For further information please contact your telephone company To check the number of new calls When new calls have been received the CALLER ID indicator flashes slowly on the base unit The handset and base unit displays show the number of new calls Ex You have received 10 new calls While the handset is on the base unit Handset display w I 10 ne...

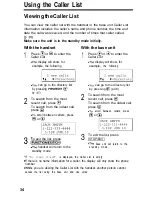
Page 34: ...ss To scroll between callers press Q or To exit the list press 3rFUNCTION EXIT CH The handset will return to the standby mode With the base unit 1 Press or to enter the Caller List The display will show for example the following I You can go to the directory list by pressing p 48 2 To search from the most recent call press Q To search from the oldest call press Q To scroll between callers press l ...

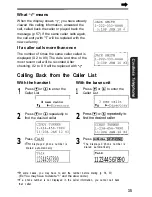
Page 35: ...X9 will be replaced with 4 p gj J Calling Back from the Caller List With the handset With the base unit 1 Press or to enter the Caller List 1 Press or to enter the Caller List 3 new calls VA b Directory 2 Press or repeatedly to find the desired caller 3 Press TALK The displayed phone number is dialed automatically 2 si l 3 3 Press DIGITAL w PHONE The displayed phone number is dialed automatically ...

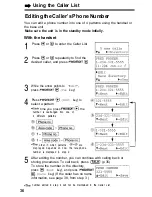
Page 36: ...ss FWD EDIT Yes key Press FWD EDIT Edit key to select a pattern Each time you press FWD EDIT the number is rearranged into one of 4 different patterns The order in which patterns I are displayed depends on how the telephone number is displayed in step 2 After editing the number you can continue with calling back or storing procedures To call back press m p 35 To store the number in the directory p...

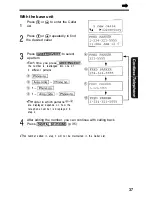
Page 37: ...ess GREETING EDIT the number is rearranged into one of 4 different patterns The order in which patterns 0 a are displayed depends on how the telephone number is displayed in step 2 t FRED PARKER 1 321 5555 I 4 After editing the number you can continue with calling back Press DIGITAL sp PHONE p 35 The number edited in step 3 will not be maintained in the Caller List 37 ...

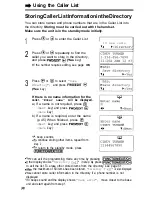
Page 38: ...ot required press Next key and press FWD EDIT Save key b If a name is required enter the name p 45 When finished press Next key and press FWD EDIT Save key A beep sounds To continue storing other items repeat from step 2 To return to the standby mode press FUNCT N EX T CH 10 new calls TA b Directorb YOU can exit the programming mode any time by pressing FUNCTION EXIT CH If the display shows Direct...

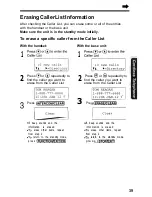
Page 39: ...edly to find the caller you want to erase from the Caller List Press INTERCOM CLEAR I 1 A beep sounds and the information is erased To erase other items repeat from step 2 To return to the standby mode press FUNCTI N EXIT With the base unit 1 2 Press Q or I repeatedly to find the caller you want to erase from the Caller List 3 Pres j ERASIR A beep sounds and the information is erased To erase othe...

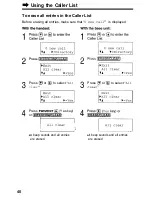
Page 40: ...e erasing all entries make sure that 0 new call is displayed 3 Press Q or to select All clear 4 Press FWD EDIT Yes key or INTERC M CLEAR I All clear I A beep sounds and all entries are erased 3 Press FJ or Q to select All cleaF A beep sounds and all entries are erased 40 ...

Page 41: ... CLEAR the digit to the left of the cursor is erased To erase all digits press and hold INTERCOM CLEAR To move the cursor press BACK or FWD EDIT V Next 6 Press Next key 1234567890123456 If you want to edit the entered number press 789012 Edit key and return to step 5 A Edit b Save 7 Press FWD EDIT Save key A beep sounds To return to the standby mode press FUNCTIONIEXITICH bProgram I I b Yes j bSav...

Page 42: ...DIRECT The stored number is displayed 1234567890123456 789012 2 Press TALK l The number is dialed You can also dial the stored number by pressing TALK then pressing 1 If your line has rotary or pulse service any access numbers stored after pressing TONE will not be dialed 42 ...

Page 43: ...der Using the directory you can make a call by selecting a name on the handset or base unit display Storing Names and Numbers in the Directory Storing must be carried out with the handset Make sure the unit is in the standby mode initially FUNCTI NIEXIT OH The dialing buttons can be used to enter letters and symbols BACK FWDIEDIT INTERCOM CLEAR REDIAuPAuSE Continued 43 ...

Page 44: ...he storing name or number press Edit key repeatedly to reach the desired display and change it 7 Press FWD EDIT Save key A beep sounds To continue storing other items repeat from step 2 To return to the standby mode press u cTi0N ExlT cH Ringer volume If a pause is required for dialing REDIAUPAUSE can be stored in a phone number in step 5 This counts as one digit p 54 You can exit the programming ...

Page 45: ...sor to the left move the cursor to the right To enter another character using the same dialing button press FWD EDIT to move the cursor to the next space If you make a mistake while entering a name Use BACK or FWD EDIT I to move the cursor to the incorrect character press INTERCOM CLEAR to delete and enter the correct character Each time you press INTERCOM CLEAR a character is erased from the righ...

Page 46: ... to move the cursor to the right Press I four times To Tom Press FWD EDIT twice to enter a blank Tom Press Q Tom 3 J Press six times then press FWDIEDIT to move the cursor to the right Press five times Tom Jo Tom Jon 10 Press five times 11 Press eight times 12 When finished press Next key To enter a phone number and continue storing see page 44 from step 5 Directory 20 items Enter name Enter phone...

Page 47: ... the desired name until any name with the same initial is displayed see the Index table on page 49 Ex To find Frank press repeatedly until the first item under F is displayed Press l J repeatedly until the name is displayed BACK FWD EDIT FUNCTI N EXIT CH You can leave the directory list any time by pressing FUNCTION EXIT CH If No items stored is displayed in step 2 the directory is empty In step 1...

Page 48: ...ter of the desired name until any name with the same initial is displayed see the Index table on page 49 Ex To find Frank press repeatedly until the first item under F is displayed Press repeatedly until the name is displayed YOU can leave the directory list any time by pressing STOP EXITJ If NO items stored is displayed in step 2 the directory is empty In step 1 you can go to the Caller List by p...

Page 49: ...ly to find the directory item that you want to dial To search for the item by initial see page 47 Frank 4567890 To exit the directory press FUNCTIONIEXITICH 4 Press TEL The number is dialed automatically 2 Press Q or Q The first item is displayed 3 Press or repeatedly to find the directory item that you want to dial To search for the item by initial see page 48 Frank 4567890 To exit the directory ...

Page 50: ...it the name using the dialing buttons BACK or FWD EDIT p 45 up to 15 characters Press Next key If you do not need to change the number go to step 7 Add a number to the current number Pressing INTERCOM CLEAR erases the digit to the left of the cursor To erase all digits press and hold INTERCOM CLEAR Press Next key If you want to change the storing name or number press Edit key repeatedly to reach t...

Page 51: ...s INTERCOM CLEAR To stop erasing press BACK No key 5 Press FWDlEDlT Yes key or INTERCOM CLEAR Clear A beep sounds and the item is erased To erase other items repeat from step 3 To return to the standby mode press FUNCTION EXIT CH Directory list VA b Caller s list 2 Press Q or J The first item is displayed 3 Press I or J repeatedly to find the directory item you want to erase To search for the item...

Page 52: ...rcom press INTERcOM CLEARI INTERCOM CLEAR T MIC Paging the handset from the base unit Handset locator Using this feature you can locate a misplaced handset 1 2 3 4 52 Base unit Press LoCATOR NTERC MI Paging is displayed on the base unit The handset beeps for 1 minute and Paging Press INTERCOM is displayed To stop paging press LOCATOR INTERCOM again Handset Press INTERC M CLEAR to answer Intercom i...

Page 53: ...dset to the base unit 1 2 3 Handset During a call press INTERCOM CLEAR Talk to the paged party after the beeps The call is put on hold and Intercom hold is displayed If the base unit user does not answer press i iX Base unit When the paging party s voice is heard answer using the MIC Base unit To answer the call press D I GITAL SP PHONE The transfer is complete From the base unit to the handset 1 ...

Page 54: ...ne is in use If this function does not operate properly consult your telephone company for details Call Waiting Caller ID Feature Call Waiting Caller ID Feature allows your unit to display the second caller s information After you hear a call waiting tone while talking the unit will display the caller s name with the phone numberand Waiting Please contact your telephone company for details and ava...

Page 55: ...on your telephone exchange or host PBX You can select the following flash times 700 600 400 300 2 50 110 100 or 90 ms milliseconds Your phone comes from the factory set to 700 ms Make sure the unit is in the standby mode initially 1 2 3 4 Press FUNCTIONIEXITICH Press I or repeatedly until the arrow points to Program and press FWDlEDlT Yes key Press or I repeatedly until the arrow points to Set fla...

Page 56: ...SWER ON Indicator AN SWER ON If you do not want the unit to answer calls press ANSWER ON again to turn off the answering system The indicator light goes out and Answel off is heard You can also turn on the answering system remotely using any other phone P 65 Monitoring incoming calls While a call is being recorded you can monitor it through the base unit speaker To answer the call with the base un...

Page 57: ...tarts _ NEW MESSAGE To adiust the speaker volume STOP EXIT 9 leveis O 8 are available while using the answering system To increase press I To decrease press During playback To repeat message To repeat from the beginning of the message Press Q If you press within 5 seconds of playback the previous message will be played To skip To skip to the next message message Press I To stop operation Press STO...

Page 58: ...s in the Caller ID Caller List p 35 FromtheHandset If someone else is in the room and you want to listen to the recorded messages privately you can use the handset 1 Handset Press FLASH CALL WAIT PLAYBACK The number of new messages is heard on the handset 2 Base unit To listen to new messages press NEW MESSAGE briefly To listen to all messages press and hold NEW MESSAGE until playback starts The m...

Page 59: ...ss ERASE CLEAR while the message you want to erase is being played The unit erases the message A short beep will sound and the unit will continue to play the next message Erasing all messages All recorded messages except the greeting message can be erased at one time 1 2 Press ERASE CLEAR Pies ERASE again to elase all messages is heard Within 5 seconds press ERASE LEAI again A beep sounds and No m...

Page 60: ...age 64 Summary of remote operation P 62 Call your unit from a touch tone phone Enter your remote code p 61 during or after the greeting message The number of new messages is heard After 3 seconds the voice menu will start p 62 Follow the menu or enter the direct commands p 64 f To end remote operation hang up The messages are saved The unit will announce the remaining recording time after playback...

Page 61: ...y Press I or J repeatedly until the arrow points to TAD program Press FWD EDIT Yes key The base unit display shows programming options Press I The current remote code is displayed on the base unit Enter a remote code using a 2 digit number 00 99 Press FWD EDIT Save key A beep sounds FProgram b Yes FSave DIRECT Set flash time TA b Yes Base unit display Remote code _ _ L 2 To return to the standby m...

Page 62: ...I Remote Operation from a Touch Tone Phone VoiceMenu The shaded boxes are voice prompts Press 1 to play back all messages s Fjm t Press Q J Press 1 to play back new messages Press Q Press CiJ Press 62 ...

Page 63: ...Message You can leave a personal message 1 Talk after you hear Please leave your message 2 When you finish recording hang up Erasing All Messages All recorded messages except greeting message are erased 1 Recording a Greeting Message You can re record your greeting message 1 Press Q You will hear a voice prompt followed by a long beep 2 After the beep talk for up to 2 minutes 3 When you finish rec...

Page 64: ... SKIP 0 2 The current message is skipped During playback The next message is played STOP l operation is stopped temporarily To resume operation enter a direct command within 15 seconds or the voice menu will start GREETING MESSAGE 0 7 RECORDING RECORD A long beep sounds After the beep talk immediately for up to 2 minutes The recording is stopped The recorded message is played ERASING A Em The curr...

Page 65: ...ed The answering system will turn on Hang up or enter the remote code for other options When turning on the answering system using a rotary or pulse service telephone you cannot enter the remote code for other options Skipping the greeting message After calling your unit press during the greeting message The unit skips the rest of the greeting message and you can start recording your message after...

Page 66: ...message playback will start I I 1 To end remote operation press FLASH CALL WAIT PLAYBACKJ The messages are saved The unit will announce the remaining recording time after playback if it is less than 5 minutes If the unit starts to ring during the remote operation press TALK to answer the call The remote operation is ended If you hear Memory full after playback erase some or all of the messages P 6...

Page 67: ...kip a message STOP Operation is stopped temporarily To resume operation enter a direct command within 15 seconds or the voice menu will start p 66 J A short beep will sound and the next ERASING A The current message is erased SPECIFIC MESSAGE message will be played During playback I ERASING ALL Em All recorded messages are erased MESSAGES A long beep sounds and No messages is I heard ANSWERING SYS...

Page 68: ...ate the cradle 90 until it faces straight de the lock switch to LOCK with the cradle facing straight up 2 Connect the AC adaptor 3 Tuck the telephone line cord inside the wall mounting adaptor Connect the telephone line cord to the unit Install the adaptor by pushing it in the direction of the arrow The word UP should face upward 68 ...

Page 69: ...t the telephone line cord Mount the unit then slide down Raise the antennas 5 To charge the handset battery Place the handset in the cradle as shown The IN USE CHARGE indicator lights IN USE CHARGE Indicator 69 ...

Page 70: ...ing an Optional Headset Plugging an optional headset into the handset allows a hands free phone conversation Please use only the Panasonic KX TCA88 headset To order call the accessories telephone number on page 2 Connecting the headset to the handset Open the headset jack cover and connect the headset to the headset jack as shown below 70 ...

Page 71: ...e the battery Then place the battery leads inside the groove otherwise the leads may be damaged when closing the cover Close the cover Make sure you charge the new battery for about 6 hours in order to display the battery strength prompt correctly p 11 Attention The product you have purchased is powered by a nickel cadmium battery which is recyclable At the end of its useful life under various sta...

Page 72: ... handset while the handset was on the base unit Lift the handset and press the button again When trying to store an item or Caller List information in the directory the directory memory is full p 38 44 To erase other stored items from the directory see page 51 While the base unit was not in the standby mode or I was pressed to search the Caller List directory list FWDlEDlT was pressed to select an...

Page 73: ...he day and time flashes with a Adjust the clock p 22 Your greeting message was not recorded correctly Record it again p 19 If message memory is full Message full will flash Erase some or all of the messages The display will be shown when the handset is ...

Page 74: ...nnel The handset and or the base The ringer volume is set to OFF Set to unit do not ring HIGH or LOW p 17 18 The handset display is The handset is in the standby mode blank p 9 Press BACK I or FWD EDIT to turn the display on The handset display is still Charge the battery fully p 11 blank after pressing a BACK or FWD EDIT You cannot store a name and phone number in the directory l You cannot store...

Page 75: ... a page 14 conversation the unit does not display the new caller s name and or phone number You cannot page the The handset is too far from the base unit handset or the base unit The handset or the base unit is engaged in an outside call viewing the Caller List directory list or listening to messages Try again later If you are using the base unit wait until Handset in use disappears You cannot red...

Page 76: ...e or all of the messages p 59 You cannot listen to the recorded messages Make sure that the unit is in the standby mode Message full flashes Memory is full Erase some or all of the on the base unit display and messages p 59 the ANSWER ON indicator flashes rapidly and no new messages are recorded You cannot operate the answering system at the base unit The handset user is operating the answering sy...

Page 77: ...ing and stops recording To answer the call press DIGITAL sP PHONE or press TALK Start again from the beginning after hanging up During playback the unit starts to ring and stops playback To answer the call press DIGITAL SP PHONE or press TALKJ To resume playback press NEW MESSAGE after hanging up The base unit does not If the caller is not stored in the Caller display the name and or List the base...

Page 78: ...is in the talk or speakerphone mode when viewing the Caller List directory list or while the answering system is in use Do not pause for over 60 seconds while programming Move closer to the base unit Make sure that the unit is in the standby mode Previously programmed information is erased If a power failure occurs programmed information may be erased Reprogram if necessary Recharge battery iS Cha...

Page 79: ...1 1 PANA 7262 Panasonic s e mail address for customer inquiries consumerproducts panasonic corn for customers in the USA or Puerto Rico ONLY Adding Another Phone This unit will not function during a power failure To connect a standard telephone on the same line use the Panasonic T adaptor KX J66 To order call the accessories telephone number on page 2 T Adaptor KX J66 ...

Page 80: ... can result in the risk of fire or electric shock Never push any objects through slots in this unit This may result in the risk of fire or electric shock Never spill any liquid on the unit To reduce the risk of electric shock do not disassemble this unit Take the unit to an authorized servicenter when service is required Opening or removing covers may expose you to dangerous voltages or other risk...

Page 81: ...ENT FIRE OR SHOCK HAZARD DO NOT EXPOSE THE BASE UNIT TO RAIN OR ANY TYPE OF MOISTURE ONLY THE HANDSET IS SHOCK AND SPLASH RESISTANT The AC adaptor is used as the main disconnect device ensure that the AC outlet is located installed near the unit and is easily accessible Splash Resistant HANDSET ONLY The handset is designed to be splash resistant You can use the handset with wet hands CAUTION l Do ...

Page 82: ...Inform the customer of the right to bring a complaint to the Federal Communication Commission pursuant to procedures set out in FCC Rules and Regulations Subpart E of Part 68 The Telephone Company may make changes in its communications facilities equipment operations or procedures where such action is reasonably required in the operation of its business and is not inconsistent with the rules and r...

Page 83: ...d near or on top of a TV or VCR If interference is experienced move the cordless telephone further away from the TV or VCR This will often reduce or eliminate interference Operating near 2 4GHz electrical appliances may cause interference Move away from the electrical appliances and or press the CH Channel button Environment do not place the unit in a room where the temperature is less than 5 C 41...

Page 84: ...e in the United States of America Sale or use of this product in other countries may violate local laws l Ce telephone sans fil est concu pour re utilise aux ctats Unis d Am ique La vente ou I emploi de cet appareil dans certains autres pays peut constituer une infraction a la legislation locale l Este telefono sin cord6n fue elaborado para uso en 10s Estados Unidos de America La venta o el empleo...

Page 85: ...maximum distance and noise free operation place the base unit in a HIGH and CENTRAL location with no obstructions or interference from electrical appliances Charge the battery for about 6 hours before initial use Place the handset on the base unit The IN USE CHARGE indicator lights and a beep sounds m IN US lndica ...

Page 86: ...s on the display or the handset beeps intermittently while it is in use Clean the handset and the base unit charge contacts with a soft dry cloth once a month Clean more often if the unit is subject to grease dust or high humidity Otherwise the battery may not charge properly SelectingtheDialingMode Your phone comes from the factory set to Tone If you cannot dial set to Pulse Use the handset near ...

Page 87: ...e available Each time you press the volume level will change Answering Calls With the handset Press TALKJ YOU can also answer a call by pressrng any dialing button to or aIf you set the Auto Talk feature to ON you can answer a call by lifting the handset off the base unit see page 16 In the Operating Instructions With the base unit Press DIGITAL SP PHONE and talk into the MIC One Touch Dialer A ph...

Page 88: ...Blank To move the cursor to the left To move the cursor to the right To enter another character using the same dialing button press FWD EDIT to move the cursor to the next space If you make a mistake while entering a name use BACK or FWD EDIT I to move the cursor to the Incorrect character press INTERCOM CLEAR to delete and enter the correct character Each time you press INTERCOM CLEAR a character...

Page 89: ...t The Caller List Information IS sorted by the most recent to the oldest call When the 51 st call IS received the first call IS deleted How caller information is displayed when a call is received The handset and base unit displays show the caller s name and number after the first ring After you answer the call the display will show the length of the call p z K Caller information cannot be displaye...

Page 90: ... rnstructions on the display The phone number will be edited into one of the 4 patterns For details see page 36 in the English Operating Instructions 1 555 666 7777 l 234 456 7890 With the base unit 7 Press Q or Q 2 Press repeatedly to find the desired caller aIf there IS no name information for a caller the display will only show the phone number To return to the previous caller press When b Dlre...

Page 91: ...ay Selecting the caller s recording time Your phone comes from the factory set to 3 minutes If you select greeting only the unit will not record a caller s message F NCT ON EXIT H m or Q to select Program I FWD EDIT Yes key I or to SfhCt TAD program I I FWD EDIT Yes key I a FWDlEDlT Save key 1 1 minute 2 3 minutes 3 greeting only Selecting the number of rings before the unit answers You can select...

Page 92: ...tor lights and Answer set IS heard oThe unit will announce the remarnrng recording time if it IS less than 5 minutes If Memory full IS heard Message full flashes on the base unit and the ANSWER ON indicator flashes rapidly erase some or all of the messages ListeningtoMessages The base unit display shows the total number of recorded messages If the ANSWER ON indicator light flashes new messages hav...

Page 93: ...enna located at 20 cm or more from persons and handset should be carned with the specific belt clip provided for the handset to ensure compliance Other non tested belt clips or similar body worn accessones may not comply therefore should be avoided Pnnted In Malaysia PQQWl2470ZA BM S M 0 2 0 1 M K O ...

Page 94: ...A 40 ameuuoyad doI panuguo3 sansse i yl uqd S AJEJS papualxa Uij Hwuolsnj AlNO VSfl WI all 1BUSINESS REPLY MAIL FIRST CLASS MAIL PERMIT NO 110 ELGIN IL POSTAGE WILL BE PAID BY THE ADDRESSEE PaIMbSOniC auS ar Technics CUSTOMER CARE PLAN ADMINISTRATION PANASONIC SERVICES COMPANY 545 TOLLGATE RD STE C ELGIN IL 60123 9964 UNITED STATES l II II ll l l II l l I I II l lll l ...

Page 95: ...plete the attached postage paid postcard and drop it in the mail We will contact you rom more information about the Customer are 8 B tly with Ian OR CALL l 800 837 2007 OFFERED AND ADMINISTERED BY Customer Care Plan Administration PANASONIC SERVICES COMPANY 545 Tollgate Road Suite C Elgin IL 60123 9964 I OWN A Panasonic 0 4u ac 0 Technics Model No Date of Purchase Serial No 5 I would like more inf...

Reviews: