background image

Useful Information

41

For assistance, please visit http://www.panasonic.com/help

Troubleshooting

If you still have difficulties after following the instructions in this section, disconnect 
the base unit’s AC adaptor, then reconnect the base unit’s AC adaptor. Remove the 
batteries from the handset, and then insert the batteries into the handset again.

General use

Programmable settings

Problem

Cause/solution

The unit does not work.

L

Make sure the batteries are installed correctly 
(page 8).

L

Fully charge the batteries (page 8).

L

Check the connections (page 8).

L

Unplug the base unit’s AC adaptor to reset the 
unit. Reconnect the adaptor and try again.

L

The handset has not been registered to the base 
unit. Register the handset (page 26).

I cannot hear a dial tone.

L

The base unit’s AC adaptor or telephone line cord 
is not connected. Check the connections.

L

If you are using a splitter to connect the unit, 
remove the splitter and connect the unit to the wall 
jack directly. If the unit operates properly, check 
the splitter.

L

Disconnect the base unit from the telephone line 
and connect the line to a known working 
telephone. If the working telephone operates 
properly, contact our service personnel to have the 
unit repaired. If the working telephone does not 
operate properly, contact your service provider/
telephone company.

The indicator on the 
handset flashes slowly.

L

New messages have been recorded. Listen to the 
new messages (page 32).

L

New voice mail messages have been recorded. 
Listen to the new voice mail messages (page 37).

Problem

Cause/solution

I have changed the display 
language to a language I 
cannot read.

L

Change the display language (page 12).

While programming, the 
handset starts to ring.

L

A call is being received. Answer the call and start 
again after hanging up.

TG743x(e).book  Page 41  Monday, December 8, 2008  1:36 PM

Summary of Contents for KX-TG7431B

Page 1: ... customers in the U S A or Puerto Rico Charge the batteries for about 7 hours before initial use Consulte Guía Rápida Española página 48 Operating Instructions Expandable Digital Cordless Answering System Model shown is KX TG7431 with 2 Handsets Model No KX TG7432 with 3 Handsets Model No KX TG7433 with 4 Handsets Model No KX TG7434 Model No KX TG7431 Panasonic s environmental declaration labels T...

Page 2: ...cial programming 23 Registering a unit 26 Caller ID Service Using Caller ID service 27 Caller list 28 Answering System Answering system 30 Turning the answering system on off 30 Greeting message 31 Listening to messages using the base unit 31 Listening to messages using the handset 32 Remote operation 33 Answering system settings 34 Voice Mail Service Voice mail service 36 Intercom Locator Interco...

Page 3: ...o Base unit Handset Part No Part No Quantity KX TG7431 series KX TG7431 1 KX TG7431 KX TGA740 1 KX TG7432 KX TG7431 KX TGA740 2 KX TG7433 KX TG7431 KX TGA740 3 KX TG7434 KX TG7431 KX TGA740 4 No Accessory item Order number Quantity KX TG 7431 KX TG 7432 KX TG 7433 KX TG 7434 1 AC adaptor PQLV219Z 1 2 3 4 2 Telephone line cord PQJA10075Z 1 1 1 1 3 Rechargeable batteries HHR 4DPA Part No HHR 65AAABU...

Page 4: ...t of the supplied handsets Optional handset feature overview Accessory item Order number Rechargeable batteries HHR 4DPA 1 L To order please call 1 800 332 5368 or visit http www panasonic com batterystore Battery requirement Nickel metal hydride Ni MH type battery 2 AAA R03 batteries for each of every handsets Headset KX TCA60 KX TCA86 KX TCA92 KX TCA93 KX TCA94 T adaptor KX J66 Battery back up p...

Page 5: ...devices to malfunction resulting in an accident L Do not allow the AC adaptor or telephone line cord to be excessively pulled bent or placed under heavy objects Operating safeguards L Unplug the product from power outlets before cleaning Do not use liquid or aerosol cleaners L Do not disassemble the product L Do not spill liquids detergents cleansers etc onto the telephone line cord plug or allow ...

Page 6: ...ple near a bathtub washbowl kitchen sink or laundry tub in a wet basement or near a swimming pool 2 Avoid using a telephone other than a cordless type during an electrical storm There may be a remote risk of electric shock from lightning 3 Do not use the telephone to report a gas leak in the vicinity of the leak 4 Use only the power cord and batteries indicated in this manual Do not dispose of bat...

Page 7: ...product can store your private confidential information To protect your privacy confidentiality we recommend that you erase information such as phonebook or caller list entries from the memory before you dispose of transfer or return the product Specifications Standard DECT 6 0 Digital Enhanced Cordless Telecommunications 6 0 Frequency range 1 92 GHz to 1 93 GHz RF transmission power 115 mW max Po...

Page 8: ...teries AAA R03 size L Do NOT use Alkaline Manganese Ni Cd batteries L Confirm correct polarities S T Battery charge Charge for about 7 hours L When the batteries are fully charged the charge indicator goes off Base unit Base unit Correct Wrong Hook Hook 120 V AC 60 Hz To single line telephone jack RJ11C DSL ADSL filter Not supplied Click Click Press plug firmly 120 V AC 60 Hz Hooks Rechargeable Ni...

Page 9: ...Note for battery charge L It is normal for the handset to feel warm during charging L Clean the charge contacts of the handset base unit and charger with a soft and dry cloth once a month Clean more often if the unit is exposed to grease dust or high humidity Battery level Note L The batteries need to be charged if the handset alerts you with a voice announcement talking battery alert after you fi...

Page 10: ...the feature shown directly above it on the display B Joystick By pushing the joystick V or repeatedly you can scroll through up down left or right various lists or items adjust the receiver or speaker volume up or down while talking L As all multiple items cannot be displayed on screen at the same time you can quickly search the desired item to move screens by pushing the joystick right or left in...

Page 11: ...nu icon is shown on one screen in large characters at a time Note L You can set the unit to always show a single item or multiple items beforehand by selecting Single item or Multi items as the display mode setting page 25 L When Multi items is selected as the display mode you can switch the screen to confirm the detailed information by pressing SINGLE Item Meaning w Within range of a base unit _ ...

Page 12: ...your telephone line service The default setting is Tone Tone For tone dial service Pulse For rotary pulse dial service 1 MENU center of joystick i 1 2 0 2 V Select the desired setting 3 SAVE i OFF Date and time 1 MENU center of joystick i 1 0 1 2 Enter the current month date and year by selecting 2 digits for each Example July 15 2009 0 7 1 5 0 9 3 OK 4 Enter the current hour and minute 12 hour cl...

Page 13: ...l list 1 REDIAL 2 V Select the desired phone number i ERASE 3 V Yes i SELECT 4 OFF Pause for PBX long distance service users A pause is sometimes required when making calls using a PBX or long distance service When storing a calling card access number and or PIN in the phonebook a pause is also needed page 17 Example If you need to dial the line access number 9 when making outside calls with a PBX...

Page 14: ...e on hold the call is disconnected L If another phone is connected to the same line page 9 you can also take the call by lifting its handset Mute While mute is turned on you can hear the other party but the other party cannot hear you 1 Press MUTE during an outside call L MUTE flashes 2 To return to the conversation press MUTE again Note L MUTE is a soft key visible on the handset display during a...

Page 15: ... entering access numbers which require tone dialing Handset clarity booster This feature can improve sound clarity when the handset is used in an area where there may be interference During an outside call this feature is turned on automatically when necessary L When this feature is turned on is displayed L While this feature is turned on the battery operating time is shortened page 9 Call share T...

Page 16: ...p 2 8 OFF Note L If you select No Ringer ID default the handset uses the ringer tone you selected on page 21 when a call is received from that caller L When you assign the ringer ID to an entry in the shared phonebook using one handset it is applied for all handsets Character table for entering names L To enter another character that is located on the same dial key first push the joystick right to...

Page 17: ...hange the ringer ID V Select the current ringer ID i SELECT i Select the desired setting i OK L To turn the ringer ID off select No Ringer ID 3 SAVE i OFF Erasing entries 1 Find the desired entry page 16 2 ERASE 3 V Yes i SELECT i OFF Chain dial This feature allows you to dial phone numbers in the phonebook while you are on a call This feature can be used for example to dial a calling card access ...

Page 18: ...tick in any direction i SELECT 3 Push the joystick down or up to select the desired item in sub menu 1 i SELECT L In some cases you may need to select from sub menu 2 i SELECT 4 Push the joystick down or up to select the desired setting i SAVE L This step may vary depending on the feature being programmed L To exit the operation press OFF Note L See page 20 for the default settings Main menu Sub m...

Page 19: ...End 23 Set date time Date and time 1 12 Alarm 23 Time adjust 1 Talking CallerID Handset 27 Base unit 1 Voice Mail Store V M no 1 36 VM tone detect 1 36 Call block 1 24 Message alert 35 Display setting Display mode 25 LCD contrast Key tone Auto talk 13 Caller ID edit 1 28 Set tel line Set dial mode 1 12 Set flash time 1 14 Set line mode 1 Registration Register handset 26 Deregistration 26 Change la...

Page 20: ...ce 2 Daily 0 Off 23 Answer off 3 2 8 r 30 Answer on 3 2 7 r 30 Auto talk 2 2 0 0 1 On 0 Off 13 Block w o num Block calls without phone number 2 4 0 1 On 0 Off r 25 Call block 2 1 7 r 24 Caller ID edit Caller ID number auto edit 2 1 4 1 On 0 Off r 28 Caller list 2 1 3 28 Check greeting 3 0 3 31 Customer support 3 6 8 0 Date and time 1 0 1 r 12 Deregistration 1 3 1 26 Display Change language 1 1 0 1...

Page 21: ...2 1 1 2 7 2 7 rings 4 0 Toll saver r 34 Ringer tone 5 6 Handset 1 6 1 1 3 Tone 1 3 4 7 Melody 1 4 Ringer volume 7 Handset 1 6 0 1 Low 2 Medium 3 High 0 Off Set dial mode 1 2 0 1 Pulse 2 Tone r 12 Set flash time 8 1 2 1 0 900ms 1 700ms 2 600ms 3 400ms 4 300ms 5 250ms 200ms 160ms 6 110ms 7 100ms 8 90ms 9 80ms r 14 Set line mode 9 1 2 2 1 A 2 B r Silent mode On Off 2 3 8 1 On 0 Off 23 Silent mode Sta...

Page 22: ... a dial tone or no one on the line when you answer the call 7 When the ringer volume is turned off is displayed and the handset does not ring for outside calls However even when the ringer volume is set to off the handset rings at the low level for alarm page 23 and intercom calls and paging page 38 8 The flash time depends on your telephone exchange or host PBX Contact your PBX supplier if necess...

Page 23: ...ur and minute you wish to end this feature 6 AM PM Select AM or PM 7 SAVE i OFF L When the silent mode is set is displayed Note L To correct a digit push the joystick left or right to move the cursor to the digit then make the correction Changing the start and end time 1 MENU center of joystick i 2 3 7 2 Continue from step 3 Turning silent mode on off page 23 Alarm You can set one of 2 different a...

Page 24: ...the call block list as unwanted Storing unwanted callers page 24 the unit receives a call without phone number Block calls without phone number page 25 When a call is received the unit rings for a short time while the caller is being identified If the unit recognizes the call as unwanted Caller blocked is displayed and the unit sends out a busy tone to the caller and then disconnects the call Impo...

Page 25: ...mber feature is turned on To turn the feature off w o NUM i V i SAVE i OFF Display mode You can select to display either a single item or multiple items on one screen at a time for the following features menu list phonebook list caller list redial list message list and call block list handset top menu icons in function menu Select the desired setting Multi items Multiple entries all menu icons are...

Page 26: ... If all registered handsets start ringing press the same button to stop Then repeat this step L The next step must be completed within 90 seconds 3 Handset Press OK then wait until a long beep sounds 4 OFF Note L While registering Base regtr ing Base registering is displayed on all registered handsets L When you purchase an additional handset refer to the additional handset s installation manual f...

Page 27: ...stored in the phonebook the stored name in the phonebook is displayed and logged in the caller list Talking Caller ID This feature lets you know who is calling without looking at the display To use this feature you must subscribe to a Caller ID service of your service provider telephone company turn this feature on page 21 22 When caller information is received the handsets and base unit announce ...

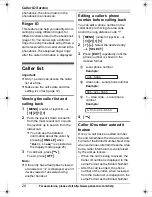
Page 28: ... 25 3 To call back press C To exit press OFF Note L If the entry has already been viewed or answered Q is displayed even if it was viewed or answered using another handset Editing a caller s phone number before calling back You can edit a phone number in the caller list by removing its area code and or the long distance code 1 1 MENU center of joystick i 2 1 3 2 V Select the desired entry i SELECT...

Page 29: ...d area codes are automatically edited L If you move to another area you can turn this feature off to erase previously edited area codes To use this feature again turn it on and reprogram the area codes you want to edit once again Erasing selected caller information 1 MENU center of joystick i 2 1 3 2 V Select the desired entry 3 ERASE i V Yes i SELECT i OFF Erasing all caller information 1 MENU ce...

Page 30: ...s turned on L When the message memory becomes full If you use the pre recorded greeting message the unit automatically switches to another pre recorded greeting message asking callers to call again later If you recorded your own greeting message the same message is still announced to callers even though their messages are not recorded Turning the answering system on off Press ANSWER ON to turn on ...

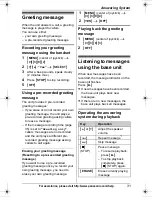
Page 31: ...e unit plays a different pre recorded greeting message asking callers to call again Erasing your greeting message Resetting to a pre recorded greeting message If you want to use a pre recorded greeting message once you record your own greeting message you need to erase your own greeting message 1 MENU center of joystick i 3 0 4 2 YES i OFF Playing back the greeting message 1 MENU center of joystic...

Page 32: ...ss C Listening to messages from the message list You can select the item to play back 1 MENU center of joystick i 3 2 9 2 V Select the desired item from the message list i PLAY L You can erase the selected message as follows ERASE i V Yes i SELECT 3 When finished press OFF Note L If the item has already been heard Q is displayed even if it was heard using another handset L If the unit cannot recei...

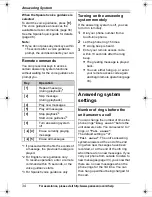
Page 33: ...stick i 3 0 6 2 Enter the desired 3 digit remote access code i SAVE i OFF Using the answering system remotely 1 Dial your phone number from a touch tone phone 2 After the greeting message starts enter your remote access code L The unit plays back new messages L The voice guidance announcements are different depending on the voice guidance language setting page 12 3 Follow the voice guidance prompt...

Page 34: ...hone 2 Let the phone ring 15 times L A long beep is heard 3 Enter your remote access code within 10 seconds after the long beep L The greeting message is played back L You can either hang up or enter your remote access code again and begin remote operation page 33 Answering system settings Number of rings before the unit answers a call You can change the number of times the phone rings Ring count ...

Page 35: ...ny before changing this setting Change the number of rings of the voice mail service so that the answering system can answer the call first To do so contact your service provider telephone company Caller s recording time You can change the maximum message recording time allotted to each caller You can also select Greeting only which sets the unit to greet callers but not record messages The defaul...

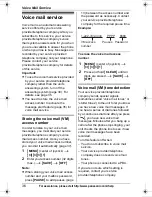
Page 36: ...t automatically page 37 1 MENU center of joystick i 3 3 1 2 Enter your access number 32 digits max i SAVE i OFF Note L When storing your voice mail access number and your mailbox password press PAUSE to add pauses page 13 between the access number and the password as necessary Contact your service provider telephone company for the required pause time Example To erase the voice mail access number ...

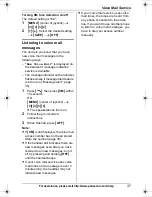
Page 37: ... seconds OR MENU center of joystick i 3 3 0 L The speakerphone turns on 2 Follow the pre recorded instructions 3 When finished press OFF Note L If VM is not displayed the voice mail access number has not been stored Store the number page 36 L If the handset still indicates there are new messages even after you have listened to all new messages turn it off by pressing and holding OFF until the hand...

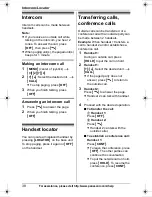
Page 38: ...or OFF on the handset Transferring calls conference calls Outside calls can be transferred or a conference call with an outside party can be made between 2 handsets Example When handset 1 transfers a call to handset 2 and or establishes a conference call 1 Handset 1 During an outside call press HOLD to put the call on hold 2 Handset 1 V Select the desired unit i CALL L If the paged party does not ...

Page 39: ...isit http www panasonic com help Belt clip Wall mounting 1 Drive the screws not supplied into the wall 2 Mount the charger A then slide it down B and to the right C until it is secure To attach To remove 25 4 mm 1 inch Screws 120 V AC 60 Hz A B C ...

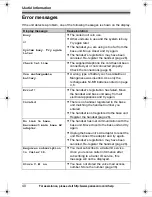
Page 40: ...chargeable Ni MH batteries noted on page 4 6 Error L The handset s registration has failed Move the handset and base unit away from all electrical appliances and try again Invalid L There is no handset registered to the base unit matching the handset number you entered L The handset is not registered to the base unit Register the handset page 26 No link to base Reconnect main base AC adaptor L The...

Page 41: ...r or telephone line cord is not connected Check the connections L If you are using a splitter to connect the unit remove the splitter and connect the unit to the wall jack directly If the unit operates properly check the splitter L Disconnect the base unit from the telephone line and connect the line to a known working telephone If the working telephone operates properly contact our service person...

Page 42: ... L Clean the battery ends S T and the charge contacts with a dry cloth and charge again Problem Cause solution _ is displayed L The handset is too far from the base unit Move closer L The base unit s AC adaptor is not properly connected Reconnect AC adaptor to the base unit L You are using the handset or base unit in an area with high electrical interference Re position the base unit and use the h...

Page 43: ...e line jack plug the unit directly into the wall jack L If you use a DSL ADSL service we recommend connecting a DSL ADSL filter between the base unit and the telephone line jack Contact your DSL ADSL provider for details L The name display service may not be available in some areas Contact your service provider telephone company for details L Other telephone equipment may be interfering with this ...

Page 44: ...D CWID you must first contact your service provider telephone company and subscribe to the desired service After subscribing you may need to contact your service provider telephone company again to activate this specific service even if you already subscribed to both Caller ID and Call Waiting with Caller ID services CWID Problem Cause solution The unit does not record new messages L The answering...

Page 45: ...one Try again using a touch tone phone While recording a greeting message or listening to messages the unit rings and the operation stops L A call is being received Answer the call and try again later Problem Cause solution Liquid or other form of moisture has entered the handset base unit L Disconnect the AC adaptor and telephone line cord from the base unit Remove the batteries from the handset ...

Page 46: ...t if advance notice isn t practical the telephone company will notify the customer as soon as possible Also you will be advised of your right to file a complaint with the FCC if you believe it is necessary The telephone company may make changes in its facilities equipment operations or procedures that could affect the operation of the equipment If this happens the telephone company will provide ad...

Page 47: ...uipment off and on the user is encouraged to try to correct the interference by one or more of the following measures Reorient or relocate the receiving antenna Increase the separation between the equipment and receiver Connect the equipment into an outlet on a circuit different from that to which the receiver is connected Consult the dealer or an experienced radio TV technician for help Some cord...

Page 48: ...parezca Cargando L Use sólo el adaptador de corriente Panasonic PQLV219 incluido L UTILICE SÓLO baterías de Ni MH tamaño AAA R03 L NO utilice baterías Alcalinas de Manganeso o de Ni Cd L Confirme que las polaridades estén correctas S T Gancho Gancho 120 V CA 60 Hz A la toma de teléfono de línea única RJ11C Filtro DSL ADSL no se suministran Clic Clic Oprima firmemente el contacto Para usuarios de l...

Page 49: ...efónico lista de personas que llamaron lista de remarcación lista de mensajes y lista de bloqueo de llamadas iconos del menú superior del auricular en el menú de funciones Los siguientes iconos se muestran al oprimir el centro del joystick en modo en espera Puede cambiar temporalmente el modo de pantalla de la siguiente manera al oprimir la tecla de función de la derecha que aparece al ver las lis...

Page 50: ...ra contestar llamadas C s Para colgar OFF Para ajustar el volumen del receptor o del altavoz Empuje el joystick hacia arriba o hacia abajo repetidamente mientras habla Cómo hacer una llamada usando la lista de remarcación REMR i V Seleccione el número telefónico deseado i C Para ajustar el volumen del timbre del auricular 1 MENU centro del joystick i 1 6 0 2 V Seleccione el volumen deseado i GUARD...

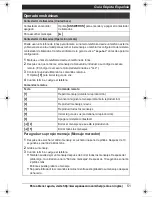
Page 51: ...zando los comandos remotos L Oprima 9 para iniciar la guía de voz 4 Cuando termine cuelgue el teléfono Comandos remotos Tecla Comando remoto 1 Repetir mensaje durante la reproducción 2 Avanzar al siguiente mensaje durante la reproducción 4 Reproducir mensajes nuevos 5 Reproducir todos los mensajes 9 Iniciar la guía de voz se detiene la reproducción 0 Apagar el sistema contestador 4 Borrar el mensa...

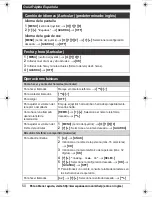
Page 52: ...ta la conversación L Trate de reubicar la unidad base de forma que se minimice la distancia al auricular L Si ocurre el mismo problema aunque el auricular se encuentre enseguida de la unidad base llame a soporte al cliente de Panasonic al 1 800 211 PANA 1 800 211 7262 Es posible añadir otro auricular accesorio a mi unidad base L Sí puede añadir hasta 6 auriculares incluyendo los que se venden con ...

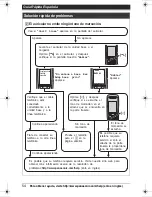
Page 53: ...ería del auricular y después conecte el adaptador para corriente e inserte de nuevo la batería en el auricular Trate de registrar de nuevo el auricular Levante el auricular y después inténtelo de nuevo Si el auricular sigue mostrando el mismo mensaje trate de registrar de nuevo el auricular Cargando aún no aparece El nuevo registro falló El nuevo registro falló Cargando aparece ahora Es posible qu...

Page 54: ...tra en la parte trasera Sin tono de marcación El tono de marcación se escucha 2 El auricular no emite ningún tono de marcación Pruebe el remedio para el 1 en la página anterior Vea si Verif Línea aparece en la pantalla del auricular Es posible que su teléfono requiera servicio si sólo el altavoz de la parte trasera le proporciona tono de marcación Es posible que su teléfono requiera servicio Visit...

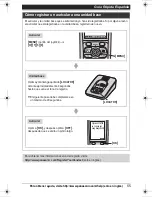
Page 55: ...o de nuevo MENU centro del joystick i 1 3 0 Oprima y mantenga oprimido LOCATOR durante aproximadamente 4 segundos hasta que suene el tono de registro L El siguiente paso debe completarse en un máximo de 90 segundos Oprima OK y después oprima OFF después de que se emita un pitido largo Para obtener más información acerca del registro visite http www panasonic com RegisterYourHandset sólo en inglés ...

Page 56: ...onday Friday 9 am to 9 pm Saturday Sunday 10 am to 7 pm EST TTY users hearing or speech impaired users can call 1 877 833 8855 TTY users hearing or speech impaired users can call 1 866 605 1277 Purchase Parts Accessories and Instruction Books online for all Panasonic Products by visiting our Web Site at http www pstc panasonic com or send your request by E mail to npcparts us panasonic com You may...

Page 57: ... This Limited Warranty only applies to products purchased and serviced in the United States or Puerto Rico This Limited Warranty is extended only to the original purchaser and only covers products purchased as new For assistance in the continental United States and Puerto Rico in obtaining repairs please ship the product prepaid to PSTC Panasonic Exchange Center 4900 George McVay Drive Suite B Doo...

Page 58: ... for lost time lost calls or messages cost of having someone remove or re install an installed unit if applicable travel to and from the servicer The items listed are not exclusive but are for illustration only ALL EXPRESS AND IMPLIED WARRANTIES INCLUDING THE WARRANTY OF MERCHANTABILITY ARE LIMITED TO THE PERIOD OF THE LIMITED WARRANTY Some states do not allow the exclusion or limitation of incide...

Page 59: ...ntrol type 10 Customer support 20 D Date and time 12 Dialing mode 12 Direct commands 20 Display Contrast 20 Language 12 Mode 25 E Error messages 40 F Flash 14 21 G Greeting message 31 H Handset Deregistration 26 Locator 38 Registration 26 Hold 14 I Intercom 38 K Key tone 20 L Line mode 21 M Making calls 13 Missed calls 27 Mute 14 P Pause 13 Phonebook 16 Power failure 9 R Redialing 13 Ringer tone 2...

Page 60: ...08 Serial No Date of purchase found on the bottom of the base unit Name and address of dealer If your product is not working properly 1 Read these Operating Instructions 2 Visit our website http www panasonic com help L FAQs and troubleshooting hints are available 3 Contact us via the web at http www panasonic com contactinfo 4 Call us at 1 800 211 PANA 1 800 211 7262 L Monday Friday 9 00am 9 00pm...

Reviews: