background image

Preparation

For assistance, please visit http://www.panasonic.com/phonehelp

11

Symbols used in these operating instructions

Symbol

Meaning

{


}

: button name/soft key name

Example:

Unit keys: 

{

INTERCOM

}

{

OFF

}

Soft keys: 

{

CALL

}

The words in the brackets indicate button names/
soft key names on the handset and base unit.

Example:

1

{

INTERCOM

}

2

Select the desired cordless 
camera. 

i


{

CALL

}

3

{

MUTE

}


4

{

OFF

}

1

Press 

{

INTERCOM

}

.

2

Push the joystick up or down to select the desired 
cordless camera, then press 

{

CALL

}

.

3

Press 

{

MUTE

}

.

4

Press 

{

OFF

}

.

{^}


{V}

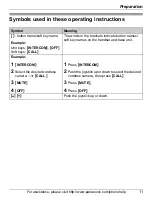
Push the joystick up or down.

TGA573(e).book  Page 11  Monday, April 24, 2006  2:05 PM

Summary of Contents for KX-TGA573

Page 1: ...Puerto Rico This cordless camera is an accessory unit for use with Panasonic base units KX TG5761 KX TG5766 KX TG5767 KX TG5771 KX TG5776 KX TG5777 You must register this cordless camera with your base unit before it can be used Camera monitoring requires a color display handset KX TGA571 5 8 GHz Expandable Digital Cordless Camera Model No KX TGA573 Operating Instructions Indoor Use Only ...

Page 2: ...For best performance 6 Preparation Controls 7 Setting up the cordless camera 8 Symbols used in these operating instructions 11 Registering the cordless camera 12 Camera Monitoring Camera monitoring using a handset 13 Useful Information Wall mounting 17 Troubleshooting 20 FCC and other information 22 Specifications 23 Customer services 24 Warranty 25 Index Index 27 ...

Page 3: ...igital cordless handset KX TGA571 color display type For further information or to order the handset visit http www panasonic com or call phone number noted on page 4 L In these operating instructions the term handset is used to refer to the color display handset KX TGA571 You can monitor the room where the cordless camera is located when you access the cordless camera using the handset page 13 th...

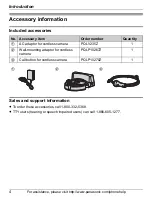
Page 4: ...support information L To order these accessories call 1 800 332 5368 L TTY users hearing or speech impaired users can call 1 866 605 1277 No Accessory item Order number Quantity 1 AC adaptor for cordless camera PQLV235Z 1 2 Wall mounting adaptor for cordless camera PQLP10267Z 1 3 Call button for cordless camera PQLP10270Z 1 1 2 3 ...

Page 5: ...ug is damaged the unit does not operate normally or has been dropped SAVE THESE INSTRUCTIONS CAUTION Installation L Do not touch the plug with wet hands L The AC adaptor is used as the main disconnect device Ensure that the AC outlet is installed near the product and is easily accessible WARNING L To prevent the risk of fire or electrical shock do not expose the product to rain or any type of mois...

Page 6: ... 5 8 GHz electrical appliances may cause interference Move away from the electrical appliances Routine care L Wipe the outer surface of the product with a soft moist cloth Do not use benzine thinner or any abrasive powder Conditions for using the cordless camera L The cordless camera is intended for indoor use only Prolonged exposure to direct sunlight or halogen light may damage the camera lens L...

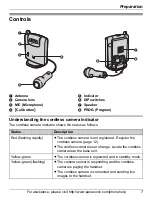
Page 7: ...r H PROG Program Status Description Red flashing rapidly L The cordless camera is not registered Register the cordless camera page 12 L The cordless camera is out of range Locate the cordless camera near the base unit Yellow green L The cordless camera is registered and in standby mode Yellow green flashing L The camera sensor is responding and the cordless camera is paging the handset L The cordl...

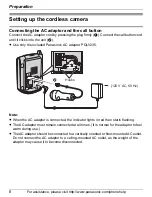
Page 8: ...nly the included Panasonic AC adaptor PQLV235 Note L When the AC adaptor is connected the indicator lights in red then starts flashing L The AC adaptor must remain connected at all times It is normal for the adaptor to feel warm during use L The AC adaptor should be connected to a vertically oriented or floor mounted AC outlet Do not connect the AC adaptor to a ceiling mounted AC outlet as the wei...

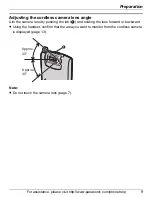
Page 9: ...the cordless camera lens angle Aim the camera lens by pushing the tab A and rotating the lens forward or backward L Using the handset confirm that the area you want to monitor from the cordless camera is displayed page 13 Note L Do not touch the camera lens page 7 A Approx 40 Approx 40 ...

Page 10: ...wn set to OFF This feature is useful when you mount the cordless camera upside down page 18 Selecting image quality standard quality mode enhanced motion mode DIP switch 2 If you want enhanced motion set to OFF Enhanced motion mode The image clarity decreases If you want to improve the image clarity leave at ON Standard quality mode The motion becomes less enhanced Selecting the cordless camera sp...

Page 11: ...ple Unit keys INTERCOM OFF Soft keys CALL The words in the brackets indicate button names soft key names on the handset and base unit Example 1 INTERCOM 2 Select the desired cordless camera i CALL 3 MUTE 4 OFF 1 Press INTERCOM 2 Push the joystick up or down to select the desired cordless camera then press CALL 3 Press MUTE 4 Press OFF V Push the joystick up or down ...

Page 12: ...t such as a pen until a beep sounds L When registration is completed successfully the cordless camera beeps and the indicator stops flashing red but remains lit in yellow green page 7 Deregistering the cordless camera The base unit can cancel the registration of a registered cordless camera Important L Before deregistering confirm the cordless camera s extension number from the handset color displ...

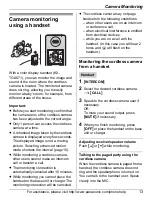
Page 13: ...nection is automatically canceled after 10 minutes L While monitoring you cannot place the handset on the base unit or charger The monitoring connection will be canceled L The cordless camera may not page handsets in the following conditions when other users are on an intercom or conference call when electrical interference is emitted from electrical devices while you are on a call with the handse...

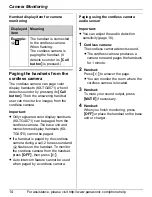
Page 14: ...andset To monitor the cordless camera from the handset press OFF then press s L Auto intercom feature cannot be used when paged by a cordless camera Paging using the cordless camera audio sensor Important L You can adjust the audio detection sensitivity page 16 1 Cordless camera The cordless camera detects sound L The cordless camera produces a camera tone and pages the handsets for 1 minute 2 Han...

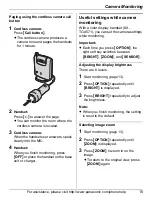
Page 15: ...on the base unit or charger Useful settings while camera monitoring With a color display handset KX TGA571 you can set the camera settings while monitoring Important L Each time you press OPTION the right soft key switches between BRIGHT ZOOM and SENSOR Adjusting the display brightness There are 6 levels 1 Start monitoring page 13 2 Press OPTION repeatedly until BRIGHT is displayed 3 Press BRIGHT ...

Page 16: ...as detected sound the cordless camera pages the handset To use the audio detection feature of the cordless camera turn the audio detection sensitivity to on There are 3 levels The default setting is off 1 Start monitoring page 13 2 Press OPTION repeatedly until SENSOR is displayed 3 SENSOR 4 To turn the feature on push Push or V to select the desired sensitivity L To turn this feature off push V r...

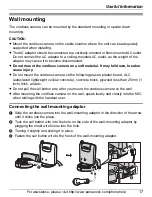
Page 17: ...se injury L Do not mount the cordless camera on the following places plaster board ALC autoclaved lightweight cellular concrete concrete block plywood less than 25 mm 1 inch thick and etc L Do not pull the call button wire after you mount the cordless camera on the wall L After mounting the cordless camera on the wall speak loudly and clearly into the MIC when talking with the handset user Connect...

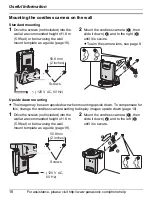
Page 18: ... the wall at a recommended height of 1 8 m 5 9 feet or below using the wall mount template as a guide page 19 2 Mount the cordless camera A then slide it down B and to the right C until it is secure L To aim the camera lens see page 9 1 Drive the screws not included into the wall at a recommended height of 1 8 m 5 9 feet or below using the wall mount template as a guide page 19 2 Mount the cordles...

Page 19: ... left side of the wall mounting plate Slide the cordless camera to the right B About the screws for wall mounting L Use the recommended screw size below L Drive the mounting screws leaving enough length from the wall to hook the cordless camera Max 9 3 mm 23 64 inch Space Max 4 5 mm 11 64 inch B A Wall mount template for the cordless camera 50 8 mm 2 inches ...

Page 20: ...tion mode page 10 L The place where the cordless camera is located is dark Improve lighting The image sent from the cordless camera is dark and difficult to see on the handset display L Adjust the display brightness setting page 15 L There is a strong sunlight or a backlight in the place where the cordless camera is located Try shading the camera s location I cannot connect to the cordless camera ...

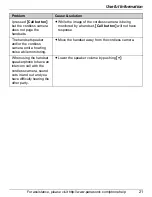
Page 21: ...onitored by a handset Call button will not have response The handset speaker and or the cordless camera emit a howling noise while monitoring L Move the handset away from the cordless camera When using the handset speakerphone to have an intercom call with the cordless camera sound cuts in and out and you have difficulty hearing the other party L Lower the speaker volume by pushing V Problem Cause...

Page 22: ...nstructions may cause harmful interference to radio communications However there is no guarantee that interference will not occur in a particular installation If this equipment does cause harmful interference to radio or television reception which can be determined by turning the equipment off and on the user is encouraged to try to correct the interference by one or more of the following measures...

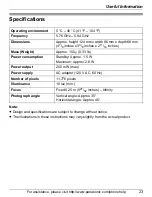
Page 23: ...nt 5 C 40 C 41 F 104 F Frequency 5 76 GHz 5 84 GHz Dimensions Approx height 124 mm x width 86 mm x depth 68 mm 47 8 inches x 33 8 inches x 211 16 inches Mass Weight Approx 150 g 0 33 lb Power consumption Standby Approx 1 5 W Maximum Approx 2 8 W Power output 200 mW max Power supply AC adaptor 120 V AC 60 Hz Number of pixels 11 776 pixels Illuminance 10 lux min Focus Fixed 0 25 m 927 32 inches Infi...

Page 24: ... hearing or speech impaired users can call 1 877 833 8855 TTY users hearing or speech impaired users can call 1 866 605 1277 Purchase Parts Accessories and Instruction Books online for all Panasonic Products by visiting our Web Site at http www pasc panasonic com or send your request by E mail to npcparts us panasonic com You may also contact us directly at 1 800 332 5368 Phone 1 800 237 9080 Fax ...

Page 25: ...d there will be no charge for labor During the Parts Limited Warranty period there will be no charge for parts You must mail in your product prepaid during the Limited Warranty period This Limited Warranty excludes both parts and labor for batteries antennas and cosmetic parts cabinet This Limited Warranty only applies to products purchased and serviced in the United States or Puerto Rico This Lim...

Page 26: ...er Authorized Servicer or damage that is attributable to acts of God THERE ARE NO EXPRESS WARRANTIES EXCEPT AS LISTED UNDER LIMITED WARRANTY COVERAGE THE WARRANTOR IS NOT LIABLE FOR INCIDENTAL OR CONSEQUENTIAL DAMAGES RESULTING FROM THE USE OF THIS PRODUCT OR ARISING OUT OF ANY BREACH OF THIS LIMITED WARRANTY As examples this excludes damages for lost time lost calls or messages cost of having som...

Page 27: ...tor 8 Wall mounting adaptor 17 Cordless Camera Settings Audio detection sensitivity 16 Brightness 15 Image orientation Upside down 10 Image quality 10 Image zoom 15 Speaker volume 10 D Deregistration 12 DIP switches 10 I Image orientation 10 Image quality 10 P Paging handsets 15 R Registering the cordless camera 12 S Speaker volume 10 Specifications 23 T Troubleshooting 20 TTY 4 24 W Wall mounting...

Page 28: ... Do not send your unit to Panasonic Consumer Electronics Company listed below or to executive or regional sales offices These locations do not repair consumer products Panasonic Consumer Electronics Company Division of Panasonic Corporation of North America One Panasonic Way Secaucus New Jersey 07094 Panasonic Puerto Rico Inc San Gabriel Industrial Park Ave 65 de Infantería Km 9 5 Carolina Puerto ...

Reviews: