– 64 –
Chapter 5 Basic Operations — KEY
5
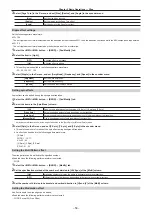
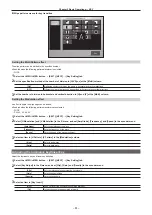
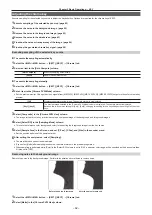
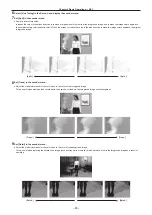
After setting the sample area, select [Sampling].
f
The noise in the area that has been set is now removed, and the colors become more natural.
f
If you select [Undo] after sampling is executed, the status returns to the pre-sampling status.
@
@
NOTE
t
Execute sampling in both the light and dark areas as the sample area.
t
If the noise cannot be completely removed from the foreground image even after performing noise removal, select [Fine Tuning] in the [Sampling
Mode] column to make fine adjustments to the image. (page 64)
Fine-tuning the noise or transparency of the image
Fine-tune the noise or transparency of the image.
1
Select the <ME1>/<ME2> button
→
[KEY1], [KEY2]
→
[Chroma] tab.
2
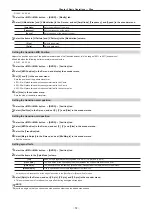
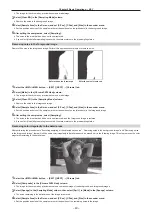
Select an item in the [Chroma PVW View] column.
[Composite]
The image for the chroma key preview becomes a composite image of the background and foreground images.
f
Set [Resizer] to [OFF]. If [ON] is set, image for chroma key preview will be reduced and sampling will not be performed
properly.
Set [Resizer] by selecting the [Resizer] tab and setting it in the [Mode] column.
[Matte]
The image for the chroma key preview becomes a matte image.
[Proc.FG]
The image for the chroma key preview becomes the processed foreground image (image before combining with the
background in which only color component processing was performed for the chroma key source).
[FG]
The image for the chroma key preview becomes the chroma key source image before processing.
3
Select an item in the [Sampling Mode] column.
f
For details on the items, refer to “Setting items for image adjustment”.
4
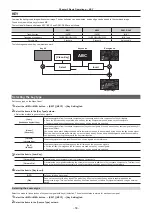
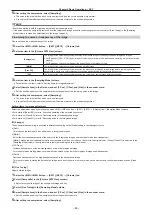
Select [Sample Area] in the R menu, and set [X-Pos], [Y-Pos], and [Size] in the encoder menu.
f
Set the position and size of the sample marker at the position of the remaining noise in the image.
5
After setting the sample area, select [Sampling].
f
The noise in the area that has been set is now removed.
f
If you select [Undo] after sampling is executed, the status returns to the pre-sampling status.
Setting items for image adjustment
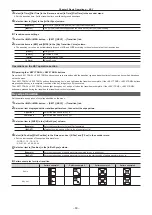
Select the adjustment mode by selecting top menu <ME1>/<ME2> button
→
[KEY1], [KEY2]
→
[Chroma] tab
→
[Sampling Mode] column.
f
For details of [Select BG], refer to “Executing sampling of the selected key source”.
f
For details on [Clean BG], refer to “Removing noise in the background image”.
f
For details on [Clean FG], refer to “Removing noise in the foreground image”.
r
[Sponge]
The behavior when sampling is executed is different depending on the [Mode] setting in the [Sponge] column.
f
[Spill
−]
This reduces the leaking of blues and greens in foreground images.
f
[Matte
+
]
Select the semi-transparent parts of the subject in the foreground image and make them matte (non-transparent).
[Matte+] makes the semi-transparent parts non-transparent, but does not change the color to the original color. (When [Clean FG] is selected in the
[Sampling Mode] column, the original state is restored including the color information.)
f
[FG Trans]
Increase transparency of the low transparency area in the foreground image.
This is useful when making areas covered with thick smoke or clouds in the foreground image semi-transparent.
f
[Detail
+
]
Decrease transparency of the high transparency area in the background image.
This is useful when restoring the details of an image (such as stray hairs or smoke), which have been lost as a result of operations such as [Clean
BG].
r
[Fine Tuning]
Adjust detailed images.
1
Select the <ME1>/<ME2> button
→
[KEY1], [KEY2]
→
[Chroma] tab.
2
Select [Composite] in the [Chroma PVW View] column.
f
Select a composite image of the background image and key.
3
Select [Fine Tuning] in the [Sampling Mode] column.
4
Select [Sample Area] in the R menu, and set [X-Pos], [Y-Pos], and [Size] in the encoder menu.
f
Set the position and size of the sample marker at the position to sample.
5
After setting the sample area, select [Sampling].
Summary of Contents for Live Production Suite Series
Page 5: ...Please read this chapter and check the accessories before use Chapter 1 Overview ...
Page 11: ...This chapter describes installation and connection Chapter 2 Installation and Connection ...
Page 50: ...This chapter describes menu operations Chapter 5 Basic Operations ...
Page 113: ...This chapter describes the configuration of operations Chapter 7 Configuring Operations ...
Page 122: ...This chapter describes how to operate system menus Chapter 8 System Menu ...
Page 136: ...This chapter describes plug in functions Chapter 9 External Interfaces ...
Page 140: ... 140 Chapter 10 Specifications Dimensions Dimensions of the XPT Unit AV LSX10 Unit mm inch ...
Page 141: ... 141 Chapter 10 Specifications Dimensions Dimensions of the ME Unit AV LSM10 Unit mm inch ...
Page 153: ...This chapter describes the setting menu table and terms Chapter 11 Appendix ...
Page 176: ...Web Site https www panasonic com Panasonic Corporation 2020 ...


