166
4-2
Control with RS-232C
4-2-1 Before External Controlling Laser Marker Using RS-232C
■
Flow
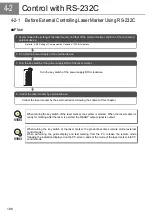
When turning the key switch of the laser marker, the system is started. When the laser marker is
ready for marking after the laser is excited, the READY output signal is output.
When turning the key switch of the laser marker, the product becomes remote mode (external
control mode).
When performing the guide display and test marking from the PC, release the remote mode
following the indication displayed on the PC screen, and set the mode of the laser marker into PC
control mode.
1. Accommodate the setting of the laser marker and that of the communication condition of the connected
external device.
2. Turn ON the power supply of the external device.
Refer to “4-2-4 Setting of Communication Condition” (P.168) for details.
4. Control the laser marker by external device.
Control the laser marker by the external device following the content of this chapter.
3. Turn the key switch of the power supply BOX of the laser marker.
Turn the key switch of the power supply BOX clockwise.
REFERENCE
REFERENCE
Summary of Contents for LP-310
Page 5: ...5 MEMO ...
Page 21: ...21 MEMO ...
Page 26: ...26 MEMO ...
Page 30: ...30 MEMO ...
Page 33: ...33 MEMO ...
Page 87: ...87 MEMO ...
Page 125: ...125 MEMO ...
Page 137: ...137 MEMO ...
Page 149: ...149 MEMO ...
Page 155: ...155 4 External Control 4 1 Control Through I O Connector 156 4 2 Control with RS 232C 166 ...
Page 186: ...186 MEMO ...
Page 187: ...187 5 Troubleshooting 5 1 Troubleshooting 188 5 2 Measures for Indicated Error 189 ...
Page 191: ...191 6 Maintenance 6 1 Maintenance 192 ...
Page 193: ...193 7 Specification 7 1 Specification 194 7 2 Outer Dimensional Drawing 195 ...
Page 197: ...197 Appendix Character Code Table 198 Readable DXF File 207 Glossary 209 ...
Page 212: ...212 Index Index 213 ...
Page 215: ...No 9000 0062 20V ...


