200
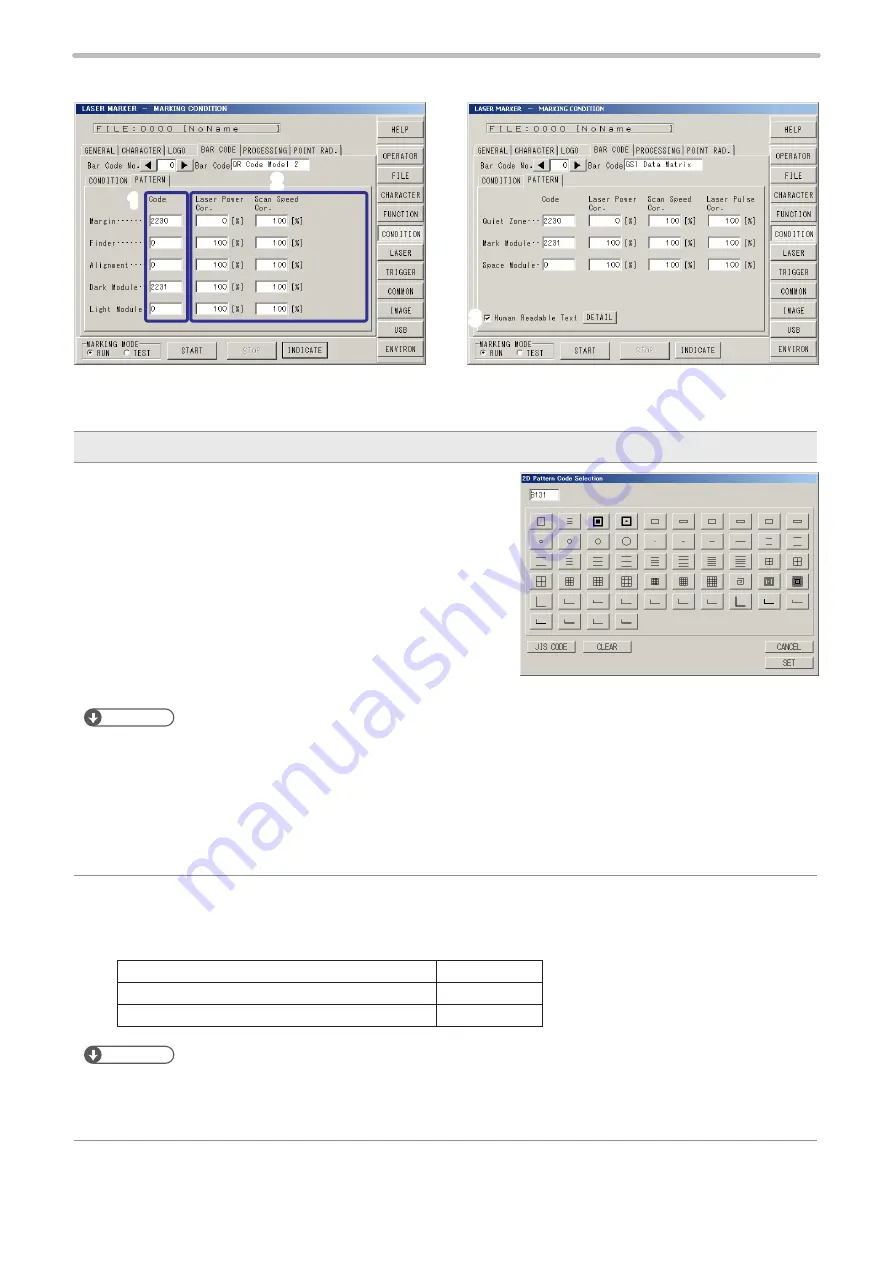
Specify the drawing pattern of the 2D code for the each code component.
Description
1
Pattern code:
Specify the drawing pattern of the 2D code for the each code
component.
Press the pattern code field and select the drawing pattern.
Press “CLEAR” to set “0” in the pattern code.
For setting a inverted (Black/White) code, set the pattern code
as follows;
•
For QR code, select the drawing pattern to the light module.
Specify “0” to margin, finder, alignment and dark module.
•
For DataMatrix code, select the drawing pattern to the
space module. Specify “0” to quiet zone and mark module.
Reference
• For QR code, when the pattern code is set to “0” in finder or alignment, these patterns are marked using the settings
for dark or light module.
•
On the pattern code input screen, the pattern image registered into 2D code font (2230(HEX) to 2239(HEX) and
8121(HEX) to 8152(HEX)) is displayed.
•
Pressing pattern code displays the pattern code input screen. On the patter code input screen, the image of the
pattern code can be selected. In case of setting the pattern code using the character code, press [JIS CODE] for
displaying the ten key, and then input the character code.
2
Laser Power Correction :
Scan Speed Correction :
Laser Pulse Cycle Correction (Only LP-V series) :
Correction of each code pattern for the laser power / scan speed / laser pulse cycle set at laser setting.
Setting Range of Laser Power Correction
0 to 200%
Setting Range of Scan Speed Correction
5 to 500%
Setting Range of Laser Pulse Cycle Correction
50 to 200%
Reference
•
If the value of “Laser power correction” × “laser power” is equal to or larger than 100, the setting will be “100”.
•
Marking is not available when the laser power correction value is “0”.
•
If the corrected value exceeds the setting limit, the nearest upper or lower limit value of the each item is set.
⿎
Pattern Setting for QR code and DataMatrix code
3
QR Code
DataMatrix Code
1
2
ME-LP400V-OP-6
Summary of Contents for LP-400 Series
Page 11: ...11 MEMO ME LP400V OP 6 ...
Page 32: ...32 1 Product Overview ME LP400V OP 6 ...
Page 58: ...2 Installation and Connection ME LP400V OP 6 ...
Page 77: ...3 Basic Operation Procedure ME LP400V OP 6 ...
Page 121: ...4 Description of Operation Screen ME LP400V OP 6 ...
Page 146: ...146 Symbol ME LP400V OP 6 ...
Page 271: ...271 MEMO ME LP400V OP 6 ...
Page 272: ...Maintenance ME LP400V OP 6 ...
Page 291: ...Troubleshooting ME LP400V OP 6 ...
Page 308: ...Appendix ME LP400V OP 6 ...
Page 328: ...Index ME LP400V OP 6 ...
Page 333: ...No 9000 0062 14V ...
Page 334: ... Panasonic Industrial Devices SUNX Co Ltd 2003 2018 July 2018 9000 0062 14V ...


