11 Graphic object
11.5 Rotate a graphic object
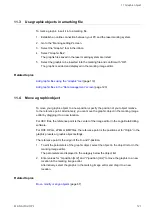
To rotate a graphic object, specify a rotation angle or use the circular arrow symbol in the
marking image editor.
The rotation center is the reference point of the graphic.
For VEC files, the reference point is the center of the image editor in the Logo Data Editing
software.
DXF, HPGL, JPEG or BMP files: If “Center” is set for “Origin” (reference point position),
the values under “X-position [mm]” and “Y-position [mm]” remain the same while rotating a
graphic. When another option is set for “Origin”, the values under “X-position [mm]” and “Y-
position [mm]” change while rotating the graphic.
1. To edit the parameters of the graphic object, select the object in the object list or in the
marking image editor.
The parameters are displayed in the category below the object list.
2. Enter a value for “Rotation angle [°]” to rotate the graphic object by a specific angle.
Enter a positive value for counterclockwise rotation and a negative value for clockwise
rotation.
Alternatively, rotate a graphic with the circular arrow symbol . Select the graphic
object in the marking image editor. Position the pointer over the symbol. Click and drag
in a circular motion.
Related topics
11.6 Edit a VEC file
After inserting a VEC file into the marking file, you can fine-tune its size and position and set
laser correction parameters in the “Marking settings” screen. To edit your VEC file with the
Logo Data Editing software, you can launch the software directly from Laser Marker NAVI
smart.
If you modify a VEC file, the changes apply to all marking files in which the graphic is used.
1. There are two different ways to open the Logo Data Editing software.
In the “Marking settings” screen:
• Double-click on the graphic object in the marking image editor. The “Graphic” dialog
opens.
122
ME-NAVIS2-OP-1


