87
Laser Check
Execute the laser check when measuring the laser power to be applied for radiation using power meter.
WARNING
•
Be sure to use the protective goggle and enclosure during radiating laser.
•
During the radiation, the laser energy is concentrated to one point. Use due
caution with long period radiation, it may cause a fire or damage to the object.
•
Once the laser check is started, the radiation will not be interrupted until [Stop]
is pressed.
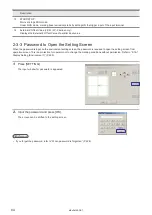
1.
Press [ADJUS.] in the operation screen.
2.
Press [LASER CHK (Laser Check)] .
3.
By pressing [START] laser will be radiated to the central of
marking field.
4.
The laser radiation is stopped by pressing [STOP].
For LP-Z series, even without “stop” or “interrupt” command, the laser
radiation automatically stops after about one minute and the shutter is
closed.
Reference
•
For LP-Mxxx-S type, laser can not be emitted without opening the laser gate. After starting the radiation, open the laser
gate by external control signals. Refer to the “Safety / Setup / Maintenance Guide” for detail.
•
Use the laser check function when measuring the laser power output with the commercially available laser power meter.
•
In laser check function, only the following settings are valid.
•
Laser power
•
Laser pulse cycle (Except LP-SxxxW type)
•
Power offset in system offset setting
•
When the laser it needs to radiate the laser only to one point for the purpose of the laser marker being performed as the
processing device, use the arbitrary point radiation function. Refer to “2-10-6 Point Radiation Condition” (P.181).
CAUTION
•
For the laser power measurement, use a laser power meter that has the
damage threshold (max. power density) of more than 10 kW/cm
2
.
•
The laser detector diameter of the laser power meter should be more than 10 mm.
•
Place the detector of the laser power meter at the one-third to half of the
specified work distance of the laser marker. Do not place the power meter
detector at the focal point (specified work distance) of the laser marker. It may
cause damage to the power meter.
ME-LPMSZ-OP-7
Summary of Contents for LP-M Series
Page 11: ...1 Basic Operation Procedure ME LPMSZ OP 7 ...
Page 76: ...76 MEMO ME LPMSZ OP 7 ...
Page 77: ...2 Description of Operation Screen ME LPMSZ OP 7 ...
Page 102: ...102 Symbol ME LPMSZ OP 7 ...
Page 255: ...Troubleshooting ME LPMSZ OP 7 ...
Page 276: ...Appendix ME LPMSZ OP 7 ...
Page 304: ...Index ME LPMSZ OP 7 ...
Page 307: ...No 9000 0063 56V ...
Page 308: ... Panasonic Industrial Devices SUNX Co Ltd 2013 2019 March 2019 9000 0063 56V ...

