73
3-2-1 DIP switch setting
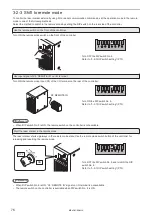
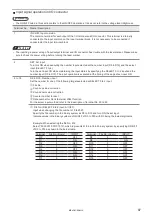
Set the operational options for the external control with the DIP switch equipped on the controller rear side.
ンㄆㄇㄆㄓㄆㄏㄆ
• The initial setting of all DIP switches is OFF.
• Turn OFF the power at DIP switch setting.
• For the details on DIP switch, refer to “2-2-3 DIP switch” (P.46).
1.
Turn OFF the power of laser marker.
2.
Remove the DIP switch cover on the rear of the controller.
ON
OFF
Rear of controller
DIP switch
3.
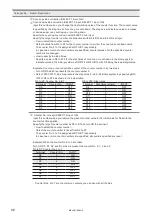
With DIP switch No. 2, select the control method, I/O or command
for some specific operations.
DIP switch No. 2
Control method for specific operations
ON
Control by serial communication commands for the
following operations
• Laser pumping (LSR)
• Shutter control (SHT)
• Guide laser (GID)
• Laser check radiation (SPT)
• Laser power measurement (PWM)
• Test marking (TST)
OFF (initial setting)
Control by I/O for the following operations
• Laser pumping
• Shutter control
• Guide laser
ンㄆㄇㄆㄓㄆㄏㄆ
• “Laser check radiation”, “Laser power measurement” and “Test marking” cannot be controlled by I/O. They can be
controlled only by using serial communication in the remote mode.
ME-LPM-SSM-10
Summary of Contents for LP-M Series
Page 16: ...16 MEMO ME LPM SSM 10...
Page 27: ...27 Chapter 1 Specification ME LPM SSM 10...
Page 37: ...37 Chapter 2 Preparation ME LPM SSM 10...
Page 69: ...Chapter 3 Connection for External Control ME LPM SSM 10...
Page 128: ...Chapter 4 Maintenance ME LPM SSM 10...
Page 148: ...Troubleshooting ME LPM SSM 10...
Page 169: ...Index ME LPM SSM 10...
Page 172: ...172 MEMO No 9000 0066 34V ME LPM SSM 10...
Page 173: ...No 9000 0066 34V...


