background image

47

1. Terminal wiring

1) When wiring the terminals, refer to the
terminal layout and wiring diagrams and
be sure to perform the wiring properly
without errors.
2) When using the instrument with an
flush mounting, the screw-down terminal
type is recommended. For the pin type,
use either the rear terminal block
(AT78041) or the 8P cap (AD8-RC) for
the 8-pin type, and the rear terminal
block (AT78051) or the 11P cap (AT8-
DP11) for the 11-pin type. Avoid solder-
ing directly to the round pins on the unit.
When using the instrument with a front
panel installation, use the DIN rail termi-
nal block (AT8-DF8K) for the 8-pin type
and the DIN rail terminal block (AT8-
DF11K) for the 11-pin type.
3) After turning the unit off, make sure
that any resulting induced voltage or
residual voltage is not applied to power
supply terminals 

W

through 

U

(8-pin

type) 

W

through 

P

(11-pin type) or 

and 

(screw terminal type). (If the

power supply wire is wired parallel to the
high voltage wire or power wire, an
induced voltage may be generated
between the power supply terminals.)
4) Have the power supply voltage pass
through a switch or relay so that it is
applied at one time. If the power supply
is applied gradually, the counting may
malfunction regardless of the settings,
the power supply reset may not function,
or other such unpredictable occurrence
may result.

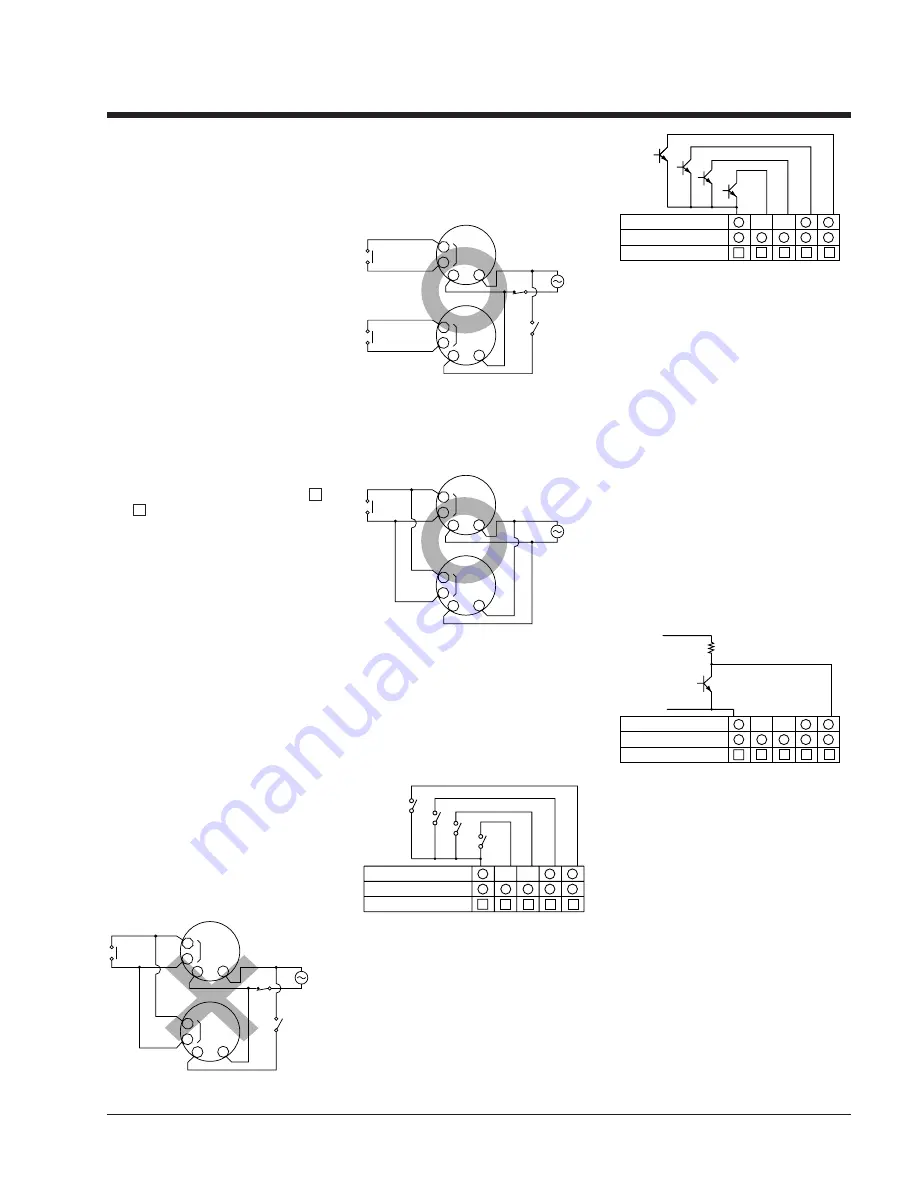
2. Input connections

The power circuit has no transformer
(power and input terminals are not insu-
lated). When an input signal is fed to two
or more timers at once, do not arrange
the power circuit in an independent way.
If the timer is powered on and off inde-
pendently as shown in Fig. A, the timer's
internal circuitry may get damaged.Be
careful never to allow such circuitry.
(Figs. A, B and C show the circuitry for
the 11-pin type.)

2

1

If independent power circuitry must be
used, keep the input contacts or transis-
tors separate from each other, as shown
in Fig. B.

When power circuitry is not independent,
one input signal can be fed to two or
more counters at once, as shown in Fig.
C.

3. Input and output

1) Signal input type
(1) Contact point input
Use highly reliable metal plated contacts.
Since the contact point’s bounce time
leads directly to error in the timer opera-
tions, use contacts with as short a
bounce time as possible. Also, select a
minimum input signal width of 20 ms.

(2) Non-contact point input
Connect with an open collector. Use
transistors whose characteristics satisfy
the criteria given below.
V

CEO

= 20 V min.

I

C

= 20 mA min.

I

CBO

= 6µA max.

Also, use transistors with a residual volt-
age of less than 2 V when the transistor
is on.

8-pin type

Screw terminal type

1

4

3

11-pin type

3

4

5

6

7

6

7

8

9

10

Reset input

Start input

Stop input

Lock
  input

Reset input

12 to 40V DC

Q

(The above example is for reset input)

8-pin type

Screw terminal type

1

4

3

11-pin type

3

4

5

6

7

6

7

8

9

10

Reset input

Start input

Stop input

Lock
  input

8-pin type

Screw terminal type

1

4

3

11-pin type

3

4

5

6

7

6

7

8

9

10

PRECAUTIONS IN USING THE LT4H SERIES

* The short-circuit impedance should be
less than 1 k

.

[When the impedance is 0 

, the current

coming from the start input and stop
input terminals is approximately 12 mA,
and from the reset input and lock input
terminals is approximately 1.5 mA.]

Also, the open-circuit impedance should
be more than 100 k

.

* As shown in the diagram below, from a

non-contact point circuit (proximity
switches, photoelectric switches, etc.)
with a power supply voltage of between
12 and 40 V, the signal can be input
without using an open collector transis-
tor. In the case of the diagram below,
when the non-contact point transistor Q
switches from off to on (when the signal
voltage goes from high to low), the sig-
nal is input. 

2) The input mode and output mode
change depending on the DIP switch set-
tings. Therefore, before making any con-
nections, be sure to confirm the opera-
tion mode and operation conditions cur-
rently set.
3) The LT4H series use power supply
without a transformer (power and input
terminals are not insulated).  In connect-
ing various kinds of input signals, there-
fore, use a power transformer in which
the primary side is separated from the
ungrounded secondary side as shown in
Fig. A, for the power supply for a sensor
and other input devices so that short-cir-
cuiting can be prevented.

10

2

3

(Fig. A)

Input contact
point or transistor

2

3

10

Power
supply

Input
terminal

terminal

Input

10

2

3

3

2

10

(Fig. B)

Input contact
point or transistor

Power
supply

point or transistor

Input contact

terminal

Input

terminal

Input

(Fig. C)

Power
supply

3

3

Input contact
point or transistor

10

2

10

2

terminal

Input

terminal

Input

Summary of Contents for LT4H/-L

Page 1: ...Output Operating voltage Power down insurance Terminal type Part number 9 999 s 0 001 s 99 99 s 0 01 s 999 9 s 0 1 s 9999 s 1 s 99 min 59 s 1 s 999 9 min 0 1 min 99 h 59 min 1 min 999 9 h 0 1 h Power ON delay 1 Power ON delay 2 Signal ON delay Signal OFF delay Pulse One shot Pulse ON delay Signal Flicker Totalizing ON delay 8 modes Relay 1 c Transistor 1 a 100 to 240 V AC 24 V AC 100 to 240 V AC 2...

Page 2: ...Shortened body 70 1 mm 2 760 inch underhead 4 Compliant with UL c UL and CE 48 1 890 48 1 890 64 5 2 539 UL File No E122222 C UL File No E122222 LT4H L Timers mm inch Product types Time range Product name Operating mode Output Operating voltage Power down insurance Terminal type Part number 9 999 s 0 001 s 99 99 s 0 01 s 999 9 s 0 1 s 9999 s 1 s 99 min 59 s 1 s 999 9 min 0 1 min 99 h 59 min 1 min ...

Page 3: ... AC DC 50 60 Hz common Max 10 V A 100 mA 30 V DC 12 to 24 V DC Max 3 W DC type Transistor output type AC type AC DC type DC type Rating Time accuracy max Contact Life Electrical Mechanical Operating conditions Rated operating voltage Rated frequency Rated power consumption Rated control capacity Time range Time counting direction Operation mode Start Reset Stop input Lock input Input signal Indica...

Page 4: ...gasket ATC18002 supplied Panel 63 5 2 500 48 1 890 66 2 598 50 1 969 48 1 890 LT4H TIMER UP OP RST LOCK DOWN LOCK RESET s m h Mounting frame for flush mount AT8 DA4 supplied Panel Rubber gasket ATC18002 supplied 1 039 11 pin type 11p cap AT8 DP11 sold separately 8 pin type 8p cap AD8 RC sold separately 48 1 890 90 3 543 48 1 890 66 2 598 50 1 969 DIN rail terminal block 8 pin type AT8 DF8K sold se...

Page 5: ... OP TIMER LT4H Changing the set time 1 It is possible to change the set time with the up and down keys even dur ing time delay with the timer However be aware of the following points 1 If the set time is changed to less than the elapsed time with the time delay set to the addition direction time delay will continue until the elapsed time reaches full scale returns to zero and then reaches the new ...

Page 6: ...ddition or stops at 0 sub traction Ignores start input Stops delay time operation at stop ON Restarts delay time operation at stop OFF 1 2 3 OFF OFF OFF Set the operation mode section of the DIP switches no s 1 2 and 3 on the side of the timer as shown Clears elapsed time value at power ON Time delay starts at start ON and elapsed time value or output resets at start OFF Instantaneous time delay s...

Page 7: ...Stops delay time operation at stop ON Restarts delay time operation at stop OFF In order to have the time delay start at power ON or reset at power OFF short out the start input beforehand 1 2 3 OFF OFF ON Set the operation mode section of the DIP switches no s 1 2 and 3 on the side of the timer as shown Clears elapsed time value at power ON Time delay starts at start ON Ignores start input during...

Page 8: ...and CE 9 Low Price All this at an affordable price to provide you with unmatched cost performance 48 1 890 48 1 890 64 5 2 539 8 pin type 11 pin type Screw terminal type Time range Operating mode Output Operating voltage Power down insurance Terminal type Part number 99 99s 999 9s 9999s 99min59s 999 9min 99h59min 999 9h 9999h Pulse input Delayed one shot OFF start flicker ON start flicker Integrat...

Page 9: ...med out 1 Form A Open collector Min 107 ope At rated control voltage 12 to 24 V DC Max 3 W 100 to 240V AC 24V AC 50 60 Hz common Max 10 V A 100 mA 30 V DC 12 to 24 V DC Max 3 W DC type Transistor output type AC type DC type Rating Time accuracy max Contact Life Electrical Mechanical Operating conditions Rated operating voltage Rated frequency Rated power consumption Rated control capacity Time ran...

Page 10: ...for flush mount for flush mount Mounting frame dimension is for 8 pin type 90 0 95 5 3 543 3 760 AT8 DLA1 sold separately Device installation rail 11 pin type AT8 DF11K sold separately DIN rail terminal block 8 pin type AT8 DF8K sold separately 80min 3 150min 80min 3 150min 45 0 0 6 1 772 0 024 45 0 0 6 1 772 0 024 45 0 0 6 1 772 0 024 A 48 n 2 5 0 6 0 A 1 890 n 098 024 0 A When n timers are conti...

Page 11: ... N C 3 5 4 2 1 11 10 9 8 7 6 Reset Start Stop Lock 3 5 4 2 1 11 10 9 8 7 6 Operating voltage Reset Start Stop Lock Relay output type Transistor output type Screw terminal type 5 4 3 2 1 10 9 8 7 6 N O N C Operating voltage Reset Start Stop Lock 5 4 3 2 1 10 9 8 7 6 Reset Start Stop Lock Operating voltage Note For connecting the output leads of the transistor output type refer to 5 Transistor outpu...

Page 12: ...h and the display returns to the normal condition 2 Setting changing the time 1 Pressing the SET LOCK key switches the set value display between T1 and T2 Display the timer T1 or T2 which is to be set or changed 2 After displaying the timer T1 or T2 which is to be set press the UP or DOWN key to change the time Checking the operation mode When the UP or DOWN key at the second digit is pressed with...

Page 13: ...put ta Power T1 tc td T2 te tc td tf tg T2 T1 th t1 ta tb T1 t2 tg th T2 te tf T1 supply ON start flicker C Remarks and notes ON start repeating operation t1 T1 t2 T2 C PULSE Start Reset Stop Output Power supply ta tb T1 tc td T2 ta tb tc td t1 t2 T1 T1 T2 T1 T2 ON start repeating operation t1 T1 t2 T2 C INTEGRATION tb Stop Start Reset Output Power ta tc td T2 T1 tf tg tc td te t1 th T1 T2 ta tb T...

Page 14: ...r opera tions use contacts with as short a bounce time as possible Also select a minimum input signal width of 20 ms 2 Non contact point input Connect with an open collector Use transistors whose characteristics satisfy the criteria given below VCEO 20 V min IC 20 mA min ICBO 6µA max Also use transistors with a residual volt age of less than 2 V when the transistor is on 8 pin type Screw terminal ...

Page 15: ... load of the controlled output make sure that it is lower than the rated control capacity 4 Operation of LT4H digital timer 1 Turning on and off the power supply while operating in A2 Power on delay 2 or G Totalizing On delay will result in a timer error to be generated due to the characteristics of the internal circuitry Therefore use the start input or stop input Not related to the start input 2...

Page 16: ...2 2 This timer employs a power supply without a transformer so the power and input signal terminals are not insulated 1 When a sensor is connected to the input circuit install double insulation on the sensor side 2 In the case of contact input use dual insulated relays etc 3 The load connected to the output con tact should have basic insulation This timer is protected with basic insula tion and ca...

Reviews: