29
s
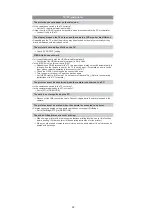
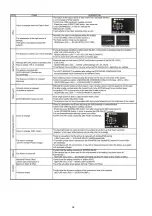
Is the ISO sensitivity high or the shutter speed slow?
Decrease the ISO sensitivity.
Increase the setting for [NOISE RED.] in [FILM MODE] or lower the setting for each of the
items other than [NOISE RED.].
Take pictures in bright places.
Set the [LONG SHTR NR] to [ON].
s
If recording under fluorescent light, the brightness or the hue may change slightly when the
shutter speed becomes fast. This occurs due to the characteristics of fluorescent light. It is not
a malfunction.
s
Are you in exposure compensation operation?
Press the front dial to switch to exposure compensation operation.
s
Set the AF area to the distinctive colour of the subject if there is a part that is different from the
surrounding colour.
s
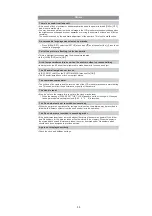
Depending on the lens used, picture may be warped slightly or see colours in the edge
depending on the zoom factor, due to the characteristics of the lens. Also, the peripherals of the
image might look warped because the perspective is enhanced when the wide angle is used.
This is not a malfunction.
s
Is the flash closed?
Slide the [
OPEN] lever to open the flash.
s
The flash is activated 2 times. The interval between the first and second flash is longer when
Red-eye reduction is set so the subject should not move until the second flash is activated.
The recorded picture looks rough.
Noise appears on the picture.
The brightness or the hue of the recorded picture is different from the actual
scene.
You can't compensate the exposure.
Subject cannot be locked.
(AF tracking not possible)
Lens
Recorded image may be warped, or nonexistent colour is surrounding the
subject.
Flash
The flash is not activated.
The flash is activated 2 times.
Summary of Contents for Lumix DMC-G1KEB
Page 13: ...13 4 Specifications ...
Page 36: ...36 7 Troubleshooting Guide ...
Page 37: ...37 ...
Page 38: ...38 ...
Page 42: ...42 9 Disassembly and Assembly Instructions 9 1 Disassembly Flow Chart 9 2 PCB Location ...
Page 44: ...44 9 3 1 Removal of the Rear Case Unit Fig D1 Fig D2 ...
Page 45: ...45 9 3 2 Removal of the Top Case Unit Fig D3 9 3 3 Removal of the LVF Unit Fig D4 ...
Page 46: ...46 9 3 4 Removal of the Main P C B Fig D5 9 3 5 Removal of the Front Case Unit Fig D6 ...
Page 50: ...50 Fig D15 9 3 12 Removal of the LCD TFT Unit Fig D16 ...
Page 52: ...52 ...
Page 55: ...55 11 Maintenance ...
Page 56: ...56 ...


