background image

Connecting to a PC or Printer

86

VQT0Q71

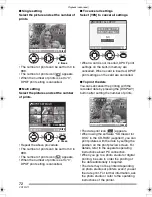
Single picture

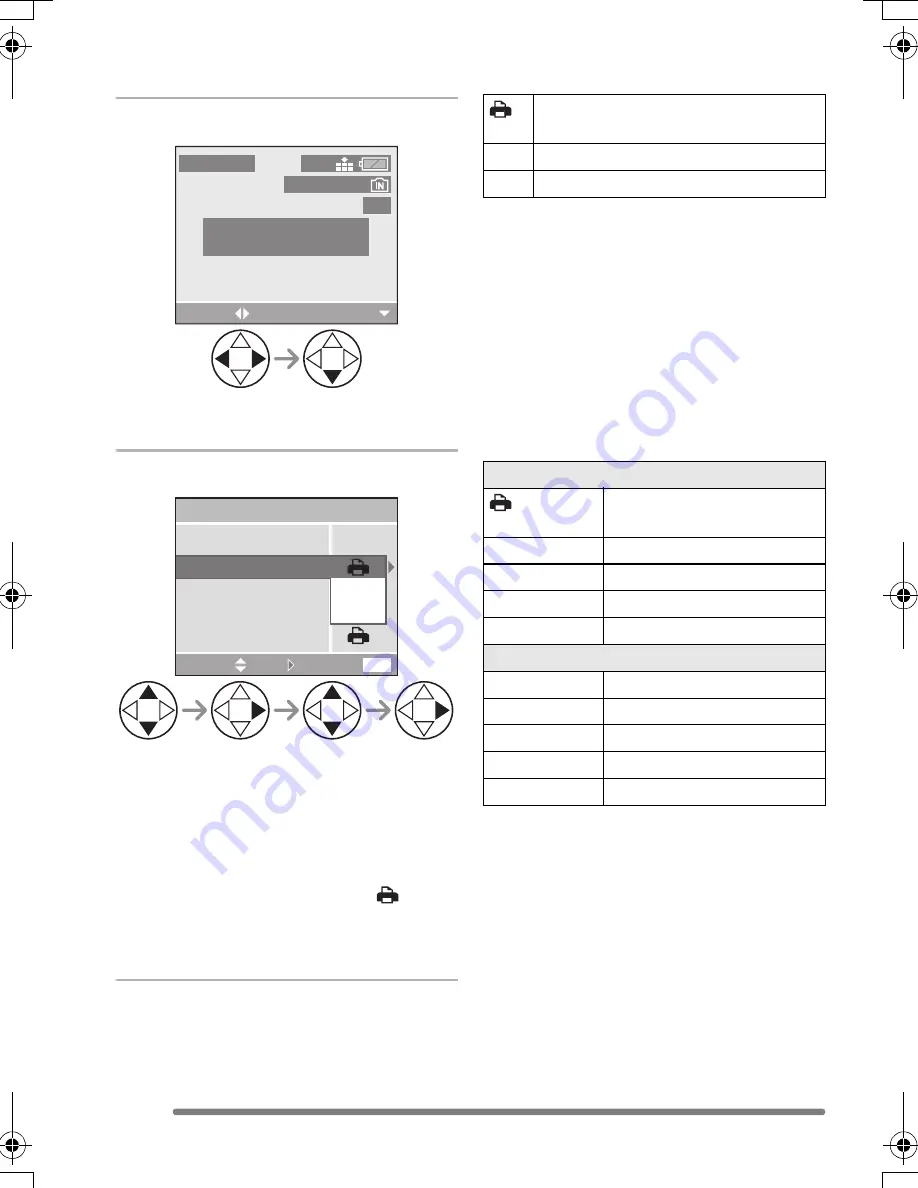
1

Select a picture to be printed.

• A message disappears in about 

2 seconds.

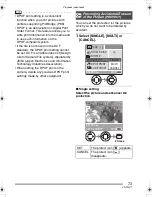
2

Set the print settings.

• The items which are not supported by 

the printer are displayed in grey and 
cannot be selected.

• When you want to print pictures in a 

paper size or a layout which is not 
supported by the camera, set [PAPER 
SIZE] or [PAGE LAYOUT] to [

] and 

then set the paper size or the layout on 
the printer. (For details, refer to the 
operating instructions of the printer.)

• [PRINT WITH DATE]

• If the printer does not support date 

printing, the date cannot be printed on the 
picture.

• [NUM. OF PRINTS]

Set the number of prints.

• [PAPER  SIZE]

(Possible paper sizes on the camera)

The items are listed on 1/2 and 2/2. Press 

4

 to select the desired item.

¢

These items cannot be displayed when 

the printer does not support the paper 
sizes.

PLEASE SELECT
THE PICTURE TO PRINT

PictBridge

PRINT

SELECT

100_0001

1 / 5

2304

CANCEL

MENU

PAPER SIZE
PAGE LAYOUT

NUM. OF PRINTS

PRINT START

SINGLE PICTURE

OFF

ON

PRINT WITH DATE

SELECT

SET

Settings on the printer are 
prioritised.

OFF Date is not printed.

ON

Date is printed.

1/2

Settings on the printer are 
prioritised.

L/3.5

qk

5

q

89 mm

k

127 mm

2L/5

q

k

7

q

127 mm

k

178 mm

POSTCARD

100 mm

k

148 mm

A4

210 mm

k

297 mm

2/2

¢

CARD SIZE

54 mm

k

85.6 mm

10

k

15cm

100 mm

k

150 mm

4

q

k

6

q

101.6 mm

k

152.4 mm

8

q

k

10

q

203.2 mm

k

254 mm

LETTER

216 mm

k

279.4 mm

VQT0Q71ENG.book  86 ページ  2005年2月14日 月曜日 午後2時19分

Summary of Contents for LUMIX DMC-LS1EB

Page 1: ...Operating Instructions Digital Camera Model No DMC LS1EB VQT0Q71 Web Site http www panasonic europe com Before use please read these instructions completely ...

Page 2: ...mewhat different from those shown in the illustrations in these Operating Instructions SD Logo is a trademark Other names company names and product names printed in these instructions are trademarks or registered trademarks of the companies concerned WARNING TO REDUCE THE RISK OF FIRE OR SHOCK HAZARD AND ANNOYING INTERFERENCE USE ONLY THE RECOMMENDED ACCESSORIES AND DO NOT EXPOSE THIS EQUIPMENT TO...

Page 3: ...t direct the lens to the sun or strong light sources It may cause not only a malfunction of the camera but irreversible damage to your eye Do not press the lens strongly Leaving the camera with the lens facing the sun may cause a malfunction Be careful when you put the camera outside or near a window About Condensation When the lens is fogged up Condensation takes place when the ambient temperatur...

Page 4: ... 25oC Recommended humidity 40 60 Be sure to remove the batteries and the card from the camera When the batteries are left inserted in the camera the batteries are discharged since a weak electric current is passed even if the camera is turned off Refer to P14 for Ni MH batteries When you keep the camera in a closet or a cabinet we recommend storing it with the desiccant silica gel ...

Page 5: ...e cursor button are described as illustrated below e g When you press the 4 button Compensating the Exposure Use this function when you cannot achieve appropriate exposure due to the difference of brightness between the subject and the background EV is an abbreviation of Exposure Value and it is the amount of light given to the CCD by the aperture value and the shutter speed 1 Modes indicated here...

Page 6: ...9 Taking Pictures with the Self timer 42 Compensating the Exposure 43 Taking Pictures using Auto Bracket 44 Optical Image Stabilizer 45 Taking Pictures using Burst Mode 46 Playback basic Playing Back Pictures 48 9 Pictures Multi Playback 49 Using the Playback Zoom 50 Deleting Pictures 51 Recording pictures advanced Using the Mode Dial 53 Economy mode 53 Macro mode 53 Motion image mode 54 Scene mod...

Page 7: ...e Display 94 Troubleshooting 96 Specifications 99 Sales and Support Information Customer Care Centre For customers within the UK 08705 357357 For customers within the Republic of Ireland 01 289 8333 Visit our website for product information E mail customer care panasonic co uk Technical Support for AV Software For UK ROI 08701 505610 Direct Sales at Panasonic UK Order accessory and consumable item...

Page 8: ...y P19 Consult the dealer or your nearest service centre if you lose the supplied accessories You can purchase the accessories separately Optional Accessories AC Adaptor DMW AC2B SD Memory Card 1 GB RP SDK01G 512 MB RP SDK512 256 MB RP SDH256 128 MB RP SD128 64 MB RP SD064 32 MB RP SD032 USB 2 0 Reader Writer BN SDUSB2E CardBus PC Card Adapter BN SDPC3E PC Card Adapter BN SDPC2E SD CF Adapter BN SD...

Page 9: ...cator P13 17 53 6 DISPLAY Button P27 7 Cursor Buttons 2 Self timer Button P42 4 REV Button P37 1 Flash Setting Button P39 3 Exposure Compensation P43 Auto Bracket P44 White Balance Fine Adjustment P63 Backlight Compensation in Simple Mode P36 Button 8 MENU Button P23 9 Single or Burst Mode P46 Delete P51 Button 1 2 3 4 7 8 9 6 5 ...

Page 10: ...tch P11 15 Strap Eyelet 16 Card Door P18 17 DIGITAL V OUT Socket P81 83 85 18 DC IN Socket P83 85 Please be sure to use genuine Panasonic AC adaptor DMW AC2B optional 19 Terminal Door 20 Battery Door P17 21 Tripod Receptacle When you use a tripod make sure the tripod is stable with the camera attached to it 12 14 10 13 11 15 16 17 18 19 20 21 ...

Page 11: ... card optional you can record or play back pictures on the built in memory P19 Refer to P18 when you use a card 2 Turn the camera on to take pictures Set the clock P22 Select the type of battery in use on BATTERY TYPE in the SETUP menu P23 1 Set the mode dial to 2 Press the shutter button to take pictures P30 3 Play back the pictures 1 Set the mode dial to 2 Select the picture you want to view P48...

Page 12: ...commend that you use Panasonic batteries The performance of the batteries may vary depending on brand or storage terms condition of the batteries The performance of the batteries may be temporarily deteriorated in low temperature conditions 10oC or less However the performance of the batteries is recovered when the batteries become close to the ambient temperature Depending on the temperature or t...

Page 13: ...LCD monitor is turned off the status indicator blinks Replace with new batteries or fully charged Ni MH batteries Proper Care and Handling of the Batteries If you mishandle the batteries leakage generation of heat and fire or explosion may occur Observe the following cautions Do not subject the batteries or the battery contacts to any moisture Do not peel off or scratch the covered seal Do not dro...

Page 14: ...one charge This is a feature of the batteries not a malfunction The overall performance will increase after repeating discharge charge cycles several times Batteries should be used to the point when the camera stops working before recharging If you charge batteries without discharging enough it can cause memory effect whereby the overall operating time can be decreased If memory effect occur use t...

Page 15: ...y CIPA standard Temperature 23 C Humidity 50 when LCD monitor is on Using Panasonic s SD Memory Card 16 MB Starting recording 30 seconds after the camera is turned on Recording once every 30 seconds with full flash every other recording Rotating the zoom lever towards Tele to Wide and vice versa in every recording Turning the camera off every 10 recordings Leaving the camera until the batteries ar...

Page 16: ...e of the batteries used We recommend using the power save mode P23 or economy mode P53 to maintain the battery power or turning the camera off frequently while recording Batteries Used Number of recordable pictures Panasonic Oxyride batteries supplied or optional Approx 35 pictures Approx 17 min Panasonic Alkaline batteries optional Approx 30 pictures Approx 15 min Fully charged Panasonic Ni MH ba...

Page 17: ...sing the camera for a long time remove the batteries When new batteries or fully charged Ni MH batteries have been inserted for more than 3 hours the clock setting is stored in the camera for at least 3 months even if the batteries are removed The storing time may be shorter if the batteries are not charged sufficiently If more than 3 months has passed the clock setting will be lost In this case s...

Page 18: ...amera is on We recommend using Panasonic s SD Memory Card Use only the genuine SD card with SD Logo 2 Insert Insert the card fully until it clicks and it is locked with the label facing the back of the camera Remove Push the card until it clicks then pull the card out upright Check the direction of the card Do not touch the connection terminals on the back side of the card The card may be damaged ...

Page 19: ...h A that can inhibit writing and formatting a card When the switch is slid to the LOCK side it is not possible to write or delete data on the card and format it When the switch is unlocked these functions become available SD Memory Card On this unit you can use SD Memory Cards of the following capacity from 8 MB to 1 GB Please confirm the latest information on the following website http panasonic ...

Page 20: ...nal when using the AC adaptor The card and the data may be damaged and the camera may not operate normally The built in memory about 14 MB can be used as a temporary memory instead of the card when the capacity of the card becomes full The data on the built in memory or the card may be damaged or lost due to electromagnetic wave static electricity or breakdown of the camera or the card We recommen...

Page 21: ...res displayed on the screen is an approximation Picture size 2304k1728 1600k1200 1280k960 640k480 1920k1080 HDTV Reference for number of pixels Approx 4M pixels Approx 2M pixels Approx 1 3M pixels Approx 0 35M pixels Approx 2M pixels Quality Built in Memory Approx 14 MB 8 15 14 27 22 40 68 111 13 25 SD Memory Card 16 MB 8 16 14 28 22 41 69 113 13 25 32 MB 17 33 31 59 47 86 145 236 28 54 64 MB 35 6...

Page 22: ...g is correct after turning the camera off and on When new batteries or fully charged Ni MH batteries have been inserted for more than 3 hours the clock setting will be stored in the camera for at least 3 months even if the batteries are removed The storing time may be shorter if the batteries are not charged sufficiently If more than 3 months has passed the clock setting will be lost In this case ...

Page 23: ...Select the desired value Close the menu by pressing the MENU button after finishing the setting In recording mode you can also close the menu by pressing the shutter button halfway OFF ON AUTO 2304 AUTO SENSITIVITY QUALITY W BALANCE PICT SIZE SETUP SELECT MENU REC 1 2 EXIT AF MODE MENU 1SEC n0 2MIN MONITOR POWER SAVE BEEP BATTERY TYPE AUTO REVIEW REC SELECT MENU EXIT SETUP 1 3 Be sure to press 1 a...

Page 24: ...firming focus Pictures in burst mode auto bracket are not enlarged even if ZOOM is selected In motion image mode auto review function is not activated When pictures are recorded in simple mode P34 any speed and on burst mode P46 or auto bracket P44 the auto review function is activated regardless of the setting on the auto review function The picture is not enlarged The setting for the auto review...

Page 25: ...er is updated and the file number starts from 0001 The folder number can be assigned from 100 to 999 When the folder number reaches 999 you cannot reset the file number We recommend formatting the built in memory or the card after saving the data on a PC or elsewhere To reset the folder number to 100 format the built in memory or the card first and then use this function to reset the file number A...

Page 26: ...e mode AUTO Scene menu appears automatically when setting the mode dial to or Select the desired scene mode LANGUAGE Set to the language on the menu screen from the following languages Set to the desired language with 3 4 and store it with 1 ENGLISH English DEUTSCH German FRANÇAIS French ESPAÑOL Spanish ITALIANO Italian Japanese When you set to other language by mistake select from the menu icons ...

Page 27: ...oom P50 the indications on the screen can be turned on and off In simple mode P34 B Normal display C No display In recording mode P30 D Normal display E Display with histogram F No display Recording guide line G No display Histogram In playback mode P48 H Normal display I Display with recorded information and histogram J No display DISPLAY BACKLIGHT 5 2304 2304 5 5 10 00 1 DEC 2005 10 00 1 DEC 200...

Page 28: ...alues are concentrated to the left the picture is under exposed B When the values in the histogram are distributed evenly the exposure is adequate and the brightness is well balanced C When the values are concentrated to the right the picture is over exposed Example of histogram A Under Exposed B Properly Exposed C Over Exposed Histogram When you take pictures with the flash or in dark places the ...

Page 29: ...pictures reducing the battery power consumption Macro mode P53 This mode allows you to take a picture closely focusing on the subject Motion image mode P54 This mode allows you to record motion images Scene mode 1 Scene mode 2 P56 This mode allows you to take pictures depending on the recording scenes This mode also allows you to set SCENE MENU on the SETUP menu to OFF and set the scene modes whic...

Page 30: ...n press the shutter button halfway A Press the shutter button halfway to focus The focus indication 2 is lit and then the aperture value 3 and the shutter speed 4 are displayed 3 Take a picture B Press the shutter button fully to take the picture S C N 1 S C N 2 OFF ON 1 25 F2 8 When the subject is not focused When the subject is focused Focus indication Blink green On green AF area Turns from whi...

Page 31: ... taking good pictures To take pictures without blurring Hold the camera gently with both hands keep arms stationary at your side and stand with your feet slightly apart Make sure that camera shake does not occur when you press the shutter button Do not cover the photo flash with your finger or other objects Do not touch the front of the lens 1 When holding the camera sideways 2 When holding the ca...

Page 32: ...tion appears and the subject is focused it is cancelled when you release the shutter button Press the shutter button halfway again Jitter camera shake Be careful of jittering when pressing the shutter button especially when fully zoomed into the subject When jitter could occur because of slow shutter speed the jitter alert A appears When the jitter alert appears we recommend using a tripod If you ...

Page 33: ...d pictures may become dark In this case compensate the exposure value on the camera P43 When you press the shutter button the LCD monitor may become bright or dark for a moment This function allows easy adjustment of focus and the recorded picture will not be affected We recommend making sure the clock is set properly before taking pictures P22 The camera is automatically turned off if you do not ...

Page 34: ...ry you use P23 BEEP CLOCK SET Change date and time P22 SIMPLE MODE BATTERY TYPE BEEP CLOCK SET PICT MODE EXITMENU SELECT SET MENU MENU ENLARGE 4 k6 10k15cm E MAIL ENLARGE This selection is intended for situations when large printing 8qk10q Letter etc is desired 4qk6q 10k15cm This selection offers an easy way to produce small general purpose prints E MAIL This selection favors a smaller file size o...

Page 35: ...OWER SAVE 2MIN P23 Self timer 10 seconds P42 Optical Image Stabilizer MODE2 P45 Burst speed Low speed P46 Number of recordable pictures in Burst mode ENLARGE max 4 pictures 4qk6q 10k15cm max 7 pictures E MAIL max 7 pictures White balance AUTO P62 ISO sensitivity AUTO P64 Picture size and Quality ENLARGE 2304k1728 pixels Fine 4qk6q 10k15cm 1600k1200 pixels Standard E MAIL 640k480 pixels Standard P6...

Page 36: ...ion function is cancelled When you use the backlight compensation function we recommend using the flash The settings on BATTERY TYPE BEEP and CLOCK SET in the simple mode are also applied to other recording modes You cannot set the following items in the simple mode NO RESET RESET USB MODE VIDEO OUT LANGUAGE However the setting on NO RESET and LANGUAGE in the SETUP menu also affects the simple mod...

Page 37: ...e P43 2 Enlarge and shift the picture 1k 4k 8k 8k 4k 1k When you change the magnification or the position to be displayed the zoom position indication A appears for about 1 second to check the enlarged area Recorded pictures can be deleted during the review Quick Deletion Once deleted pictures cannot be recovered Multi pictures or all pictures can be deleted Read P51 or P52 to operate them SCN1 SC...

Page 38: ...tographic lenses Distortion may be more visible when using a wider area of the zoom lens as you get closer to the subject When using the zoom lens at high magnification the quality of the picture can be enhanced if a tripod is used At high magnification even small movements can cause a slight decrease in picture sharpness If you use the zoom function after focusing on the subject focus on the subj...

Page 39: ...ted 2 times The first flash is activated only for a preparation of actual recording The subject should not move until the second flash is finished Use this when you take pictures of people in low lighting conditions Forced ON The flash is activated every time regardless of the recording condition Use this when your subject is back lit or under fluorescent light Forced ON Red eye reduction The flas...

Page 40: ...on Refer to P32 for the focus range Refer to P64 for the ISO sensitivity If the ISO sensitivity is set to AUTO it is automatically adjusted from ISO100 to ISO400 when you use the flash To avoid noise we recommend decreasing the ISO sensitivity P64 or setting PICT ADJ to NATURAL P67 ISO sensitivity Available flash control range Wide Tele AUTO 30 cm 4 2 m 30 cm 2 4 m ISO64 30 cm 1 7 m 30 cm 90 cm IS...

Page 41: ...the picture may become bright or dark When you repeat taking a picture recording may be disabled even if the flash is activated Take a picture after the access indication disappears When the jitter alert appears we recommend using the flash When you set to burst mode or auto bracket only 1 picture is recorded for every flash activated The flash icon turns red when activating the flash and pressing...

Page 42: ...ing a tripod or in other cases setting the self timer to 2 seconds is a convenient way to avoid the jitter caused by pressing the shutter button When you press the shutter button fully with one stroke the subject is automatically focused just before the recording In simple mode the self timer is fixed to 10 seconds P34 When you set the self timer in the burst mode the camera starts taking a pictur...

Page 43: ...s 3 several times until EXPOSURE appears and then compensate the exposure You can compensate from j2 EV to i2 EV in steps of 1 3 EV EV is an abbreviation of Exposure Value and it is the amount of light given to the CCD by the aperture value and the shutter speed The compensation range of the exposure will be limited depending on the brightness of the subject The exposure compensation value appears...

Page 44: ...you cannot take pictures by setting auto bracket When taking pictures using auto bracket after the exposure compensation the pictures are based on the compensated exposure When the exposure is compensated the compensated exposure value appears on the lower left of the screen When the flash is activated you can take only 1 picture When setting auto bracket and the burst mode simultaneously auto bra...

Page 45: ...splayed the optical zoom is fixed to Wide 1k and the zoom function cannot be activated Moreover you cannot take pictures The stabilizer function may not work sufficiently in the following cases When too much jitter occurs In digital zoom range When taking pictures while following subjects in motion When the shutter speed is extremely slow due to dark conditions or other reasons Be careful of jitte...

Page 46: ...eed is higher than 1 60 and the flash is not activated When the burst mode setting is set to Unlimited You can take pictures until the capacity of the built in memory or the card becomes full The speed of taking pictures becomes slow during a recording In simple mode the burst speed is fixed to Low P34 SCN1 SCN2 2304 5 Burst speed pictures second Number of recordable pictures pictures 4 max 4 max ...

Page 47: ...is set to or they are fixed to the values set for the first picture The burst speed is prioritised When the burst speed is set to they are adjusted each time you take a picture When setting the burst mode the auto review function is activated regardless of the setting on the auto review function The picture is not enlarged Moreover the settings for the auto review function on the SETUP menu are di...

Page 48: ...ew playback in the recording mode or multi playback the picture can only be forwarded or rewound one by one When you forward or rewind a large number of pictures release 2 1 once before reaching the picture to be played back then press 2 1 to forward rewind pictures little by little This camera is based on the DCF standard Design rule for Camera File system which was established by the Japan Elect...

Page 49: ...on The picture with the number coloured in orange appears To delete a picture during a 9 pictures multi playback Press the button When the confirmation screen appears press 4 to select YES and press 1 P51 Pictures will not be displayed in the rotated direction even if ROTATE DISP is set to ON P70 1 2 3 4 7 9 5 6 8 10 00 1 DEC 2005 CANCEL SELECT T W 2304 100_0001 1 18 1 2 3 4 7 5 6 10 11 8 9 12 CAN...

Page 50: ...cture during playback zoom Press the button When the confirmation screen appears press 4 to select YES and press 1 P51 When you use the zoom function on rotated pictures they are not displayed in the rotated direction P70 The more the picture is enlarged the more its quality deteriorates The playback zoom may not operate if pictures have been recorded with other equipment Even if the indications o...

Page 51: ...e deleting the picture appears on the screen To delete multiple pictures 1 Select MULTI DELETE 2 Select the pictures to be deleted Repeat the above procedure The selected pictures appear with When 4 is pressed again the setting is cancelled The icon blinks red if the selected picture cannot be deleted Cancel the protect setting P73 10 00 1 DEC 2005 2304 100_0001 1 5 DELETE THIS PICTURE DELETE SING...

Page 52: ...the same time Once deleted pictures cannot be recovered Please double check before deleting pictures Do not turn off the camera while deleting When you delete pictures use batteries with sufficient battery power P13 or use the AC adaptor DMW AC2B optional Pictures that are protected P73 or do not conform to DCF standard P48 will not be deleted even if ALL DELETE is selected MULTI DELETE SELECT SET...

Page 53: ...wing cases The power save mode is activated While the menu screen is displayed While the self timer is set When you use the AC adaptor DMW AC2B optional the power save mode is not activated This mode allows you to take close up pictures of the subject e g when taking pictures of flowers You can take pictures approaching the subject at a distance up to 5 cm from the lens by rotating the zoom lever ...

Page 54: ... frames used in 1 second Close the menu by pressing the shutter button halfway or the MENU button after finishing the setting 2 Press the shutter button halfway When the subject is focused the focus indication A lights 3 Press the shutter button fully to start the recording The remaining recording time approximation appears on the screen By pressing the shutter button fully again the recording sto...

Page 55: ... type of the card recording may stop while you are recording motion images When motion images recorded with the camera are played back on other equipment the quality of pictures may be deteriorated or it may not be possible to play them back Motion images recorded with setting MOTION RATE to 30fps on the camera cannot be played back on a camera which does not support 30fps of motion rate In motion...

Page 56: ...button while the scene menu is displayed you can set the REC mode menu P61 and the SETUP menu P23 PORTRAIT P57 SPORTS P57 SCENERY P58 NIGHT SCENERY P58 NIGHT PORTRAIT P59 FIREWORKS P59 PARTY P60 SNOW P60 When you take pictures with a scene mode which is not adequate for the purpose the hue may differ from the actual scene When you want to change the brightness of the picture to be recorded compens...

Page 57: ...e from the camera and get closer to the subject This mode is suitable for outdoors in the daytime The ISO sensitivity is fixed to AUTO This mode allows you to take pictures of a fast moving subject e g When taking pictures of outdoor sports Technique for Sports mode To take a sharp picture of a fast moving subject the shutter speed becomes faster than usual This mode is more effective when taking ...

Page 58: ...The landscape can be recorded vividly by slowing down the shutter speed Technique for Night scenery mode Since the shutter speed becomes slow max about 8 sec use a tripod The focus range is 5 m The shutter may be kept closed max about 8 sec after taking a picture because of signal conditioning but it is not a malfunction When you take pictures in dark places noise may become visible The ISO sensit...

Page 59: ...about 1 sec after taking a picture because of signal conditioning but it is not a malfunction When you take pictures in dark places noise may become visible When the flash setting is set to Forced OFF press 1 to set to Slow sync Red eye reduction The flash setting is fixed to Slow sync Red eye reduction and the flash is always activated The ISO sensitivity is fixed to AUTO This mode allows you to ...

Page 60: ...mmend using a tripod We recommend taking pictures by rotating the zoom lever to Wide 1k and being at a distance about 1 5 m from the subject When the flash is activated the flash setting can be set to Forced ON Red eye reduction or Slow sync Red eye reduction The ISO sensitivity is fixed to AUTO This mode allows you to take a picture in locations such as skiing resorts and locations near snowy mou...

Page 61: ...e When rotating the zoom lever toward T or W the page of the menu screen can be forwarded or reversed Close the menu by pressing the shutter button halfway or the MENU button after finishing the setting W BALANCE P62 SENSITIVITY P64 PICT SIZE P64 QUALITY P65 AF MODE P65 SLOW SHUTTER P66 D ZOOM P67 COL EFFECT P67 PICT ADJ P67 SCN1 SCN2 EXITMENU SENSITIVITY QUALITY AF MODE PICT SIZE SELECT SET REC 1...

Page 62: ...t sources auto white balance adjustment may not operate properly In this case set the white balance to a mode except AUTO manually 1 The range that is controlled by the auto white balance adjustment mode of the camera 2 Blue sky 3 Cloudy sky Rain 4 TV screen 5 Sunlight 6 White fluorescent light 7 Incandescent light bulb 8 Sunrise and sunset 9 Candlelight KlKelvin Colour Temperature White Balance W...

Page 63: ...reddish 2 RED Press when the hue is bluish About the white balance In simple mode the white balance is fixed to AUTO When taking a picture with the flash the white balance will be automatically adjusted except for Daylight but the white balance may not be properly adjusted if the flash level is insufficient About the white balance fine adjustment The white balance icon on the screen turns red or b...

Page 64: ...he picture to an e mail or post it on a website because the file size is small For details on how to playback pictures recorded using HDTV mode on a High Definition TV HDTV has a 16 9 aspect refer to P81 Both ends of the pictures recorded using HDTV mode may be cut off in printing Check the picture before printing P98 In motion image mode the picture size is fixed to 320k240 pixels Pictures may ap...

Page 65: ...re quality Picture quality will be high Standard High compression This type gives priority to the number of recordable pictures and records standard quality pictures SCN1 SCN2 AF Mode AF MODE 5 area focusing The camera focuses on any of 5 focus areas You can record a picture in free composition without limiting the position of the subject 3 area focusing The camera focuses on any of the left centr...

Page 66: ...ocusing mode The shutter speed can be automatically adjusted However if you want brighter pictures you can manually select a slower shutter speed This is especially effective if you want to take pictures where both the night landscape and the subject are bright using NIGHT PORTRAIT in scene mode P56 The slow shutter speed values you can select are 1 8 1 4 1 2 and 1 Example Usually set to 1 8 to ta...

Page 67: ... In the digital zoom range the stabilizer function may not be effective We recommend using a tripod The AF area is displayed with a size wider than usual and set only to a point on the centre of the screen in the digital zoom range P66 You can use 4 types of colour effects depending on the atmosphere of the picture Use this function according to the recording situation and the atmosphere of the pi...

Page 68: ...se Press 3 during motion image playback Press 3 again to cancel pause The motion images cannot be recorded with audio You cannot use the zoom function while playing back or pausing motion images The file format that can be played back with the camera is QuickTime Motion JPEG Some QuickTime Motion JPEG files recorded by a PC or other equipment may not be played back with the camera When playing bac...

Page 69: ...the zoom lever toward T or W the page of the menu screen can be forwarded or reversed After selecting a menu item with the operation described above make settings for each menu ROTATE DISP P70 ROTATE P70 PROTECT P73 DPOF PRINT P71 SLIDE SHOW P74 RESIZE P75 TRIMMING P76 COPY P78 FORMAT P79 PLAY 1 2 ROTATE DPOF PRINT SLIDE SHOW PROTECT EXITMENU SELECT MENU ROTATE DISP ON Menu items ...

Page 70: ...res in normal playback can be rotated When playing back rotated pictures in zoom playback or multi playback pictures appear in original orientation You can rotate and display pictures by using ROTATE function even if you do not take pictures by holding the camera vertically You can rotate the recorded pictures in steps of 90 and display them Example When rotating clockwise Original picture 1 Selec...

Page 71: ...l Print Order Format is a system that allows the user to select which pictures are to be printed how many copies of each picture will be printed or whether the recording date is to be printed on compatible photo printers or commercial photo printing services For details ask photo printing servicer When you want to use commercial photo printing servicer to print pictures recorded in the built in me...

Page 72: ...ded date by pressing the DISPLAY button after setting the number of prints The date print icon appears When using the software SD Viewer for DSC in the CD ROM supplied you can print pictures with the date by setting the position on the print preview screen For details refer to the separate operating instructions about PC connection When you go to a photo studio for digital printing be sure to orde...

Page 73: ...ipulated by JEITA Japan Electronics and Information Technology Industries Association When setting the DPOF print on the camera delete any previous DPOF print settings made by other equipment You can set the protection for the pictures which you do not want to be deleted by accident 1 Select SINGLE MULTI or CANCEL Single setting Select the picture and set cancel the protection Preventing Accidenta...

Page 74: ...9 The protect setting may not be effective in other equipment Sliding the Card Write Protect switch A on the SD Memory Card to LOCK prevents the picture from deletion even if the protection is not set The following functions cannot be used with protected pictures ROTATE P70 1 Set the items of the Slide Show 2 Select START 3 By pressing the MENU button the Slide Show stops Playing Back with Slide S...

Page 75: ...ayed back in the Slide Show This function is useful if you want to reduce the file size of the picture in cases when it needs to be attached to an e mail or uploaded to a website 1 Select the picture and set it The following pictures cannot be resized Pictures equal to or smaller than 640k480 pixels Pictures recorded after setting the picture size to HDTV Motion images It may not be possible to re...

Page 76: ...lect NO a resized picture is newly created Use this function when you trim needed parts of the recorded picture 1 Select the picture to trim and set it The following pictures cannot be trimmed Pictures smaller than 640k480 pixels Pictures recorded after setting the picture size to HDTV Motion images It may not be possible to trim pictures recorded with other equipment RESIZE CANCEL MENU DELETE ORI...

Page 77: ...e trimmed picture When you select NO a trimmed picture is newly created Pictures will not be displayed in the rotated direction even if ROTATE DISP is set to ON P70 The picture size of the trimmed pictures may become smaller than that of the original one depending on the cut size The picture quality of the trimmed picture will be deteriorated ZOOM EXIT TRIMMING MENU T W 2304 1 5 100_0001 TRIM SHUT...

Page 78: ... to the card all pictures are selected at one time and this screen does not appear 3 Select YES and set it The illustration is the screen when pictures are copied from the built in memory to the card When you copy pictures from the card to the built in memory the message COPY THIS PICTURE TO BUILT IN MEMORY appears If you turn the camera off or operate for other functions before the copy is comple...

Page 79: ...halfway DPOF settings on the original picture data will not be copied Set DPOF settings again after the copy is completed P71 Only files conforming to DCF standard P48 73 can be copied Files which do not conform to DCF standard cannot be copied It may take time to copy the data Pictures which are recorded or edited with other equipment may not be copied 1 Select YES to format the medium The illust...

Page 80: ...rotected images are irretrievably erased Please confirm that all data is transferred to your PC before proceeding with format function During formatting do not turn the camera off When you format the built in memory or the card use batteries with sufficient battery power P13 or AC adaptor DMW AC2B optional When the SD Memory Card Write Protect switch is slid to LOCK you cannot format the card It m...

Page 81: ...ial to playback mode Viewing pictures in other countries When setting VIDEO OUT on the SETUP menu you can view images on the TV in other countries regions which use the NTSC or PAL system Playback pictures on TV with SD Memory Card slot A recorded SD Memory Card can be played back on TVs with an SD Memory Card slot If you play back pictures recorded using HDTV mode on a High Definition TV HDTV has...

Page 82: ...1 Select USB MODE 2 Select PC or PictBridge PTP If you connect the camera to a PC select PC P83 If you connect the camera to a printer supporting PictBridge select PictBridge PTP P85 When PC is selected the camera is connected via USB Mass Storage communication system When PictBridge PTP is selected the camera is connected via PTP Picture Transfer Protocol communication system NO RESET VIDEO OUT C...

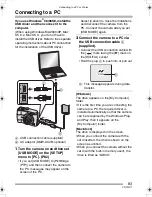
Page 83: ... camera from the PC Connect the camera after you set USB MODE again 2 Connect the camera to a PC via the USB connection cable A supplied Connect the USB connection cable with the mark facing the 1 mark on the DIGITAL socket Hold the plug C to push into or pull out D This message appears during data transfer Windows The drive appears on the My Computer folder If it is the first time you are connect...

Page 84: ...rmation in the card may be damaged Do not use any other USB connection cables except the supplied one For more information refer to the separate operating instructions about PC connection Also refer to the operating instructions of the PC If the card is not inserted when the camera is connected to a PC you can edit or access the picture data in the built in memory If the card is inserted you can e...

Page 85: ...eries with sufficient battery power P13 or the AC adaptor DMW AC2B optional when you connect to a printer If the remaining battery power becomes low during communication the status indicator blinks and the alarm beeps In this case stop the communication at once Disconnect the USB connection cable after printing Do not use any other USB connection cables except the supplied one If the card is not i...

Page 86: ... printed on the picture NUM OF PRINTS Set the number of prints PAPER SIZE Possible paper sizes on the camera The items are listed on 1 2 and 2 2 Press 4 to select the desired item These items cannot be displayed when the printer does not support the paper sizes PLEASE SELECT THE PICTURE TO PRINT PictBridge PRINT SELECT 100_0001 1 5 2304 CANCELMENU PAPER SIZE PAGE LAYOUT NUM OF PRINTS PRINT START S...

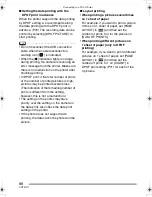
Page 87: ...t it to the printer again You can change the DPOF print setting by pressing the MENU button P71 2 Select PRINT START and then print out the picture Refer to P86 for print setting Press the MENU button to cancel printing Settings on the printer are prioritised 1 page with no frame print 1 page with frame print 2 pages print 4 pages print CANCELMENU PAPER SIZE PAGE LAYOUT NUM OF PRINTS PRINT START S...

Page 88: ...tures may be printed several times The indication of the remaining number of prints is different from the setting however this is not a malfunction The setting on the printer may have priority over the setting on the camera in the date print Also check the date print setting on the printer If the printer does not support date printing the date cannot be printed on the picture Layout printing When ...

Page 89: ... memory Card 13 Recording state 14 Histogram P28 15 Current date and time P22 This is displayed for about 5 seconds when turning the camera on setting the clock and after switching from the playback mode to the recording mode Zoom Digital zoom P38 67 16 Shutter speed P30 17 Aperture value P30 18 Exposure compensation P43 19 Slow shutter P66 20 Auto bracket P44 21 AF area P30 22 Spot AF area P65 23...

Page 90: ...uilt in memory Card 7 Recording state 8 AF area P30 9 Operation for backlight compensation P36 10 Current date and time P22 This is displayed for about 5 seconds when turning the camera on setting the clock and after switching from the playback mode to the simple mode Zoom P38 11 Backlight compensation P36 12 Self timer P42 13 Burst P46 11 13 12 BACKLIGHT 5 1 2 3 9 10 8 4 7 6 5 W T ...

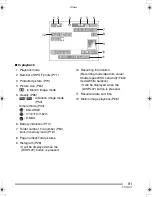
Page 91: ...ile number P84 built in memory card P19 8 Page number Total pictures 9 Histogram P28 It will be displayed when the DISPLAY button is pressed 10 Recording information Recording mode Aperture value Shutter speed ISO sensitivity Flash mode White balance It will be displayed when the DISPLAY button is pressed 11 Recorded date and time 12 Motion image playback P68 9 10 11 1 1 2 12 F2 8 1 25 ISO100 AUTO...

Page 92: ...era near radio transmitters or high voltage lines If you record near radio transmitters or high voltage lines recorded pictures may be adversely affected Make sure to use the supplied cords and cables If you use optional accessories use the cords and the cables supplied with them Do not extend the cords and the cables Do not spray insecticides or volatile chemicals onto the camera If the camera is...

Page 93: ...tteries If the batteries are left in extremely high or low temperatures the terminals may rust and cause malfunctions If you drop the batteries accidentally check to see if the battery body and terminals are damaged Inserting a damaged battery in the camera will damage the camera When you go out bring spare batteries Be aware that the operating time of the batteries will become shorter in low temp...

Page 94: ...DCF standard the DPOF print cannot be set NO ADDITIONAL DELETE SELECTIONS CAN BE MADE You have exceeded the number of pictures that can be set at once with MULTI DELETE Once delete the selected pictures and then repeat deleting multiple pictures NOT ENOUGH SPACE ON BUILT IN MEMORY NOT ENOUGH MEMORY IN THE CARD There is no space left on the built in memory or the memory card When you copy pictures ...

Page 95: ...erate properly Turn the camera off and on If the message persists contact the dealer or your nearest servicentre MEMORY CARD ERROR Failed access to the card Insert the card again READ ERROR Data reading error Play it back again WRITE ERROR Data writing error Turn the camera off and remove the card Then insert the card and turn the camera on again Be sure that the camera is turned off before removi...

Page 96: ...ake pictures with the flash While the flash is being charged the LCD monitor is turned off 5 The camera is turned off immediately even after it is turned on Are the batteries exhausted Replace them with batteries which have enough capacity When you use Ni MH batteries charge them If you leave the camera with turning it on the batteries are exhausted Turn the camera off frequently by using the econ...

Page 97: ...on the subject red eye phenomenon before actually recording pictures After the first flash the flash is activated again for recording Playback 1 Pictures being played are rotated and displayed in an unexpected direction The camera has a function to automatically rotate and display pictures recorded by holding the camera vertically If you take pictures aiming the camera up or down the camera may re...

Page 98: ...details Others 1 Unreadable language was selected by mistake Press the MENU button and select icon on the SETUP menu to set the desired language 2 The setting for the auto review function is disabled Is the camera in burst mode P46 auto bracket P44 or motion image mode P54 In these cases you cannot set the auto review function in the SETUP menu 3 The lens clicks When brightness has changed due to ...

Page 99: ... Number of recordable pictures Max 7 frames Standard max 4 frames Fine Depends on the remaining capacity of the built in memory or the card unlimited Performance in burst recording is only with SD Memory Card MultiMediaCard performance will be less Motion image recording 320k240 pixels 30 or 10 frames second without audio The maximum recording time depends on the capacity of the built in memory or...

Page 100: ...ge Quality Fine Standard Recording file format Still Picture JPEG Design rule for Camera File system based on Exif 2 2 standard DPOF corresponding Motion images QuickTime Motion JPEG motion images without audio Interface Digital USB 2 0 Full Speed Analogue video NTSC PAL Composite Switched by menu Terminal DIGITAL V OUT Dedicated jack 8 pin DC IN type 1 jack Dimensions 93 5 mm W k63 0 mm H k30 7 m...

Page 101: ...101 VQT0Q71 MEMO ...

Page 102: ...102 VQT0Q71 MEMO ...

Page 103: ...103 VQT0Q71 MEMO ...

Page 104: ...ectric Industrial Co Ltd Web Site http www panasonic co jp global VQT0Q71 F0205Mn0 QuickTime and the QuickTime logo are trademarks used under license The QuickTime logo is registered in the U S and other countries B ...

Reviews: