background image

9

3.4.

How to Define the Model Suffix (NTSC or PAL model)

There are seven kinds of DMC-TZ3/TZ2, regardless of the colours.

• a) DMC-TZ3S
• b) DMC-TZ3, TZ2P/PC
• c) DMC-TZ3, TZ2EB/EF/EG/EGM/GN
• d) DMC-TZ3, TZ2EE
• e) DMC-TZ3, TZ2GD
• f)  DMC-TZ3, TZ2GT
• g) DMC-TZ3PL/GC/GK/SG, TZ2PL/GC/GK

(DMC-TZ3S is exclusively Japan domestic model.)
What is the difference is that the “INITIAL SETTINGS” data which is stored in Flash ROM mounted on Main PCB.

3.4.1.

Defining methods:

To define the model suffix to be serviced, refer to the nameplate which is putted on the bottom side of the Unit.

NOTE:

After replacing the MAIN PCB, be sure to achieve adjustment.
The adjustment instruction is available at “software download” on the “Support Information from NWBG/VDBG-PAVC” web-site
in “TSN system”, together with Maintenance software.

Summary of Contents for Lumix DMC-TZ2P

Page 1: ...violation of law ORDER NO DSC0703017CE B26 Digital Camera DMC TZ2P DMC TZ2PC DMC TZ2PL DMC TZ2EB DMC TZ2EE DMC TZ2EF DMC TZ2EG DMC TZ2EGM DMC TZ2GC DMC TZ2GD DMC TZ2GK DMC TZ2GN DMC TZ2GT DMC TZ3P DMC...

Page 2: ...tant Notice 1 Other than U S A and Canadian Market 8 3 4 How to Define the Model Suffix NTSC or PAL model 9 4 Specifications 12 5 Location of Controls and Components 13 6 Service Mode 15 6 1 Error Cod...

Page 3: ...exposed to shock hazards 1 2 Leakage Current Cold Check 1 Unplug the AC cord and connect a jumper between the two prongs on the plug 2 Measure the resistance value with an ohmmeter between the jumper...

Page 4: ...g Procedure 1 Refer to the disassemble procedure and Remove the necessary parts unit 2 Put the insulation tube onto the lead part of Resistor ERG5SJ102 1k 5W an equivalent type of resistor may be used...

Page 5: ...ces 4 Use only an antistatic solder removal device Some solder removal devices not classified as antistatic ESD protected can generate electrical charge sufficient to damage ES devices 5 Do not use fr...

Page 6: ...must not be used until a replacement cover is obtained A replacement fuse cover can be purchased from your local Panasonic Dealer If the fitted moulded plug is unsuitable for the socket outlet in you...

Page 7: ...st never be subjected to excessive heat or discharge It must therefore only be fitted in requirement designed specifically for its use Replacement batteries must be of same type and manufacture They m...

Page 8: ...ing the lead free solder To put lead free solder it should be well molten and mixed with the original lead free solder Remove the remaining lead free solder on the PCB cleanly for soldering of the new...

Page 9: ...domestic model What is the difference is that the INITIAL SETTINGS data which is stored in Flash ROM mounted on Main PCB 3 4 1 Defining methods To define the model suffix to be serviced refer to the...

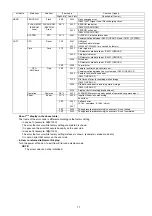
Page 10: ...ep 1 The temporary cancellation of factory setting Set the mode dial to Normal picture mode Red camera mark While keep pressing Optical Image Stabilizer and UP of Cross key simultaneously turn the Pow...

Page 11: ...IRMATION The display shows PLEASE SET THE CLOCK when turn the Power on again When the unit is connected to PC with USB cable it is detected as removable media When the GT or GK model suffix is selecte...

Page 12: ...12 4 Specifications...

Page 13: ...13 5 Location of Controls and Components...

Page 14: ...14...

Page 15: ...e dial to Normal picture mode Red camera mark While keep pressing Optical Image Stabilizer Button and UP of Cross key simultaneously turn the Power on 2 The display of error code Press Optical Image S...

Page 16: ...00 HP High detect error C B encoder full retract always High detect FP9802 13 14 signal line or IC6001 VENUS 3 0300 ENC1 detect error C B motor encoder detect error FP9802 10 signal line or IC6001 VEN...

Page 17: ...CPU Reset 30 0 0001 0007 NMI reset Non Mask able Interrupt 30000001 30000007 are caused by factors Card Card 31 0 0001 Card logic error SD memory card data line or IC6001 VENUS 3 0002 Card physical er...

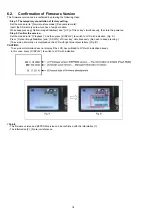
Page 18: ...2 Confirm the version Set the mode dial to Playback and then press DISPLAY to switch to LCD with indication Fig A Press Optical Image Stabilizer and DOWN of Cross key simultaneously No need to keep pr...

Page 19: ...19 7 Service Fixture Tools 7 1 Service Fixture and Tools The following Service Fixture and tools are used for checking and servicing this unit...

Page 20: ...Extension cables for servicing Table S1 Extension Cable List 7 3 1 Extension Cable Connections for DMC TZ3 No Parts No Connection Form 1 VFK1950 FP9801 MAIN CCD UNIT 33PIN 0 3 FFC 2 RFKZ0416 FP9802 MA...

Page 21: ...the capacitor on FLASH PCB Refer to HOW TO DISCHARGE THE CAPACITOR ON FLASH PCB The capacitor voltage is not lowered soon even if the AC Cord is unplugged or the battery is removed 2 Be careful of th...

Page 22: ...22 8 Disassembly and Assembly Instructions 8 1 Disassembly Flow Chart 8 2 PCB Location...

Page 23: ...TZ3 Fig D3a DMC TZ2 PP9001 Connector FP9005 Flex Main P C B 4 Lens Unit Fig D4 1 Screw D 2 Screws E FP9801 Flex FP9802 Flex Lens Unit 5 Top Operation Unit Fig D5 Top Operation Unit 6 Top Operation P...

Page 24: ...24 For DMC TZ2 Fig D1a 8 3 2 Removal of the LCD Unit For DMC TZ3 Fig D2 For DMC TZ2 Fig D2a...

Page 25: ...25 8 3 3 Removal of the Main P C B For DMC TZ3 Fig D3 For DMC TZ2 Fig D3a 8 3 4 Removal of the Lens Unit Fig D4 8 3 5 Removal of the Top Operation Unit Fig D5...

Page 26: ...26 8 3 6 Removal of the Top Operation P C B AF Assist P C B and Speaker Fig D6 Fig D7 8 3 7 Removal of the Sub P C B Fig D8...

Page 27: ...27 8 3 8 Removal of the Flash Unit Battery Frame Unit Lens Plate and Front Grip Fig D9 Fig D10...

Page 28: ...ibility of the CCD being dirt perform disassemble and or assemble under the condition of the CCD is being mounted Disassembling procedures for the CCD unit refer to item 8 6 2 Take care that the dust...

Page 29: ...and 1st Lens Frame 2nd Lens Frame 3rd Lens Frame 1 Turn the drive frame and then Align the groove of drive frame and pin of 1st lens frame 2 Push the 1st lens frame to the indicated by arrow from len...

Page 30: ...Frame 1 Turn the direct frame and then Align the groove of direct frame and groove of both side cam 2 Remove the 3rd lens frame and 2nd lens frame from the direct frame both side cam 8 4 6 Removal of...

Page 31: ...31 8 5 Assembly Procedure for the Lens 8 5 1 Phase alignment of the Penetration Cam and Drive Frame 8 5 2 Phase alignment of the Direct Frame and Both Side Cam...

Page 32: ...32 8 5 3 Assembly for the 2nd Lens Frame and 3rd Lens Frame 8 5 4 Assembly for the Direct Frame Both Side Cam and 2nd Lens Frame 3rd Lens Frame...

Page 33: ...bly for the Direct Frame Both Side Cam and 1st Lens Frame 2nd Lens Frame 3rd Lens Frame 8 5 6 Assembly for the Direct Frame Both Side Cam 1st Lens Frame 2nd Lens Frame 3rd Lens Frame Penetration Cam a...

Page 34: ...34 8 5 7 Assembly for the Zoom Motor Unit and Master Flange Unit...

Page 35: ...35 8 6 Removal of the CCD Unit To prevent the CCD unit from catching the dust and dirt do not remove the CCD unit except for replacing 8 7 Removal of the Zoom Motor Unit...

Page 36: ...it are as follows Apply grease additionally in the specified position if necessary When the grease is applied use a toothpick and apply thinly Focus motor nut moving part Grease VFK1850 Furoyl type Am...

Page 37: ...cess to TSN Website at Support Information from NWBG VDBG PAVC NOTE After adjustments have been terminated make sure to achieve INITIAL SETTINGS NOTE There is no LCD adjustment in this model There is...

Page 38: ...D Panel with your hand When cleaning the lens use air Blower to blow off the dust When cleaning the LCD Panel dampen the lens cleaning paper with lens cleaner and the gently wipe the their surface Not...

Page 39: ...TZ2GT DMC TZ3P DMC TZ3PC DMC TZ3PL DMC TZ3EB DMC TZ3EE DMC TZ3EF DMC TZ3EG DMC TZ3EGM DMC TZ3GC DMC TZ3GD DMC TZ3GK DMC TZ3GN DMC TZ3GT DMC TZ3SG Digital Camera Name of Signal OFTR FEP This signal is...

Page 40: ...MERA PROCESS J PEG COMP EX PANDS MEDIA I F USB I F MAIN MICROPROCESSOR FLASH TOP OPERATION UNIT X9101 32 768kHz IC1001 POWER SHUTTER IC9101 SYSTEM IC IC6002 FLASH ROM 128Mbit ZOOM OIS CONTROL LENS DRI...

Page 41: ...VBB SC DSD DSG B R G CSH VSS STH HVDD CKH1 CKH2 1 2 3 4 5 6 7 8 9 10 11 12 13 14 15 16 17 18 19 FP9004 4 3 2 1 D GND BL RANK BL MINUS BL PLUS CKH2 CKH1 HVDD STH VSS CSH G R B DSG DSD SC VBB CSV ENB V...

Page 42: ...N FOR CONTINUED PROTECTION AGAINST FIRE HAZARD REPLACE ONLY WITH THE SAME TYPE 1 25A 32V FUSE ATTENTION POUR UNE PROTECTION CONTINUE LES RISQUES D INCENDIE N UTILISERQUE DES FUSIBLE DE M ME TYPE 1 25A...

Page 43: ...8 A8 8 A 0 A 0 41 18 4 8 8 8 8 8 8 8 8 8 8 1 219 4A10A 219 4A10A 219 4A59 5 76A 7 5 766 4A 5 766 4A 5 766 4A 5 766 4A 5 76A 5 766 4 A 0 A4 A 0 0 A 66 A A A A A A A A A A A A 52 A A A A A A A A A A A...

Page 44: ...8 8 8 4 8 4 8 8 8 8 8 8 8 8 8 4 8 4 57 59 57 59 8 8 857 857 A219 4 A219 4A5 857 857 8 8 8 8 8 8 8 8 8 8 A 0 A 0 A 0 A 0 A 0 A6 4 1 8 8 8 8 8 8 8 8 8 8 8 8 8 5 8 5 8 8 8 4 8 4 0 0 8 8 8 4 8 4 57 59 57...

Page 45: ...8 8 8 8 8 5 8 5 8 4 8 4 8 8 8 8 8 8 857 857 57 59 57 59 61 5 A 0 8 8 8 8 8 8 8 8 5 8 8 8 4 8 4 8 8 8 8 8 4 8 4 8 8 8 8 8 8 8 5 8 5 8 8 8 857 857 57 59 57 59 26 4 4 0 0 8 81 A6 4 1 8 A 0 A 0 A 0 A 0 A...

Page 46: ...V 33 YV 34 YHO 35 YV 36 YHO 37 XHO 38 XV 39 FBP 4 FBP 3 FAN 2 FBN 1 DC MOTOR ZOOM MOTOR UNIT G3 G4 G7 D2 D1 C3 C2 C1 B3 B2 D PHOTO SENSOR ZOOM ENCODER 1 B G8 G2 G1 G12 G11 G10 G9 G5 G6 DC SOLENOID IRI...

Page 47: ...S 9 S4 Print Circuit Board S4 1 Flash P C B 2 4 6 6 3 4 4 6 6 6 6 6 6 4 4 4 4 3 4 DMC TZ2 TZ3 Flash P C B 10 9 8 7 6 5 4 3 2 1 G F E D C B A Foil Side Component Side...

Page 48: ...tion P C B S4 3 AF Assist P C B 2 2 2 6 4 6 6 5 5 5 5 5 4 4 4 4 4 4 4 4 6 DMC TZ2 TZ3 Top Operation P C B Foil Side Component Side DMC TZ2 TZ3 AF Assist P C B 10 9 8 7 6 5 4 3 2 1 G F E D C B A Foil S...

Page 49: ...S 11 S4 4 CCD Flex P C B DMC TZ2 6 4 3 4 4 4 6 DMC TZ2 CCD Flex P C B 10 9 8 7 6 5 4 3 2 1 G F E D C B A Foil Side Component Side...

Page 50: ...S 12 S4 5 CCD Flex P C B DMC TZ3 6 4 3 4 4 4 6 DMC TZ3 CCD Flex P C B 10 9 8 7 6 5 4 3 2 1 G F E D C B A Foil Side Component Side...

Page 51: ...5 4 3 2 1 DMC TZ3 TZ2 LENS FLEX P C B A2 FOCUS MOTOR UNIT A1 A4 A3 A Pin 41 Pin 1 G1 G2 OIS G G3 G4 G5 G6 G8 G7 G12 G11 G10 G9 E3 E1 E2 FOCUS ENCODER E B B1 ZOOM ENCODER2 B3 B2 C ZOOM ENCODER1 C1 C3 C...

Page 52: ...S 14...

Page 53: ...of this assembly in production it will no longer be available All resistors are in OHMS K 1 000 OHMS All capacitors are in MICRO FARADS uf P uuF Components identified with the mark have the special ch...

Page 54: ...3101 ERJ2GEJ470 M RESISTOR CH 1 16W 47 1 F8001 ERBSE1R25U FUSE 32V 1 25A 1 R3102 ERJ2RKD330 M RESISTOR CH 1 16W 33 1 F8002 ERBSE1R50U FUSE 32V 1 5A 1 R3103 ERJ2GEJ222 M RESISTOR CH 1 16W 2 2K 1 R3104...

Page 55: ...W 1 K A 24 VMS7822 BATTERY DOOR SHAFT 1 B11 VHD1876 SCREW 1 S 25 VMS7823 JACK DOOR SHAFT 1 B12 VHD1877 SCREW 1 K A 26 VYF3143 BATTERY DOOR UNIT 1 K TZ2 B12 VHD1876 SCREW 1 S 26 VYF3140 BATTERY DOOR UN...

Page 56: ...GK GN GT FRENCH 309 VPF1132 BAG POLYETHYLENE 1 EG EGM GC PL SG 312 VQT1D74 O I SOFTWARE 1 EG 310 VQT1B74 INSTRUCTION BOOK 1 EB GERMAN FRENCH ITALIAN ENGLISH DUTCH 310 VQT1B75 INSTRUCTION BOOK 1 EE 312...

Page 57: ...25 PACKING CASE 1 2PK 2PCK 407 VPK3259 PACKING CASE 1 2PS 2PCS 407 VPK3319 PACKING CASE 1 3PK 3PCK 407 VPK3256 PACKING CASE 1 3PS 3PCS 407 VPK3323 PACKING CASE 1 3PA 3PCA 408 VPN6548 CUSHION 1 P PC 40...

Page 58: ...1 7 6 10 3 4 5 B1 B2 9 8 12 37 15 13 B13 1 35 B23 31 2 25 24 26 19 33 43 B10 41 B8 B9 42 38 B12 B5 B24 17 39 40 16 46 14 B21 B7 B6 208 209 207 210 211 204 214 215 B15 B16 B20 205 213 212 202 203 201 B...

Page 59: ...Accessories Section 1 S 21 306 309 312 310 311 301 303 304 313 307 308 320 DMC TZ2 TZ3GN DMC TZ2 TZ3GK GT DMC TZ3GD 318 316 317 315 314 305 302 DMC TZ2EB GC DMC TZ3EB GC SG DMC TZ2EE EF EG EGM GC DMC...

Page 60: ...S6 3 Packing Parts and Accessories Section 2 S 22 406 409 412 410 411 401 403 404 414 408 405 413 402 407...

Reviews: