background image

IMPORTANT SAFETY INSTRUCTIONS

Before using the vacuum cleaner, please observe these basic safety instructions.

Correct usage

 - This appliance is for indoor use with domestic 

purpose only and is not specifically designed for 

allergy sufferers. Use the appliance only in 

accordance with the instructions in this manual. 

Any other usage or modification is dangerous.  

The manufacturer is not liable for damage due to 

improper use of the appliance.


WARNING

To reduce the risk of fire, electric shock, or injury

 - This appliance is not intended for use by persons 

(including children) with reduced physical, sensory 

or mental capabilities, or lack of experience and 

knowledge, unless they have been given 

supervision or instruction concerning use of the 

appliance by a person responsible for their safety.

 - Children should be supervised to ensure that they 

do not play with the appliance.

 - Do not use the appliance if the cord or plug is 

damaged or faulty.

 - If the cord is damaged, it must be replaced by the 

manufacturer, its service agent or similarly qualified 

persons in order to avoid a hazard.

 - The plug must be removed from the socket outlet 

before cleaning or maintaining the appliance.

 - Turn off before cleaning or maintaining the power 

nozzle.

 - Turn off the appliance before removing the plug. Do 

not pull on the cord, always pull on the plug body 

itself.

 - Do not handle plug or the appliance with wet 

hands.

 - Do not use the appliance on people or animals.

 - Do not use wet filters after wash, make sure they 

are completely dry to avoid damaging the 

appliance.

 - Do not vacuum the followings

 - Hot ash or embers

 - Large and sharp objects

 - Water or other liquids

 - Explosive materials or gases

 - Flammable or combustible materials or gases

 - Toner dust, for example, those from printers and 

photocopiers

 - Conductive dusts from power tool

 - Keep the appliance away from heat sources, for 

example, radiators, fires, direct sunlight, etc.

 - Do not use the appliance in areas where flammable 

or combustible materials or gas may be present.

 - This appliance is fitted with a thermal cut-out 

device which automatically turns off the appliance 

to prevent overheating of the motor. When this 

happens, check the dust compartment and filters 

as they may be full or clogged with fine dust. Check 

for any other obstructions in the nozzle pipe. After 

removing the obstruction, leave the appliance to 

cool down until the thermal cut-out resets after 

approximately 30 minutes.

 - Do not use or store the appliance or the parts at 

head level to avoid the risk of injury.

 - Do not sit on the appliance.

 - Be careful when using the appliance on staircases 

as the appliance may falls.

 - Use the appliance where the lighting is sufficient to 

avoid the risk of tripping.

 - For the purposes of recharging the battery, only 

use the detachable supply unit AMV61V-NTC.

 - Do not use the charging adapter of this appliance 

to charge any other batteries or battery powered 

appliances.

 - Do not store cells or batteries haphazardly in a box 

or drawer where they may short-circuit each other 

or be short-circuited by other metal objects.

 - Keep cells and batteries clean and dry.

 - Replace only with same Panasonic Corporation 

type AMV97V-NT battery pack.

EN2

Summary of Contents for MC-BJ870

Page 1: ...ance and save these instructions for future reference Model No MC BJ870 Operating Instructions English Contents IMPORTANT SAFETY INSTRUCTIONS EN2 Vacuum Cleaner Parts EN3 Preparation EN4 Charging EN6 How To Use The Vacuum Cleaner EN8 Maintenance EN12 Changing The Settings EN17 Product Disposal EN18 Trouble Shooting EN19 Specifications EN20 English ...

Page 2: ...sure they are completely dry to avoid damaging the appliance Do not vacuum the followings Hot ash or embers Large and sharp objects Water or other liquids Explosive materials or gases Flammable or combustible materials or gases Toner dust for example those from printers and photocopiers Conductive dusts from power tool Keep the appliance away from heat sources for example radiators fires direct su...

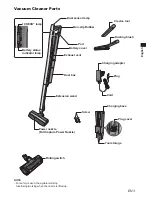
Page 3: ...pter Charging base Tool storage NOTE For safety reason the agitator will stop functioning working when the nozzle is lifted up Rolling switch ランプ点灯 Dust sensor lamp Non slip Rubber Port Battery cover Exhaust vent Dust box Extension wand Battery status indicator lamp CHECK lamp Plug Cord Plug cover Screw EN3 ...

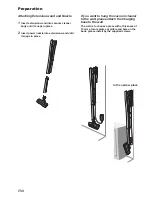
Page 4: ...ce with a thickness of 10 mm or more plates or pillars and bars on the back please install by the supplied screws In the narrow place Attaching Extension wand and Nozzle 1 Insert extension wand into vacuum cleaner body until it snaps in place 2 Insert power nozzle into extension wand until it snaps in place Preparation EN4 ...

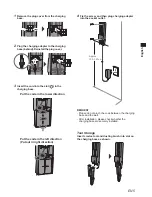
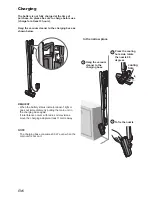
Page 5: ...the charging base are securely installed Tool Storage Insert crevice tool and dusting brush into slot on the charging base as shown 1 Remove the plug cover from the charging base 2 Plug the charging adapter to the charging base behind Reinstall the plug cover 3 Insert the cord into the slot in the charging base Put the code in the lower direction Put the code in the left direction Put out in right...

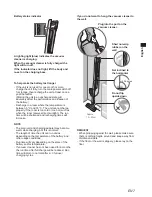
Page 6: ...se be sure to charge before use charge for at least 3 hours Hang the vacuum cleaner to the charging base as shown below 1 2 REQUEST When the battery status indicator doesn t light or goes out immediately try putting the main unit in the charging base again If interference occurs with radios or televisions move the charging adapter at least 1 metre away NOTE The charging base consumes 0 5 W even wh...

Page 7: ... charge the unit fully turn the main power switch off for storage then recharge the unit at least once a year thereafter Storing the unit in an uncharged state will adversely affect the performance and lifespan of the battery Recharge in a room where the temperature is between 5 C and 35 C The unit cannot charge properly if the room is too cold or too hot such as when the room receives direct sunl...

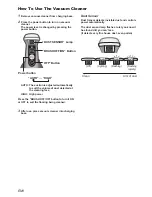
Page 8: ...cuum Cleaner 1 Remove vacuum cleaner from charging base 2 Press the power button to turn on vacuum cleaner The power level is changed by pressing the power button BRUSH OFF ON Button Power button OFF Button DUST SENSOR Lamp AUTO HIGH AUTO The suction is adjusted automatically to suit the volume of dust detected at the cleaning face HIGH High power Press the BRUSH OFF ON button to turn it ON or OFF...

Page 9: ...ed the end of its service life Please contact to the retailer where you purchased this vacuum cleaner Anti idling Function The agitator will stop functioning working when the nozzle is lifted up for more than 5 sec It will restart when the nozzle is lowered onto the floor The dust sensor lamp is blinking slowly about 3 second intervals when the anti idling function is working If the anti idling fu...

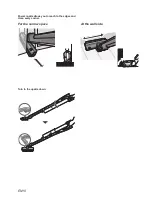
Page 10: ...At the wall side Power nozzle allows you to reach to the edges and clean every corner For the narrow space Turn to the upside down EN10 ...

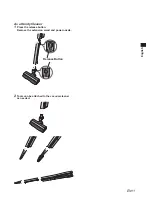
Page 11: ...English As a Handy Cleaner 1 Press the release button Remove the extension wand and power nozzle Release Button 2 Tools can be attached to the vacuum cleaner as needed EN11 ...

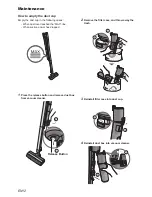
Page 12: ...level reached the MAX line When suction power has dropped 1 Press the release button and remove dust box from vacuum cleaner Release Button 1 2 2 Remove the filter case and throw away the trash 1 2 3 3 Reinstall filter case into dust cup 1 2 4 Reinstall dust box into vacuum cleaner 1 2 EN12 ...

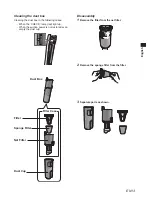
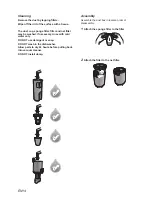
Page 13: ...ilter from the filter 3 Separate parts as shown Cleaning the dust box Cleaning the dust box in the following cases When the CHECK lamp red light up When the suction power is not restored even empty the dust cup ランプ点灯 Dust Cup Filter Sponge Filter Net Filter Filter Case Dust Box EN13 ...

Page 14: ... be washed If necessary rinse with cold water only DO NOT use detergent or soap DO NOT wash in the dishwasher Allow parts to dry 24 hours before putting back into vacuum cleaner DO NOT install damp Assembly Assemble the dust box in reverse order of disassembly 1 Attach the sponge filter to the filter 2 Attach the filter to the net filter EN14 ...

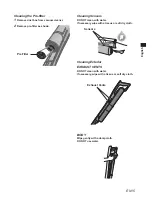
Page 15: ... cloth Sensors Cleaning Exterior EXHAUST VENTS DO NOT clean with water If necessary wipe with a tissue or soft dry cloth Exhaust Vents BODY Wipe gently with a damp cloth DO NOT use water Cleaning the Pre filter 1 Remove dust box from vacuum cleaner 2 Remove pre filter as shown Pre Filter EN15 ...

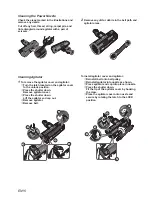
Page 16: ...the shutter down Remove agitator cover Press the shutter down Lift the agitator end cap out Remove agitator Remove belt 1 2 3 4 5 2 Remove any dirt or debris in the belt path and agitator areas To install agitator cover and agitator Reinstall belt onto belt pulley Reinstall agitator into nozzle as shown Press agitator end cap into place in nozzle Press the shutter down Fit the tip of the agitator ...

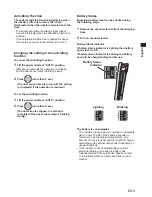
Page 17: ... OFF ON Release OFF and hold BRUSH OFF ON for more than 5 seconds States of the dust sensor lamp Red Lighting Normal Red Flashing rapidly High Red Flashing Light 2 Press BRUSH OFF ON to select the sensitivity Changes each time you press BRUSH OFF ON Lighting Red Flashing rapidly Red Red Flashing 3 Press OFF Setting finished Off EN17 ...

Page 18: ...ery from vacuum cleaner then take it to appropriate collection points in accordance with your municipal rules For more information contact with the retailer or your local authorities in charge of waste management Before removing the battery discharge it completely by operating the unit until it stops 1 To remove the battery cover Unscrew the screw Remove the battery cover 1 2 2 Remove the battery ...

Page 19: ... Push Power button to on Charge Battery Empty dust cup clean filters and leave cleaner for 30 minutes Suction power weakened Full or clogged dust cup Dirty filters Clogged nozzle or dust cup Thermal cut out for nozzle motor activated Worn agitator Empty dust cup Change clean filters Clean nozzle or dust cup Turn off for 30 minutes and then turn on again Replace agitator Agitator not turning Therma...

Page 20: ...ty of battery 1850 mAh AC Adapter Input Characteristics AC 100 240 V 50 60 Hz 0 7 0 25 A AC Adapter Output Characteristics DC 24 5 V 1 A Tools Crevice tool Dusting brush Class with respect to protection against electric shock 1006 Oaza Kadoma Kadoma shi Osaka 571 8501 Japan http www panasonic com Panasonic Corporation 2017 Charging Information for battery pack Nominal Specifications Item Specifica...

Reviews: