background image

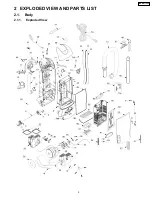
2.1.2. Parts List (Body)

Ref. No.

Part No.

Part Name & Description

Quantity

Remarks

1

AC40KDEKZV07

DUST COMPARTMENT

1

2

AC16CDDWZ000

ROLLER SHAFT

1

3

AC01CV0ZV06

WHEEL UNIT

2

4

AXWG6E115FY

WASHER

2

Shipped 10 per package

5

AC74SUSZ00

STOPPER WHEEL

2

Shipped 10 per package

6

AC83DDAAZU00

LOCKING CAM

1

7

AXTS3+8BFY

SCREW

1

Shipped 10 per package

8

AC68AZAZ00

SCREW, LOWER PLATE

1

Shipped 10 per package

9

AXTN4+16BFY

SCREW

31

Shipped 10 per package

10

AC70PDDWZV07

WAND HOLDER

1

11

AC32RDDWZV07

ATTACHMENT HOLDER

1

12

AC24PDDWZV07

HOSE FITTING (HOSE SUPPORT)

1

13

AMC62E-J20

CORD STOPPER (C62EJ2)

1

14

AC84PDDWZV07

HOSE UNIT

1

15

AC52PDDWZV07

CONNECTOR PIPE

1

16

AC23PDDWZV07

HOSE HOLDER

1

17

AC01EDDXZ000

ON-OFF SWITCH

1

18

AXTN4+45BFY

SCREW

1

19

AC74EDDWZ000

SEAL (AIR PATH)

2

20

AC94EDEKZY02

POWER CORD

1

21

AC85GDDWZ000

BLACK LEAD WIRE UNIT

1

22

AC85WDDWZ000

WHITE LEAD WIRE UNIT

1

23

AC39GDEKZ000

GREEN LEAD WIRE UNIT

1

24

AC99WCYKZ000

LEAD ASSEMBLY FUSE

1

25

AC51E4GZU01

RUBBER PROTECTOR

1

26

AMC-1CTCE23

WIRE NUT

8

Shipped 10 per package

27

AC54LDDWZU01

AIR GUIDE LEFT

1

28

AC55LDDWZU01

AIR GUIDE RIGHT

1

29

AC4154151

SEAL-IMPELLER

1

30

AC90FDEKZ000

MOTOR ASSEMBLY

1

31

AC26FDDWZU01

MOTOR CAP

1

32

AC45LDDWZV07

AIR OUTLET PACKING

2

33

AC99GAMMZ00

NOISE SUPPRESSOR

1

34

AC69KJMZV06

PROTECTOR

1

35

AC70KCNFZG00

PROTECTOR SPRING

1

36

AC68KAJDZV06

PROTECTOR CASE

1

37

AC39GDDXZ000

GREEN LEAD WIRE UNIT

1

38

AC25SBSKZ000

FLANGE

1

39

AXTN4+8JFY

SCREW TAPTITE

2

Shipped 10 per package

40

AC03FAFYZ00

MOTOR SUPPORT RUBBER

1

41

AC39ADDWZ000

BODY PACKING, RIGHT

1

42

AC64HARTZ000

SUCTION INLET PACKING

1

43

AC85KDDXZU01

DUST BOX UNIT

1

44

AC66KDDXZ000

DUST COMPARTMENT PACKING

1

45

AC66KCRCZ000

DUST COVER PACKING

1

46

AC80FDDXZU01

SWITCH COVER

1

47

AC21TDDXZ000

ORNAMENTAL PLATE

1

48

AC02HDDWZV07

COVER LID

1

49

AC21HDEKZU01

WINDOW

1

50

AC44HDDWZU01

LID HOLDING BRACKET

2

51

AC28LDDXZU01

AIR OUTLET GUIDE

1

52

AC28LDDWZU01

AIR OUTLET GUIDE

1

53

AC18DDDWZ000

SPRING, RELEASE BUTTON

2

54

AC15KDDWZU01

FASTENER

1

55

AC48HDEKZUU1

COVER (DECO)

1

56

AC42KDDWZM0H

FILTER CASE

1

57

AC38KBRMZ000

EXHAUST FILTER, HEPA

1

58

AC37KDDWZ000

FILTER SECONDARY (FOAM)

1

59

AC32KDDWZV07

FILTER SUPPORTER

1

60

AC03KDDWZV07

BAG BRACKET

1

61

AC64BDDWZM0H

HANDLE

1

62

AC16KCRRZ000

DUST BAG

1

63

AC01ZDEKZ000

OPERATING INSTRUCTIONS

1

64

AC94EDDWZY02

POWER CORD

1

65

AC40PBRLZV06

EXTENSION WAND UNIT

1

66

AC60RCNFZV06

CREVICE TOOL

1

67

AC63RDDWZV06

COMBINATION BRUSH

1

6

MC-GG773-00

Summary of Contents for MC-GG773-00

Page 1: ...C HOME APPLIANCES COMPANY DIVISION OF PANSONIC CORPORATION OF NORTH AMERICA All rights MC GG773 00 Vacuum Cleaner Specifications are subject to change without notice for further improvement Order Number MAC0712002CE ...

Page 2: ... 4 Packing Materials 10 3 REPLACEMENT INSTRUCTIONS 11 3 1 Lower Plate Replacement 11 3 2 Agitator Assembly Replacement 11 3 3 Brush Replacement 11 3 4 Belt Replacement 12 3 5 Power Cord Replacement 13 3 6 Switch ON OFF Replacement 13 3 7 Handle Release Assembly 13 3 8 Motor Replacement 14 3 9 Motor Protector Replacement 14 CONTENTS Page Page 2 MC GG773 00 ...

Page 3: ...1 WIRING DIAGRAM AND DRAWING 1 1 Wiring Diagram 3 MC GG773 00 ...

Page 4: ...ervicing it is necessary to eliminate pinching of any wire during reassembly After servicing any electrical component or electrical enclosure the unit should be reassembled and checked for dielectric breakdown or current leakage 4 MC GG773 00 ...

Page 5: ...2 EXPLODED VIEW AND PARTS LIST 2 1 Body 2 1 1 Exploded View 5 MC GG773 00 ...

Page 6: ...MPELLER 1 30 AC90FDEKZ000 MOTOR ASSEMBLY 1 31 AC26FDDWZU01 MOTOR CAP 1 32 AC45LDDWZV07 AIR OUTLET PACKING 2 33 AC99GAMMZ00 NOISE SUPPRESSOR 1 34 AC69KJMZV06 PROTECTOR 1 35 AC70KCNFZG00 PROTECTOR SPRING 1 36 AC68KAJDZV06 PROTECTOR CASE 1 37 AC39GDDXZ000 GREEN LEAD WIRE UNIT 1 38 AC25SBSKZ000 FLANGE 1 39 AXTN4 8JFY SCREW TAPTITE 2 Shipped 10 per package 40 AC03FAFYZ00 MOTOR SUPPORT RUBBER 1 41 AC39A...

Page 7: ...2 2 Nozzle Housing 2 2 1 Exploded View 7 MC GG773 00 ...

Page 8: ...ER 1 9 AC19ACPSZ000 BODY PACKING 1 10 AC34PDDEZV06 NOZZLE HOSE 1 11 AC92SDDXZ000 AGITATOR ASSEMBLY 1 12 AC85RDDWZU01 BRUSH UNIT 6 13 AC01ADEKZYU2 BODY NOZZLE HOUSING 1 14 AC10ADDWZV07 FURNITURE GUARD 1 15 AMC68A V30 SCREW FOR BODY 2 16 AC91ADDXZV07 LOWER PLATE UNIT 1 17 AC43AAFYZ00 BRACKET 1 18 AC47ADAAZM0E PEDAL 1 19 AC58AAFVZ00 PEDAL SPRING 1 20 AMC51A YUZ0000 PEDAL SHAFT 1 21 AXTN4 16BFY SCREW ...

Page 9: ... 3 2 Parts List Handle Ref No Part No Part Name Description Quantity Remarks 1 AC93BDDXZV07 HANDLE GRIP UNIT 1 2 AC06BDDXZV07 HANDLE COVER A 1 3 AC07BDDWZV07 HANDLE COVER B 1 4 AXTN4 16BFY SCREW 5 Shipped 10 per package 9 MC GG773 00 ...

Page 10: ...Packing Materials 2 4 1 Exploded View 2 4 2 Parts List Packing Materials Ref No Part No Part Name Description Quantity Remarks 1 AC61ZDEKZ000 Packing Assembly 1 Includes 1 and items a thru g 10 MC GG773 00 ...

Page 11: ... the Belt Replacement section 3 2 2 Installation 1 Place the belt around the motor shaft 2 Place the belt around the agitator pulley on the agitator assembly 3 Start the new agitator assembly back into the nozzle housing by placing the side opposite the belt partially into the nozzle housing slot The small tabs should be aligned with the nozzle and the other against the lower plate This will hold ...

Page 12: ...ut 10 Position belt over agitator pulley on the agitator 11 Reinstall agitator and lower plate 3 4 Belt Replacement 3 4 1 Removal 1 Remove lower plate 2 Remove agitator by carefully lifting out 3 Remove worn or broken belt 4 Clean agitator 3 4 2 Installation 1 Loop new belt Panasonic Type UB8 only around motor shaft and agitator pulley see illustration for correct belt routing 2 Reinstall agitator...

Page 13: ...any wire during reassembly After servicing any electrical component or electrical enclosure the unit should be reassembled and checked for dielectric breakdown or current leakage 3 6 Switch ON OFF Replacement 3 6 1 Removal 1 Remove the switch cover expose the electrical connections of the switch 2 Unplug the lead wire terminals from switch 3 Pull out the switch from switch cover 3 6 2 Installation...

Page 14: ...t the motor leads and remove the motor assembly 4 Remove two air outlet packing and two screws from the motor assembly to open 5 Remove noise suppressor motor cap and motor flange Save these items to place them on the new motor 3 8 2 Installation 1 Add a new seal impeller and body packing to the new motor 2 Assemble the noise suppressor motor cap and motor flange onto new motor and place it into t...

Reviews: