background image

FR15

Préparations des Ingrédients pour l’Égouttoir à salade

Fonction

Ingrédient

Vitesse

Max

Utilisation 

unique

Temps de

fonctionnement (env.)

Méthode de préparation

Égouttoir

Feuilles 

de laitue

1

100 

g

20 ~ 40 sec

Broyage en tranches de 3 à 5 

cm.

Chou

200 

g

20 ~ 50 sec

Coupé en 1 à 3 mm.

Comment utiliser : Égouttoir à salade

1

2

A

B

PP

PP

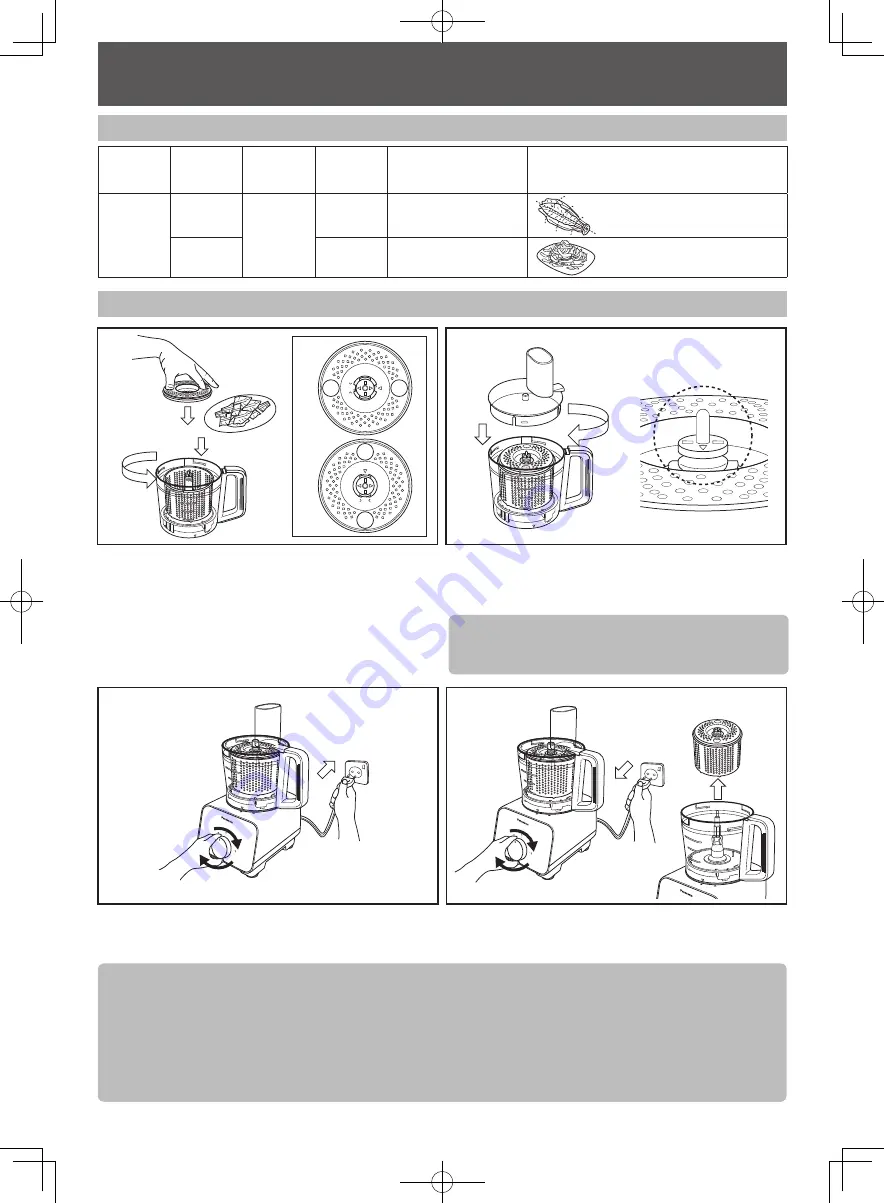
Après avoir inséré l’égouttoir à salade dans le Bol, 

insérez les ingrédients dans l’égouttoir à salade. Placez 

le Couvercle de l’égouttoir sur le dessus de l’égouttoir 

à salade jusqu’à ce que la marque s’aligne comme 

indiqué dans A. Tournez le Couvercle de l’égouttoir vers 

la gauche jusqu’à ce que la marque s’aligne comme 

indiqué dans B.

Placez le Couvercle du bol sur le dessus du Bol et 

tournez vers la droite jusqu’à ce qu’un « clic » se fasse 

entendre. Fixez l’ensemble du Bol sur le Boîtier du 

moteur comme illustré page FR10.

Note:

Assurez-vous que la tige de métal est en saillie de 

l’Égouttoir à salade après insertion.

3

4

Branchez la fiche dans la prise et tournez le cadran 

rotatif pour sélectionner la vitesse souhaitée.

Une fois que le traitement est terminé, retournez le 

cadran rotatif en position OFF “0” et débranchez de la 

prise. Retirez l’Égouttoir à salade du Bol.

Note :

• 

Capacité opérationnelle maximale de l’égouttoir à salade

 : 200 

g

 ou jusqu’à la hauteur maximum de l’Égouttoir 

à salade, selon la première éventualité.

• 

Ingrédients interdits : Reportez-vous à la page FR6.

• 

Veiller à ce que les ingrédients soient répartis uniformément autour de l’égouttoir à salade avant de traiter. 

• 

Assurez-vous toujours que le Couvercle de l’égouttoir est fixé sur l’égouttoir à salade avant toute opération, 

sinon les ingrédients pourraient sortir et se répandre autour du Bol.

•  Selon la quantité d’ngrédients utilisés, il y aura d’importantes vibrations. Dans ce cas, maintenez le Couvercle 

du bol avec les deux mains pour le soutenir lors de son fonctionnement.

ROBOT DE CUISINE MULTIFONCTION

 - ÉGOUTTOIR À SALADE -

100_160419_MK-F500_Second_EU(UZ50G155).indb   15

2016/04/19   16:58:48

Summary of Contents for MK-F500

Page 1: ...z conserver ce mode d emploi pour référence ultérieure Grazie per aver acquistato il prodotto Panasonic Questo prodotto è destinato esclusivamente a un uso domestico Leggere attentamente queste istruzioni per utilizzare I apparecchio in modo corretto e sicuro Prima di utilizzare questo prodotto prestare particolare attenzione alle PRECAUZIONI DI SICUREZZA Pagine IT3 IT5 Conservare queste istruzion...

Page 2: ... Ingredients How to Use iii SLICING BLADES SHREDDING BLADES JULIENNE BLADE GB14 GB15 Preparation of Ingredients How to Use iv SALAD DRAINER GB16 Preparation of Ingredients How to Use v CITRUS PRESS GB17 Preparation of Ingredients How to Use BLENDER i INTRODUCTION GB18 ii BLENDER GB18 Preparation of Ingredients How to Use DRY MILL i DRY MILL GB19 Preparation of Ingredients How to Use AFTER USE GB20...

Page 3: ...g or unplug the Plug with wet hands It may cause electric shock O O Do not exceed outlet voltage or use an alternate current other than that specified on the appliance It may cause electric shock or fire Make sure the voltage supplied to the appliance is the same as your local supply Plugging other devices into the same outlet may cause over heating O O Do not immerse the Motor Housing in water or...

Page 4: ...play with the appliance It may cause burning injury or electric shock O O Insert the Plug firmly Otherwise it may cause electric shock and fire caused by the heat that may generate around the Plug O O Clean the Plug regularly A soiled Plug may cause insufficient insulation due to moisture and may cause fire O O When abnormal operation or breaking down occurs discontinue the appliance operation imm...

Page 5: ...nstruction O O Always disconnect the appliance from the supply if it is left unattended and before assembling disassembling or cleaning Otherwise it may cause electric shock or fire caused by current leakage O O Remove the Bowl the Blender Jug and the Mill Container before lift up the Motor Housing from the table It may cause injury O O Switch off the appliance and disconnect it from power supply ...

Page 6: ...at vegetables nuts sauces spreads Whipping Blade Any other ingredients aside from egg whites and fresh cream Grating Blade Viscous ingredients ingredients with high hard fiber concentrations ingredients that are too small and thin e g yam celery leek pine nuts and etc Salad Drainer Large chunky ingredients ingredients that are soft and fragile e g large carrot or potato chunks tomato tofu pasta no...

Page 7: ...ust not be used until a replacement cover is obtained A replacement fuse cover can be purchased from your local Panasonic Dealer If the fitted moulded plug is unsuitable for the socket outlet in your home then the fuse should be removed and the plug cut off and disposed of safety There is a danger of severe electrical shock if the cut off plug is inserted into any 13 amp socket How to replace the ...

Page 8: ...Drainer Cover 9 Salad Drainer 10 Blade Stand 11 Fine Shredding Blade 12 Coarse Shredding Blade 13 Thin Slicing Blade 14 Thick Slicing Blade 15 Julienne Blade 16 Citrus Cone 17 Citrus Strainer 18 Bowl 19 Drive Shaft 20 Motor Housing 21 Rubber Foot 22 Rotary Switch 23 Cord 24 Plug The shape of the Plug may vary from illustration PART NAMES 100_160419_MK F500_Second_EU UZ50G155 indb 8 2016 04 19 16 5...

Page 9: ...ation CIRCUIT BREAKER PROTECTION This appliance has the Circuit Breaker function to stop the motor when motor is overloaded When the Circuit Breaker stops the motor due to overloading turn off the Rotary Switch to OFF position 0 and follow the instruction below 1 Reduce the ingredients to less than half and resume operation 2 If it still does not start turn off the Rotary Switch to OFF position 0 ...

Page 10: ...e Safety Pin if the Bowl Lid or Citrus Strainer is secured on the Bowl Safety Pins Note Do not push the Safety Pin and Safety Lever with any instrument stick etc Do not pour liquids or ingredient at the Safety Pin and Safety Lever area Keep the Safety Pin and Safety Lever area clean to avoid foreign particles accumulate on the area Actions above will ensure the Safety Pin and Safety Lever function...

Page 11: ...ime approx Preparation Method Mince Meat 2 50 400 g 5 50 sec Remove all skin bones and tendons cut into 2 3 cm cubes Fish 50 500 g 3 20 sec Chop Onion 1 Intermittent 150 500 g 4 15 times Peel skin cut into 2 3 cm cubes Garlic 2 5 500 g 10 30 sec Peel skin Carrot 50 450 g 10 30 sec Peel skin cut into 2 3 cm cubes Italian Parsley 5 70 g 10 40 sec Remove stalk Mushroom 30 250 g 3 15 sec Cut into 2 3 ...

Page 12: ... yeast with water and add during the processing of dough adding yeast directly before processing may result in flaking and premature rising If dough mix still appears flaky after initial processing add 1 tsp of water into the mix When large vibrations occur due to dough mix wrapping around the Drive Shaft add 1 tbsp of flour Do not reprocess the dough after the process is complete if the dough is ...

Page 13: ...ay occur Do not insert hot ingredients into the Bowl for processing Always ensure that the ingredients are sufficiently cooled before inserting i e boiled potato For Juice Make fill in the solid ingredients first into the Bowl followed by the liquid ingredients until the total volume does not exceed 1 500 mL When process the liquid ingredients together with ice cubes put the ice cubes not more tha...

Page 14: ...ding Blades Coarse Fine Function Ingredient Speed Max Single Use Operating Time approx Preparation Method Shred Cucumber 2 500 g Cut ingredient till it is small enough to fit into the Feeding Tube Carrot 500 g Potato 650 g Cheese 500 g Cut ingredient till it is small enough to fit into the Feeding Tube Do not use hard ingredients such as Parmesan Ingredient Preparations for Julienne Blade Function...

Page 15: ... sound is heard Note Ensure that the Drive Shaft is protruding from the Blade Stand after insertion 3 4 Plug in the plug into the socket and turn the Rotary Switch to select the speed required refer to the Preparation of Ingredients at page GB14 Insert the ingredients into the Feeding Tube and push down with the Food Pusher After the processing is completed return the Rotary Switch to OFF position...

Page 16: ... the Salad Drainer after insertion 3 4 Plug in the plug into the socket and turn the Rotary Switch to select the speed required After the processing is completed return the Rotary Switch to OFF position 0 and unplug from the socket Remove the Salad Drainer from the Bowl Note Maximum working capacity of the Salad Drainer 200 g or tilll maximum height of Salad Drainer whichever comes first Prohibite...

Page 17: ...ace the half cut fruit with the cut side on top of the Citrus Cone and press down firmly to extract juice After the processing is completed return the Rotary Switch to OFF position 0 and unplug from the socket Remove the Citrus Press attachment from the Bowl before pouring the extracted juice out Note Always ensure that the Citrus Cone is placed onto the Citrus Strainer before usage Stop the proce...

Page 18: ... the socket Remove the Blender Unit from the Motor Housing and proceed to remove the ingredients Note Maximum working capacity 1 L Prohibited ingredients for Blender Jug refer to page GB6 It is not recommended to blend hard and viscous ingredients However if necessary cut the hard ingredients into small pieces e g cut carrot into 1 cm cubes and fill the Blender Jug with the ingredients not exceedi...

Page 19: ... clockwise until a click sound is heard Plug in the plug into the socket and turn the Rotary Switch to select the speed required 3 4 After the processing is completed return the Rotary Switch to OFF position 0 and unplug from the socket Remove the Dry Mill Unit from the Motor Housing and proceed to remove the ingredients Turn the Mill Container Base anticlockwise to unlock and lift up from the Mil...

Page 20: ...0 times Blender Turn the Rotary Switch to select speed 2 and operate for 10 20 seconds Return the Rotary Switch to OFF position 0 and unplug from the socket Remove the attachments and proceed for cleaning Wash these items by rinsing them under running water Use neutral kitchen detergent if necessary Proceed to wipe them dry with a clean cloth Wash these items by rinsing them under running water an...

Page 21: ...at the bottom side of the Motor Housing at the same time as seen in the above picture and lift up Tilt the Motor Housing on its side and proceed to wind up the Power Cord around the Cord Winding Area partially leaving the Plug at the sides 3 i ii iii i Store the Knife Blade inside the Bowl The Storage Case Unit is included to store the other attachments Store the attachments in place as per packag...

Page 22: ...ngagement Ensure that the ingredients used and the amount are as stated Lock the Bowl Lid or Citrus Strainer onto the Bowl firmly and ensure that the Bowl Blender Unit or Dry Mill Unit is locked firmly onto the Motor Housing There is abnormal vibration and noise during operation O O The Rubber Feet and or the work top are not clean Wipe off any dirt or stains with a clean damp cloth The Rubber Foo...

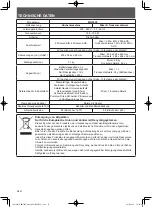
Page 23: ...ienne Blade Citrus Press and Storage Case Unit Blender Unit Dry Mill Unit Common Accessories Brush with Spatula Dishwasher Safe Items Bowl and Bowl Lid Airborne Acoustical Noise 88 dB A re 1 pW 88 dB A re 1 pW Disposal of Old Equipment Only for European Union and countries with recycling systems This symbol on the products packaging and or accompanying documents means that used electrical and elec...

Page 24: ...nung iii SCHNEIDEEINSÄTZE REIBEEINSÄTZE MESSERKLINGE DE13 DE14 Vorbereitung der Zutaten Bedienung iv SALATSCHLEUDER DE15 Vorbereitung der Zutaten Bedienung v ZITRUSPRESSE DE16 Vorbereitung der Zutaten Bedienung MIXER i EINFÜHRUNG DE17 ii MIXER DE17 Vorbereitung der Zutaten Bedienung TROCKENMAHLWERK i TROCKENMAHLWERK DE18 Vorbereitung der Zutaten Bedienung NACH GEBRAUCH DE19 DE20 FEHLERBEHEBUNG DE2...

Page 25: ...hen O O Überschreiten Sie nicht die zulässige Steckdosenspannung und verwenden Sie keine andere als die auf dem Gerät angegebene Stromstärke Dies kann zu Stromschlag oder Feuer führen Stellen Sie sicher dass die dem Gerät zugeführte Stromspannung ihrer Ortsversorgung entspricht Das Einstecken anderer Geräte in die gleiche Steckdose kann zu elektrischer Überhitzung führen O O Das Motorengehäuse nic...

Page 26: ...pielen Es besteht Verbrennungs Verletzungs und Stromschlaggefahr O O Stecken Sie den Stecker fest ein Anderenfalls kann die möglicherweise um den Stecker herum entstehende Hitze zu Stromschlag und Feuer führen O O Der Stecker sollte regelmäßig gereinigt werden Ein verunreinigter Stecker kann aufgrund von Feuchtigkeit zu unzureichender Isolierung führen und eine Brandgefahr darstellen O O Sofern ab...

Page 27: ...us der Steckdose ab wenn das Gerät unbeaufsichtigt zurückgelassen wird und bevor Sie das Gerät zusammensetzen demontieren oder reinigen Es bestent Verbrennugs und Verletzungsgefahr O O Entfernen Sie Behälter und Mixbehälter bevor Sie das Motorengehäuse vom Tisch nehmen Andernfalls können Verletzungen verursacht werden O O Schalten Sie das Gerät aus und ziehen Sie den Stecker ab bevor Sie Zubehörte...

Page 28: ...eignen sind z B Fleisch Gemüse Nüsse Soßen Aufstriche Schlagsahne Aufsatz Alle anderen Zutaten abgesehen von Eiweiß und frischer Sahne Raspelscheibe Zähflüssige Zutaten Zutaten mit hoher Festfaserkonzentrationen Zutaten die zu klein und dünn sind z B Süßkartoffeln Kartoffeln Sellerie Lauch Pinienkerne etc Salatschleuder Große klobige Zutaten Zutaten die weich und zerbrechlich z B große Karotten od...

Page 29: ... Salatschleuder Deckel 9 Salatschleuder 10 Universaleinsatz 11 Reibeeinsatz fein 12 Reibeeinsatz grob 13 Schneideeinsatz dünn 14 Schneideeinsatz dick 15 Pommes Frites Schneider 16 Zitruspresse 17 Filtersieb 18 Universalschüssel 19 Antriebswelle 20 Motorengehäuse 21 Gummifuß 22 Drehschalter 23 Kabel 24 Stecker Die Form des Steckers kann sich von der Abbildung unterscheiden TEILE NAMEN 100_160419_MK...

Page 30: ...eine Schutzschalter Funktion um den Motor bei Überlastung auszuschalten Wenn der Schutzschalter den Motor wegen Überlastung automatisch stoppt schalten Sie den Drehschalter auf AUS 0 und folgen Sie den Anweisungen unten 1 Verringern Sie die Zutaten auf weniger als die Hälfte und fahren Sie mit der Verarbeitung fort 2 Wenn das Gerät immer noch nicht startet schalten Sie den Drehschalter erneut auf ...

Page 31: ... Behälterabdeckung oder die Zitruspresse vollständig mit dem Behälter verriegelt sind Sicherheitsbolzen Hinweis Drücken Sie den Sicherheitsbolzen und Sicherheitshebel nicht mit einem Gerät Stift etc herunter Geben Sie keine Flüssigkeiten oder Zutaten über den Bereich des Sicherheitsbolzens und des Sicherheitshebels hinzu Halten Sie den Bereich um den Sicherheitsbolzen und den Sicherheitshebel saub...

Page 32: ...gsart Zerkleinern Fleisch 2 50 400 gr 5 50 Sek Entfernen Sie Haut Knochen und Sehnen und schneiden Sie es in 2 3 cm große Würfel Fisch 50 500 gr 3 20 Sek Zerhacken Zwiebel 1 Intervallbetrieb 150 500 gr 4 15 mal Die Haut abziehen und in 2 3 cm große Würfel schneiden Knoblauch 2 5 500 gr 10 30 Sek Die Haut abziehen Karotten 50 450 gr 10 30 Sek Die Haut abziehen und in 2 3 cm große Würfel schneiden G...

Page 33: ...g der Masse hinzu das direkte Hinzufügen von Hefe ohne diese zu verarbeiten kann dazu führen dass der Teig zu früh aufgeht oder diese bröckelig wird Ist die Teigmischung nach der ersten Verarbeitung immer noch flockig fügen Sie einen Teelöffel Wasser hinzu Wenn starke Vibrationen entstehen weil sich die Teigmischung um die Antriebswelle wickelt fügen Sie 1 Esslöffel Mehl hinzu Verarbeiten Sie den ...

Page 34: ...öchstmenge beim Kneten nicht da übermäßige Vibrationen auftreten können Geben Sie keine heißen Zutaten zur Verarbeitung in den Behälter Achten Sie immer darauf dass die Zutaten abkühlen bevor Sie sie hinzugeben z B bei Salzkartoffeln Um Saft zu machen fügen Sie die festen Zutaten zuerst hinzu und daraufhin die flüssigen so dass das Gesamtvolumen 1 500 ml nicht überschreitet Wenn Sie Flüssigkeiten ...

Page 35: ...ie Reibeeinsätze Grob Fein Funktionsweise Zutaten Geschwindigkeit Max Einmalgebrauch Betriebszeit ca Zubereitungsart Reiben von Gurken 2 500 gr Schneiden Sie die Zutaten bis sie klein genug sind um in den Fülltrichter zu passen Karotten 500 gr Kartoffeln 650 gr Käse 500 gr Schneiden Sie die Zutaten bis sie klein genug sind um in den Fülltrichter zu passen Verwenden Sie keine harten Zutaten wie Par...

Page 36: ...m Uhrzeigersinn bis Sie ein Klicken hören Hinweis Vergewissern Sie sich dass die Antriebswelle nach dem Einführen aus dem Universaleinsatz herausragt 3 4 Stecken Sie den Stecker in die Steckdose und betätigen Sie den Drehschalter für die gewünschte Geschwindigkeit siehe Vorbereitung der Zutaten auf S DE13 Fügen Sie die Zutaten in den Fülltrichter und drücken Sie sie mit dem Schieber herunter Nachd...

Page 37: ...etallschaft nach dem Einführen aus der Salatschleuder herausragt 3 4 Stecken Sie den Stecker in die Steckdose und betätigen Sie den Drehschalter für die gewünschte Geschwindigkeit Nach Abschluss der Verarbeitung drehen Sie den Schalter auf die Position 0 OFF und ziehen Sie den Stecker heraus Entfernen Sie den Salatschleuder vom Behälter Hinweis Maximale Verarbeitungskapazität der Salatschleuder 20...

Page 38: ...ht mit der Seite der Schale nach oben auf die Zitruspresse und drücken Sie diese fest nach unten um den Saft daraus zu gewinnen Nachdem die Verarbeitung abgeschlossen ist drehen Sie den Drehschalter zurück auf AUS 0 und ziehen Sie den Stecker aus der Steckdose Entfernen Sie das Zubehör der Zitruspresse vom Behälter bevor sie den gewonnenen Saft abschütten Hinweis Vergewissern Sie sich stets vor de...

Page 39: ...urück auf AUS 0 und ziehen Sie den Stecker aus der Steckdose Entfernen Sie den Mixbehälter vom Motorengehäuse und daraufhin entnehmen Sie den Inhalt Hinweis Verarbeitungskapazität 1 L Verbotene Zutaten siehe Seite DE6 Es wird nicht empfohlen harte und zähflüssige Zutaten zu mixen Falls erforderlich schneiden Sie die harten Zutaten in kleine Stücke z B Karroten in 1 cm3 große Würfel und füllen Sie ...

Page 40: ... den Stecker in die Steckdose und betätigen Sie den Drehschalter für die gewünschte Geschwindigkeit 3 4 Nachdem die Verarbeitung abgeschlossen ist drehen Sie den Drehschalter zurück auf AUS 0 und ziehen Sie den Stecker aus der Steckdose Entfernen Sie das Trockenmahlwerk vom Motorengehäuse und daraufhin entnehmen Sie den Inhalt Drehen Sie das Mahlwerkunterteil gegen den Uhrzeigersinn und heben Sie ...

Page 41: ...eit 2 zu einstellen und nehmen Sie ihn für 10 20 Sekunden in Betrieb Drehen Sie den Drehschalter zurück auf AUS 0 und ziehen Sie den Stecker aus der Steckdose Entfernen Sie das Gerätezubehör und fahren Sie mit der Reinigung fort Waschen Sie diese Artikel indem Sie sie unter fließendes Wasser halten Verwenden Sie neutrale Reinigungsmittel falls erforderlich Trocknen Sie diese mit einem sauberen Tuc...

Page 42: ...n Entriegelungshebel auf der unteren Seite des Motorengehäuses und heben Sie es ab wie im Bild oben dargestellt Kippen Sie das Motorengehäuse auf eine Seite und wickeln Sie daraufhin das Stromkabel im Wicklungsbereich fast gänzlich auf und lassen Sie den Stecker an der Seite 3 i ii iii i Bewahren Sie die Messerklinge im Behälter auf Zur Lagerung des übrigen Gerätezubehörs wurde eine Aufbewahrungsb...

Page 43: ... des Betriebes kann das Sicherheitsschloss außer Kraft setzen Stellen Sie sicher dass Sie die angegeben Mengen verwendet haben Schließen Sie die Behälterabdeckung oder das Filtersieb fest auf dem Behälter und vergewissern Sie sich dass der Behälter der Mixer oder das Trockenmahlwerk fest mit dem Motorengehäuse verriegelt ist Beim Betrieb gibt es unnormale Vibrationen und Geräusche O O Die Gummifüß...

Page 44: ...ungsbox Mixer Trockenmahlwerk Gemeinsames Zubehör Bürste mit Spatel Spülmaschinengeeignete Teile Behälter und Behälterabdeckung Luftschallemission 88 dB A bei 1 pW 88 dB A bei 1 pW Entsorgung von Altgeräten Nur für die Europäische Union und Länder mit Recyclingsystemen Dieses Symbol auf den Produkten der Verpackung und oder den Begleitdokumenten bedeutet dass gebrauchte elektrische und elektronisc...

Page 45: ...ploi iii LAMES DE TRANCHAGE LAMES DE BROYAGE LAME À JULIENNE FR13 FR14 Préparation des Ingrédients Mode d emploi iv ÉGOUTTOIR À SALADE FR15 Préparation des Ingrédients Mode d emploi v PRESSE AGRUMES FR16 Préparation des Ingrédients Mode d emploi MIXEUR i INTRODUCTION FR17 ii MIXEUR FR17 Préparation des Ingrédients Mode d emploi ACCESSOIRE DE BROYAGE À SEC i ACCESSOIRE DE BROYAGE À SEC FR18 Prépara...

Page 46: ...appareil Cela pourrait provoquer une électrocution ou un incendie S assurer que la tension fournie à l appareil est la même que celle de l alimentation locale Brancher d autres appareils dans la même prise électrique peut provoquer une surchauffe O O Ne pas plonger l appareil dans l eau ou l asperger avec de l eau Cela pourrait provoquer une électrocution ou un incendie dû à un court circuit O O N...

Page 47: ...pliqués Les enfants ne doivent pas jouer avec l appareil Cela pourrait provoquer une brûlure des blessures ou une électrocution O O Insérer fermement la Fiche dans la prise Sinon cela pourrait provoquer une électrocution et un incendie dû à la chaleur qui peut se générer autour de la prise O O Nettoyer régulièrement la Fiche Une Fiche sale peut causer une isolation insuffisante en raison de l humi...

Page 48: ...és dans ce Mode d emploi O O Toujours enlever l appareil de l alimentation s il est laissé sans surveillance et avant le montage le démontage ou le nettoyage Cela peut causet une brûlure ou blessure O O Retirez le Bol le récipient du mixeur et le récipient du Broyeur avant de soulever le Boîtier du moteur de la table Cela peut provoquer des blessures O O Eteindre l appareil et débrancher l aliment...

Page 49: ...s noix sauces pâtes à tartiner Lame pour fouetter Tous les ingrédients à part les blancs d œufs et la crème fraîche Lame pour râper Ingrédients visqueux ingrédients avec concentrations de fibres dures élevées ingrédients trop petits et minces par exemple igname pomme de terre céleri poireau noix de pin etc Égouttoir à salade Grands ingrédients en morceaux ingrédients mous et fragiles par exemple g...

Page 50: ...8 Couvercle de l égouttoir 9 Égouttoir à salade 10 Socle de lame 11 Lame pour broyage fin 12 Lame pour broyage épais 13 Lame pour tranches fines 14 Lame pour tranches épais 15 Lame à julienne 16 Cône pour agrumes 17 Presse agrumes 18 Bol 19 Axe d entraînement 20 Boîtier du moteur 21 Pied en caoutchouc 22 Cadran Rotatif 23 Cordon 24 Prise La forme de la prise peut être différente de l illustration ...

Page 51: ...tre différente de l illustration PROTECTION PAR DISJONCTEUR Cet appareil dispose de al fonction Disjoncteur pour arrêter le moteur quand ce dernier est en surcharge Lorsque le disjoncteur arrête le moteur pour cause de surcharge mettez le cadran rotatif en position OFF 0 et suivez les instructions ci dessous 1 Réduire les ingrédients à moins de la moitié et reprenez l opération 2 S il ne démarre t...

Page 52: ...urité uniquement si le Couvercle du bol ou la passoire à agrumes est entièrement fixé e sur le Bol Goupilles de sécurité Note Ne poussez pas les goupilles de sécurité et le levier de sécurité avec un instrument bâton etc Ne versez pas de liquides ou d ingrédients dans la zone des goupilles de sécurité et du levier de sécurité Gardez la zone des goupilles de sécurité et du levier de sécurité propre...

Page 53: ...ntité Temps de fonctionnement env Méthode de préparation Hacher Viande 2 50 400 g 5 50 sec Retirez la peau et les os coupez en cubes de 2 à 3 cm Poisson 50 500 g 3 20 sec Émincer Oignon 1 Intermittent 150 500 g 4 15 fois Pelez la peau coupez les en cubes de 2 à 3 cm Ail 2 5 500 g 10 30 sec Pelez la peau Carotte 50 450 g 10 30 sec Pelez la peau coupez les en cubes de 2 à 3 cm Persil plat 5 70 g 10 ...

Page 54: ...c de la levure et ajoutez la au cours du traitement de la pâte l ajout de levure directement avant le traitement peut entraîner un effritement et le levage prématuré Si un mélange de pâte paraît toujours friable après le traitement initial ajoutez 1 cuillère à café d eau dans le mélange Lorsque de trop grandes vibrations se produisent parce que le mélange de pâte s enroule autour de l axe d entraî...

Page 55: ... pourrait se produire N insérez pas d ingrédients très chauds à traiter dans le Bol Assurez vous toujours que les ingrédients sont suffisamment refroidis avant de les insérer comme des pommes de terre bouillies Pour faire un jus remplissez d abord le Bol d ingrédients solides suivis par des ingrédients liquides sans que le volume total ne dépasse 1 500 ml Lorsque vous transformez des ingrédients e...

Page 56: ...dient Vitesse Max Utilisation unique Temps de fonctionnement env Méthode de préparation Broyage Concombre 2 500 g Coupez les ingrédients jusqu à ce qu ils soient assez petits pour tenir dans le tube d alimentation Carotte 500 g Pomme de terre 650 g Fromage 500 g Coupez les ingrédients jusqu à ce qu ils soient assez petits pour tenir dans le tube d alimentation Ne pas utiliser des ingrédients durs ...

Page 57: ...ote Assurez vous que l axe d entraînement est en saillie du Socle de lame après l insertion 3 4 Branchez la fiche dans la prise et tournez le cadran rotatif pour sélectionner la vitesse souhaitée voir Préparation des ingrédients page FR13 Insérez les ingrédients dans le tube d alimentation et poussez vers le bas avec le Poussoir à aliments Une fois que le traitement est terminé retournez le cadran...

Page 58: ... est en saillie de l Égouttoir à salade après insertion 3 4 Branchez la fiche dans la prise et tournez le cadran rotatif pour sélectionner la vitesse souhaitée Une fois que le traitement est terminé retournez le cadran rotatif en position OFF 0 et débranchez de la prise Retirez l Égouttoir à salade du Bol Note Capacité opérationnelle maximale de l égouttoir à salade 200 g ou jusqu à la hauteur max...

Page 59: ... souhaitée 4 3 Placez les fruits coupés à moitié côté tasse sur le dessus du cône pour agrumes et appuyez fermement pour en extraire le jus Une fois que le traitement est terminé retournez le cadran rotatif en position OFF 0 et débranchez de la prise Retirez le Presse agrumes du Bol avant de verser le jus extrait Note Assurez vous toujours que le cône pour agrumes soit placé sur la passoire à agru...

Page 60: ...n rotatif en position OFF 0 et débranchez de la prise Retirez l Unité de mixeur du Boîtier du moteur et retirez les ingrédients Note Capacité opérationnelle maximale 1 L Ingrédients interdits pour le Récipient du mixeur Reportez vous à la page FR6 Il est recommandé de ne pas mixer les ingrédients durs et visqueux Cependant si nécessaire coupez les ingrédients durs en petits morceaux par exemple de...

Page 61: ...e broyage à sec vers la droite jusqu à ce qu un clic se fasse entendre Branchez la fiche dans la prise et tournez le cadran rotatif pour sélectionner la vitesse souhaitée 3 4 Une fois que le traitement est terminé retournez le cadran rotatif en position OFF 0 et débranchez de la prise Retirez l Unité de broyage à sec du Boîtier du moteur et retirez les ingrédients Tournez la base du récipient de b...

Page 62: ...ition VITESSE 5 10 fois Mixeur Tournez le cadran rotatif pour sélectionner la vitesse 2 et faites fonctionner pendant 10 20 secondes Retournez le Cadran Rotatif en position OFF 0 et débranchez de la prise Retirez les accessoires et nettoyez Lavez ces éléments en les rinçant à l eau courante Utilisez un détergent neutre de cuisine si nécessaire Essuyez les avec un chiffon propre Laver ces éléments ...

Page 63: ...er du moteur appuyez sur le levier de déblocage situé sur le côté bas du Boîtier du moteur en même temps comme on le voit dans l image ci dessus et soulevez Inclinez le Boîtier du moteur sur le côté et enroulez le Cordon d alimentation autour de la zone d enroulage du Cordon en laissant la fiche sur les côtés 3 i ii iii i Rangez la Lame du couteau à l intérieur du Bol Une boîte de rangement est in...

Page 64: ... que décrits Verrouillez fermement le Couvercle du bol ou de la passoire à agrumes sur le Bol et veillez à ce que le Bol l Unité de mixeur ou l Unité de broyage à sec soient bien verrouillés sur le Boîtier du moteur Il y a une vibration et un bruit anormaux pendant le fonctionnement O O Le Pied en caoutchouc et ou le plan de travail ne sont pas propres Essuyez toutes les traces de saleté ou les ta...

Page 65: ...nt Unité de mixeur Unité de broyage à sec Accessoires communs Brosse avec Spatule Éléments passant au lave vaisselle Bol et Couvercle du bol Bruit acoustique aérien 88 dB A référence 1 pW 88 dB A référence 1 pW L élimination des équipements usagés Applicable uniquement dans les pays membres de l Union européenne et les pays disposant de systèmes de recyclage Apposé sur le produit lui même sur son ...

Page 66: ...LAME PER AFFETTARE LAME PER SMINUZZARE LAMA PER PATATINE IT13 IT14 Preparazione degli ingredienti Modalità dʼuso iv SCOLAINSALATA IT15 Preparazione degli ingredienti Modalità dʼuso v SPREMIAGRUMI IT16 Preparazione degli ingredienti Modalità dʼuso FRULLATORE i INTRODUZIONE IT17 ii FRULLATORE IT17 Preparazione degli ingredienti Modalità dʼuso TRITATUTTO i TRITATUTTO IT18 Preparazione degli ingredien...

Page 67: ...osse elettriche O O Non superare la tensione in uscita e non utilizzare una corrente alternata diversa da quanto indicato sull apparecchio Ciò potrebbe provocare scosse elettriche o incendi Assicurarsi che la tensione fornita all apparecchio sia la stessa della propria rete locale Collegare altri dispositivi nella stessa presa elettrica potrebbe provocare surriscaldamento O O Non immergere l appar...

Page 68: ...ini non devono giocare con l apparecchio Può causare bruciature lesioni o scosse elettriche O O Inserire saldamente la Spina In caso contrario si possono verificare delle scosse elettriche e incendi causati dal calore generato intorno alla Spina O O Pulire regolarmente la Spina Una Spina sporca può causare isolamento insufficiente a causa dell umidità e può causare un incendio O O In caso di anoma...

Page 69: ...viene utilizzato e prima di montare smontare o pulire La mancata osservanza di questo accorgimento potrebbe provocare ustioni o infortuni O O Rimuovere il Recipiente e la Caraffa del Frullatore e il Contenitore del Tritatutto prima di sollevare l Alloggiamento del Motore dal tavolo Può provocare lesioni O O Spegnere l apparecchio e scollegare la corrente prima di cambiare gli accessori o di avvici...

Page 70: ...noci salse creme spalmabili Disco panna montata Eventuali altri ingredienti a parte bianchi d uovo e panna fresca Lama per grattugiare Ingredienti viscosi ingredienti con alta concentrazione di fibre dure ingredienti troppo piccoli e sottili ad esempio patata dolce patate sedano porro pinoli ecc Scolainsalata Ingredienti grossi ingredienti morbidi e fragili ad esempio la carota grande o pezzi di p...

Page 71: ...iolatore 9 Scolainsalata 10 Supporto lame 11 Lama per sminuzzare finemente 12 Lama per sminuzzare grossolanamente 13 Lama per affettare finemente 14 Lama per affettare grossolanamente 15 Lama per patatine 16 Cono spremiagrumi 17 Filtro 18 Recipiente 19 Albero di rotazione 20 Blocco motore 21 Piedino in gomma 22 Manopola 23 Cavo 24 Spina La forma della presa può essere diversa da quella in figura N...

Page 72: ...la in figura PROTEZIONE INTERRUTTORE Questo apparecchio è dotato di funzione sistema salvavita per arrestare il motore quando questo è sovraccarico Quando l Interruttore arresta il motore per sovraccarico spegnere la manopola mettendolo in posizione OFF 0 e seguire le istruzioni qui di seguito 1 Ridurre gli ingredienti a meno della metà e riavviare 2 Se ancora non si avvia spegnere la manopola in ...

Page 73: ...o di Sicurezza se il Coperchio del Recipiente o il Colino per Agrumi sono fissati completamente nel Recipiente Perni di sicurezza Nota Non spingere il Perno di Sicurezza e la Leva di Sicurezza con nessun strumento bastone ecc Non versare liquidi o ingredienti nell area del Perno di Sicurezza o della Leva di Sicurezza Mantenere pulita l area del Perno di Sicurezza e della Leva di Sicurezza per evit...

Page 74: ...e Tagliare a pezzi Carne 2 50 400 g 5 50 sec Rimuovere la pelle le ossa e i tendini tagliare a cubetti di 2 3 cm Pesce 50 500 g 3 20 sec Impasto Cipolla 1 Alternata 150 500 g 4 15 volte Rimuovere la pelle tagliare a cubetti di 2 3 cm Aglio 2 5 500 g 10 30 sec Rimuovere la pelle Carota 50 450 g 10 30 sec Rimuovere la pelle tagliare a cubetti di 2 3 cm Prezzemolo 5 70 g 10 40 sec Rimuovere il gambo ...

Page 75: ...e la lavorazione della pasta aggiungere il lievito direttamente prima della lavorazione può far sì che la pasta si sfaldi o si alzi prematuramente Se la pasta appare ancora friabile dopo la preparazione iniziale aggiungere 1 cucchiaino di acqua nel mix Quando si verificano grandi vibrazioni dovute alla preparazione dell impasto con il mix intorno all Albero Principale aggiungere 1 cucchiaio di far...

Page 76: ...carsi delle vibrazioni anomale Non inserire ingredienti caldi nel Recipiente per la preparazione Assicurarsi sempre che gli ingredienti siano sufficientemente raffreddati prima di inserirli ad esempio le patate bollite Per preparare i Succhi riempire gli ingredienti solidi prima nel Recipiente e poi gli ingredienti liquidi fino a quando il volume totale non supera i 1 500 ml Mentre gli ingredienti...

Page 77: ...i Funzione Ingredienti Velocità Un solo utilizzo Max Tempo di funzionamento ca Metodo di preparazione Sminuzzamento Cetriolo 2 500 g Tagliare gli ingredienti fino a che siano abbastanza piccolo da entrare nel Tubo di Alimentazione Carota 500 g Patate 650 g Cheese 500 g Tagliare gli ingredienti fino a che siano abbastanza piccolo da entrare nel Tubo di Alimentazione Non usare ingredienti duri come ...

Page 78: ...un clic Nota Assicurarsi che l Albero del Motore sporga dal Supporto per Lama dopo l inserimento 3 4 Inserire la spina nella presa di corrente e accendere la manopola per selezionare la velocità desiderata consultare la voce Preparazione degli Ingredienti a pagina IT13 Inserire gli ingredienti nel Tubo di Alimentazione e spingere verso il basso con il Pressatore Al termine dell operazione rimetter...

Page 79: ...rsi che l albero di metallo sporga fuori dallo Scolainsalata dopo l inserimento 3 4 Inserire la spina nella presa di corrente e accendere la manopola per selezionare la velocità desiderata Al termine dell operazione rimettere la manopola in posizione OFF 0 e staccare la spina dalla presa di corrente Rimuovere lo Scolainsalata dal Recipiente Nota Capacità di lavoro massima dello Scolainsalata 200 g...

Page 80: ... 3 Posizionare il frutto tagliato a metà con la parte da spremere sopra il Cono per Agrumi e premere con forza per estrarre il succo Al termine dell operazione rimettere la manopola in posizione OFF 0 e staccare la spina dalla presa di corrente Rimuovere lo Spremiagrumi dal Recipiente prima di versare fuori il succo estratto Nota Assicurarsi che il Cono per Agrumi sia posizionato sul Colino per Ag...

Page 81: ...rimettere la manopola in posizione OFF 0 e staccare la spina dalla presa di corrente Rimuovere l Unità del Frullatore dall Alloggiamento del Motore e procedere a rimuovere gli ingredienti Nota Capacità di lavoro massima 1 L Ingredienti vietati per il Contenitore del Frullatore Consultare pagina IT6 Non è consigliabile frullare gli ingredienti duri e viscosi Tuttavia se necessario tagliare gli ingr...

Page 82: ...el Motore Girare l Unità Tritatutto in senso orario fino a quando si sente un clic Inserire la spina nella presa di corrente e accendere la manopola per selezionare la velocità desiderata 3 4 Al termine dell operazione rimettere la manopola in posizione OFF 0 e staccare la spina dalla presa di corrente Rimuovere l Unità Tritatutto dall Alloggiamento del Motore e procedere a rimuovere gli ingredien...

Page 83: ...à IMPULSO 5 10 volte Frullatore Ruotare la manopola per selezionare la velocità 2 e operare per 10 20 secondi Mettere la manopola in posizione OFF 0 e staccare la spina dalla presa Rimuovere gli accessori e procedere con la pulizia Lavare gli elementi risciacquandoli sotto l acqua corrente Utilizzare un detergente neutro da cucina se necessario Procedere ad asciugarli con un panno pulito Lavare gl...

Page 84: ...io situata sul lato inferiore dell alloggiamento del motore contemporaneamente come si vede nella figura sopra e sollevare Inclinare l Alloggiamento del Motore su un lato e procedere ad avvolgere il Cavo di Alimentazione attorno alla Zona di Avvolgimento del Cavo parzialmente lasciando la Spina ai lati 3 i ii iii i Conservare la Lama da taglio dentro il Recipiente Per conservare gli altri allegati...

Page 85: ...dienti utilizzati e le quantità siano quelli indicati Fissare il Coperchio del Recipiente o il Colino per Agrumi con fermezza sul Recipiente e assicurarsi che il Recipiente l Unità per il Frullatore o l Unità Tritatutto siano bloccate saldamente sull Alloggiamento del Motore Vibrazioni anomale e rumore si verificano durante l uso O O Il Piedino in Gomma e o il piano di lavoro non sono puliti Pulir...

Page 86: ...emiagrumi e Unità per la conservazione Unità del frullatore Unità Tritatutto Accessori comuni Spazzola con Spatola Elementi lavabili in lavastoviglie Recipiente e Coperchio del Recipiente Rumore aereo 88 dB A re 1 pW 88 dB A re 1 pW Smaltimento di vecchie apparecchiature Solo per Unione Europea e Nazioni con sistemi di raccolta e smaltimento Questo simbolo sui prodotti sull imballaggio e o sulle d...

Page 87: ...PARA RODAJAS CUCHILLAS PARA TIRAS CUCHILLAS PARA TIRAS EN JULIANA SP13 SP14 Preparación de ingredientes Modo de uso iv ESCURRIDOR DE ENSALADA SP15 Preparación de ingredientes Modo de uso v EXPRIMIDOR DE CÍTRICOS SP16 Preparación de ingredientes Modo de uso LICUADORA i INTRODUCCIÓN SP17 ii LICUADORA SP17 Preparación de ingredientes Modo de uso ACCESORIO PARA MOLER EN SECO i ACCESORIO PARA MOLER EN ...

Page 88: ... exceda el voltaje en la toma y no use corriente alterna que no sea la mencionada en el dispositivo Puede causar una descarga eléctrica e incendio Asegúrese de que el voltaje suministrado al dispositivo es el mismo que el de su suministro local Si se enchufan otros dispositivos en la misma toma se puede producir un sobre calentamiento eléctrico O O No sumerja el dispositivo en agua ni lo salpique ...

Page 89: ...spositivo Puede causar quemadura lesión o una descarga eléctrica O O Inserte el Enchufe firmemente De otro modo puede causar una descarga eléctrica e incendio causado por el calor que puede generarse alrededor del Enchufe O O Limpie el Enchufe con regularidad Un Enchufe húmedo puede causar aislación insuficiente debido a la humedad y puede causar incendio O O Si ocurre algo anormal o hay una rotur...

Page 90: ... dispositivo del suministro eléctrico si se lo deja sin supervisión y antes de montar desmontar o limpiar Puede causar una quemadura o lesiones O O Saque el Recipiente la Jarra de la Licuadora y el contenedor del molinillo antes de levantar el Alojamiento del motor de la mesa Puede causar lesiones O O Apague el dispositivo y desconéctelo del suministro eléctrico antes de cambiar accesorios o acerc...

Page 91: ...para montar Cualquier otro ingrediente aparte de claras de huevo y crema fresca Cuchilla para rallar Ingredientes viscosos ingredientes con altas concentraciones de fibra ingredientes que son demasiado pequeños y delgados ej Batata patata apio puerro piñones y etc Escurridor de ensalada Ingredientes gruesos grandes ingredientes que son suaves y frágiles por ejemplo trozos grandes de zanahoria o pa...

Page 92: ...rridor 9 Escurridor de ensalada 10 Base para cuchillas 11 Cuchilla para tiras finas 12 Cuchilla para tiras gruesas 13 Cuchilla para rodajas finas 14 Cuchilla para rodajas gruesas 15 Cuchilla para cortar en juliana 16 Cono para cítricos 17 Colador para cítricos 18 Recipiente 19 Eje central 20 Alojamiento del motor 21 Topes de goma 22 Botón giratorio 23 Cable 24 Enchufe La forma del Enchufe puede va...

Page 93: ...ufe puede variar con respecto a la del dibujo PROTECCIÓN DEL INTERRUPTOR DE CIRCUITO Este aparato dispone de la función de disyuntor que para el motor en caso de sobrecarga Cuando el interruptor de Circuito detiene al motor debido a la sobrecarga apague el botón giratorio a la posición OFF 0 y siga las instrucciones a continuación 1 Reduzca los ingredientes a menos de la mitad y reanude la operaci...

Page 94: ... si la Tapa del Recipiente o el Colador de cítricos están totalmente asegurados en el Recipiente Pines de seguridad Nota No empuje el Pin de seguridad y la palanca de seguridad con cualquier instrumento palito etc No vierta líquidos o ingredientes en el área del Pin de seguridad y área de la Palanca de seguridad Mantenga limpia el área del Pin de seguridad y de la Palanca de seguridad para evitar ...

Page 95: ...Tiempo de funcionamiento aprox Método de preparación Moler Carne 2 50 400 g 5 50 seg Remove all skin bones and tendons cut into 2 3 cm cubes Pescado 50 500 g 3 20 seg Picar Cebolla 1 Intermitente 150 500 g 4 15 veces Quite la piel y los huesos corte en cubos de 2 3 cm Ajo 2 5 500 g 10 30 seg Pelar la piel Zanahoria 50 450 g 10 30 seg Quite la piel y los huesos corte en cubos de 2 3 cm Perejil ital...

Page 96: ...on agua y agregue durante el procesamiento de la masa agregar levadura directamente antes del procesamiento puede causar escamas y elevación prematura Si la mezcla de masa aún aparece escamosa después del procesamiento inicial agregue 1 cucharadita de agua a la mezcla Cuando se producen grandes vibraciones debido a que se derrama la mezcla de la masa sobre el Eje principal agregue 1 cucharada de h...

Page 97: ...ecida de ingredientes para amasar ya que podría producirse una vibración anormal No inserte ingredientes calientes en el Recipiente para procesar Siempre asegúrese de que los ingredientes estén lo suficientemente fríos antes de introducirlos por ejemplo patatas hervidas Para hacer jugo llene los ingredientes sólidos primero en el Recipiente y después los ingredientes líquidos y que el volumen tota...

Page 98: ...unción Ingrediente Velocidad Uso único Máx Tiempo de funcionamiento aprox Método de preparación Tiras Pepino 2 500 g Corte los ingredientes hasta que sean lo suficientemente pequeños para entrar en el Tubo de entrada de alimentos Zanahoria 500 g Papa 650 g Queso 500 g Corte los ingredientes hasta que sean lo suficientemente pequeños para entrar en el Tubo de entrada de alimentos No use ingrediente...

Page 99: ...que se escuche un sonido clic Nota Asegúrese de que el eje de metal esté sobresaliendo de la Base para cuchillas después de la inserción 3 4 Enchufe en la toma y gire el Botón giratorio para seleccionar la velocidad requerida consulte la Preparación de Ingredientes en la página SP13 Inserte los ingredientes en el Tubo de entrada de alimentos y empuje hacia abajo con el Empujador de alimentos Despu...

Page 100: ...iendo del Escurridor de ensalada después de la inserción 3 4 Enchufe en la toma y gire el Botón giratorio para seleccionar la velocidad requerida Después de que se completó el procesamiento regrese el Botón giratorio a la posición OFF 0 y desenchufe de la toma Saque el Escurridor de ensalada del Recipiente Nota Capacidad de trabajo máxima del Escurridor de ensalada 200 g o hasta la altura máxima d...

Page 101: ...ad de la fruta con el lado de la taza sobre el Cono para cítricos y presione firmemente para extraer el jugo Después de que se completó el procesamiento regrese el Botón giratorio a la posición OFF 0 y desenchufe de la toma Retire el complemento del Exprimidor de cítricos del Recipiente antes de verter el jugo extraído Nota Siempre asegúrese de que el Cono para cítricos esté colocado en el Colador...

Page 102: ...posición OFF 0 y desenchufe de la toma Quite la Unidad de la licuadora del Alojamiento del motor y proceda a quitar los ingredientes Nota Capacidad de trabajo máxima 1 L Ingredientes prohibidos para la Jarra de la licuadora Consulte la página SP6 No se recomienda mezclar ingredientes duros y viscosos Sin embargo si es necesario corte los ingredientes duros en piezas pequeñas ej Corte la zanahoria ...

Page 103: ...oler en seco en el sentido horario hasta que se escuche un sonido clic Enchufe en la toma y gire el Botón giratorio para seleccionar la velocidad requerida 3 4 Después de que se completó el procesamiento regrese el Botón giratorio a la posición OFF 0 y desenchufe de la toma Saque la Accesorio para moler en seco del Alojamiento del motor y saque los ingredientes Gire la Base del contenedor del moli...

Page 104: ...torio hasta PULSACIÓN 5 10 veces Licuadora Gire el Botón giratorio a la velocidad seleccionada 2 y haga funcionar por 10 20 segundos Regrese el Botón giratorio a la posición OFF 0 y desenchufe de la toma Saque los complementos y proceda a limpiar Para lavar estos ítems enjuáguelos bajo el agua corriente Use detergente de cocina neutro si es necesario Lávelos y séquelos con un paño limpio Para lava...

Page 105: ...da en el extremo inferior del Alojamiento del motor al mismo tiempo como se ve en la figura anterior y levántelos Incline el Alojamiento del motor a su lado y proceda a enrollar el Cable de suministro alrededor del área de enrolle de cable en forma parcial y deje cable a los costados 3 i ii iii i Almacene las Cuchillas rotativas dentro del Recipiente Se incluye una Unidad de almacenaje para almace...

Page 106: ... ingredientes establecidos Trabe la Tapa del recipiente o Colador para cítricos en el Recipiente firmemente y asegúrese de que el Recipiente la Unidad de la licuadora o la Accesorio para moler en seco estén firmemente ajustados en el Alojamiento del motor Hay vibración y ruidos anormales durante el funcionamiento O O Los topes de goma o la superficie de trabajo no están limpios Seque toda suciedad...

Page 107: ...uchillas Cuchillas para tiras Gruesas y finas Cuchillas para rodajas Gruesas y finas Cuchilla para cortar en Juliana Exprimidor de cítricos y Unidad de almacenaje Unidad de la licuadora Accesorio para moler en seco Accesorios comunes Cepillo con espátula Elementos seguros del lavavajillas Recipiente y Tapa del recipiente Ruido acústico aéreo 88 dB A ref 1 pW 88 dB A ref 1 pW Eliminación de Aparato...

Page 108: ...BLADEN RASPSCHIJVEN JULIENNEMES NL13 NL14 Ingrediënten voorbereiden De machine gebruiken iv SALADECENTRIFUGE NL15 Ingrediënten voorbereiden De machine gebruiken v PERSKEGEL NL16 Ingrediënten voorbereiden De machine gebruiken BLENDER i INLEIDING NL17 ii BLENDER NL17 Ingrediënten voorbereiden De machine gebruiken HAKMOLEN i HAKMOLEN NL18 Ingrediënten voorbereiden De machine gebruiken NA GEBRUIKEN NL...

Page 109: ...iciteitsschokken O O Het voltage van het stopcontact niet overschrijden en geen wisselstroom gebruiken anders dan aangegeven op het apparaat anders kan dit tot elektriciteitsschokken of brand leiden Zorg ervoor dat het voltage naar het apparaat hetzelfde is als dat van uw plaatselijke stroomvoorziening Het aansluiten van andere apparatuur op hetzelfde stopcontact kan leiden tot oververhitting O O ...

Page 110: ...in het stoptcontact anders kan dit leiden tot elektriciteitsschokken en brand veroorzaakt door de hitte die rondom de plug kan worden gegenereerd O O Maak de plug regelmatig schoon een vuile plug kan tot onvoldoende isolatie leiden door het vocht en kan leiden tot brand O O Indien er zich een abnormaal gebruik of onregelmatig afsluiten voordoet stopt u het gebruik van het apparaat onmiddellijk en ...

Page 111: ...bereiden in deze gebruikershandleiding O O Haal het apparaat altijd uit het stroom indien deze zonder toezicht wordt achtergelaten evenals bij montage demontage of reiniging dit kan brandwoden of letsel veroorzaken O O Verwijder de kom en de kan voordat u de behuizing van de motor optilt Dit kan tot letsel leiden O O Schakel het apparaat uit en haal de stekker uit het stopcontact vooraleer de acce...

Page 112: ...n sauzen smeersels Klopschijf Andere ingrediënten buiten eiwitten en verse room Raspschijf Kleverige ingrediënten ingrediënten met een hoge concentratie harde vezels ingrediënten die te klein en te dun zijn bijv yams aardappels selderij prei pijnboompitten etc Slacentrifuge Grote stukken ingrediënten ingrediënten die zacht en breekbaar zijn bijv grote wortelen of stukken aardappel tomaten tofu pas...

Page 113: ... Deksel 9 Salade Centrifuge 10 Mesbladhouder 11 Snijblad Fijn Snipperen 12 Snijblad Grof Snipperen 13 Dun Snijblad 14 Dik Snijblad 15 Julienne mes 16 Perskegel 17 Citruszeef 18 Kom 19 Aandrijving 20 Behuizing Motor 21 Rubberen Voet 22 Draaischakelaar 23 Kabel 24 Stekker De vorm van de stekker kan op de afbeelding anders zijn ONDERDEELNAMEN 100_160419_MK F500_Second_EU UZ50G155 indb 7 2016 04 19 16...

Page 114: ...KER Dit apparaat heeft een stroomonderbrekerfunctie om de motor te stoppen als deze overbelast is Als de stroomonderbreker de motor stopt wegens overbelasting zet u de draaischakelaar UIT op positie 0 en volgt u de onderstaande instructies 1 Halveer de ingrediënten en hervat het gebruik 2 Als de keukenmachine nu nog niet start zet u de draaischakelaar UIT op positie 0 en hervat u het gebruik 3 Als...

Page 115: ...alleen als het deksel van de kom of de citruszeef goed op de kom geplaatst zijn Veiligheidspennen Opmerking Duw niet met instrumenten stokjes etc op de veiligheidspen en veiligheidshendel Giet geen vloeistoffen of ingrediënten in het gebied rondom de veiligheidspen en de veiligheidshendel Houd het gebied rondom de veiligheidspen schoon en voorkom dat er zich vreemde deeltjes ophopen in dit gebied ...

Page 116: ...stijd Ong Voorbereidingswijze Hakken Vlees 2 50 400 g 5 50 sec Verwijder alle huid botten en pezen snijd in blokjes van 2 3 cm Vis 50 500 g 3 20 sec Snijden Uien 1 Voortdurende 150 500 g 4 15 tijden Schil de vruchten en snijd ze in blokjes van 2 3 cm Knoflook 2 5 500 g 10 30 sec Schillen Wortel 50 450 g 10 30 sec Schil de vruchten en snijd ze in blokjes van 2 3 cm Italiaanse peterselie 5 70 g 10 4...

Page 117: ... van deeg gist toe door gist direct toe te voegen voorafgaand aan de verwerking krijgt u klonten in uw deel en rijst het te vroeg Als het deeg nog altijd klonten bevat nadat deze verwerkt is voegt u 1 theelepel water toe aan uw mengsel Als er zich veel trillingen voordoen doordat het deegmengsel zich rondom de invoerbuis wikkelt voegt u 1 eetlepel bloem toe Verwerk het deeg niet opnieuw nadat de e...

Page 118: ...erwerken Zorg er altijd voor dat de ingrediënten die u plaatst voldoende zijn afgekoeld voordat u ze in de kom plaatst bijv gekookte aardappelen Als u sap wilt maken vult u de kom eerst met de vaste ingrediënten gevolgd door de vloeibare ingrediënten Overschrijd het totaalvolume van 1 500 ml niet Als u de vloeibare ingrediënten verwerkt samen met ijsklontjes plaatst u niet meer dan circa 10 ijsklo...

Page 119: ...rediënten voorbereiden op snijbladen grof fijn Functie Ingrediënt Snelheid Max enkel gebruik Bedrijfstijd Ong Voorbereidingswijze Snipperen Komkommer 2 500 g Snijd het ingrediënt tot het klein genoeg is om in de invoerbuis te passen Wortel 500 g Aardappel 650 g Kaas 500 g Snijd het ingrediënt tot het klein genoeg is om in de invoerbuis te passen Gebruik geen harde ingrediënten zoals Parmezaanse ka...

Page 120: ... het mesblad heeft geplaatst 3 4 Steek de stekker in het stopcontact en zet de draaischakelaar op de gewenste snelheid raadpleeg Ingrediënten voorbereiden op pagina NL13 Plaats de ingrediënten in de invoerbuis en duw ze naar beneden met de stamper Nadat u de ingrediënten heeft verwerkt zet u de draaischakelaar UIT op positie 0 en haalt u de stekker uit het stopcontact Verwijder de mesbladhouder ui...

Page 121: ...m is geplaatst 3 4 Steek de stekker in het stopcontact en zet de draaischakelaar op de gewenste snelheid Nadat u de ingrediënten heeft verwerkt zet u de draaischakelaar UIT op positie 0 en haalt u de stekker uit het stopcontact Verwijder de slacentrifuge uit de kom Opmerking Maximale werkcapaciteit van de slacentrifuge 200 g of tot de maximale hoogte van de saladecentrifuge naar gelang wat eerder ...

Page 122: ...itzijde op de Perskegel en duw er stevig op om het fruit te persen Nadat u de ingrediënten heeft verwerkt zet u de draaischakelaar UIT op positie 0 en haalt u de stekker uit het stopcontact Verwijder de Perskegel uit de kom voordat u het geperste sap in een glas giet Opmerking Zorg er altijd voor dat de Perskegel op de citruszeef is geplaatst voordat u ingrediënten gaat verwerken Stop de verwerkin...

Page 123: ...an de behuizing van de motor en verwijder de ingrediënten uit de blenderkan Opmerking Maximale werkcapaciteit 1 L Ingrediënten die niet zijn toegestaan voor gebruik in de blenderkan Raadpleeg pagina NL6 Het wordt afgeraden om harde kleverige ingrediënten in de blender te verwerken Snijd indien nodig de harde ingrediënten in kleine stukjes snijd bijv wortels in blokjes van 1 cm en vul de blenderkan...

Page 124: ...teek de stekker in het stopcontact en zet de draaischakelaar op de gewenste snelheid 3 4 Nadat u de ingrediënten heeft verwerkt zet u de draaischakelaar UIT op positie 0 en haalt u de stekker uit het stopcontact Verwijder de basis van de hakmolen van de behuizing van de motor en verwijder de ingrediënten Draai de basis van de hakmolen tegen de klok in om hem los te maken en til hem op van de maalb...

Page 125: ...hakelaar op PULSEREN 5 10 keer Blender Draai de draaischakelaar om snelheid 2 te selecteren en gebruik hem 10 20 seconden Zet de draaischakelaar UIT op positie 0 en haal de stekker uit het stopcontact Verwijder de hulpstukken en maak de keukenmachine verder schoon Was de onderdelen door ze goed af te spoelen onder stromend water Gebruik indien nodig een neutraal afwasmiddel Droog alles met een sch...

Page 126: ... Om de rubbereb voet op de voet van de behuizing van de motor te verwijderen maakt u de ontgrendelingshendel onderaan de behuizing van de motor los zoals afgebeeld op de bovenstaande afbeelding Hierna tilt u de hendel op Kantel de behuizing van de motor en wikkel het snoer gedeeltelijk rondom het wikkelpunt waarbij u de stekker aan de zijkant laat hangen 3 i ii iii i Sla het mesblad op in de kom E...

Page 127: ...org ervoor dat ingrediënten worden gebruikt in hoeveelheden en afmetingen zoals aangegeven Plaats het deksel of de citruszeef goed op de kom en zorg ervoor dat de kom blendereenheid of maaleenheid goed op de behuizing van de motor is geplaatst Er doen zich buitengewone trillingen en een vreemd geluid voor tijdens gebruik O O De rubberen voet en of het werkblad zijn niet schoon Veeg vuil of vlekken...

Page 128: ...pbergeenheid Blendereenheid maaleenheid Algemene accessoires Borstel met spatel Vaatwasserbestendige onderdelen Kom en deksel van de kom Akoestisch geluidsniveau 88 dB A re 1 pW 88 dB A re 1 pW Het ontdoen van oude apparatuur Enkel voor de Europese Unie en landen met recycle systemen Dit symbool op de producten verpakkingen en of begeleidende documenten betekent dat gebruikte elektrische en elektr...

Page 129: ...MEMO 100_160419_MK F500_Second_EU UZ50G155 indb 129 2016 04 19 16 59 06 ...

Page 130: ...MEMO 100_160419_MK F500_Second_EU UZ50G155 indb 130 2016 04 19 16 59 06 ...

Page 131: ...MEMO 100_160419_MK F500_Second_EU UZ50G155 indb 131 2016 04 19 16 59 06 ...

Page 132: ...ve in EU Panasonic Marketing Europe GmbH Panasonic Testing Centre Winsbergring 15 22525 Hamburg Germany E1 UZ50G155 F0416 0 Panasonic Manufacturing Malaysia Berhad No 3 Jalan Sesiku 15 2 Section 15 Shah Alam Industrial Site 40200 Shah Alam Selangor Darul Ehsan Malaysia http www panasonic com Panasonic Manufacturing Malaysia Berhad 2016 110_Back Cover indd 132 2016 04 20 10 00 14 ...

Reviews: