


– 6 –
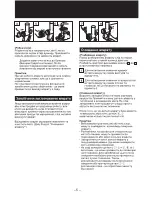
• Make sure that the voltage and frequency indicated on
the bottom plate are the same as your local supply.
• Unplug when assembling or disassembling the unit.
• Close supervision is necessary when any appliance is
used near children.
• When carrying the unit, be sure to hold the motor housing
with both hands; do not hold only the hopper plate.
• Never feed food with hands. Use the food pusher.
• Do not grind hard foods such as bones and nuts.
(They may cause jamming.)
• Do not grind ginger and other materials with hard fiber.
(They will not be ground.)
• To avoid jamming, do not force to operate the unit with
excessive pressure.
If the unit jams due to hard materials lodged onto the
feed screw or the cutting blade, switch off immediately
and clean the unit.
When the circuit breaker activates, do not switch on.
(See "Caution on Jamming" on page 7.)
• Never try to disassemble or repair the unit by yourself.
• If the supply cord is damaged, it must be replaced by
a special cord or a cord assembly available from your
Panasonic dealer or its service agent.
• Never remove or attach the hopper plate, the head or
cap when the motor is operating.
• Do not disassemble the grinder or place anything
(especially finger, spoon, fork, etc.) in the grinder during
operation.
• This product is intended for household use only.
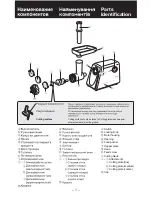
Wash all the parts (except those that do not touch foods
a
,
b
,
c
, and
d
) in warm soapy water.
Before plugging in, ensure the switch is off.
Before use
To Grind Meat
Precautions
How to Use
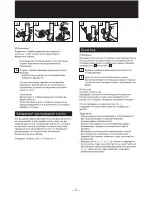
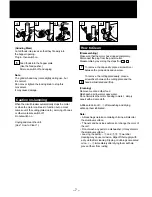
1
2
3
4
5
Place the head onto the opening of the motor
housing. Holding the head with one hand, place the
locking knob into the hole on the side of the motor
housing and tighten it clockwise.
Place the feed screw into the head, long end first,
by turning the feed screw slightly until it is set into
the motor housing.
Place the cutting blade onto the feed screw shaft
with the blade facing the front as illustrated.
(If it is not fitted properly, meat will not be ground.)
Place the desired cutting plate next to the cutting
blade, fitting protrusions in the slots.
Screw the cap into place until tight.
(Do not over tighten.)
Place the hopper plate on the head and fix into
position.
Locate the unit on a firm surface.
(The air passage at the bottom and the side of the
motor housing should be kept free and not blocked.)
(Assembling)


