background image

Installation

13


■ Make sure to ask a service person for installation. Do not install by yourself.


■ If the installation, test run and inspection of the washing machine are not carried out following 

this installation method, Panasonic will not be liable for any accident or damage caused.

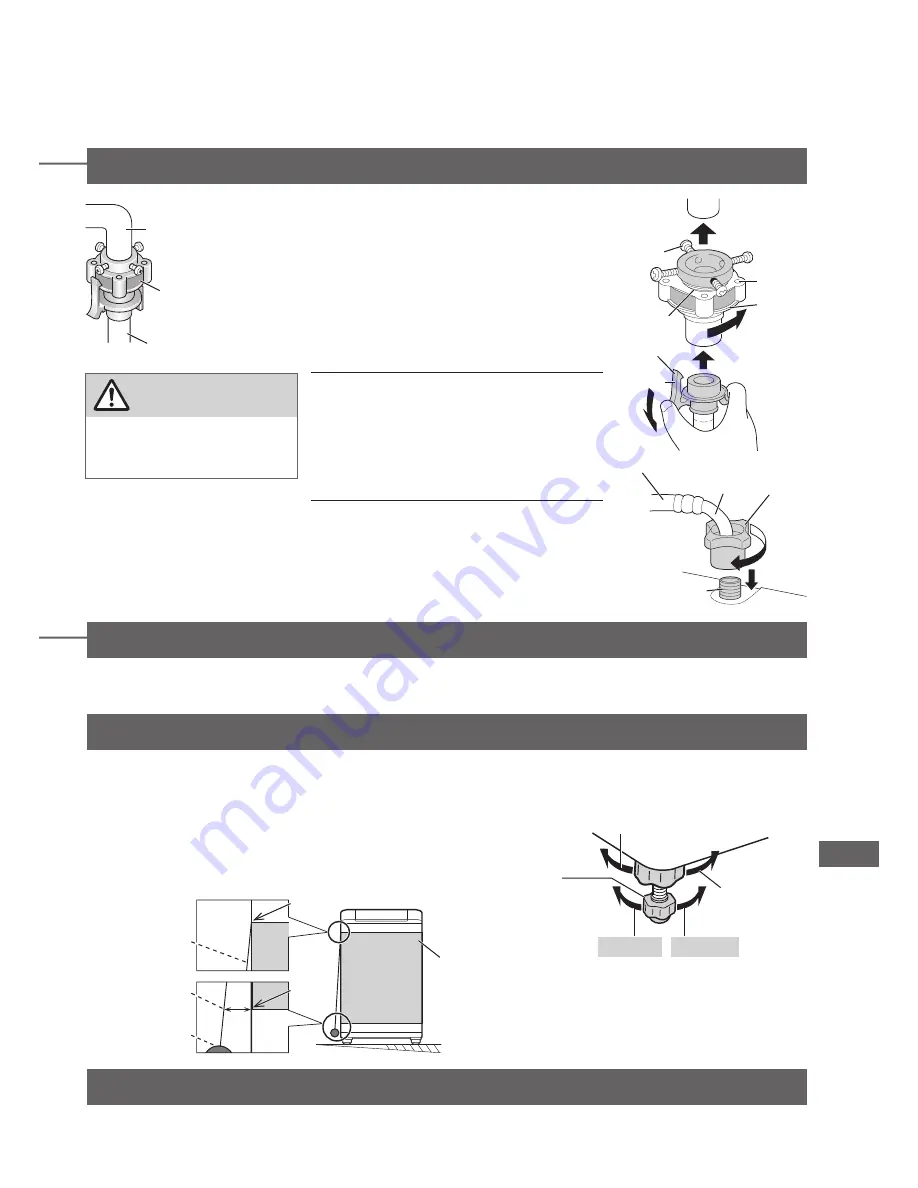
4. Connect the water tap adaptor and water supply hose.

Water faucet

Water supply hose

Water tap adaptor

CAUTION


● Tighten the nut firmly.


● Do not twist, squash, 

modify or cut the hose.

Part A

Flange

Thread

Lever

Claw

Screw

Elbow

Water supply hose

Nut

Water supply 

valve screw

1

Connect the water tap 

adaptor to the water faucet.

1


Turn part A to the left until approx. 

4 mm of the thread becomes visible.

2

  Loosen the 4 screws.

3

  Connect to the faucet and 

tighten the screws.

4


Turn part A to the right and tighten 

securely. (To prevent water leakage)

2

Connect the water supply 

hose to the water tap adaptor.

Insert the hose into the adaptor 

while pushing down the lever, 

and hook the claw of the lever on 

the flange of the adaptor.

3

Connect the water supply 

hose to the water supply 

valve screw.

1


Hold the elbow and tighten the nut.

2


Check that the elbow is not loose.

5. Connect the power plug and grounding wire.


● Ask a service person to do the grounding work.


● In case of a 2-pin power cord, establish a ground.

6. Check that the washing machine is level.


Check the balance state using a plummet:

1


Take upper edge of the body as the base. From this 

position, release the string to make it vertical to the ground.

2

  Take lower edge of the body as the base. Measure 

the distance from the edge to the string. The 

distance must be less than 10 mm to the left, to the 

right, to the front, and to the back of the machine.


If the washing machine wobbles

3

  Turn to 

the right 

to tighten.

1

  Turn the adjustable leg 

knob to the left to loosen.

2

  Turn the 

adjustable leg 

to eliminate 

wobble.

To lower

To raise

Body

Upper 

edge

String

Plummet

Less than 10 mm

Lower 

edge

7. Perform a trial operation.


● Check that there is no water leakage, abnormal sounds or error display.

Summary of Contents for NA-F80VG8

Page 1: ...icate CHĂN MÀN Blanket SẤY BẰNG GIÓ 90 Air Dry Wash Rinse Spin Convenient Functions 10 Maintenance 10 Installation 12 Troubleshooting 14 Error Display 15 Specifications 16 Thank you for purchasing this product Read these instructions carefully for optimum performance and safety before use Keep this manual for future reference Operating Installation Instructions Fully Automatic Washing Machine Dome...

Page 2: ...ord and ask your nearest service centre for repair Do not allow children to use on their own This appliance is not intended for use by persons including children with reduced physical sensory or mental capabilities or lack of experience and knowledge unless they have been given supervision or instruction concerning use of the appliance by a person responsible for their safety Children should be su...

Page 3: ... not climb or put heavy objects on the appliance To prevent deformation and breakage resulting in injury If the lid is broken immediately stop using the appliance To prevent deformation and breakage resulting in injury Do not connect to the hot water supply Do not directly pour hot water of 50 ºC or higher into the tub Do not obstruct the openings of the bottom face with carpet etc Turn off the wa...

Page 4: ...red The lamp lights up when the operation resumes Change water level During the wash process press Water Level to change the water level Some water levels cannot be selected depending on the program When the remaining time is displayed press Water Level to check the water level Preset Set the time to finish washing in hours e g 8 hours later Setting range 2 24 hours later in one hour increments 3 ...

Page 5: ...he cover To prevent damage to clothes and the main unit Do not use the 8 SẤY BẰNG GIÓ 90 Air Dry program To prevent uneven drying and wrinkles Purpose Program Maximum capacity Everyday clothes Daily washing 1 GIẶT THƯỜNG Normal P 7 8 0 kg Speedy washing for light soil 2 GIẶT NHANH Speedy P 7 8 0 kg Delicates Washing delicates gently 3 GIẶT NHẸ Delicate P 8 4 2 kg Clothes for babies people with sen...

Page 6: ... Fragrance program Close the cover securely after the softener is put in When using concentrated softener dilute it with water before putting it in NOTE Softener cannot be used with the 7 TIẾT KIỆM NƯỚC Water Save program Do not use separated or solidified softener If Pause is pressed during spin cycle the softener will be added too early and its effectiveness will decrease The softener will not b...

Page 7: ...ration ends with beeps Set how many hours later to finish operation P 4 2 minutes after start up all indications except Preset turn off To confirm after the timer has been set press Preset To cancel or change press On Off The hours that can be set differ depending on the program After pressing Start You can change the water level until the end of the wash process You cannot change the program Time...

Page 8: ... water temperature below 15 ºC Test was conducted based on IEC60456 except for water temperature GIẶT NHẸ Delicate Use this program to gently wash delicate clothes and stylish garments Load laundry evenly Load lighter items first and press them from above Use laundry nets for delicate underwear only Amount that can be washed at one time 55 L 4 2 kg 47 L 3 0 kg NOTE Do not use bleach Use liquid del...

Page 9: ...llation condition of the washing machine Since no heater is used for this function you may feel that clothes are cold and half dry Contents of Programs Program Total time approx Wash Rinse Spin 1 GIẶT THƯỜNG Normal 55 min 11 min Twice 5 min 2 GIẶT NHANH Speedy 40 min 3 min Twice 3 min 3 GIẶT NHẸ Delicate 40 min 9 min Twice 1 min Baby care 65 min 11 min Twice 7 min 4 GIẶT NGÂM NƯỚC XẢ Fragrance 75 ...

Page 10: ... do the same procedure 4 short beeps Turning the tub by hand If it is difficult to reach the softener or bleach inlet 1 Turn the power on 2 When a clicking sound is heard Turn the tub Clockwise only NOTE If there is water in the tub or Start is pressed the tub cannot be turned Lint filter After each operation Lint filter 1 Remove the filter 2 Open the filter and remove lint If lint is difficult to...

Page 11: ...hout loading laundry P 9 Once a month VỆ SINH LỒNG GIẶT Tub Hygiene Preparation Turn on the water faucet 1 Without loading laundry Turn the power on 2 Select the 9 VỆ SINH LỒNG GIẶT Tub Hygiene program 3 Start When the tub is filled with water Pause 4 Put bleach in the tub Use chlorine bleach for clothes Approx 200 ml 5 After closing the lid Start After approx 2 hours tub cleaning ends Detergent c...

Page 12: ...ven or unstable locations on blocks timbers a table with wheels etc 2 Attach the bottom cover 1 Insert the bottom cover along the guides 2 Fix with a screw Screw 3 Attach the external drain water hose 1 Connect Elbow Do not direct the elbow upward Insert all the way 2 Slide the hose band in the arrow direction Slide all the way until it stops Hose band NOTE Do not put the hose tip under water Do n...

Page 13: ...daptor while pushing down the lever and hook the claw of the lever on the flange of the adaptor 3 Connect the water supply hose to the water supply valve screw 1 Hold the elbow and tighten the nut 2 Check that the elbow is not loose 5 Connect the power plug and grounding wire Ask a service person to do the grounding work In case of a 2 pin power cord establish a ground 6 Check that the washing mac...

Page 14: ...s water in the tub before operation the water level may be higher The water level is too low for the amount of laundry With light clothes of synthetic fibre etc the water level may be lower Rinse Spin Operation started with rinse but water is not supplied If there is no water in the tub water is supplied after spin If there is water in the tub water is supplied after water discharge Operation sudd...

Page 15: ... washing machine with the lid open Close the lid Spin or Air Dry is not possible Are clothes concentrated on one side of the tub Distribute the clothes evenly and close the lid Is the washing machine installed on an unstable or inclined surface You can resume operation by opening and closing the lid Water cannot be supplied Is the water faucet turned on Water outage Is the water supply filter clog...

Page 16: ... 240 V Rated frequency 50 Hz Rated power consumption 380 W Standard water amount 66 L Maximum capacity 8 0 kg Product dimensions 595 mm W x 626 mm D x 995 mm H Product weight 34 kg Pressure of tap water 0 01 1 MPa Operation is guaranteed with the voltage fluctuation from 195 V to 245 V but not for performance ...

Reviews: