background image

24

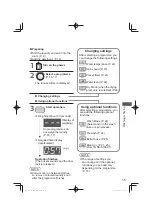
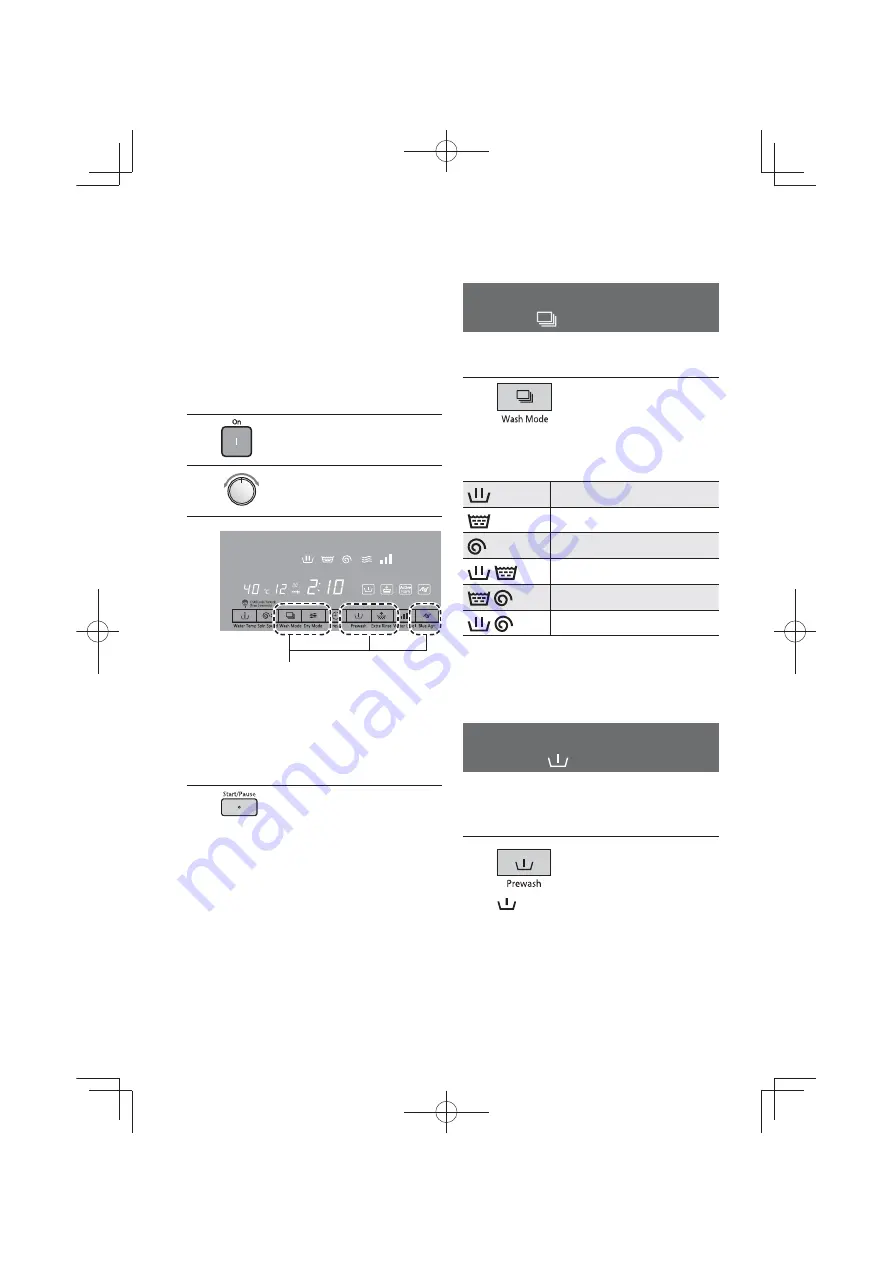
Washing with Optional Functions

You can use combinations of optional 
functions with each programme.


„

Preparing 


z

Sort the laundry and put it into the 

drum. ( P. 9)


z

Add the detergent. ( P. 12)

1

 Turn on the power.

2

 Select a programme. 
 

( P. 16,  17)

3

Add optional function.


z

The options available differ 

depending on the programme.
(P. 18)


z

An alarm sounds if you select 

an option that is unavailable.

4

 Start operation.

Select and run processes 


Wash


Mode

You can select and run a combination 
of wash, rinse and spin processes.

3

 Press.

The indication displayed 
changes with each press.

 *

2

Washes

*

1

Rinses

*

1

Spins


Washes and rinses


*

1

Rinses and spins


Washes and spins

'UDLQV¿UVWLIWKHUHLVZDWHULQWKH

drum.

*2 Water will remain.

Prewash 

 Prewash

You can wash laundry twice by adding 
the prewash option. This is good for 
heavily soiled items.

3

 Press.

 lights (activated) or goes out 

with each press.

NA-S106X1_EN_MY_VI.indb   24

2017-11-20   17:40:05

Summary of Contents for NA-S106X1

Page 1: ...AWW9901C2Z00 S0318 0 V 03 2018 Printed in Vietnam ...

Page 2: ...ps 20 Changing Programme Settings 22 y Changing the temperature Water Temp 22 y Changing the water level Water Level 22 y Changing the spin speed Spin Speed 23 y Setting the programme end time Preset 23 Washing with Optional Functions 24 y Select and run processes Wash Mode 24 y Prewash Prewash 24 y Rinse thoroughly Extra Rinse 25 y Sterilise the laundry Blue Ag Max 3 kg 25 y Dry Mode Dry Mode 26 ...

Page 3: ...y filter 28 y If the water supply hose is frozen 28 y Appliance 28 y Drum 29 y Detergent drawer 29 y Drain filter 30 For Better Results 31 Troubleshooting 34 Error Display 37 Choosing the Right Location 39 Moving and Installing 40 Connecting the Hoses 42 Checking after Installation 44 Power and Water Consumption 46 Specifications 47 Images in these instructions are of the NA S106X1 unless otherwis...

Page 4: ...c z To prevent injury do not touch the drum until it completely stops z The appliance is not to be used if industrial chemicals have been used for cleaning They may cause a fire z The lint must not be allowed to accumulate around the appliance z Do not dry unwashed items in the appliance z Items that have been soiled with substances such as cooking oil acetone alcohol petrol kerosene spot removers...

Page 5: ...ce Do not use a plug adaptor or extension cord z Do not use a power cord or plug that is damaged If the power cord is damaged it must be replaced by the PDQXIDFWXUHU LWV VHUYLFH DJHQW RU VLPLODUO TXDOL HG persons in order to avoid a hazard z Do not plug in or unplug the power cord with wet hands z Always fully insert the power plug into the socket z Do not hold or pull on the cord when removing th...

Page 6: ... are to be used and old hose sets should not be reused z Turn off the tap if the appliance is not going to be used for a prolonged period such as during a holiday Water could leak while you are away and cause damage to household goods To prevent injury and burns z HHS RXU QJHUV DZD IURP WKH GRRU hinge when opening and closing the door z Do not climb onto the appliance z When washing at high temper...

Page 7: ...oil etc The oil can get hot and deform the door seal leading to water leakage z Do not wash rinse or spin waterproof sheets or clothes Intense vibration during spin or falling of the appliance may result in injury GDPDJH WR WKH PDLQ XQLW ZDOO À RRU ODXQGU RU ZDWHU OHDNDJH For example Raincoats wet suits etc z Fabric softeners or similar products should be used as VSHFL HG E WKH IDEULF VRIWHQHU LQV...

Page 8: ...egion Water inlet P 43 Anchor bolts P 41 Rear of appliance Detergent drawer P 12 Hinge UDLQ OWHU FRYHU P 30 Door seal Drum 1 Washing spin drying tub Control panel P 10 Door 1 When the washing machine is powered on the drum light illuminates at the time of door opening closing and completion of washing and then you can observe the situation of clothes in the drum NA S106X1_EN_MY_VI indb 8 2017 11 2...

Page 9: ...bric and degree of soiling This helps you choose a suitable programme and temperature Stained items zApply stain remover to any stains z StainMaster programmes P 17 are recommended for removing stains Only for NA S106X1 Sorting zWash separately clothes that are not colour fast denim dark coloured items etc Before put clothes in drum To prevent damaging clothes or appliance malfunction carry out th...

Page 10: ...Child Lock 1 P 27 Spin speed P 23 Wash Mode P 24 Dry Mode P 26 Preset P 23 Prewash P 24 Extra Rinse P 25 Water Level P 22 Blue Ag 1 P 25 Child Lock 2 P 27 1 NA S106X1 2 NA S106G1 5 Display P 11 NOTE zTo turn the power off and back on press Power to switch off and make sure the display has gone off before turning back on For about 3 seconds Goes off zIf you do not press Start Pause within 10 minute...

Page 11: ...V QLVKHV wash rinse spin dry 4 Water level 5 Dry Mode P 26 6 ECONAVI lamp Lights up while the ECONAVI programme is selected Flashes during the ECONAVI detection P 21 7 Water temperature 8 Spin speed 9 Remaining time This indicator shows the approximate time until the RSHUDWLRQ QLVKHV Error display An error is displayed if the appliance malfunctions P 37 e g U11 10 Optional functions Selected optio...

Page 12: ...tergent for prewashing It s automatically added WR ODXQGU GXULQJ QDO rinsing zDo not let it exceed MAX 130 ml line Detergent drawer Foam generator CAUTION Do not operate this appliance with detergent drawer detached It will leak water When using Prewash function P 24 zWhen using a tub cleaning detergent also put it in this compartment P 29 Detergent water softener bleach stain remover NA S106X1_EN...

Page 13: ...he drawer zDo not put detergent in the foam generator Prewashing zYou need separate detergent for prewash and main wash zUse powdered detergent for main wash Liquid detergent washes away in prewash Water softening agent If you live in a hard water area 1 3 mmol L hardness or more we recommend using a water softening agent This reduces the detergent required and prevents limescale which damages the...

Page 14: ...ot put too much laundry into the drum It can cause excessive vibration or damage to the appliance To open the door during operation The door is locked during operation Press Pause The lock is released with a click zDuring spinning process it may take about 1 minute for the drum to stop rotating Basic Method NA S106X1_EN_MY_VI indb 14 2017 11 20 17 39 49 ...

Page 15: ...ween clothes so remove coloured laundry soon DIWHU WKH SURJUDPPH QLVKHV Changing settings After selecting a programme you can change the following settings Water temperature P 22 Spin speed P 23 Preset timer P 23 Water level P 22 Dry Mode when the drying procedure is selected P 26 Using optional functions After selecting a programme you can add the following optional functions Wash Mode P 24 Selec...

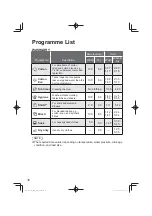
Page 16: ... drum No clothing 3 36 4 23 Hygiene Washes infants clothing tablecloths and sheets 10 0 6 0 1 43 1 58 3 25 5 55 Shirts 2 For shirts and women s blouses 2 0 2 0 1 11 5 12 Mixed For blended fabrics e g cotton linen and synthetic EUHV 10 0 6 0 1 12 1 47 2 44 5 34 Soak For heavily soiled clothes 5 0 5 0 1 47 3 30 5 45 Dry only Used to dry clothes 6 0 1 20 3 35 NOTE zThe required time varies depending ...

Page 17: ... soiled items 2 0 0 15 Quick 30 2 30 min quick wash for lightly soiled cotton and linen blends 5 0 0 30 Bedding 2 For large items such as blankets curtains and bedspreads 3 0 1 21 Delicates 2 For underwear and machine washable silk clothes Gentler than the Wool programme 2 0 0 41 StainMaster Suitable for removing stains Mud For mud stains 10 0 2 27 3 12 Oily Sauce For stains of oily sauce 10 0 2 0...

Page 18: ...30 40 Soak 9 9 40 900 Cold 30 40 Dry only 9 9 9 9 Cold 1000 Cold 30 40 50 60 Active Speed 9 9 40 900 Cold 30 40 Synthetic 9 9 30 700 Cold 30 40 Wool 9 Cold 500 Cold 30 Rapid 15 9 9 Cold 900 Unchangeable Quick 30 9 Cold 900 Unchangeable Bedding 9 9 Cold 700 Cold 30 Delicates 9 9 30 500 Cold 30 40 Mud 9 40 900 Unchangeable Oily Sauce 9 40 900 Unchangeable Collar Sleeve 9 40 900 Unchangeable 1 When t...

Page 19: ...9 9 9 9 9 9 H M 500 700 900 1000 1200 9 9 9 9 9 9 Unchangeable 900 1000 1200 9 9 M L 500 700 900 1000 1200 9 9 H M L 500 700 900 9 9 9 9 9 Unchangeable Unchangeable 9 9 9 H M L 500 700 900 9 H M L 500 700 900 9 H M 500 700 9 9 9 9 Unchangeable Unchangeable 9 9 9 Unchangeable 500 700 900 1000 1200 9 9 9 9 9 Unchangeable 500 700 900 1000 1200 9 9 9 9 9 Unchangeable 500 700 900 1000 1200 9 9 9 9 9 3 ...

Page 20: ...pins to hold the size and shape 3 Iron using a lot of steam and then leave the item to dry Bedding programme Washable items zItems with Wash or Handwash on label zBlankets 100 synthetic and 100 cotton zSheets zBedspreads zUndersheets 100 synthetic NOTE zYou can only wash 1 item at a time zYou cannot wash items made of wool silk or long pile fake fur zYou cannot wash electric blankets zDo not use a...

Page 21: ...whitens the yellowed clothes More effective with the water of 60 C Replacing the Ag part When the appliance is switched RQ DQG WKH OXH J ODPS ÀDVKHV replace the internal Ag part to keep the sterilising effect The Blue Ag lamp on the other KDQG ÀDVKHV GXULQJ ULQVH WR VKRZ WKH Blue Ag sterilisation is working NOTE zThe Blue Ag works for about three years if used twice a week with normal water condit...

Page 22: ...nge the washing temperature according to the type of laundry or the degree of soiling 3 Press The temperature indication displayed changes with each press Setting guide zHigher temperature Whites cottons heavily soiled items zLower temperature Colours items that shrink easily lightly soiled items Changing the water level Water Level You can change the washing water amount 3 Press The water level i...

Page 23: ...d time Preset You can set how may hours later the washing will end 3 Press The time indication displayed changes with each press Holding down Preset changes the time continuously Setting range Up to 24 hours in increments of 1 hour To check a preset time Press To cancel settings Turn off the power All settings are cancelled NOTE zBe sure to close the door and press Start Pause to activate the Pres...

Page 24: ...ption that is unavailable 4 Start operation Select and run processes Wash Mode You can select and run a combination of wash rinse and spin processes 3 Press The indication displayed changes with each press 2 Washes 1 Rinses 1 Spins Washes and rinses 1 Rinses and spins Washes and spins UDLQV UVW LI WKHUH LV ZDWHU LQ WKH drum 2 Water will remain Prewash Prewash You can wash laundry twice by adding t...

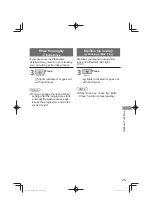
Page 25: ... can change the Extra Rinse setting after the programme starts and until the wash process ends Pause the programme and do the steps 3 and 4 Sterilise the laundry Blue Ag Max 3 kg Sterilises your laundry using silver ions and ultraviolet UV light P 21 3 Press lights activated or goes out with each press NOTE zIf the Blue Ag is set the Extra Rinse function comes together NA S106X1_EN_MY_VI indb 25 2...

Page 26: ...nkled For half dry clothes Time 30 minutes and above NOTE zDo not put clothing heavier than 6 0 kg otherwise uneven drying would be caused zFor clothing not easy to dry it is recommended to use single spin single drying zNot all programs can dry the clothing P 16 17 z7DS ZDWHU LV QHHGHG IRU FRROLQJ DQG GHKXPLGL FDWLRQ VR RSHQ WKH IDXFHW HYHQ in drying otherwise drying cannot work with the faucet c...

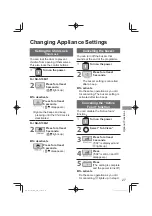
Page 27: ...u can turn off the buzzer that sounds at the end of the programme 1 Turn on the power 2 Press for at least 5 seconds The buzzer setting is cancelled after a beep To activate Do the same operation as you did for cancelling The buzzer setting is activated after two beeps Cancelling the Active Foam function You can disable the Active foam function 1 Turn on the power 2 Select Tub Clean 3 Press for at...

Page 28: ... the water supply hose is frozen 1 Wrap warm towels around the joints of the water supply hose Joints Water supply hose 2 Put 2 to 3 litres of hot water about 50 C into the drum 3 Wait for about 10 minutes select and run the spin process in Wash Mode function P 24 Appliance Use a soft cloth to wipe off any water or dirt NOTE zDo not splash water zDo not use gritty cleaners thinners nor products co...

Page 29: ...Turn off the power 2 Remove all clothes from the drum 3 Turn on the power 4 Select the Tub Clean programme 5 Press for 5 seconds Detergent drawer Wash the detergent drawer with water A build up of detergent can develop mould 1 Pull out the detergent drawer 2 Pull laterally by both thumbs with proper force as shown by the small DUURZV LQ WKH JXUH DQG SXVK the softener cover upwards by the thumbs to...

Page 30: ...CAUTION R QRW UHPRYH WKH GUDLQ OWHU LI there is water inside the drum such as during operation If you do a large volume of water possibly scalding water will pour out 4 No water being left turn the drain OWHU DQWLFORFNZLVH WR ORRVHQ DQG pull it out 5 Remove any lint and debris 6 5HSODFH WKH GUDLQ OWHU 7 Replace the hose stopper and SXPS KRVH DQG FORVH WKH GUDLQ OWHU cover CAUTION H VXUH WR WXUQ WK...

Page 31: ... rust in water detergent residue colour transfer etc It may look charred zDiscolouration caused by sunlight cannot be remedied If darkening of clothes colour transfer or odour is noticeable After dark spots yellowing fading and smell are generated ĺ8VLQJ WKH VSRRQ WKDW FRPHV ZLWK WKH detergent add 2 spoonfuls of detergent to warm water of approx 40 C soak clothes overnight and wash ĺ I WKH VWDLQV ...

Page 32: ...SHUIRUP WKH U RSHUDWLRQ IRU QLVK z KHPLFDO EUHV PD VKULQN GXH WR KHDW generated in drying If cotton products have shrunk by drying ĺ0RLVWHQ FORWKHV ZLWK ZDWHU VXIILFLHQWO and stretch them The shrunk clothes are recovered to some extent When the hand feeling changes due to severe wrinkles zDepending on the material weaving method thickness and type some clothes are not suited for washing or drying ...

Page 33: ... EUH PL HG WRJHWKHU RU FORWKHV WKDW DUH QRW GULHG VXI FLHQWO please use Timer dry zDid you put too much clothes zIs the spin time too short For the clothes that are not easy to dry please set the spin time for 15 minutes zDue to the different types and quantities of clothing drying may be uneven RU FORWKHV WKDW DUH QRW GULHG VXI FLHQWO please use Timer dry zIs the blanket twisted into a ball and p...

Page 34: ...mell will go away over time Run the Tub Clean programme to clean the drum P 29 Wash No water going into the appliance The tap may be turned off The water supply may be disrupted The water supply hose may be frozen P 28 7KH ZDWHU VXSSO OWHU PD EH EORFNHG 3 Water builds up during a wash This is normal Water is automatically supplied if the water level falls Water drains out during a wash If there is...

Page 35: ...on During the spin process the drum stops and rotates several times This is normal When the appliance detects an unbalanced load it automatically tries to correct it The laundry may be too light Try adding one or two bath towels Foam or water remains on the door or door seal Some foam or water may remain depending on the state of the laundry or the amount of detergent used Wipe foam or water away ...

Page 36: ...f the drain pump working There is a fan rotation sound This is normal The fan cools electric parts Others When power cut occurs The appliance stops running Even if the power supply is recovered the appliance will not run again Switch on the power and restart the appliance A circuit breaker trips the electricity supply The appliance stops running After the circuit breaker is reset the appliance wil...

Page 37: ...sed properly Close the door securely and press Start Pause Unable to spin dry The product has been designed to detect unbalanced loads particularly small loads in order to ensure quiet operation and achieve the best results This is not a malfunction Perform any of the following solutions What to do Please try to untangle clumps of clothing If you wash large items e g blankets please reduce the loa...

Page 38: ...in Are there too many bubbles in the drum Is there too much detergent What to do Turn off and re start Run Rapid 15 programme recommended programme Remove the foam in the drum An error starting with H is displayed What to do Turn off the tap just to be safe Check the 2 digit number after H unplug the machine and contact a service agent of our company Error Display continued NA S106X1_EN_MY_VI indb...

Page 39: ...hildren from being locked in the drum Locations the appliance is not to be installed In a damp place or where the appliance may be exposed to rain etc As this could cause electric VKRFN RU UH Locations that are uneven or unstable As this could cause vibration and noise In direct sunlight As this could cause a malfunction or deformation CAUTION Do not install where temperatures may reach freezing S...

Page 40: ...am pad of the package do not dispose of it Upper foam pad Bottom plate The bottom plate must be installed with the FRONT mark facing frontwards 1 Tilt the body backwards by about 60 and keep it stable then place the bottom plate beneath the unit 6 0 2 Hang the rear claws of the bottom plate to the base 3 Snap the front claws into the base until they click 4 Snap the left and right claws into the b...

Page 41: ...before operation zStore the anchor bolts They will be needed when the appliance is moved again in the future zWhen moving the appliance again the anchor bolts must be attached to the appliance Attach the anchor bolts in the reverse order they were removed Levelling the appliance Prepare a thin spanner and spirit level not supplied Use a spirit level to make sure the appliance is level Spirit level...

Page 42: ...oses and power cord Left side connections Right side connections Sink Water supply hose Water supply hose Drain hose Drain hole 110 cm 40 cm 125 cm S T Rise of drain hose max 100 cm Drain hole 125 cm 75 cm 85 cm Sink S T Rise of drain hose max 100 cm Drain hose NA S106X1_EN_MY_VI indb 42 2017 11 20 17 40 22 ...

Page 43: ...e and tighten by hand Water inlet Water supply hose Rear of appliance 2 Attach the other end of the hose to the tap and tighten by hand min 10 mm 3 4 3 Turn on the tap slowly and make sure there are no leaks Drain hose Draining to a sink or wash basin CAUTION Secure the drain hose with an elbow so that it does not come off by water pressure during drainage Elbow supplied Draining to a stand pipe S...

Page 44: ... and securely tightened P 41 zIs the appliance level P 41 Water supply hose zIs the water supply hose properly connected Is it free from leaks P 43 Installation place z V WKH DSSOLDQFH RQ D ÀDW VWDEOH surface zDoes it run without vibrating P 41 Drain hose zIs the drain hose properly connected Does it drain normally P 43 Water supply hose Drain hose Power plug Anchor bolts 4 Adjustable feet 4 NA S1...

Page 45: ...e Rapid 15 programme 5 Start operation Water leaks zCheck the appliance and hose joints for leaks P 42 Abnormal noise zMake sure the appliance is level P 41 Error display Unable to drain P 37 Unable to supply water P 37 zAfter resolving an error open and close the door and press Start Pause to resume the test NA S106X1_EN_MY_VI indb 45 2017 11 20 17 40 26 ...

Page 46: ... 0 4 kWh 94 L 2 23 40 C High 10 kg 1 1 kWh 94 L 2 38 Dry only 6 kg 5 2 kWh 140 L 3 35 1 The power water consumption and time indicated in the table may vary depending on variations in pressures water hardness and temperatures URRP WHPSHUDWXUHV W SHV DQG DPRXQWV RI ODXQGU YROWDJH ÀXFWXDWLRQV DQG functions to be used 2 For normally soiled laundry with the rated capacity Cotton Eco programme with 40 ...

Page 47: ... min Product dimensions 596 mm W 560 mm D 845 mm H Product weight 68 kg Maximum wash capacity Dry cloth 10 kg 10 kg Maximum dry capacity Dry cloth 6 kg 6 kg Water consumption Refer to Power and Water Consumption P 46 Pressure of tap water 0 03 1 MPa Check the power supply The rated power of the appliance is shown on the name plate Make sure it matches the VSHFL FDWLRQV RI RXU UHVLGHQFH Name plate ...

Page 48: ...NA S106X1_EN_MY_VI indb 48 2017 10 23 10 48 40 http www panasonic com Panasonic Appliances Vietnam Co Ltd 2018 ...

Reviews: