English
10
11
English
For fabrics of thick materials and with stubborn wrinkles,
and cleaning the steam vents at the same time.
1. Keep the steam/dry selector in the " Dry " position and
set the temperature select button to "
3
"
, or some hot
water will drop from the iron.
2. Pump the power shot button
after the indicator light
changes from blink to
illumination.
•
The interval of pumping
for the power shot should
not be shorter than
2 seconds to avoid
hot water dripping from the soleplate.
•
When the steam does not come out sufficiently at the
beginning of use, pump the power shot button several
times until the steam comes out.
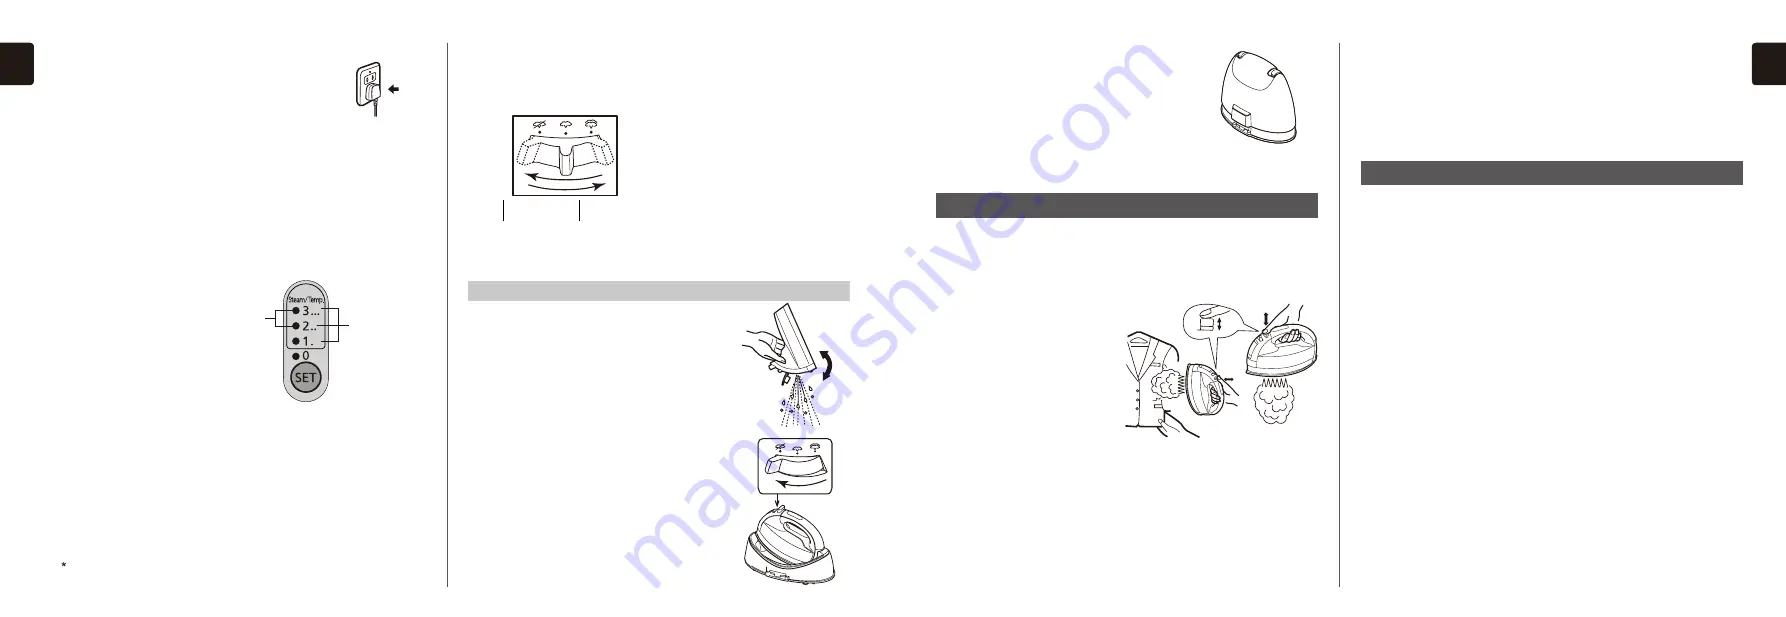
When using the vertical shot
Hang the garment on a clothes hanger. Hold the iron
away from your body, close to but not touching the
fabric. Pull the fabric tight with your free hand and
pump the power shot button 2-5 seconds interval.
4. Set the iron back to the power base.
Push the cover case down until a
click sound is heard; then store the
iron at safe place.
•
After ironing, while cool down
and store; always keep the steam
button in the " Dry " position.
•
The iron can be stored in the cover case when it is
still hot.
How to use as a dry iron
1. Remove the cover case same as step 1 of "How to use
as a steam iron", move the steam/dry selector to
the " Dry " position.
2. Set the iron on the power base securely, insert the
appliance plug into the power base and plug the
power plug into an electrical outlet.
3. According to «Fabric and ironing recommendations»
push the temperature select button to the desired
position.
Preheat the iron until the temperature control indicator
light changes from blink to illumination, and start to
iron.
4. After ironing, set the iron back to the power base and
pull out the plug. Push the cover case vertically until a
click sound is heard; then store the iron at safe place.
Notes:
•
Never iron clothes on the body or point your iron at anyone
when steaming.
•
When steam does not come out enough during use, set the
iron back on the power base to reheat it for approx. 30
seconds.
How to use the power shot and the vertical shot
7. Plug the power cord into an electrical outlet.
Set the iron on the power base securely.
Push the temperature select button
until the temperature control indicator
light for steam zone starts blinking.
Notes:
•
When using the steam, please set the temperature select
scale to “
2
” or “
3
”.
•
For high steam, please set to “
3
”. Low temperature will
lead to water leakage.
•
Do not leave the iron unattended while it is connected to
the electrical source.
8. a) Preheat the iron until the temperature control
indicator light changes from blink to illumination
(When the iron is placed on the
power base during use,
it is reheated as long as
the temperature
decreases, however
the light will illuminate
instead of blinking.)
b) Move the steam/dry
selector, select steam
quantity; and start to iron.
c) Please confirm the water volume during use. Pull out
the plug before refilling the iron according to the
step 3-6.
Steam
zone
Temperature
select scale
Steam/dry selector (switch as the following)
Low steam:
for thin or delicate fabrics
that require small amount of
steam.
High steam:
for fabrics that require high
amount of steam (i.e.thick
materials, items with stubborn
wrinkles.)
1. After ironing, push the temperature
select button until the " 0 " light turns
on, pull out the plug. Move the
steam/dry selector to " Dry " position.
2. Press the water tank release button,
take out the water tank.
Empty water from the water tank.
3. Re-install the water tank, keep
the steam/dry selector in the
" Dry " position.
Dry
Low steam
High steam
After use
Notes:
•
The iron should be set on the power base securely for
connecting to power supply.
While not in use, please set
back on the power base to maintain the selected
temperature.
Just put the iron into power base, don't put it
at other place.
This iron must only be used with the power base provided.
•
When steam does not come out enough during use, set the
iron back on the power base to reheat it for approx. 30
seconds.


