background image

5

3. Performance Data

3.1 NR-AH181MS1N , AH181MK1N , AH181MT1N

"

1

"

"

3

"

"

5

"

g

n

i

t

t

e

S


l

a

i

D


t

a

t

s

o

m

r

e

h

T

5

.

2


±


5

.

0

-

5

.

2


±


5

.

6

-

5

.

2


±


5

.

2

1

-

)

C

°

(

e

r

u

t

a

r

e

p

m

e

T


r

e

z

e

e

r

F

Fresh Food Compartment Temperature

(°C)

-4.0 ± 2.5

1.0 ± 2.5

6.5 ± 2.5

5

1


±


5

2

5

1


±


0

4

5

1


±


0

6

)

%

(

o

i

t

a

R


g

n

i

n

n

u

R

R

E

D

N

U


R

O


0

.

1

)

y

a

D

/

h

W

k

(

n

o

i

t

p

m

u

s

n

o

C


r

e

w

o

P

NR-AH181MS1N / AH181MK1N / AH181MT1N

4. Disassembly Instruction

4.1. TOP PANEL

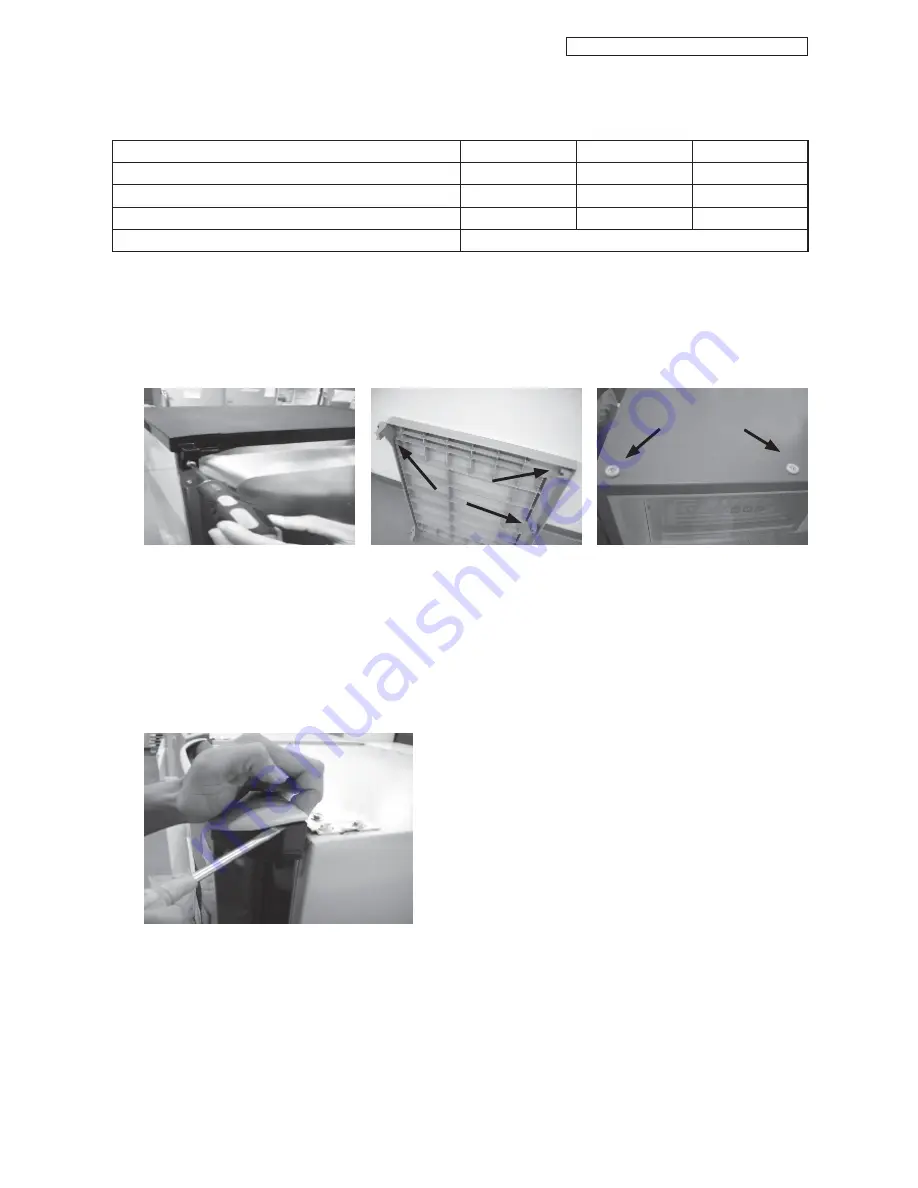
-  Take out Top Panel by remove screws at Hanger Shells (Fig. 1).
-  Open the door.
-  Lift the Top Panel by pull back little for unlock from Hook (Fig. 2).
-  Lift up the Top Panel and push it forward for unlock from Grill Button (Fig. 3).

4.2. ESCUTCHEON TOP

-  Take out by use  fingers lift up Escutcheon Top have small gap then put end of the screw driver between 

them.

-  Lift up Escutcheon Top carefully because it has many hooks which break down easy.

Fig. 4

3


.

g

i

F

2


.

g

i

F

1


.

g

i

F

Summary of Contents for NR-AH181MK1N

Page 1: ...rcuit Board Diagrams Exploded Views and Replacement Parts List It is essential that these critical parts should be replaced with manufacturer s specified parts to prevent shock fire or other hazards Do not modify the original design without permission of manufacturer IMPORTANT SAFETY NOTICE Order No PHAT090601C3 Product Colour CFCs have been used in refrigerant as refrigerator and the insulation m...

Page 2: ... three minutes at least for discharging capacitor Check safety after repairing Check the screws parts lead wires to take in place And check the repairing portion whether circumferential parts are damaged or not Check insulation resistance between supply plug and earth When install refrigerator check condition of supply cord and plug Wipe off the dust on plug Watch the hot parts During operation an...

Page 3: ... e p o l c y C n o i t a l u s n I Sealed Unit r o s s e r p m o C Evaporator Roll Bonded Aluminum Sheet type t a o c c n i z e b u t l e e t s l l a w e l g n i S r e s n e d n o C g 5 5 8 a 4 3 1 C F H e g r a h c t n a r g i r f e R l i o g n i t a c i r b u L Electric Parts T S P S e p y t h c t i w S A 5 0 V 0 5 2 n o r m o 1 2 1 D 3 D C P h c t i w s r o o D Split phase induction motor EQ BR...

Page 4: ...gray white white 91K Ω brown black black black 3 M C A 6 5 2 2 1 light blue white white LAMP 240V 15W THERMOSTAT STARTING RELAY RUNNING CAPACITOR COMPRESSOR MOTOR THERMO HEATER AS MOTOR PROTECTOR DOOR SWITCH N C C B 3 P 220V 50Hz NR AH181MS1N AH181MK1N AH181MT1N 2 2 2 Wiring Connection ...

Page 5: ...e w o P NR AH181MS1N AH181MK1N AH181MT1N 4 Disassembly Instruction 4 1 TOP PANEL Take out Top Panel by remove screws at Hanger Shells Fig 1 Open the door Lift the Top Panel by pull back little for unlock from Hook Fig 2 Lift up the Top Panel and push it forward for unlock from Grill Button Fig 3 4 2 ESCUTCHEON TOP Take out by use fingers lift up Escutcheon Top have small gap then put end of the sc...

Page 6: ...6 5 Parts Location 5 1 BODY NR AH181MS1N AH181MK1N AH181MT1N NR AH181MS1N AH181MK1N AH181MT1N ...

Page 7: ...7 5 2 DOOR NR AH181MS1N AH181MK1N AH181MT1N NR AH181MS1N AH181MK1N AH181MT1N ...

Page 8: ...TOP PAD L TOP PAD R 8 NR AH181MS1N AH181MK1N AH181MT1N 6 Packing Location BOTTOM TRAY AS PAPER PROTECTOR FRONT PACKING AS STICKER MODEL NAME POS CODE ...

Page 9: ...E PIN PIN HINGE TOP SPRING HINGE PIN SEAL CAP DOOR PC DOOR AS FOAM S DOOR AS FOAM K DOOR AS FOAM T CNRAF 161303 CNRAF 167497 CNRAG 153290 CNRBG 166070 CNR39 610762 CNRAJ 152310 CNRBG 166060 CNRAG 159920 CNRAG 156520 CNRAH 207522 CNRAG 150711 CNRAF 172750 CNRAH 140750 CNRAH 230040 CNRAH 238400 CNRAH 267020 CNRAH 267030 CNRAH 267040 CNRAH 238410 CNRBC 315442 CNRBC 315462 CNRAE 136091 CNRAH 248024 CN...

Page 10: ...CNR38 1143A0 CNR38 191551 CNR38 191551 CNR38 1754A3 4 2 2 3 7 2 4 2 2 3 7 2 4 2 2 3 7 2 Screws FIX TRIM EVA FIX TABLE FIX BUTTON GRILL FRONT FIX HINGE TOP FIX PLATEFORM FIX HINGE BOTTOM Part name Ref No Part No Safety Remark Model Qty 181MS1N 181MK1N 181MT1N PACKING AS BOTTOM TRAY AS PLASTIC COVER TOP PAD L TOP PAD R INSTRUCTION BOOK PAPER PROTECTOR FRONT CNRBK 118750 CNRBK 118760 CNRBK 118770 CNR...

Reviews: