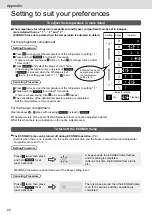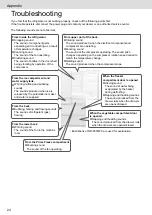
20
Appendix
Cleaning, removing and re-installing
Trays / Slide tray (made of glass)
Once every 3 months
■
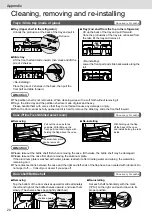
Tray (Upper shelf in the refrigerator)
Unhook the protrusion at the back of the tray and pull it.
Protrusion
■
Slide tray
■
Tray (2nd shelf from the top in the refrigerator)
Lift up the back of the tray and pull it forward.
Once the protrusions of the tray are unhooked from
the rails, tilt the tray and remove it.
Lift the front half and slide inward, then stack and lift the
pile of 2 shelves.
<Re-installing>
Place the pile of 2 shelves in the back, then pull the
front half and slide forward.
<Re-installing>
Lower the front part and slide backwards along the
rail.
Attention
●
The partition shelf is not removable. When cleaning, wipe with a soft cloth without removing it.
●
Trays, the slide tray and the partition shelf are made of glass and heavy.
Please handle them with care so that they do not fall and cause any damage or injury.
●
When the door cannot be fully opened and it is hard to remove the slide tray, slide the front half inward.
Case (Prime Fresh/Chilled select room)
Once every 3 months
■
Removing
The aluminum plate
can be removed.
Pull out the case as far as
possible. With lifting up the
front, pull it out at an angle with
holding the flap above the case.
■
Re-installing
With holding up the flap,
lift the back of the case
and install it along the rails
inside.
Attention
●
Please take out the bottle shelf first when removing the case. (Otherwise, the bottle shelf may be damaged.)
●
Please take out the case first when removing the aluminum plate.
If the aluminum plate is washed with water, please reattach it after draining water and wiping the waterdrop
remaining on it.
●
The contact sections between the case and the right and left ends of the flap have been coated with lubricant. Do
not wipe it off. → Consult your dealer if you wipe off.
Door shelf/Bottle shelf
Once every 3 months
■
Removing
Tap the bottom of the door shelves upward or slide alternately
the left and right of the bottle shelves upward, and raise them
slowly. (The shelves have been tightly attached.)
Slide the
shelves upward.
■
Re-installing
Set each shelf horizontally, with the mark
[>PS<] on the right, and push it down to its
proper position.
Summary of Contents for NR-F657WX-X3
Page 31: ...31 iso butane...
Page 32: ...32 3...
Page 33: ...33...
Page 34: ...34 1 30 50 5 15 15 90 47 49 2 4 5 57...
Page 39: ...39 30 30...
Page 42: ...42 49 49 100 100 24 49 1 2...
Page 48: ...48 PS...
Page 49: ...49 57 43 43 AUTO ICE OFF FRONT...
Page 51: ...51 COOLING ASSIST COOLING ASSIST 44 3 10 1 2 3 3 Prime Freeze 3 CL CL CL...
Page 52: ...52 NR F657WX Prime Freeze...
Page 53: ...53 34 34 35 50 60 30 50 50 24 AUTO ICE OFF 43 43 49 42 AUTO ICE OFF 10 1 2 3 36...
Page 55: ...55 FRESH FREEZING QUICK ICE MAKING 7 47 49 56 34 34 43 49 34 2 cm 15 43 AUTO ICE OFF 43...
Page 56: ...56 LED U 10 Prime Freeze LED 1 3 5 5 2 5 ECONAVI nanoe X H dd 10...
Page 58: ...58 Memo...
Page 59: ...59...


