background image

40

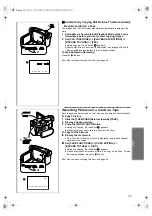
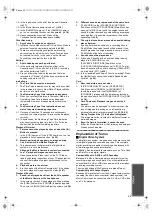
Formatting a Card 

If a Card becomes unreadable by the Movie Camera, formatting it may make 
it reusable. Formatting erases all the data recorded on a Card.

1

Set [CARD FUNCTIONS] >> [CARD EDITING] >> 
[CARD FORMAT] >> [YES].

Since a confirmation message appears, select [YES] and formatting will 
be carried out.

When the formatting is completed, the screen becomes white.

It may not be possible to use the Card which was formatted using this 
Movie Camera on another unit. In this case, format the Card on the unit 
which will be using the Card. Take steps to ensure that valuable 
pictures are stored on the  personal computer, etc. as well before 
proceeding.

~~~~~~~~~~~~~~~~~~~~~~~~

Writing Printing Data on a Card

(DPOF Setting)
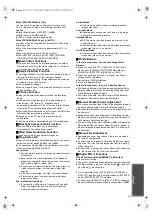
DPOF Setting Printing data (DPOF Settings), such as the number of images 
to be printed, can be written to the Card. “DPOF” means Digital Print Order 
Format.

1

Set [CARD FUNCTIONS] >> [CARD EDITING] >> 
[DPOF SETTING] >> [YES] >> [VARIABLE].

To print all pictures one at a time, select [ALL 1]. When all images are 
not printed, select [ALL 0].

2

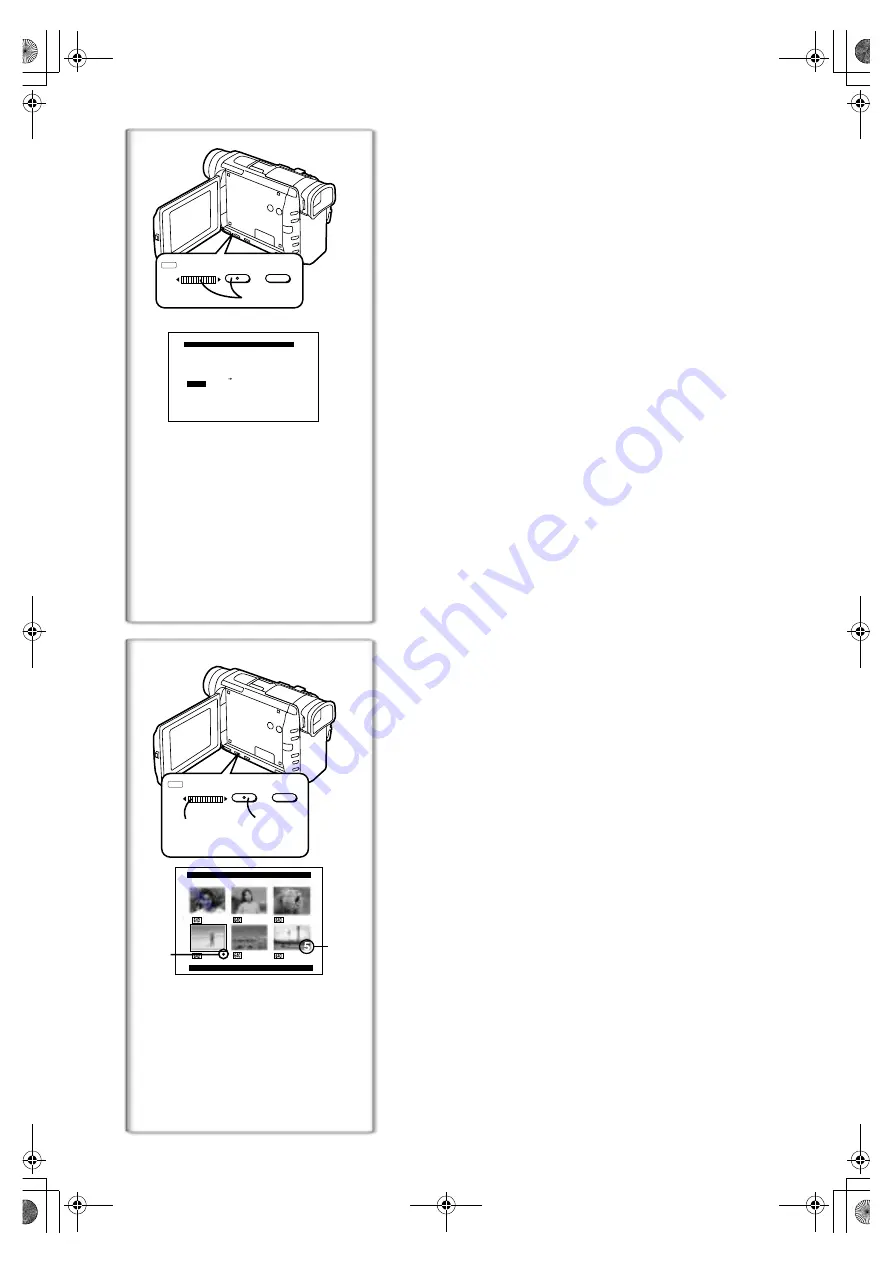
Select a desired picture and press the [PUSH] Dial.

The selected picture is marked with a frame.

The number of prints set by DPOF 

1

 is displayed.

3

Turn the [PUSH] Dial and select the number of pictures to be 
printed, and press the [PUSH] Dial.

[

µ

] Indication 

is displayed in the picture set.

4

Repeat Step 2 and 3 and press the [MENU] Button when the 
setup is completed.

To Verify DPOF Setting

Select [VERIFY] in Step 1 above. The pictures for which 1 or more print is set 
in DPOF are played back continuously.

For other notes concerning this item, see page 45.

FORMAT WILL ERASE
ALL PICTURES, MUSIC
FILES AND PRESET TITLES
  NO  ---  RETURN

  YES

CARD FORMAT

1

W.B/SHUTTER/IRIS/MF/VOL/JOG

MENU

MENU

FOCUS

FOCUS

PUSH

DPOF SETTING

(PRINT QUANTITY)

PRESS MENU TO EXIT

2

1

1, 2,
3, 4

1, 4

W.B/SHUTTER/IRIS/MF/VOL/JOG

MENU

MENU

FOCUS

FOCUS

PUSH

A.book  40 ページ  2001年7月28日 土曜日 午前9時27分

Summary of Contents for NV-DS88A

Page 1: ...Digital Video Camera Operating Instructions Before use please read these instructions completely VQT9361 Model No NV DS88A A book 1 ページ 2001年7月28日 土曜日 午前9時27分 ...

Page 2: ... recorded tapes or discs or other published or broadcast material for purposes other than your own private use may infringe copyright laws Even for the purpose of private use recording of certain material may be restricted Windows is a trademark or registered trademark of Microsoft Corporation U S A SD Logo is a trademark All other company and product names in the operating instructions are tradem...

Page 3: ...al Iris Adjustment 24 Manual Focus Adjustment 24 Digital Effect Functions 25 VCR Mode Playing Back 26 Finding a Scene You Want to Play Back 26 Slow Motion Playback 27 Still Playback Still Advance Playback 27 Finding the End of Recording 27 Index Search Functions 28 Playback Digital Effect Functions 29 Playback Zoom Function 29 Playing Back on Your TV 30 Audio Dubbing 30 Copying on an S VHS or a VH...

Page 4: ...Stereo Zoom Microphone VW VMS1E 13 Stereo Microphone VW VMS2E 14 Shoe Adaptor VW SK11E 15 Tripod VZ CT55E 16 Tripod with Remote Controller VZ CTR1E 17 Editing Controller VW EC500E VW EC1E 18 Personal Computer Connection Kit VW DTA10E A VW DTA9E 19 Edit Cable VW K8E 20 Edit Terminal Conversion Adaptor VW CE1E 21 DV Cable VW CD1E 22 SD Memory Card Application Software VW SWA1E TitleStudio software f...

Page 5: ...ght and pull down to open the Cassette Compartment Cover Insert the Cassette Press the PUSH CLOSE 2 to load the Cassette Close the Lower Compartment Cover 4 Turn the Movie Camera on and start recording l 12 18 Slide the 3 Switch to ON The CAMERA Lamp lights up Press the 4 Button Recording starts Press the 4 Button again to pause the recording Viewing What Has Been Recorded 5 Switch to the VCR Mode...

Page 6: ...18 10 Multi Function Dial PUSH l 13 22 24 26 11 Menu Button MENU l 13 12 Focus Button FOCUS l 24 13 Mode Selector Switch AUTO MNL l 18 22 23 24 14 Accessory Shoe Accessories such as a stereo microphone VW VMS2E optional are attached here 15 Lens Hood l 48 16 Lens 17 Microphone built in stereo l 19 18 White Balance Sensor l 50 Remote Control Sensor l 9 19 Recording Lamp l 18 20 DV Terminal i LINK l...

Page 7: ... 38 Card Slot Cover l 34 39 Cassette Compartment Window 40 Grip Belt l 11 41 Cassette Holder l 11 42 Upper Cassette Compartment Cover l 11 43 Cassette Eject Lever OPEN EJECT l 11 44 Lower Cassette Compartment Cover 45 Tripod Receptacle Used for mounting the Movie Camera on an optional tripod 46 S Video Input Output Socket S VIDEO IN OUT l 30 31 32 47 Edit Socket EDITD MINI l 32 USB Socket DIGITAL ...

Page 8: ...41 2 Indication Output Button OSD l 30 3 Counter Indication Shift Button COUNTER l 41 4 Reset Button RESET l 50 5 Recording Button REC l 31 32 6 Audio Dubbing Button A DUB l 30 7 Cursor Buttons for Variable Speed Search Function π l 26 Direction Buttons for Playback Zoom Function π l 29 8 Slow Motion Still Advance Buttons E D E reverse D forward l 27 9 Index Search Buttons 9 reverse 9 forward l 28...

Page 9: ...ery out of the reach of children Never put Button Type battery in mouth If swallowed call your doctor ªUsing the Remote Controller 1 Direct the Remote Controller to the Remote Control Sensor of the Movie Camera and press an appropriate button Distance from the Movie Camera Within approximately 5 metres Angle Within approximately 15o in the vertical and horizontal directions from the central axis T...

Page 10: ...ging is completed 2 Attach the charged Battery to the Movie Camera Disconnecting the Power Source Set the OFF ON MODE Switch 1 to OFF and while pressing the PUSH BATT Button 2 slide the Battery or DC Cable upward to disconnect it ªUsing the Car Battery Charger If you use the Car Battery Charger VW KBD2E optional you can supply power to the Movie Camera and charge the battery inside your car For fu...

Page 11: ...the Shoulder Strap through the Shoulder Strap Holder on the Movie Camera 2 Fold the tip of the Shoulder Strap run it through the Shoulder Strap Length Adjuster and pull it Pull it out more than 2 cm 1 from the Shoulder Strap Length Adjuster so that it cannot slip off Inserting a Cassette When power is supplied to the Movie Camera the Cassette can be taken out without turning the Movie Camera ON 1 ...

Page 12: ...ring the LCD Monitor out about 90o in the direction of the arrow The Viewfinder goes off 2 2 2 2 Adjust the LCD Monitor angle according to the desired recording angle The LCD Monitor can rotate a maximum of 180o 2 from the vertical position to the upward direction and a maximum of 90o 3 to the downward direction Forcefully rotating the LCD Monitor beyond these ranges will damage the Movie Camera C...

Page 13: ... Button on the Remote Controller l 8 To Exit the Menu Screen Press the MENU Button again About the Menu Mode Setting The setting selected on the Menu will be retained even when the Movie Camera is turned off However if the Battery or AC Adaptor is disconnected before turning off the Movie Camera the selected setup may not be retained But the setups of EFFECT2 l 25 are not retained Menu operation f...

Page 14: ...g CINEMA l 21 6 Returning to the Main Menu RETURN If you set RETURN to YES the menu changes back to the Main Menu DIGITAL EFFECT Sub Menu 7 Digital Effects 1 EFFECT1 l 25 8 Digital Effects 2 EFFECT2 l 25 CARD SETUP Sub Menu 9 Picture Quality PICTURE QUALITY l 34 10 Title Creation CREATE TITLE l 38 RECORDING SETUP Sub Menu 11 Recording Speed Mode REC SPEED l 17 12 Audio Recording Mode AUDIO REC l 1...

Page 15: ...T PICTURE QUALITY FINE NORMAL ECONOMY RETURN YES YES CREATE TITLE VCR Mode Main Menu VCR FUNCTIONS PLAYBACK FUNCTIONS Sub Menu 1 Blank Search BLANK SEARCH l 27 2 Recording to Card RECORD TO CARD l 35 3 Automatic Printing AUTO PRINT l 32 4 Index Search Mode SEARCH l 28 5 Audio Selector 12bit AUDIO l 30 6 Audio Output Mode AUDIO OUT l 44 7 Returning to the Main Menu RETURN DIGITAL EFFECT Sub Menu 8 ...

Page 16: ...ding pictures by number appears l 36 12 ERASE PICTURE The ERASE PICTURE Menu for erasing the picture being displayed appears l 39 Use this Menu after the picture to be erased appears 13 FILE LOCK The FILE LOCK Menu for avoiding accidental erasure of pictures Lock Setting being displayed appears l 39 Use this Menu after the picture to be locked appears 14 DPOF SETTING The DPOF SETTING Menu for sett...

Page 17: ...ium battery is near exhaustion 1 Connect the AC Adaptor to the Movie Camera with the power turned off and then connect to the AC Mains socket After charging for 4 hours the built in lithium battery can power the clock for approximately 3 months LP Mode A desired recording speed can be selected with REC SPEED on the RECORDING SETUP Sub Menu If LP Mode is selected the recording time becomes 1 5 time...

Page 18: ...recorded scene The CHK Indication is displayed After checking the Movie Camera resumes the Recording Pause Mode ªTo View the Recorded Scene while the Recording Is Paused Camera Search The recorded scene can be viewed by keep pressing the SEARCHj Button 6 or SEARCHi Button 7 in the Recording Pause Mode When the SEARCHj Button is pressed images are played back in the reverse direction When the SEARC...

Page 19: ...licking sound is recorded ªDigital Still Picture When the STILL Button 2 is pressed images become still pictures When the button is pressed again the Digital Still Picture Mode is cancelled We recommend that you press the STILL Button first at the position where you wish to record the picture so as to enter the Digital Still Picture Mode and then press the PHOTO SHOT Button For other notes concern...

Page 20: ...rected If the Movie Camera shakes too much this function may not be able to stabilize images 1 Set CAMERA FUNCTIONS CAMERA SETUP SIS ON The Indication 1 appears To Cancel Image Stabilizer Set SIS on the CAMERA SETUP Sub Menu to OFF For other notes concerning this item see page 43 Fade In Out Functions Fade In 1 Fade In brings out images and sounds gradually from a black screen at the beginning of ...

Page 21: ...from behind a recording subject 1 Press the BLC Button The ª Indication 1 flashes and then is displayed To Resume Normal Recording Press the BLC Button When the BLC Button is pressed the entire screen becomes brighter By operating the OFF ON MODE Switch the Backlight Compensation Function is cancelled For other notes concerning this item see page 43 Wind Noise Reduction Function This function redu...

Page 22: ...3 Recording in Natural Colours White Balance Depending on the scene or light condition the Automatic White Balance Adjustment Mode may not be able to bring out natural colours l 23 50 In such a case the white balance can be adjusted manually When power is turned on with the Lens Cap on the Automatic White Balance Adjustment may not function properly Please turn on the Movie Camera after removing t...

Page 23: ...during recording Otherwise White Balance will not function normally The red light from the Tally Lamp 2 will be reflected off your hand or object possibly causing the White Balance sensor to operate incorrectly and changing the colouring Outside of the effective range of Automatic White Balance Adjustment the image will become reddish or bluish Even within the effective range of Automatic White Ba...

Page 24: ...is used Iris adjustment is by OPi15dB When a value closer to CLOSE is selected the image becomes darker When a value closer to OPi18dB is selected the image becomes brighter The value to which idB is attached indicates a Gain up value If this value is too large the quality of the image deteriorates To Resume Automatic Adjustment Set the Mode Selector Switch to AUTO For other notes concerning this ...

Page 25: ...T2 a desired Digital Effect To Cancel the Digital Effect Set CAMERA FUNCTIONS DIGITAL EFFECT EFFECT1 or EFFECT2 OFF If the Movie Camera is turned off the EFFECT2 settings are cancelled For other notes concerning this item see page 43 ªWipe Mode and Mix Mode Wipe Mode Like a curtain is being pulled the still picture of the last recorded scene gradually changes to the moving image of a new scene Mix...

Page 26: ...me cannot be adjusted using the Remote Controller in Playback Zoom Mode l 29 If a cassette recorded with a copyright protection signal is played back the picture is distorted by mosaic like patterns For other notes concerning this item see page 44 Finding a Scene You Want to Play Back ªCue Review Playback If the 5 Button 1 or 6 Button 2 is pressed during Playback it turns to Cue Playback A or Revi...

Page 27: ...of the Movie Camera in the Still Playback Mode still pictures can be advanced one frame at a time in the forward or backward direction If the Movie Camera is left in the Still Playback Mode for more than 6 minutes the Movie Camera switches to the Stop Mode to protect the video heads from excessive wear and tear Finding the End of Recording Blank Search Function The Blank Search Function aids you l...

Page 28: ...S SEARCH PHOTO 2 Press the 9 Button 1 or Button 2 on the Remote Controller With each press of the corresponding button still pictures recorded in Photoshot Mode are searched Sounds are played back for approximately 4 seconds ªScene Index Search 1 Set VCR FUNCTIONS PLAYBACK FUNCTIONS SEARCH SCENE 2 Press the 9 Button or Button on the Remote Controller When the corresponding button is pressed once t...

Page 29: ...Controller during playback If the OFF ON Button is pressed while Wipe or Mix is carried out the effect will stop temporarily at that point Pressing the OFF ON Button again will bring back the effect Playback Zoom Function A part of the image can be enlarged up to 10 times during playback 1 During playback press the P B ZOOM Button on the Remote Controller The centre of the image is enlarged to app...

Page 30: ...performed on a recording done in LP Mode l 17 1 Set VCR FUNCTIONS AV IN OUT SETUP AV JACK IN OUT 2 Continuing the aforesaid setup select A DUB INPUT MIC or AV IN Set to AV IN when external device is used and to MIC when an external or built in microphone is used 3 Switch the Movie Camera over to the Still Playback Mode where you want to add new sound 4 Press the A DUB Button on the Remote Controll...

Page 31: ...nsert an unrecorded Cassette with an erasure prevention tab If various setups such as external input tape speed etc are required please refer to the operating instructions of your VCR Movie Camera 3 Press the 1 Button to start playback VCR 4 Start recording 5 Press the Pause or Stop Button to stop recording Movie Camera 6 Press the Button to stop playback 1 S Video Cable not supplied 2 AV Cable Re...

Page 32: ... Socket and your Movie Camera you can automatically print out the still pictures with the Photoshot Index l 28 After making connections in the figure set up the Video Printer as necessary 1 1 1 1 Search for the Still Picture where you want to start printing with the Automatic Printing Function If you want to print all the still pictures recorded on the Cassette rewind the tape back to the beginnin...

Page 33: ...u can import still pictures into your personal computer 1 Install the supplied USB driver 2 Set the Movie Camera to Card Playback Mode 3 Set the Movie Camera to Still Playback Mode 4 Connect the supplied USB Cable 1 to DIGITAL to USB Socket 2 It enters PC connection mode The USB Connection Kit can be used with Windows98 Second Edition Me 2000 Use AC Adaptor as power source for the Movie Camera The...

Page 34: ...n be recorded on a Card from the Movie Camera lens as well as from scenes that have already been recorded on a cassette ªCard Photoshot Recording from the Movie Camera Lens CAMERA Mode 1 Slide the TAPE CARD Selector towards CARD 2 Press the PHOTO SHOT Button If nothing is recorded for approximately 6 minutes the Movie Camera is turned off automatically When the TAPE CARD Selector is set to CARD yo...

Page 35: ...utomatically To Copy 1 Picture 1 Slide the TAPE CARD Selector towards TAPE 2 Display a desired picture 3 Press the PHOTO SHOT Button During the copying the Indication 1 appears It takes a few seconds to record a picture to the Tape To Copy All the Pictures 1 1 1 1 Display the first picture If a picture other than the first one is displayed only the subsequent pictures will be copied 2 2 2 2 Set CA...

Page 36: ...5 Picture Size 6 File Number 7 File Name Using Picture Search Mode 1 Set CARD FUNCTIONS CARD EDITING PICTURE SEARCH YES 2 Turn the PUSH Dial and select the desired file number and press the PUSH Dial 8 For other notes concerning this item see page 45 Slide Show The recorded still pictures in the Card can be played back like a Slide Show To Play Back All the Pictures Continuously 1 Set CARD FUNCTIO...

Page 37: ... Has Been Set You must set SLIDE SHOW EDIT first 1 1 1 1 Set CARD FUNCTIONS CARD EDITING SLIDE SHOW YES SLIDE SHOW PRESET 2 2 2 2 Press the 1 Button The M SLIDE Indication is displayed 4 To Verify the Selected Picture Set CARD FUNCTIONS CARD EDITING SLIDE SHOW YES VERIFY YES Only the selected pictures are displayed in Multi Picture Mode in the Playback order To Delete the Selected Picture 1 Set CA...

Page 38: ...erning this item see page 45 Adding a Title A title can be added to the picture It is displayed in Camera Mode VCR Mode and Card Playback Mode 1 Press the TITLE Button The title is displayed 2 Press CARD MULTI Button A list of titles is displayed 1 3 Turn the PUSH Dial to select a desired title The selected title is marked with a frame 4 Press the PUSH Dial or press the CARD MULTI Button The selec...

Page 39: ...o Select and Delete Pictures 1 Set CARD FUNCTIONS ERASE PICTURE TITLE ERASE PICTURE BY SELECTION To erase a title select ERASE TITLE BY SELECTION 2 Select the picture you wish to delete and press the PUSH Dial The frame around the selected picture flashes To erase 2 pictures or more repeat this step 3 Press the PHOTO SHOT Button A verification message appears 4 Select YES and press the PUSH Dial T...

Page 40: ...rder Format 1 Set CARD FUNCTIONS CARD EDITING DPOF SETTING YES VARIABLE To print all pictures one at a time select ALL 1 When all images are not printed select ALL 0 2 Select a desired picture and press the PUSH Dial The selected picture is marked with a frame The number of prints set by DPOF 1 is displayed 3 Turn the PUSH Dial and select the number of pictures to be printed and press the PUSH Dia...

Page 41: ...dication appears l 24 SLIDE Slide Show Playback l 36 SLIDE Slide Show Playback Pause l 36 M SLIDE Manual Slide Show Playback l 37 M SLIDE Manual Slide Show Playback Pause l 37 F2 4 When you adjust the F Number manually this indication appears l 24 AWB Automatic White Balance Mode l 22 1 White Balance setting Mode l 22 z Outdoor Mode l 22 Indoor Mode recording under incandescent lamp l 22 Z MIC Zoo...

Page 42: ...ing Removing the Cassette In the case of using a previously recorded Cassette you can use the Camera Search Function to find the position where you want to continue recording If a new Cassette is inserted rewind to the beginning of the tape before starting recording When inserting the cassette make sure it faces in the right direction and then push it in until it stops When opening or closing the ...

Page 43: ...cord a still picture in Progressive Photoshot Mode the brightness and hue of the recorded still picture may become unstable Portrait Mode If this mode is used for indoor recording playback images may flicker Low Light Mode Extremely dark scenes may not be able to be made brighter to a satisfactory degree Spotlight Mode With this mode recorded images may turn out to be extremely dark If the recordi...

Page 44: ...ller ªPlaying Back on Your TV If you set AV JACK on the AV IN OUT SETUP Sub Menu to IN OUT nothing will be shown on the TV screen except during playback ªAudio Dubbing The blank section of a tape cannot be dubbed Sounds sent through the DV Terminal cannot be dubbed If a tape has a non recorded portion when the tape is dubbed images and sounds may be disturbed when this portion of the tape is playe...

Page 45: ...l Still Picture Terminal If you press the TITLE Button the last original title is displayed When an original title is not created the preset title is displayed Original titles are added after the preset titles ªLock Setting The Lock Setting carried out by this Movie Camera is only effective for this Movie Camera The SD Memory Card has a write protection switch on it If the switch is moved to the L...

Page 46: ... contact with the Movie Camera for a long period of time Do not use benzine thinner or alcohol for cleaning the Movie Camera The camera body may be deformed and the surface finish may peel off Before cleaning detach the Battery or pull out the AC Mains Lead from the AC mains socket Wipe the Movie Camera with a soft dry cloth To remove stubborn stains wipe with a cloth that is soaked in a detergent...

Page 47: ...conditions such as temperature humidity dust etc ªOptimal Use of the Battery Battery Characteristics This Battery is a rechargeable lithium ion battery Its ability to generate power is based upon the chemical reaction that takes place inside it This reaction is susceptible to the surrounding temperature and humidity and if the temperature is too high or too low the operating time of the Battery be...

Page 48: ...to it it is not practical to look in the Viewfinder from behind the Battery In this case lift up the Viewfinder to an easy to see angle Extremely high precision technology is employed to produce the Viewfinder screen featuring a total of approximately 113 000 pixels The result is more than 99 99 effective pixels with a mere 0 01 of the pixels inactive or always lit However this is not a malfunctio...

Page 49: ...phones 1 Is the volume too low During playback keep pressing the PUSH Dial until the VOLUME Indication appears Then turn the PUSH Dial to adjust the volume l 26 2 Different sounds are reproduced at the same time 2 12bit AUDIO on the PLAYBACK FUNCTIONS Sub Menu of the VCR FUNCTIONS Main Menu has been set to MIX As a result the original sound and sound that was recorded by audio dubbing are played b...

Page 50: ...hue of light that it receives through the Lens and White Balance Sensor l 6 thereby judging the recording condition and selects the closest hue setting This function is called Automatic White Balance Adjustment However since white balance settings for only several kinds of light sources are stored the Auto White Balance Function does not operate properly when recording occurs under light that is o...

Page 51: ...put Level Line 316 mV 600 ohm Video Input Level 1 0 Vp p 75 ohm S Video Input Level Y Input 1 0 Vp p 75 ohm C Input 0 286 Vp p 75 ohm Audio Input Level Line 316 mV 10 kohm or more Mic Input Mic sensitivity 50 dB 0 dB 1 V Pa 1 kHz Stereo mini jack Digital Still Picture Digital Still Picture Output Control Signal Input Output Transfer rate max 115 kbps USB Mini SystemD Card reader writer function US...

Page 52: ... Close up 19 Manual Focus 24 Memory Stop 50 Menu Screen 13 Microphone 19 Mirror Mode 25 Mix Mode 25 Mosaic Mode 25 ªN Negative Mode 25 ªP Photoshot 19 34 Picture Search Mode 36 Picture Size 36 Playback Digital Effects 29 Playback Zoom 29 Portrait Mode 22 Programme AE 22 ªR Recording Check 18 Recording Pause Mode 18 Recording Speed 17 Remaining Tape Time 41 Remote Controller 8 Repeat Playback 44 Re...

Page 53: ...53 A book 53 ページ 2001年7月28日 土曜日 午前9時27分 ...

Page 54: ...54 A book 54 ページ 2001年7月28日 土曜日 午前9時27分 ...

Page 55: ...55 A book 55 ページ 2001年7月28日 土曜日 午前9時27分 ...

Page 56: ...A VQT9361 F0801Me0 530 A C Matsushita Electric Industrial Co Ltd Web site http www panasonic co jp global A book 56 ページ 2001年7月28日 土曜日 午前9時27分 ...

Reviews: