background image

Setting up

VCR

TV

  Aerial

(not supplied)

21-pin Scart cable

(not supplied)

RF Coaxial Cable

(supplied)

Note:

n

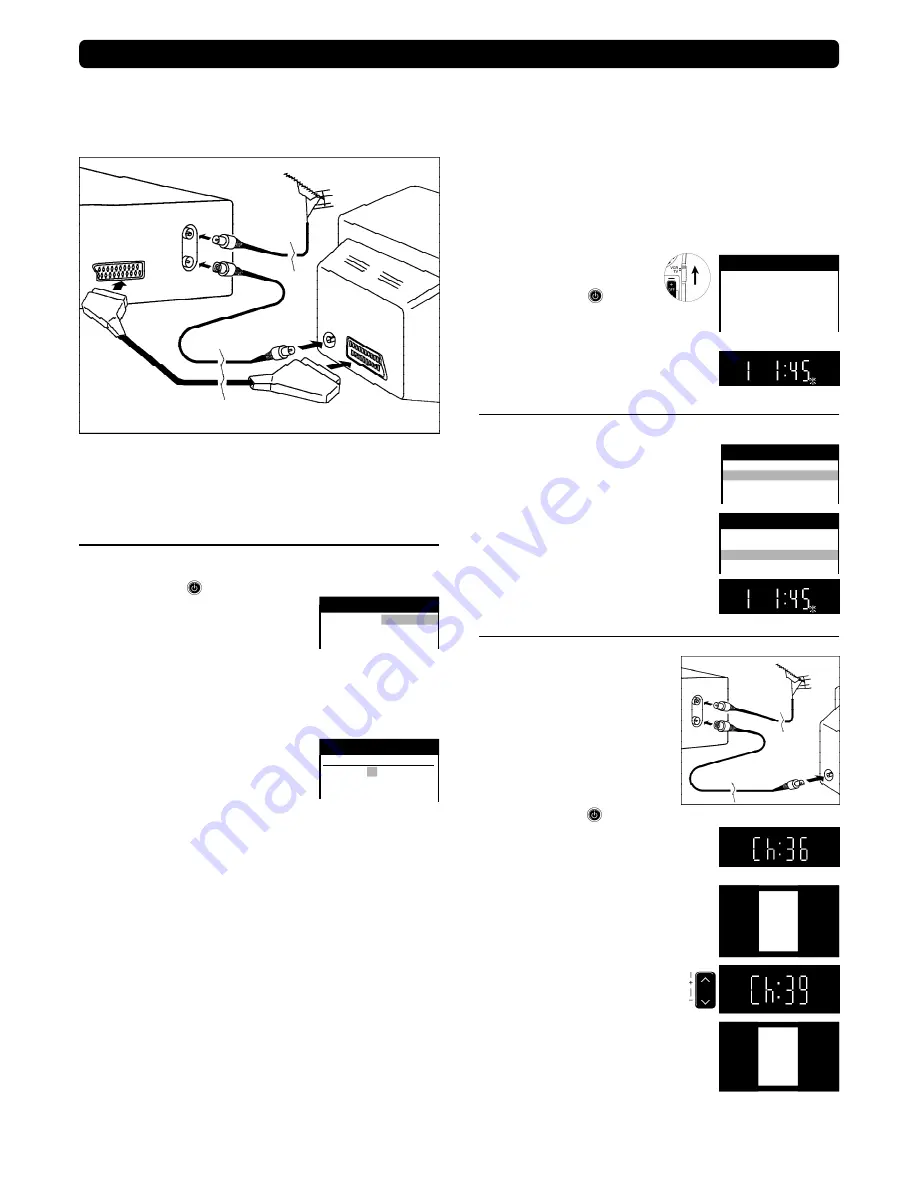
The RF (radio frequency) coaxial cable must be connected for TV
reception, even if the video recorder is already connected with
a 21-pin Scart cable.

n

More information about the remote control buttons and of cursors,
see page 4-5.

Set up the connections shown here, and connect the mains lead
(supplied) to your AC mains.

If you want to connect the TV
only with a RF Coaxial Cable

(supplied), you must ensure that
the video output channel is adjusted
to the input channel of the TV.

For this purpose, please also read
the operating instructions for your TV.

n

Switch on the VCR


n

Press the 

m

 Button for about 7

seconds until the number of the channel
appears on the VCR display
(the pre-setting is channel 36).

n

Tune the TV until the test screen appears.
A distorted picture on the 

channel

 can be

reduced, by adjusting the VCR and the TV
to another channel.

n

Use this button to select
the channel number (e.g. channel 39).

n

Tune the TV until the test screen appears.

n

To store this adjustment, press


o


.

n

After that, please continue with the

Automatic Setting

with the [Country] setting menu.

On Screen Display

VCR

Ch:36


VCR display

VQT9524

3

Automatic Setting without Q Link

n

Switch on the VCR


and the [Country] setting menu will appear.

n

Use the cursors 

:;8


9

 on the

remote control to select your country.

n

After pressing 

o

, all the TV stations

which can be received will be tuned
automatically in about 5 minutes.

n

When the menu  [Clock setting] appears,
use the cursors 

:;8


9

 on

the remote control to select
the Time and Date manually.

n

To end this procedure, press 

o

.

n

To cancel this settings press 

e

.

Notes:

n

If the selection for the Country menu does not appear
after switching on the VCR, you can restart the  Automatic Setting;
see page 8.

n

An incorrect setting of Time or Date (observe summer- and wintertime)
will influence the Timer recording.

n

If you select the country [Suisse] the menu [Power save] will appear.
Select the settings with the cursors 

:;

 and store with 

o

 .

More information see on page 9.

Notes about


:

(for NV-FJ631, NV-FJ630, NV-FJ626)

n

Following systems from other manufacturers

have similar function with Q Link from Panasonic.

n

List of registered trademarks:

Q Link (Panasonic), DATA LOGIC (Metz), Easy Link (Philips),

Megalogic (Grundig), SMARTLINK (Sony)

On Screen Display


Panasonic     VCR

 Country

Belgien

Deutschland

Belgique

Österreich

Belgi

ê

Portugal


Panasonic     VCR

Clock setting

Clock setting  :  MAN.
Time

: 20:30:24

Date

: 21.03.01

RF Coaxial Cable

(supplied)

TV

VCR

AV

RF IN

RF OUT

VCR

Ch:39

Automatic Setting with Q Link

(for NV-FJ631, NV-FJ630, NV-FJ626)
If your TV is equipped with Q Link or with a similar function from other
manufacturers (see notes), the TV programme positions can be
downloaded with a fully-wired 21-pin Scart cable (not supplied).

The programme positions must be tuned on the TV first.

n

Connect the Scart cable.

n

Set the AV channel of the TV.

n

Set the remote control to VCR.

n

Switch on the VCR


 .

n

Downloading of the TV data starts.

n

When the indication appears on
the VCR display, the downloading
is complete.

Download in
progress,
please wait.

Position               49

                               Panasonic VCR

Download

On Screen Display


VCR display

Manual download start

(for NV-FJ631, NV-FJ630, NV-FJ626)

n

Set the AV channel of the TV.

n

press 

m

n

Select [Tuning] 

;

n

Access by pressing 

o

n

Select [Download]

;

n

Press 

o

n

Confirm by pressing 

o

n

When the indication appears on
the VCR display, the downloading
is complete.


Panasonic     VCR

 Tuning

Manual
Auto-Setup Restart
Download
Shipping condition


Panasonic     VCR

 Main menu

Timer recording
Tuning
Clock setting
Other settings

Connecting and Setting up

Summary of Contents for NV-FJ623

Page 1: ...30 Series Hi Fi NV FJ626 Series Hi Fi NV FJ623 Series Hi Fi Controls Operations 12 OSD On Screen Display VCR Video Cassette Recorder TV Television Troubleshooting 13 Index Specifications 16 Amplifier Decoder Page Operating Instructions Video Cassette Recorder N2QAKB000022 Model NV FJ623 N2QAHB000022 Standard Accessories 1 remote control 1 RF coaxial cable 1 mains lead 2 batteries type R6 Model NV ...

Page 2: ...ck There are no user serviceable parts inside Refer all servicing to qualified service personnel n Only transport and set up this equipment in a horizontal position n Only connect cables when all the parts of this equipment are switched off n Only clean the outside of this equipment using a soft cloth and no cleaning fluid n The mains lead must not be used for other equipment n In case of rapid te...

Page 3: ...y menu does not appear after switching on the VCR you can restart the Automatic Setting see page 8 n An incorrect setting of Time or Date observe summer and wintertime will influence the Timer recording n If you select the country Suisse the menu Power save will appear Select the settings with the cursors and store with o More information see on page 9 Notes about for NV FJ631 NV FJ630 NV FJ626 n ...

Page 4: ...by pressing this button again or the Playback Button Slow Playback n Keepthisbuttonpresseddownontheremotecontrol for more than 2 seconds during playback n Resume normal playback by pressing the Playback Button Notes Topreservethevideoheads thefollowingfunctions areswitchedoffautomaticallyafter5 10minutes Distortedpicturesandtapetransportnoises duringthesefunctionsarenotfunctionalfaults n Forward S...

Page 5: ...thisbuttonrepeatedly Stereo sound Display L R Leftchannel Display L Rightchannel Display R Mono sound No display appears VCR Operation Operations TV Operation WiththisremotecontrolyoucanoperatesomePanasonicTV Please also read the operating instructions for your TV Switch the TV on and off Select the AV input on the TV Select the TV channel Operate the TV volume Model NV FJ626 NV FJ630 NV FJ631 Sel...

Page 6: ...eck the Remaining tape time look at the VCR display REMAIN Makesurethattheremainingtime on the cassette is longer than the time set for recording otherwise the whole programmes cannot be recorded n To store the programme press o n In order to preset other recordings repeat this procedure n Press to switch the VCR to Standby mode forTimer recording Make sure that the VCR display iappears n Switch o...

Page 7: ...e changed n Press to delete the Timer recording n Usetherelevantfunctionbuttons to change the entries n Press oto store these changes n Press to quit the menu Timer Recording with ShowView not for NV FJ623 Panasonic VCR Programme List Pos Name Date Start 1 01 27 10 17 44 2 01 28 10 15 00 Panasonic VCR Timer recording 1 2 Pos Start Stop VPS Name DATE ON OFF PDC 1 ARD 20 9 15 00 16 00 SP ON 2 3 Pana...

Page 8: ...n Set the Time and Date 89 n Store these settings by pressing o n Presse Restoring the original settings of the VCR Shipping condition n Press m n Select Tuning n Access by pressing o n Select Shipping condition n Press o n Confirm by pressing o Panasonic VCR Tuning Panasonic VCR Main menu Intro Jet Scan Function You can playback the beginning of each recording with the Intro Jet Scan Function Pre...

Page 9: ...dge of the screen the displays are not visible during playback in 16 9 format 16 9 displays are on the edge of the screen in 16 9 format the displays are in the centre of the screen in 4 3 format OFF No On Screen Displays Panasonic VCR Main menu Panasonic VCR Other settings Tape length AUTO 8E 240 SQPB AUTO Power save OFF VCR display DIMMED OSD 4 3 Timer recording Tuning Clock setting Other settin...

Page 10: ...ame Ch 33 33 125 34 35 35 23 Delete Add Move Setting a new Channel Add Delete Move a Channel on the list Pos 34 Name Channel 2 Fine tuning AUTO Video system PAL Panasonic VCR Tuning Pos Name Ch 33 33 125 34 35 35 23 colouredcommands n Press m n Select Tuning n Access by pressing o n Access Manual by pressing o n Search for an unused Channel position for rapid search keep the cursor button pressed ...

Page 11: ...cord it This notice is displayed on the screen In order to delete this notice presso To stop the recording press the EXT LINK Button on the VCR VCR display VCR now recording this programme EXT LINK2 Tocontrolexternalrecording with some Satellite or Digital Receiver Videosignal EXT LINK1 For a Digital Receiver which transmits a special control signal for recordings for example the F U N Receiver TU...

Page 12: ... Set the Channel to Decoder n Press m n Select Tuning n Access by pressing o n Access Manual by pressing o n Select the encoded channel n Access by pressing o n Select Decoder n Selecttheinputfield9 n Select the Decoder to ON the picture in the background should become clear n Store change by pressing o n Presse AV LINK Function You can select the TV or video reception with the button If video rec...

Page 13: ...V FJ630 NV FJ626 with an Audio cable not supplied to the stereo amplifier Take care on the direction of the connection left white L right red R L R With an special scart cable not supplied you can connect the VCR s AVoutwithanamplifier This is also possible with the NV FJ623 Amplifier ...

Page 14: ...with an intact erasure prevention tab see page 6 The Programmed recording function does not work n The time and date must be set correctly see page 8 TheVCRdoesnotrecord eventhoughtherecordinghasbeenprogrammed n Setthestarttimeandthetimetostoprecordingcorrectly and set the VCR on Standby Recording by pressing the TIMER Button see pages 6 7 n The VPS PDC function was used to set the recording but t...

Page 15: ...VCR No problem anymore This VCR can play back tapes in VHS quality which are recorded with the S VHS and S VHS ET format SQBP page 9 The Easy Guide OSD is directing you directlystepbysteptothedestination There is a big number of different individual Settings and languages with a quick overview ofallfunctions AUTO Long Play The Panasonic VCRs are equipped with a Jet Rewind Drive To rewind a E180 ca...

Page 16: ...ER 6 7 Timerrecording 6 7 TRACKING V LOCK 14 TV TEXT 5 TV ASPECT 5 TVOperation 5 VCR display 9 VCR Operation 5 Volume 5 VPS 6 Power supply 220 240 V AC 50 60 Hz Powerconsumption 18W in operation approx 3W in Power save Controls multifunctional remote control VCR and Panasonic TV VCR direct controls main functions Playbackfunctions PAL and NTSC Playback on PAL TV NV FJ630 NV FJ631 S VHS Quasi Playb...

Reviews: