background image

Others

77

VQT1A45

ª

LCD monitor/viewfinder

LCD monitor

When the LCD monitor gets dirty, wipe it with a 
dry soft cloth. 

In a place with drastic temperature changes, 
condensation may form on the LCD monitor. 
Wipe it with soft dry cloth.

If your movie camera is extremely cold, the LCD 
monitor is slightly darker than usual immediately 
after you turn the power on. However, as the 
internal temperature increases, it goes back to 
normal brightness.

Viewfinder

ª

Periodical check-ups

To maintain the highest image quality, we 
recommend replacing worn parts such as heads 
after approx. 1000 hours of use. (This, however, 
depends on operating conditions including 
temperature, humidity and dust.) 

Explanation of terms

ª

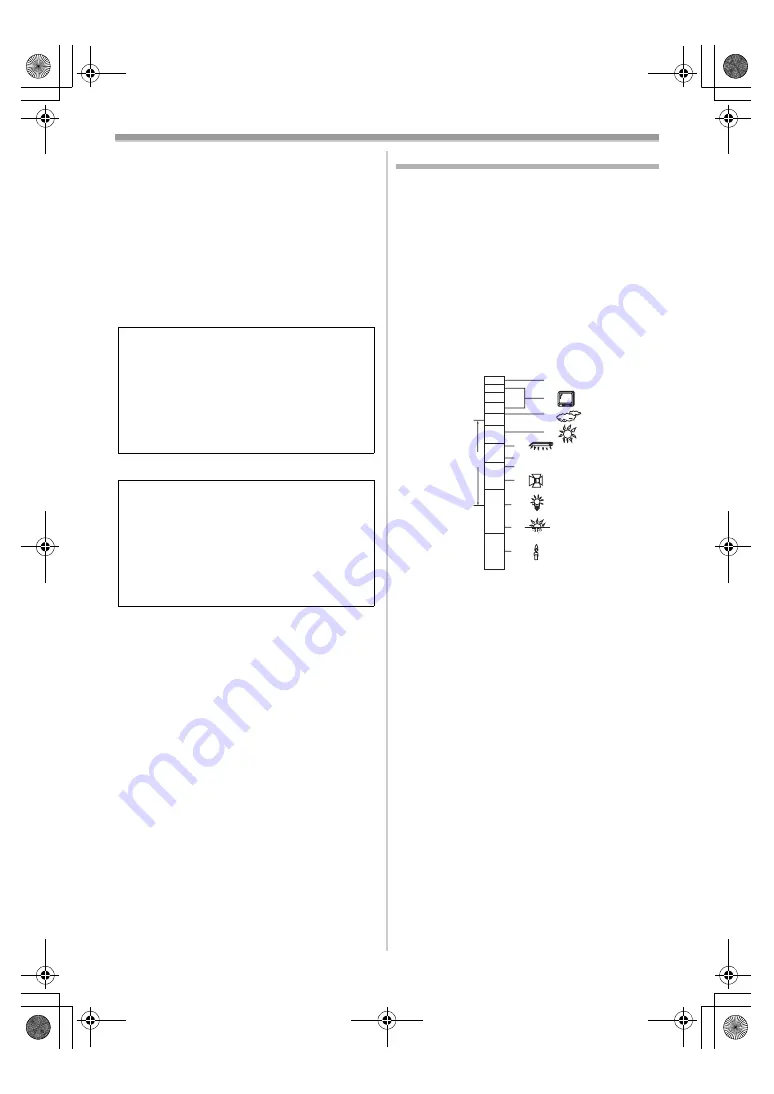
Automatic white balance

White balance adjustment recognizes the colour 
of light and adjusts so the white colour will 
become a pure white. The movie camera 
determines the hue of light that comes through 
the lens and white balance sensor, thereby 
judging the recording condition, and selects the 
closest hue setting. This is called automatic white 
balance adjustment. However, since the movie 
camera only stores white colour information 
under several light sources, automatic white 
balance adjustment does not function normally 
under the other light sources. 

Outside of the effective range of automatic white 
balance adjustment, the image will become 
reddish or bluish. Even within the effective range 
of automatic white balance adjustment, the 
automatic white balance adjustment may not 
function properly if there is more than one light 
source. For light outside the functional auto white 
balance adjustment range, use the manual white 
balance adjustment mode.
1) The effective range of automatic white 

balance adjustment on this movie camera

2) Blue sky
3) TV screen 
4) Cloudy sky (rain)
5) Sunlight
6) White fluorescent lamp
7) 2 hours after sunrise or before sunset
8) 1 hour after sunrise or before sunset
9) Halogen light bulb
10) Incandescent light bulb
11) Sunrise or sunset
12) Candlelight

Extremely high precision technology is 
employed to produce the LCD monitor 
screen featuring a total of approximately 
123,000 pixels. The result is more than 
99.99% effective pixels with a mere 0.01% of 
the pixels inactive or always lit. However, 
this is not a malfunction and does not affect 
the recorded picture.

Extremely high precision technology is 
employed to produce the viewfinder screen 
featuring a total of approximately 113,000 
pixels. The result is more than 99.99% 
effective pixels with a mere 0.01% of the 
pixels inactive or always lit. However, this is 
not a malfunction and does not affect the 
recorded picture.

2)

3)

4)

5)

6)

7)
8)

9)

10)

11)

12)

10 000K

9 000K
8 000K

7 000K

6 000K

5 000K

4 000K

3 000K

2 000K

1 000K

1)

VQT1A45_EP_ENG.book  77 ページ  2006年12月6日 水曜日 午前9時10分

Summary of Contents for NV-GS320

Page 1: ...bsługi Digital Video Camera Model No NV GS320 Before use please read these instructions completely Przed pierwszym włączeniem kamery prosimy o dokładne przeczytanie instrukcji obsługi VQT1A45 VQT1A45_EP_ENG book 1 ページ 2006年12月6日 水曜日 午前9時10分 ...
Page 2: ...l other company and product names in the operating instructions are trademarks or registered trademarks of their respective corporations Files recorded on SD Memory Card It may not be possible to play back the files on this Movie Camera recorded on and created by other equipment or vice versa For this reason check the compatibility of the equipment in advance WARNING TO REDUCE THE RISK OF FIRE ELE...

Page 3: ... accepted on a free of charge basis Alternatively in some countries you may be able to return your products to your local retailer upon the purchase of an equivalent new product Disposing of this product correctly will help to save valuable resources and prevent any potential negative effects on human health and the environment which could otherwise arise from inappropriate waste handling Please c...

Page 4: ...han one computer Article 5 Reverse Engineering Decompiling or Disassembly Licensee may not reverse engineer decompile or disassemble the Software except to the extent either of them is permitted under law or regulation of the country where Licensee resides Matsushita or its distributors will not be responsible for any defects in the Software or damage to Licensee caused by Licensee s reverse engin...

Page 5: ...S 33 Self timer recording 34 Wide 4 3 Function 34 Image stabilizer function 35 Guideline function 35 Recording in various situations Scene mode 36 Recording in natural colours White balance 37 Manual focus adjustment 38 Manual shutter speed aperture adjustment 38 Playback mode Playing back tape 40 Slow motion playback frame by frame playback 41 Variable speed search function 41 Playback on TV 42 P...

Page 6: ...ersion lens VW LT3714ME 9 Filter kit VW LF37WE 10 Video DC light VW LDC10E 11 Light bulb for video DC light VZ LL10E 12 Tripod VW CT45E 13 DV cable VW CD1E Some optional accessories may not be available in some countries Parts identification and handling ª Camera 1 White balance sensor 37 Remote control sensor 23 2 Grip belt 9 3 Lens LEICA DICOMAR 4 Microphone built in stereo 29 33 5 Mode select s...

Page 7: ...es such as a video DC light VW LDC10E optional are attached here 28 Cassette eject lever OPEN EJECT 15 29 Cassette cover 15 30 Zoom lever W T 29 Volume lever s VOLr 40 31 Photoshot button 27 Due to limitations in LCD production technology there may be some tiny bright or dark spots on the Viewfinder screen However this is not a malfunction and does not affect the recorded picture 8 9 10 11 12 13 1...

Page 8: ...for the Filter Kit When fitting the tele conversion lens VW LT3714ME optional or the wide conversion lens VW LW3707M3E optional first remove the lens hood Refer to the operating instructions for the tele conversion lens or the wide conversion lens When 2 lens accessories such as the ND filter and tele conversion lens are fitted and the W T lever is pressed toward the W side the 4 corners of an ima...

Page 9: ...he DC input lead is connected to the AC adaptor then the battery will not get charged Remove the DC input lead from the AC adaptor 1 Connect the AC mains lead to the AC adaptor and the AC mains socket 2 Put the battery on the battery mount by aligning the mark and then securely plug it in ª Charging lamp Lights up Charging Goes off Charging completed Flashing The battery is over discharged dischar...

Page 10: ... for other equipment since the power cord is exclusively designed for the movie camera Or do not use the power cord of other equipment for the movie camera ª Fitting the battery Push the battery against the battery holder and slide it until it clicks ª Removing the battery While sliding the BATTERY lever slide the battery to remove it Hold the battery with your hand so it does not fall Before remo...

Page 11: ...amera with the LCD monitor lit up with the POWER LCD setting The batteries heat up after use or charging The main unit of the movie camera being used will also heat up This is normal Along with the reduction of the battery capacity the display will change If the battery discharges then will flash Turning the camera on When the camera is turned on with the lens cap fitted the automatic white balanc...

Page 12: ...the LCD monitor or extend the viewfinder to turn the power on and use the movie camera again The status indicator lights red and the power turns on Setting date and time When the movie camera is turned on for the first time SET DATE AND TIME will appear Select YES and press the centre of the joystick Do steps 2 and 3 below to set the date time If the screen shows the incorrect date time then adjus...

Page 13: ...ection of the arrow It can open up to 90o 2 Adjust the angle of the LCD monitor according to your preference It can rotate up to 180o 1 towards the lens or 90o 2 towards the viewfinder The brightness and colour level of the LCD monitor can be adjusted from the menu If it is forcibly opened or rotated the camera may be damaged or fail If the LCD monitor is rotated by 180o towards the lens and the v...

Page 14: ...seconds after it is turned on ª To cancel Quick Start 1 Set SETUP QUICK START OFF 19 If the OFF ON switch is set to OFF while the unit is in quick start standby the power turns off If the standby continues for approx 30 minutes then the status indicator will go off and the camera will be completely turned off In the following cases quick start is cancelled and the power turns off When the Mode dia...

Page 15: ...ssette cover do not get anything such as a cable caught in the cover After use be sure to rewind the cassette completely remove it and put it in a case Store the case in an upright position 76 If the indicator of the condensation does not display on the LCD monitor and or viewfinder and you notice condensation on the lens or the main unit do not open the cassette cover otherwise condensation may b...

Page 16: ...ck erasing etc the access lamp lights up If the following operations are performed when the access lamp is lit then the card or the recorded data may be damaged or the camera may malfunction Inserting or removing the card Operating the OFF ON switch or the mode dial Removing the battery or AC adaptor ª SD Card The memory capacity indicated on the SD Card label corresponds to the total amount of ca...

Page 17: ...files to be played back on the multi image display Move the joystick up down left or right to select an item or file and then push in the centre to set it ª Joystick and screen display Push the centre of the joystick and icons will be displayed on the screen Each time the joystick is moved down the indication changes In the Tape playback mode or the Card Playback Mode the icons will be automatical...

Page 18: ...s set to FOCUS 6 Card Playback Mode 4 4 2 Iris or gain value 38 3 White balance 37 1 Shutter speed 38 5 5 2 Manual focus adjustment 38 1 3 Playback pause 40 4 Stop 40 2 Rewind review playback 40 1 Fast forward cue playback 40 2 1 2 1 2 2 Self timer recording 34 3 Backlight compensation 30 1 Help mode 19 2 2 2 Soft skin mode 31 1 Tele macro 32 3 3 2 Iris or gain value 38 3 White balance 37 1 Shutte...

Page 19: ...ved down the indication changes ª To exit the Help mode Select EXIT icon or press the MENU button When the Help mode is used it is not possible to record or set the functions Switching the language You can switch the language on the screen display or the menu screen 1 Set LANGUAGE select the desired language Using the menu screen For each individual menu please refer to 62 1 Press the MENU button ...

Page 20: ... About the menu setting The menu is not displayed while recording on a tape or a card Also you cannot record on a tape or a card while the menu is displayed ª Operating with remote control The menu screen transition is the same as when the buttons on the main unit are used 1 Press the MENU button 2 Select a menu item Use the direction buttons 3 2 1 4 and ENTER button in place of the joystick on th...

Page 21: ...the LCD monitor cannot be adjusted To adjust the brightness of the viewfinder close the LCD monitor and extend the viewfinder to activate it These settings will not affect the images actually recorded ª In order to increase the brightness of the entire LCD monitor 1 Set SETUP POWER LCD ON The indication appears on the LCD monitor If the POWER LCD is set to ON the entire LCD monitor will become app...

Page 22: ...tton MENU 20 10 Photoshot button PHOTO SHOT 11 Rewind review button 6 12 Pause button 13 Stop button 14 Recording start stop button START STOP 15 Playback button PLAY 1 16 Fast forward cue button 5 17 Enter button ENTER 20 means that these buttons function in the same manner as the corresponding buttons on the movie camera ª Install a button type battery Install the button type battery supplied in...

Page 23: ...but it depends on operation frequency Keep the button type battery out of the reach of children If the remote control mode of the camera and that of the remote control do not match with each other REMOTE will appear When the remote control is operated for the first time after the camera is turned on CHECK REMOTE MODE 67 will appear and operation is impossible Set the same remote control mode The r...

Page 24: ...the AUTO MANUAL FOCUS switch to AUTO and colour balance white balance and focusing will be adjusted automatically Auto white balance 77 Auto focusing 78 Depending on the brightness of the subject etc the aperture and shutter speed are automatically adjusted for an optimum brightness When set to the Tape recording mode The shutter speed is adjusted to a maximum of 1 250 Colour balance and focus may...

Page 25: ... to preserve the original sound recorded when audio dubbing 48 set ADVANCED AUDIO REC 12bit to take pictures ª On screen display in the tape recording mode These are only displayed when you press the button half way while a card is inserted These are not displayed when using the remote control 1 Recording time elapse 2 Remaining tape indication 3 Still picture size 4 Card indication 66 5 Number of...

Page 26: ...lank search function is cancelled and the camera is put into recording pause Set to Tape Recording Mode 1 Press the joystick to display the icon during the recording pause Move the joystick down until icon 1 appears 2 Move the joystick right to select the blank search icon 3 When the confirmation message appears select YES and press the centre of the joystick ª Stopping blank search midway through...

Page 27: ...d in Tape Recording Mode 1 Set ADVANCED PICTURE SIZE select the desired picture size REC ASPECT 16 9 1280t720 640t360 REC ASPECT 4 3 1280t960 640t480 Recording still pictures onto a card Photoshot Set to Card Recording Mode 1 Press the button halfway in order to adjust focusing For auto focusing only If you set O I S to ON then the image stabilizer function will be more effective MEGA OIS will be ...

Page 28: ...lect the size of still pictures to be recorded on a card 1 Set BASIC PICTURE SIZE select the desired picture size REC ASPECT 16 9 2048t1152 640t360 REC ASPECT 4 3 2048t1512 1600t1200 1280t960 640t480 When you purchase this unit REC ASPECT is set to 16 9 The sides of pictures recorded when 16 9 is set may be cut at printing Check before printing ª Select the picture quality for photoshot images 1 S...

Page 29: ... a mechanical sound may be recorded when the W T lever is released while zooming Gently move the zoom lever back to it s original possition before releasing it ª Digital zoom function If the zoom magnification exceeds 10 times then the digital zoom function will be activated The digital zoom function allows you to select a magnification from 25t to 700t Set to Tape Recording Mode 1 Set ADVANCED D ...

Page 30: ...ven if you push the centre of the joystick Backlight compensation function This protects a backlit subject from being darkened Set to Tape Card Recording Mode 1 Press the joystick to display the icon Move the joystick down until icon 1 appears 2 Move the joystick up to select the backlight compensation icon The BACKLIGHT COMPENSATION ON indication appears on the screen of the movie camera The imag...

Page 31: ...me of the CCD up to approximately 25k longer than usual so that dark scenes a minimum of 1 lx can be recorded brightly For this reason bright dots that are usually invisible may be seen but this is not a malfunction The colour night view function is cancelled when you turn off the power or operate the mode dial Soft skin mode This allows the skin colour to be recorded in a softer tone This is more...

Page 32: ...chieved adjust the focus manually In the following cases the tele macro function is cancelled The zoom magnification becomes lower than 10k The power is off or the mode dial is operated Fade in fade out function Fade in The image and audio gradually appear Fade out The image and audio gradually disappear Set to Tape Recording Mode 1 Press the joystick to display the icon Move the joystick down unt...

Page 33: ... wind weakens the stereo effect will be restored Anti Ground Shooting AGS This function prevents unnecessary recording when you forget to pause recording and walk with the camera tilted upside down while recording continues If the movie camera continues to be tilted upside down from the normal horizontal position while recording on a tape it is automatically put into recording pause AGS Anti Groun...

Page 34: ...ct ratio Set to Tape Card Recording Mode 1 Wide Function Set BASIC REC ASPECT 16 9 4 3 Function Set BASIC REC ASPECT 4 3 ª To Cancel the Wide 4 3 Function Wide Function Set BASIC REC ASPECT 4 3 4 3 Function Set BASIC REC ASPECT 16 9 The default setting is 16 9 In the wide screen mode the menu screens operation icons and other screen displays appear horizontally oriented When images are played back...

Page 35: ...on may not work effectively When the digital zoom is used When a conversion lens is used When the camera is shaken greatly When you record a moving subject while tracking it Guideline function View the slope and the balance of the image while recording You can check if the image is level while recording motion pictures The function can also be used to estimate the balance of the composition Set to...

Page 36: ...of recorded pictures this mode presents free of camera shakes During normal playback the image movement may not look smooth Avoid recording under fluorescent light mercury light or sodium light because the colour and brightness of the playback image may change If you record a subject illuminated with strong light or a highly reflective subject vertical lines of light may appear If the brightness i...

Page 37: ...Step 3 Then while viewing a white subject on the entire screen move the joystick up to select the indication ª About flashing of the indication When the manual adjustment mode is selected Flashing indicates that the white balance previously adjusted is stored This setting is stored until the white balance is adjusted again When white balance cannot be set in the manual adjustment mode White balanc...

Page 38: ...e automatic adjustment Set the AUTO MANUAL FOCUS switch to AUTO or FOCUS Manual shutter speed aperture adjustment Shutter Speed Adjust it when recording fast moving subjects Aperture Adjust it when the screen is too bright or too dark Set to Tape Card Recording Mode 1 Set the AUTO MANUAL FOCUS switch to MANUAL 2 Move the joystick left or right to select the aperture icon or shutter speed icon 3 Mo...

Page 39: ... of the screen may change or flickers If so adjust the shutter speed manually to 1 50 or 1 100 Manual iris gain adjustment Set the shutter speed before setting the aperture iris gain when manually adjusting both settings If the value does not become OPEN you cannot adjust the gain value If the gain value is increased the noise on the screen increases Depending on the zoom magnification there are i...

Page 40: ...ases the volume Nearer the bar to i larger the volume On the remote control press the T button to increase the volume or the W button to decrease it When the adjustment is completed the volume indication will disappear If you do not hear the sound check the settings of SETUP 12bit AUDIO ª Repeat playback When the tape end is reached the tape will be rewound and played back again 1 Set ADVANCED REP...

Page 41: ... appears for an instant Continuous frame by frame playback will start after the pause icon disappears ª To return to normal playback Press the PLAY 1 button on the remote control or move t he joystick up to the 1 icon to start playback Slow motion playback In the reversed slow motion playback the time code indication may be unstable Frame by frame playback Press and hold the E or the D button in t...

Page 42: ...up to select the 1 icon to start playback The image and audio are output on the TV 5 Move the joystick down to select the icon to stop playback Whenever plugging in the S Video terminal plug in the VIDEO IN terminal and AUDIO IN terminal too Use the AC adaptor to free you from worrying about the battery running down ª If the image or audio from this camera is not output on the TV Check that the pl...

Page 43: ... and time display is different from when it was recorded ª To display multiple playback files Multiple files on the card 6 files on 1 screen are displayed 1 Move the s VOLr lever to switch the images Towards i Full screen display Displays 1 image Towards j Multi screen display Displays 6 files on 1 screen In the multi screen display Move the joystick to select a file The selected file will be enci...

Page 44: ...Card Playback Mode and delete unnecessary files If files conforming to DCF standard are deleted all the data related to the files will be deleted ª Deleting still picture files recorded on a card by other equipment A still picture file other than JPEG that cannot be played back on the movie camera may be erased Formatting a card Please be aware that if a card is formatted then all the data recorde...

Page 45: ...k Mode 1 Set ADVANCED DPOF SET SET 2 Move the joystick to select a file to be set and then press it The number of prints 1 set to be in DPOF is displayed 3 Move the joystick up or down in order to select the number of prints and then press it You can select from 0 to 999 Selected number of pictures can be printed as you set the number of prints with the printer supporting DPOF 2 or more files can ...

Page 46: ...ons for the recorder Place a recorded cassette in the movie camera and an unrecorded DVD RAM or cassette in the DVD recorder or VCR 1 Connect the movie camera and the recorder Connecting with the Multi cable Connect the movie camera and the recorder by using the Multi cable 1 If the recorder has an S Video terminal then also connect to this terminal 2 It allows you to copy clearer image Connecting...

Page 47: ...By connecting other digital video equipment with DV terminal and the movie camera by using the DV cable VW CD1E optional 1 high image quality dubbing can be done in digital format This model cannot be used as a Recorder Set to Tape Playback Mode Player recorder 1 Connect the movie camera and digital video equipment with the DV cable 2 Start playback Player 3 Start recording Recorder 4 Stop playbac...

Page 48: ...bed when this portion of the tape is played back ª Before recording with audio dubbing Set to Tape Recording Mode When you want to preserve the original sound taken during recording set ADVANCED AUDIO REC 12bit to take pictures When set 16bit the sounds taken during recording are erased after recording with audio dubbing Set BASIC REC SPEED SP to take pictures ª To play back the sound recorded wit...

Page 49: ...r When images are displayed in multi screen they cannot be printed 2 Select SINGLE PRINT or DPOF PRINT If there is no file with a DPOF setting you cannot select DPOF PRINT When you select DPOF PRINT for printing set the number of prints in DPOF setting When DPOF PRINT is selected print after you determine the paper size Step 6 When DPOF PRINT is selected date printing is unavailable 3 Move the joy...

Page 50: ...ent may not be printed When the movie camera and the printer are connected in the Tape Recording Playback Mode the Indication may appear on the LCD monitor However pictures cannot be printed The sides of pictures recorded when 16 9 is set may be cut at printing When you purchase this unit REC ASPECT is set to 16 9 When using a printer with a trimming or borderless function cancel this setting Refe...

Page 51: ...l In this manual the Panasonic make digital video camera with USB terminal is referred to as movie camera These instructions do not cover the basic operations of the personal computer or define any terms For this information refer to the operating instructions which accompany your personal computer ª Names and functions of packaged items 1 USB cable This cable is used to connect a personal compute...

Page 52: ... brands of video editing software please consult with your retailer for compatibility ª Operating environment Despite having the operating environment indicated it may not be possible to use the programme with some types of personal computer A CD ROM drive is required to install this programme SweetMovieLife 1 0E MotionDV STUDIO 5 6E LE for DV OS IBM PC AT compatible personal computer with pre ins...

Page 53: ...bit or more Desktop resolution of 800k600 pixels or more RAM 128 MB or more 256 MB or more recommended Free hard disk space 250 MB or more Communication Speed 56 kbps or faster is recommended Interface USB 1 1 or later A type Other requirements to send receive audio Sound card Speaker or headphones Software Windows Messenger 5 0 5 1 Windows XP MSN Messenger 7 0 7 5 Windows 2000 XP Windows Live Mes...

Page 54: ...he following screens may appear 1 Your personal computer does not support USB port Hi Speed USB USB 2 0 so the video on tape cannot be imported from the video camera to the personal computer with the USB cable You can use the Web Camera function 2 The personal computer has recognized a Hi Speed USB USB 2 0 driver other than the Microsoft driver Update the driver to make sure that it operates prope...

Page 55: ... of DirectX may not operate properly by installing DirectX 9 0b In this case consult the manufacturers of the applications disabled When you use Windows 2000 SP4 to connect the personal computer and the movie camera by USB cable and then use MotionDV STUDIO installing the USB driver is needed 1 Insert the supplied CD ROM into the personal computer s CD ROM drive Quit all applications The Setup Men...

Page 56: ...rmation procedure is completed If a description other than Microsoft is displayed Update the driver with the following procedure 1 Click Update Driver 2 Check Install from a list or specific location Advanced and then click Next When your OS is Windows 2000 click Next after Update Device Driver Wizard appears 3 When your OS is Windows XP Check Don t search I will choose the driver to install and t...

Page 57: ...e help file 1 Set start All Programs Programs Panasonic SweetMovieLife 1 0E or MotionDV STUDIO 5 6E LE for DV Manual PDF format Start the software and select Help Help from the menu to display the help file You will need Adobe Acrobat Reader 5 0 or later to read the PDF operating instructions With USB cable supplied The personal computer should be compatible with USB port Hi Speed USB USB 2 0 1 Se...

Page 58: ...grams Programs Windows Update If the movie camera is connected to your personal computer you can send video and sound from the movie camera to the other parties via the network Audio may also be exchanged if the personal computer is configured accordingly You can use the microphone equipped with the personal computer instead of the one on the movie camera Refer to page 53 for the minimum requireme...

Page 59: ...on instead of appearing from the side of the screen when you press the centre of the joystick Others ª Copying files to a personal computer Card reader function Mass storage If you connect the movie camera to a personal computer with the USB cable you can use the movie camera which includes a card as a external drive of a personal computer and you can copy files recorded on the card to the persona...

Page 60: ...ng the steps below you can disconnect the cable safely 1 Double click the icon in task tray Hardware disconnect dialogue appears 2 Select USB Mass Storage Device and click Stop 3 Verify Matshita DVC USB Device is selected and click OK Click Close and you can safely disconnect the cable Note on the driver name displayed The driver name displayed will differ depending on your OS operating environmen...

Page 61: ...Camera the quality of the video to be exchanged will depend on the Internet connection status In the Web Camera mode video picture cannot be recorded onto a tape or a card In the Web Camera mode the audio may be interrupted in the midway of communication depending on the communication environment or the performance of the personal computer If you connect the USB cable while you operate a tape in t...

Page 62: ...35 FADE COLOUR 33 AUDIO REC 64 USB FUNCTION 57 D ZOOM 29 ZOOM MIC 29 3 SETUP DISPLAY 64 DATE TIME 64 POWER SAVE 64 QUICK START 14 AGS 33 REMOTE 23 BEEP SOUND 64 POWER LCD 21 LCD SET 21 EVF SET 21 INITIAL SET 65 DEMO MODE 65 4 LANGUAGE 19 ª TAPE PLAYBACK MENU 1 BASIC DATE TIME 64 USB FUNCTION 57 2 ADVANCED REC DATA 64 PICT QUALITY 28 REPEAT PLAY 40 3 SETUP 12bit AUDIO 48 AUDIO OUT 64 DISPLAY 64 REM...

Page 63: ...LAY 64 DATE TIME 64 POWER SAVE 64 QUICK START 14 REMOTE 23 BEEP SOUND 64 POWER LCD 21 LCD SET 21 EVF SET 21 INITIAL SET 65 4 LANGUAGE 19 ª CARD PLAYBACK MENU 1 BASIC DATE TIME 64 PROTECT 45 2 ADVANCED DPOF SET 45 FORMAT CARD 44 3 SETUP DISPLAY 64 REMOTE 23 POWER LCD 21 LCD SET 21 EVF SET 21 POWER SAVE 64 TV ASPECT 42 4 LANGUAGE 19 VQT1A45_EP_ENG book 63 ページ 2006年12月6日 水曜日 午前9時10分 ...

Page 64: ...isplayed on the screen 67 ª POWER SAVE OFF When about 5 minutes passed without any operation the standby mode automatically will be set In the standby mode blinks and it takes time more than usual to start recording after you press the recording start stop button 5 MINUTES When about 5 minutes passed without any operation the movie camera automatically turns off to protect the tape or to prevent t...

Page 65: ...t to DEMO MODE ON without inserting a cassette and a card the movie camera is automatically set to the demonstration mode for introducing its functions If any button is pressed or operated the demonstration mode is cancelled If no operations take place for approx 10 minutes the demonstration mode automatically starts To terminate the demonstration mode insert a cassette or a card or set to DEMO MO...

Page 66: ...ng under incandescent lamp 37 Outdoor mode 37 White balance adjustment mode 37 Playback indications 1 Playback 40 Pause 40 5 Fast forward Cue playback 40 6 Rewind Review playback 40 D E Slow motion playback 41 1 2 Frame by frame playback 41 2t5 Variable speed search 41 Repeat playback 40 WEB CAMERA mode Playback 50 A DUB Audio dubbing 48 A DUB Audio dubbing pause 48 12bit 16bit Audio recording mod...

Page 67: ... after powering on 23 WRONG TAPE FORMAT You are attempting to play back a tape section that has been recorded with a different TV system This cassette is incompatible UNPLAYABLE CARD You are attempting to play back data not compatible with this movie camera CLOSE CASSETTE DOOR The cassette cover is open Close the cassette cover 15 UNABLE TO A DUB LP RECORDED Audio dubbing cannot be performed becau...

Page 68: ... conditions Functions Conditions which disable the functions Digital zoom Fade When the Card Recording mode is used Backlight compensation When the colour night view function is used When the iris gain is set Help mode Recording check Blank search Soft skin Tele macro While recording to a tape Colour Night View While recording to a tape When the Card Recording mode is used Scene mode When setting ...

Page 69: ...an extremely cold place The battery is affected by ambient temperature In cold places the operating time of the battery becomes shorter Has the battery worn out The battery has a limited life If the operating time is still too short even after the battery is fully charged depending on the usage the battery has worn out and can no longer be used 5 The movie camera cannot be operated though powered ...

Page 70: ... surroundings for which the auto focus does not operate correctly 78 If so use the manual focus mode to adjust the focus 38 5 The camera arbitrarily stops recording Is the AGS function activated Record in the normal horizontal position or set AGS to OFF 33 Indications 1 A sentence is displayed in red in the screen centre Read the contents and respond to them 67 2 The time code becomes inaccurate 0...

Page 71: ... cassette with no audio dubbing set 12bit AUDIO ST1 48 Is the variable speed search function working Press the VAR SEARCH button on the remote control to cancel the variable speed search function 41 Playback Pictures 1 Although the movie camera is correctly connected to a TV playback images cannot be seen The images are vertical Have you selected video input on the TV Please read the operating ins...

Page 72: ...SD card SD Memory Card SDHC Memory Card that you inserted 16 Refer to the operating instructions of the device for details Others 1 The indication disappears the screen is frozen or no operation can be performed Turn off the power to the movie camera If the power cannot be turned off press the RESET button or detach the battery or AC adaptor and then reattach it After that turn on the power again ...

Page 73: ...Use ª About condensation If you turn the movie camera on when condensation occurs on the head or the tape condensation Indication 3 yellow or red is displayed on the viewfinder or the LCD monitor and the messages 3DEW DETECT or 3EJECT TAPE only when the tape is inserted appear If so follow the procedure below 1 Remove the tape if it is inserted It takes about 20 seconds to open the cassette holder...

Page 74: ...electromagnetic equipment such as microwave ovens TVs video games etc If you use the Digital Video Camera on top of or near a TV the pictures and sound on the Digital Video Camera may be disrupted by electromagnetic wave radiation Do not use the Digital Video Camera near cell phones because doing so may result in noise adversely affecting the pictures and sound Recorded data may be damaged or pict...

Page 75: ...of the movie camera Be sure to detach the battery after use If the battery is left attached to the movie camera a minute amount of current is consumed even when the movie camera power is OFF If the battery is left attached to the movie camera for a long time over discharge takes place The battery may become unusable after it is charged The battery should be stored in a cool place free from humidit...

Page 76: ...camera and the heads After use be sure to rewind the tape to the beginning put the cassette in the case to protect it from dust and store it upright Keep the cassette away from strong magnetism Apparatuses using magnets such as magnetic necklaces and toys have magnetic force that is stronger than expected and they may erase the contents of a recording or may increase noise ª About the card When in...

Page 77: ... effective range of automatic white balance adjustment the image will become reddish or bluish Even within the effective range of automatic white balance adjustment the automatic white balance adjustment may not function properly if there is more than one light source For light outside the functional auto white balance adjustment range use the manual white balance adjustment mode 1 The effective r...

Page 78: ...e following situations Record pictures in the manual focus mode Recording a subject with one end located closer to the movie camera and the other end farther away from it As auto focus adjusts at the centre of an image it may be impossible to focus on a subject that is located in both the foreground and background Recording a subject behind dirty or dusty glass The subject behind the glass will no...

Page 79: ... 1 0 Vp p 75 C Output 0 3 Vp p 75 Audio output level Line 316 mV 600 USB Card reader writer function USB port Hi Speed USB USB 2 0 No copyright protection support PictBridge compliant Digital interface DV output terminal IEEE1394 4 pin Dimensions 78 5 mm W k72 6 mm H k136 0 mm D excluding the projecting parts Mass Approx 450 g without supplied battery and DV cassette Approx 515 g with supplied bat...

Page 80: ...MB 45 95 12 19 4 7 16 MB 100 200 29 46 11 18 32 MB 220 440 64 98 24 39 64 MB 440 880 130 200 51 81 128 MB 880 1760 250 390 99 155 256 MB 1760 3520 530 810 210 330 512 MB 3520 7040 1040 1600 410 650 1 GB 7040 14080 2090 3200 820 1290 2 GB 14080 28160 4250 6510 1680 2630 4 GB 28160 56320 8350 12780 3290 5170 PICTURE SIZE PICT QUALITY 8 MB 45 95 9 15 5 9 3 5 16 MB 100 200 21 35 13 21 8 13 32 MB 220 4...

Page 81: ...az produktów wymienione w niniejszej instrukcji obsługi są znakami towarowymi lub zastrzeżonymi znakami towarowymi odpowiednich podmiotów Pliki zapisywane na karcie SD Odtwarzanie plików zapisanych przez inne urządzenia za pomocą kamery może okazać się niemożliwe to samo dotyczy też sytuacji odwrotnej W związku z powyższym należy zawczasu sprawdzić zgodność urządzeń OSTRZEŻENIE ABY UNIKNĄĆ POŻARU ...

Page 82: ... lub odzysku podzespołów polega na przekazaniu urządzenia do wyspecjalizowanego punktu zbiórki gdzie będzie przyjęte bezpłatnie W niektórych krajach produkt można oddać lokalnemu dystrybutorowi podczas zakupu innego urządzenia Prawidłowa utylizacja urządzenia umożliwia zachowanie cennych zasobów i uniknięcie negatywnego wpływu na zdrowie i środowisko które może być zagrożone przez nieodpowiednie p...

Page 83: ... Oprogramowania wyłącznie na jednym komputerze a instalowanie go na innych komputerach jest zabronione Artykuł 5 Odtwarzanie kodu źródłowego dekompilacja i dezasemblowanie Licencjobiorca nie ma prawa do odtwarzania kodu źródłowego dekompilacji oraz dezasemblowania Oprogramowania z wyjątkiem przypadków dozwolonych przepisami prawa obowiązującymi w kraju zamieszkania Licencjobiorcy Firma Matsushita ...

Page 84: ...a panoramiczna 4 3 113 Funkcja stabilizatora obrazu 114 Funkcja linii pomocy 114 Zdjęcia w różnych sytuacjach tryb sceny 115 Wykonywanie zdjęć w naturalnych kolorach balans bieli 116 Ręczne ustawianie ostrości 117 Ręczne ustawianie szybkości migawki i przesłony 117 Tryb odtwarzania Odtwarzanie z taśmy 119 Odtwarzanie w zwolnionym tempie poklatkowe 120 Funkcja przeszukiwania ze zmienną prędkością 1...

Page 85: ...3714ME 9 Zestaw filtrów VW LF37WE 10 Lampa oświetlająca VW LDC10E 11 Żarówka do lampy oświetlającej VZ LL10E 12 Statyw VW CT45E 13 Kabel DV VW CD1E Pewne akcesoria opcjonalne mogą być niedostępne w niektórych krajach Wykaz elementów i zasady ich obsługi ª Kamera 1 Czujnik balansu bieli 116 Czujnik zdalnego sterowania 102 2 Pasek uchwytu 88 3 Obiektyw LEICA DICOMAR 4 Mikrofon wbudowany stereofonicz...

Page 86: ...iów np lampy oświetlającej VW LDC10E wyposażenie opcjonalne 28 Suwak wysuwania kasety OPEN EJECT 94 29 Pokrywa kieszeni na kasetę 94 30 Regulator zoomu W T 108 Regulator głośności s VOLr 119 31 Przycisk migawki 106 W związku z ograniczeniami w zakresie technologii wytwarzania ekranów ciekłokrystalicznych na ekranie wizjera mogą występować niewielkie jasne lub ciemne punkty Nie jest to jednak oznak...

Page 87: ... został opisany w instrukcji obsługi Mocując telekonwerter VW LT3714ME wyposażenie opcjonalne lub konwerter szerokokątny VW LW3707M3E wyposażenie opcjonalne najpierw należy zdjąć nasadkę na obiektyw Patrz instrukcja obsługi telekonwertera lub konwertera szerokokątnego Jeśli na obiektyw założono 2 akcesoria np filtr ND i telekonwerter po przesunięciu regulatora zoomu W T w stronę pozycji W wszystki...

Page 88: ...li do zasilacza sieciowego jest podłączony kabel zasilania prądem stałym akumulator nie jest ładowany Aby rozpocząć ładowanie należy odłączyć ten kabel od zasilacza 1 Podłącz kabel sieciowy do zasilacza sieciowego i gniazda sieciowego 2 Umieść akumulator w uchwycie korzystając z prowadnicy a następnie wsuń go do oporu ª Kontrolka ładowania Świeci Trwa ładowanie Nie świeci Ładowanie zostało zakończ...

Page 89: ... kamerą do innych urządzeń ponieważ został on opracowany specjalnie do współpracy z kamerą Nie należy również używać do zasilania kamery kabli od innych urządzeń ª Zakładanie akumulatora Wsuń akumulator w uchwyt i dociśnij aż do zablokowania ª Wyjmowanie akumulatora Przesuń suwak zwalniania blokady akumulatora BATTERY i wysuń akumulator aby go odłączyć Przytrzymaj akumulator aby nie spadł Przed wy...

Page 90: ...zewają się co jest normalnym zjawiskiem To samo dotyczy nagrzewania się korpusu kamery W miarę rozładowywania akumulatora zmienia się symbol wyświetlany na ekranie Całkowite rozładowanie akumulatora jest sygnalizowane pulsującym symbolem Włączanie kamery Jeśli w chwili włączania kamery na obiektywie znajduje się przykrywka automatyczna korekcja balansu bieli 156 może nie działać prawidłowo W związ...

Page 91: ...łączyć zasilanie i ponownie używać kamery Włączy się zasilanie i wskaźnik trybu pracy zaświeci się na czerwono Ustawianie daty i godziny Przy pierwszym włączeniu kamery na wyświetlaczu pojawi się komunikat SET DATE AND TIME Wybierz YES i naciśnij środkową część joysticka Wykonaj podane poniżej kroki 2 i 3 aby ustawić datę godzinę Jeśli na ekranie jest wyświetlana błędna data i godzina można ją sko...

Page 92: ...unkiem wskazywanym przez strzałkę Maksymalny kąt otwarcia wyświetlacza wynosi 90o 2 Ustaw wyświetlacz pod odpowiednim kątem zgodnie z własnymi upodobaniami Wyświetlacz można również obrócić o 180o 1 w kierunku obiektywu lub o 90o 2 w kierunku wizjera Jasność i nasycenie kolorów wyświetlacza LCD reguluje się za pomocą menu Posługiwanie się nadmierną siłą przy otwieraniu bądź obracaniu wyświetlacza ...

Page 93: ...ndy po włączeniu ª Anulowanie szybkiego startu 1 Wybierz opcję USTAWIENIA SZYBKI START WYŁĄCZ 98 Jeżeli przełącznik OFF ON jest ustawiony na OFF gdy aparat znajduje się w trybie oczekiwania Standby z szybkim startem zasilanie wyłącza się Jeśli kamera pozostaje w trybie gotowości przez około 30 minut wskaźnik trybu pracy gaśnie a kamera zostaje całkowicie wyłączona W następujących przypadkach funkc...

Page 94: ...ąć np kabla Po użyciu kasetę należy przewinąć do początku wyjąć z kamery i umieścić w pudełku Pudełko należy przechowywać w pozycji pionowej 155 Jeśli na wyświetlaczu LCD lub w wizjerze nie pojawi się wskaźnik skraplania choć na obiektywie lub urządzeniu widać skroploną parę wodną nie należy otwierać pokrywy kieszeni ponieważ para może osiąść na głowicach lub taśmie 152 ª Rozwiązywanie problemów z...

Page 95: ...rzania usuwania itd Aby zapobiec utracie zapisanych danych bądź uszkodzeniu kamery w czasie gdy świeci kontrolka dostępu nie należy Wkładanie lub wyjmowanie karty Korzystać w wyłącznika OFF ON lub pokrętła wyboru trybu pracy Wyjmowanie akumulatora lub odłączanie zasilacza sieciowego ª Karta SD Pojemność pamięci wskazana na etykiecie karty SD odpowiada całkowitej pojemności wymaganej w celu ochrony...

Page 96: ...eracji na ekranie menu i wybór odtwarzanych plików na ekranie z wieloma obrazami Poruszając joystickiem w górę w dół w lewo lub w prawo wybiera się elementy i pliki Wybór potwierdza się poprzez naciśnięcie środkowej części joysticka ª Obsługa menu ekranowego za pomocą joysticka Po naciśnięciu środkowej część joysticka na ekranie wyświetlane są ikony Każdy ruch joysticka w dół powoduje zmianę trybu...

Page 97: ...yb odtwarzania karty 4 4 2 Wartość przesłony lub wzmocnienia 117 3 Balans bieli 116 1 Szybkość migawki 117 5 5 2 Ręczne ustawianie ostrości 117 1 3 Odtwarzanie pauza 119 4 Stop 119 2 Przewijanie lub przewijanie z podglądem 119 1 Przewijanie przewijanie z podglądem 119 2 1 2 1 2 2 Zdjęcia z samowyzwalaczem 113 3 Komp przeciwośw 109 1 Tryb pomocy 98 2 2 2 Soft Skin 110 1 Tele makro 111 3 3 2 Wartość...

Page 98: ...a ª Aby zakończyć korzystanie z trybu pomocy Wybierz ikonę EXIT lub naciśnij przycisk MENU W trybie pomocy nie można nagrywać ani ustawiać żadnych funkcji Zmiana języka Istnieje możliwość zmiany języka w którym wyświetlane jest menu ekranowe i menu główne 1 Wybierz opcję LANGUAGE Polski Korzystanie z ekranu menu Informacje o poszczególnych menu znajdują się na stronie 141 1 Naciśnij przycisk MENU ...

Page 99: ...waga dotycząca ustawień menu Menu nie jest wyświetlane w trakcie nagrywania taśmy lub karty Natomiast jeśli jest wyświetlane nagrywanie taśmy lub karty jest niemożliwe ª Obsługa za pomocą pilota Przechodzenie między ekranami menu odbywa się tak samo jak w przypadku korzystania z przycisków na korpusie urządzenia 1 Naciśnij przycisk MENU 2 Wybierz element menu Przyciski kierunkowe 3 2 1 4 i przycis...

Page 100: ...ie można regulować jego jasności Aby ustawić jasność obrazu wyświetlanego w wizjerze należy zamknąć wyświetlacz LCD i uaktywnić wizjer wysuwając go Powyższe ustawienia nie mają wpływu na nagrywany obraz ª Zwiększanie jasności całego wyświetlacza LCD 1 Wybierz opcję USTAWIENIA JASNOŚĆ LCD WŁĄCZ Na wyświetlaczu LCD pojawi się wskaźnik Ustawienie w opcji JASNOŚĆ LCD wartości WŁĄCZ powoduje mniej więc...

Page 101: ... MENU 99 10 Przycisk migawki PHOTO SHOT 11 Przycisk przewijania przewijania z podglądem do tyłu 6 12 Przycisk pauzy 13 Przycisk stop 14 Przycisk start stop nagrywania START STOP 15 Przycisk odtwarzania PLAY 1 16 Przycisk przewijania przewijania z podglądem do przodu 5 17 Przycisk Enter ENTER 99 Symbol oznacza że dany przycisk działa w taki sam sposób jak odpowiadający mu przycisk na kamerze ª Wkła...

Page 102: ...niedostępnym dla dzieci W przypadku niezgodności trybu zdalnego sterowania kamery i pilota wyświetlany jest komunikat ZDALNY W przypadku korzystania z pilota po raz pierwszy po włączeniu kamery wyświetlany jest komunikat SPRAWDź USTAWIENIA KODU PILOTA 146 a korzystanie z urządzenia nie jest możliwe W takim przypadku należy ustawić w obu urządzeniach ten sam tryb zdalnego sterowania Pilot jest prze...

Page 103: ... wyświetlacza LCD i wizjera 100 Sprawdzenie zasilania 88 Włożenie kasety lub karty 94 95 Ustawienie daty i godziny 91 Przygotowanie pilota 101 Ustawienie trybu SP LP 103 ª Uwagi dotyczące trybu automatycznego Po ustawieniu przełącznika AUTO MANUAL FOCUS w pozycji AUTO korekcja barw balans bieli i ostrość będą regulowane automatycznie Automatyczny balans bieli 156 Automatyczne ustawianie ostrości 1...

Page 104: ...poczęciem nagrywania 113 lub zmienić ustawienie FORMAT TV w czasie oglądania nagrań na podłączonym odbiorniku 121 Włącz tryb nagrywania taśmy 1 Naciśnij przycisk start stop nagrywania aby rozpocząć filmowanie 2 Naciśnij ponownie przycisk start stop nagrywania aby przerwać filmowanie Informacje o czasie nagrywania taśmy znajdują się na stronie 90 Aby sprawdzić czy obraz jest zarejestrowany poprawni...

Page 105: ... sprawdzania nagrania Na ekranie kamery zostanie wyświetlony komunikat ROZPOCZ SPRAW NAGRW Funkcja szukania przerw Funkcja ta umożliwia wyszukanie punktu końcowego ostatnio dokonanego nagrania czyli początku nieużywanej części taśmy Po zakończeniu wyszukiwania funkcja szukania przerw zostanie anulowana i kamera przełączy się w tryb pauzy w nagrywaniu Włącz tryb nagrywania taśmy 1 Naciśnij joystick...

Page 106: ...1280k720 640k360 FORMAT 4 3 1280k960 640k480 Wykonywanie zdjęć na karcie funkcja Photoshot Włącz tryb nagryw karty 1 Naciśnij przycisk do połowy aby ustawić ostrość Tylko w trybie automatycznej regulacji ostrości Jeśli dla opcji STAB DRGAŃ zostanie wybrane ustawienie WŁĄCZ funkcja stabilizatora obrazu może działać skuteczniej Pojawi się MEGA OIS Wartość przesłony i wzmocnienia jest stała a kamera ...

Page 107: ... ustaw żądaną rozdzielczość zdjęć FORMAT 16 9 2048k1152 640k360 FORMAT 4 3 2048k1512 1600k1200 1280k960 640k480 W nowo nabytym urządzeniu dla FORMAT jest ustawiona opcja 16 9 Boczne krawędzie zdjęć zarejestrowanych przy ustawionej opcji 16 9 mogą zostać obcięte przy drukowaniu Sprawdź przed drukowaniem ª Wybór jakości zdjęć 1 Wybierz opcję PODSTAWOWE JAKOŚĆ OBR i ustaw żądaną jakość zdjęć Wysoka j...

Page 108: ...kującym się około 4 0 cm od obiektywu Należy pamiętać że w przypadku zwolnienia regulatora zoomu W T może zostać zarejestrowany mechaniczny odgłos Przed puszczeniem regulatora należy łagodnie przesunąć go w położenie wyjściowe ª Funkcja zoomu cyfrowego Przy zbliżeniu większym niż 10 krotne uaktywnia się funkcja zoomu cyfrowego która umożliwia powiększenie od 25k do 700k Włącz tryb nagrywania taśmy...

Page 109: ...owej części joysticka Funkcja kompensacji tylnego oświetlenia Funkcja ta pozwala uniknąć zaciemnienia obiektu który jest oświetlony od tyłu Włącz tryb nagrywania taśmy lub na karcie 1 Naciśnij joystick aby wyświetlić ikonę w trakcie pauzy w nagrywaniu Poruszaj joystickiem w dół aż pojawi się ikona 1 2 Porusz joystickiem w prawo aby wybrać symbol kompensacji tylnego oświetlenia Na ekranie kamery zo...

Page 110: ...rnika CCD ulega wydłużeniu do około 25k w porównaniu z normalnym trybem pracy aby umożliwić wyraźne zarejestrowanie ciemnych miejsc minimum 1 lx Z tego powodu mogą pojawić się jasne punkty które są zazwyczaj niewidoczne Nie jest to oznaką usterki Funkcja obraz nocny kolor zostaje wyłączona w przypadku wyłączenia zasilania lub zmiany pozycji pokrętła wyboru trybu pracy Soft Skin Funkcja ta umożliwi...

Page 111: ...bliżenia makro zostaje wyłączona w przypadku Ustawienia powiększenia mniejszego niż 10k Wyłączenie zasilania lub zmiana pozycji pokrętła wyboru trybu pracy Funkcja przejścia Pojawianie się Funkcja ta powoduje stopniowe pojawianie się obrazu i dźwięku Zanikanie Funkcja ta powoduje stopniowe zanikanie obrazu i dźwięku Włącz tryb nagrywania taśmy 1 Naciśnij joystick aby wyświetlić ikonę w trakcie pau...

Page 112: ...ktu stereofonicznego zostanie on przywrócony po zmniejszeniu się siły wiatru Anti ground Shooting AGS Ta funkcja zapobiega niepożądanemu nagrywaniu kiedy użytkownik zapomni włączyć pauzę i idzie z kamerą odwróconą z włączonym nagrywaniem Jeśli kamera będzie trzymana odwrotnie do góry nogami względem standardowej pozycji poziomej podczas nagrywania taśmy zostanie automatycznie włączona pauza w nagr...

Page 113: ...cja ta umożliwia nagrywanie obrazu o proporcjach 4 3 Włącz tryb nagrywania taśmy lub na karcie 1 Funkcja panoramiczna Wybierz opcję PODSTAWOWE FORMAT 16 9 Funkcja 4 3 Wybierz opcję PODSTAWOWE FORMAT 4 3 ª Wyłączanie funkcji panoramicznej 4 3 Funkcja panoramiczna Wybierz opcję PODSTAWOWE FORMAT 4 3 Funkcja 4 3 Wybierz opcję PODSTAWOWE FORMAT 16 9 Ustawieniem domyślnym jest 16 9 W trybie szerokoekra...

Page 114: ...azu może nie działać prawidłowo w przypadku Korzystania ze zbliżenia zoomu cyfrowego Korzystania z konwertera Silnych wstrząsów kamery Filmowania ruchomego obiektu jeśli kamera podąża za obiektem Funkcja linii pomocy Podczas filmowania należy zwracać uwagę na odpowiednie ustawienie obrazu Funkcja ta umożliwia kontrolę wypoziomowania obrazu podczas filmowania Służy ona również do oceny rozplanowani...

Page 115: ... w pozycji AUTO Tryb sportowy Tryb ten pozwala skompensować drżenie kamery podczas odtwarzania zapisanego obrazu w zwolnionym tempie bądź podczas pauzy Podczas normalnego odtwarzania ruchy mogą nie być płynne Należy unikać wykonywania zdjęć przy świetle lamp jarzeniowych rtęciowych lub sodowych ponieważ może to spowodować zmianę kolorów i jasności rejestrowanego obrazu Podczas filmowania obiektów ...

Page 116: ...bieli Wybierz opcję w punkcie 3 a następnie skieruj obiektyw na biały przedmiot wypełniający cały kadr i poruszaj joystickiem w górę aby wybrać symbol ª Pulsowanie symbolu Praca w trybie korekcji ręcznej Pulsowanie oznacza że zapisano ustawiony wcześniej balans bieli Ustawienia pozostają w pamięci do czasu ponownego ustawienia balansu bieli Problemy z ustawieniem balansu bieli w trybie ręcznym W c...

Page 117: ... korekcji automatycznej Ustaw przełącznik AUTO MANUAL FOCUS w pozycji AUTO lub FOCUS Ręczne ustawianie szybkości migawki i przesłony Szybkość migawki Szybkość migawki należy skorygować podczas wykonywania zdjęć szybko poruszających się obiektów Przesłona Ustawienia należy skorygować jeśli obraz jest zbyt jasny lub zbyt ciemny Włącz tryb nagrywania taśmy lub na karcie 1 Ustaw przełącznik AUTO MANUA...

Page 118: ...przypadku należy ustawić ręcznie szybkość migawki na wartość 1 50 lub 1 100 Ręczne ustawianie przesłony i wzmocnienia W przypadku ręcznej regulacji szybkość migawki należy ustawić przed wartością przesłony wzmocnienia Wartości wzmocnienia nie można ustawić jeśli nie zostanie wyświetlony komunikat OPEN Zwiększenie wartości wzmocnienia może powodować powstawanie większych szumów na ekranie W zależno...

Page 119: ...powiednią głośność W stronę pozycji r większa głośność W stronę pozycji mniejsza głośność Im bliżej symbolu r znajduje się pasek tym większa głośność W przypadku pilota do zwiększania głośności służy przycisk T a do jej zmniejszania przycisk W Po zakończeniu regulacji symbol głośności znika Jeśli nie słychać dźwięku należy sprawdzić ustawienie opcji USTAWIENIA FONIA12bit ª Powtarzanie odtwarzania ...

Page 120: ... standardowego odtwarzania Naciśnij przycisk PLAY 1 na pilocie lub zaznacz joystickiem ikonę 1 aby rozpocząć odtwarzanie Odtwarzanie w zwolnionym tempie Podczas odtwarzania w zwolnionym tempie do tyłu wskazanie kodu czasu może być niedokładne Odtwarzanie poklatkowe Naciśnij i przytrzymaj przycisk E lub D podczas pauzy w odtwarzaniu aby rozpocząć ciągłe odtwarzanie obrazu klatka po klatce Funkcja p...

Page 121: ...ę 1 i rozpocząć odtwarzanie Obraz i dźwięk zostaną odtworzone w telewizorze 5 Porusz joystickiem w dół aby wybrać ikonę i zatrzymać odtwarzanie Podłączając wtyczkę do gniazda S Video zawsze należy podłączać również wtyczki do gniazd VIDEO IN i AUDIO IN Podłączenie zasilacza sieciowego pozwala uniknąć rozładowania akumulatora ª Brak obrazu lub dźwięku z kamery w telewizorze Wszystkie wtyki muszą by...

Page 122: ...Funkcja ta umożliwia jednoczesne wyświetlenie kilku plików zapisanych na karcie 6 plików na ekranie 1 Za pomocą regulatora s VOLr wybierz żądany obraz W stronę pozycji r wyświetlanie na całym ekranie 1 obraz W stronę pozycji wyświetlanie wielo obrazowe 6 obrazów na jednym ekranie Obsługa trybu wyświetlania kilku obrazów na ekranie Pliki wybiera się za pomocą joysticka wybrany plik zostaje zaznaczo...

Page 123: ...cej danych Włóż nową kartę lub ustaw kamerę w trybie odtwarzania karty i usuń niepotrzebne pliki Podczas usuwania plików zgodnych ze standardem DCF usuwane są również wszystkie związane z nimi dane ª Usuwanie zdjęć zapisanych na karcie przez inne urządzenia Kamera umożliwia usuwanie pików zdjęć w formacie innym niż JPEG których nie można na niej odtworzyć Formatowanie karty Należy pamiętać że sfor...

Page 124: ... Za pomocą joysticka wybierz plik który ma zostać ustawiony a następnie naciśnij środkową część joysticka Zostanie wyświetlona liczba odbitek 1 wybranych do obsługi za pomocą funkcji DPOF 3 Poruszając joystickiem w górę lub w dół ustaw liczbę odbitek a następnie naciśnij środkową część joysticka Dopuszczalne są wartości w przedziale od 0 do 999 W przypadku niektórych obrazów liczbę kopii można ust...

Page 125: ...a pomocą rejestratora DVD lub magnetowidu kopiowanie synchroniczne Obraz nagrany za pomocą kamery można przechowywać na płytach DVD RAM lub innych tego rodzaju nośnikach Więcej informacji na ten temat znajduje się w instrukcji obsługi rejestratora Umieść w kamerze zapisaną kasetę a w rejestratorze DVD lub magnetowidzie czystą płytę DVD RAM lub kasetę 1 Podłącz kamerę do rejestratora lub magnetowid...

Page 126: ... muszą być wsunięte do oporu Sprawdź ustawienia FONIA12bit 127 Kable muszą być podłączone do właściwych gniazd Nagrywanie za pomocą kabla DV cyfrowe kopiowanie synchroniczne Podłączenie innego cyfrowego urządzenia wideo do gniazda DV kamery za pomocą kabla DV VW CD1E wyposażenie opcjonalne 1 umożliwia wykonywanie wysokiej jakości kopii w formacie cyfrowym Tego modelu nie można wykorzystywać do nag...

Page 127: ...u ª Uwagi dotyczące podkładania dźwięku Włącz tryb nagrywania taśmy Aby zachować dźwięk zarejestrowany podczas filmowania należy włączyć opcję ZAAWANSOW NAGR AUDIO 12 BIT przy wykonywaniu zdjęć Opcja 16 BIT powoduje usunięcie pierwotnej ścieżki dźwiękowej podczas podkładania dźwięku Podczas wykonywania zdjęć należy wybrać opcję PODSTAWOWE PRĘDKOŚĆ SZYBKA ª Odtwarzanie podłożonego dźwięku Kamera um...

Page 128: ...onę 2 Wybierz opcję DR POJED lub DR DPOF W przypadku braku pliku z ustawieniami DPOF nie można wybrać opcji DR DPOF Po wybraniu opcji DR DPOF należy wybrać liczbę odbitek w ustawieniach DPOF Jeśli została wybrana opcja DR DPOF drukowanie należy rozpocząć po określeniu formatu papieru Krok 6 Po wybraniu opcji DR DPOF drukowanie daty jest niedostępne 3 Poruszając joystickiem w lewo lub w prawo wybie...

Page 129: ...zeniu do drukarki kamera działa w trybie nagrywania taśmy lub odtwarzania taśmy na wyświetlaczu LCD może zostać wyświetlony symbol W takim przypadku nie można jednak drukować zdjęć Boczne krawędzie zdjęć zarejestrowanych przy ustawionej opcji 16 9 mogą zostać obcięte przy drukowaniu W nowo nabytym urządzeniu dla FORMAT jest ustawiona opcja 16 9 Używając drukarki z funkcją przycinania lub drukowani...

Page 130: ...firmy Panasonic wyposażona w złącze USB określana jest jako kamera Niniejsza instrukcja nie obejmuje podstawowych zasad obsługi komputera osobistego ani jakichkolwiek definicji Informacje te znajdują się w instrukcji obsługi dołączonej do komputera ª Nazwy i funkcje elementów zestawu 1 Kabel USB Kabel ten służy do połączenia komputera osobistego z kamerą 2 Płyta CD ROM SweetMovieLife 1 0E 133 Moti...

Page 131: ... obrazu wideo należy skonsultować się ze sprzedawcą w zakresie zgodności ª Środowisko operacyjne W przypadku niektórych komputerów uruchomienie programu może okazać się niemożliwe pomimo posiadania wskazanego środowiska operacyjnego Do zainstalowania programu niezbędny jest napęd CD ROM SweetMovieLife 1 0E MotionDV STUDIO 5 6E LE for DV System operacyjny Komputer osobisty zgodny ze standardem IBM ...

Page 132: ...zość pulpitu 800k600 pikseli lub większa Pamięć RAM 128 MB lub więcej zalecane 256 MB lub więcej Wolne miejsce na dysku 250 MB lub więcej Szybkość przesyłania danych zalecana 56 kb s lub większa Interfejs USB 1 1 lub nowszy typ A Inne wymagania przesyłanie odbieranie dźwięku Karta dźwiękowa Głośnik lub słuchawki Oprogramowanie Windows Messenger 5 0 5 1 Windows XP MSN Messenger 7 0 7 5 Windows 2000...

Page 133: ...ńczyć instalowanie sterownika USB uruchom ponownie komputer Zależnie od komputera może zostać wyświetlony jeden z następujących ekranów 1 Komputer nie posiada portu USB Hi Speed USB USB 2 0 w związku z czym nie można importować obrazów nagranych na taśmie z kamery do komputera za pośrednictwem kabla USB Można używać funkcji kamery internetowej 2 Komputer rozpoznał sterownik Hi Speed USB USB 2 0 in...

Page 134: ... rozmaitych efektów specjalnych takich jak pojawianie zanikanie obrazu przejście i tytuły Na komputerze zostanie zainstalowany pakiet DirectX 9 0b o ile nie został wcześniej zainstalowany Aplikacje zgodne ze starszymi wersjami pakietu DirectX mogą nie działać prawidłowo po zainstalowaniu wersji DirectX 9 0b W takim przypadku należy skontaktować się z producentem niedziałającej prawidłowo aplikacji...

Page 135: ...st nazwy Enhanced Host Controller występuje EHCI 4 Kliknij kartę Driver aby sprawdzić opis w polu Driver Provider Jeśli w polu Driver Provider wyświetlana jest nazwa Microsoft można zakończyć procedurę Jeśli wyświetlana jest inna nazwa niż Microsoft Należy uaktualnić sterownik zgodnie z poniższymi zaleceniami 1 Kliknij przycisk Update Driver 2 Zaznacz pole Install from a list or specific location ...

Page 136: ...bierz start All Programs Programs Panasonic SweetMovieLife 1 0E lub MotionDV STUDIO 5 6E LE for DV Manual PDF format Uruchom program i wybierz opcję Help Help z menu aby wyświetlić plik pomocy Aby otworzyć instrukcję obsługi PDF wymagany jest program Adobe Acrobat Reader 5 0 lub nowszy Korzystanie z kabla USB w zestawie Komputer powinien posiadać port USB Hi Speed USB USB 2 0 1 Ustaw w kamerze odt...

Page 137: ...mocą pakietu SP2 należy wybrać opcje start All Programs Programs Windows Update Po podłączeniu kamery do komputera można przesyłać obraz wideo i dźwięk z kamery do innych osób za pośrednictwem sieci Odpowiednie skonfigurowanie komputera umożliwia również przesyłanie dźwięku w obie strony można korzystać z mikrofonu podłączonego do komputera zamiast mikrofonu kamery Minimalne wymagania przedstawion...

Page 138: ...anie podświetlony na żółto Naciśnięcie środkowej części joysticka powoduje miganie ikony operacji zamiast pojawienia się jej z boku ekranu Inne ª Kopiowanie plików do komputera PC Funkcja czytnika kart pamięć masowa Po podłączeniu do komputera PC za pomocą kabla USB kamera z kartą pamięci może pełnić rolę zewnętrznego napędu Tym samym pliki zapisane na karcie można kopiować na komputer za pomocą p...

Page 139: ...nę w obszarze powiadomień paska zadań Zostanie wyświetlone okno dialogowe odłączania sprzętu 2 Wybierz element USB Mass Storage Device i kliknij przycisk Stop 3 Sprawdź czy zaznaczony został element Matshita DVC USB Device i kliknij przycisk OK Po kliknięciu przycisku Close można bezpiecznie odłączyć kabel Uwaga dotycząca wyświetlanej nazwy sterownika Wyświetlana nazwa sterownika zależy od używane...

Page 140: ...zas używania kamery w roli kamery internetowej jakość przesyłanego obrazu wideo zależy od jakości połączenia z Internetem W trybie kamery internetowej zapisywanie obrazu wideo na taśmie lub karcie jest niemożliwe Podczas pracy w trybie kamery internetowej w czasie przesyłania dźwięk może być przerywany w zależności od środowiska wymiany danych oraz wydajności komputera osobistego Podłączenie kabla...

Page 141: ...4 LINIE POMOCY 114 WYGAŚ KOL 112 NAGR AUDIO 143 F CJA USB 136 ZOOM CYFR 108 ZOOM MIKR 108 3 USTAWIENIA WYŚWIETL 143 DATA CZAS 143 OSZCZ EN 143 SZYBKI START 93 SAMOWYŁĄCZ 112 ZDALNY 102 DźW BIP 143 JASNOŚĆ LCD 100 USTAW LCD 100 USTAW EVF 100 UST WST 144 F CJA DEMO 144 4 LANGUAGE 98 ª TRYB ODTWARZANIA Z TAŚMY 1 PODSTAWOWE DATA CZAS 143 F CJA USB 136 2 ZAAWANSOW DANE NAGR 143 JAKOŚĆ OBR 107 POWT ODTW...

Page 142: ...DATA CZAS 143 OSZCZ EN 143 SZYBKI START 93 ZDALNY 102 DźW BIP 143 JASNOŚĆ LCD 100 USTAW LCD 100 USTAW EVF 100 UST WST 144 4 LANGUAGE 98 ª TRYB WYŚWIETLANIA OBRAZU 1 PODSTAWOWE DATA CZAS 143 CHROŃ 124 2 ZAAWANSOW UST DPOF 124 FORM KARTY 123 3 USTAWIENIA WYŚWIETL 143 ZDALNY 102 JASNOŚĆ LCD 100 USTAW LCD 100 USTAW EVF 100 OSZCZ EN 143 FORMAT TV 121 4 LANGUAGE 98 VQT1A45_POL book 142 ページ 2006年12月6日 水曜...

Page 143: ... ekranie 146 ª OSZCZ EN WYŁĄCZ Tryb gotowości włącza się automatycznie po około 5 minutach bezczynności W trybie gotowości pulsuje symbol W takim przypadku rozpoczęcie nagrywania po naciśnięciu przycisku start stop nagrywania trwa dłużej niż zwykle 5 MINUT Po około 5 minutach bezczynności kamera automatycznie wyłącza się co ma na celu ochronę taśmy oraz uniknięcie rozładowania akumulatora Aby rozp...

Page 144: ...a lub karta powoduje automatyczne uaktywnienie trybu demonstracyjnego prezentującego funkcje kamery Naciśnięcie któregokolwiek przycisku bądź skorzystanie z innych elementów sterujących powoduje przerwanie demonstracji Tryb demonstracji włącza się automatycznie po około 10 minutach bezczynności Aby przerwać demonstrację należy włożyć kasetę bądź kartę lub wybrać opcję F CJA DEMO WYŁĄCZ Podczas nor...

Page 145: ...b światła punktowego tryb sceny 115 Tryb zdjęć na śniegu tryb sceny 115 Automatyczny balans bieli 116 Tryb zdjęć w pomieszczeniach wykonywanie zdjęć w świetle żarówek 116 Tryb zdjęć w plenerze 116 Tryb korekcji balansu bieli 116 Wskaźniki dotyczące odtwarzania 1 Odtwarzanie 119 Pauza 119 5 Przewijanie przewijanie z podglądem do przodu 119 6 Przewijanie przewijanie z podglądem do tyłu 119 D E Odtwa...

Page 146: ...pisania obrazu na kasecie z suwakiem blokady zapisu w pozycji SAVE Podjęto próbę podłożenia dźwięku bądź cyfrowego kopiowania synchronicznego na kasetę z suwakiem blokady zapisu w pozycji SAVE SPRAWDź USTAWIENIA KODU PILOTA Wybrano niewłaściwy kod tryb pracy pilota Informacja ta jest wyświetlana tylko po pierwszym użyciu pilota po włączeniu kamery 102 NIEODPOW TAŚMA Podjęto próbę odtwarzania fragm...

Page 147: ...óbę zmiany opcji ZOOM CYFR w trybie MotionDV Funkcje z których nie można korzystać jednocześnie W pewnych warunkach niektóre funkcje kamery są wyłączone bądź nie można ich uaktywnić W poniższej tabeli przedstawiono przykłady funkcji których działanie może być w pewnych warunkach ograniczone Funkcja Warunki uniemożliwiające działanie danej funkcji Zoom cyfrowy Funkcja przejścia Korzystanie z trybu ...

Page 148: ...ratura otoczenia w dużym stopniu wpływa na pracę akumulatora nadmierne wychłodzenie powoduje skrócenie czasu pracy Czy okres eksploatacji akumulatora dobiegł końca Akumulator ma ograniczony cykl eksploatacji Jeśli czas pracy po właściwym naładowaniu jest zbyt krótki przy normalnym użytkowaniu okres eksploatacji akumulatora dobiegł końca i nie należy z niego korzystać 5 Nie można korzystać z kamery...

Page 149: ...utomatycznego W pewnych warunkach i przy wykonywaniu zdjęć pewnych obiektów automatyczne ustawianie ostrości może nie działać prawidłowo 157 W takim przypadku należy ustawić ostrość ręcznie 117 5 Kamera arbitralnie zatrzymuje nagrywanie Czy funkcja AGS jest uaktywniona Nagrywaj w normalnej poziomej pozycji lub ustaw opcję SAMOWYŁĄCZ na WYŁĄCZ 112 Wskaźniki 1 Na środku ekranu wyświetlany jest komun...

Page 150: ...ła wybrana opcja USTAWIENIA FONIA12bit ST2 Podczas odtwarzania kasety bez podłożonego dźwięku należy wybrać opcję FONIA12bit ST1 127 Czy została włączona funkcja przeszukiwania ze zmienną prędkością W takim przypadku należy nacisnąć przycisk VAR SEARCH na pilocie aby wyłączyć działanie tej funkcji 120 Odtwarzanie obraz 1 Kamera jest właściwie podłączona do telewizora ale nie widać odtwarzanego obr...

Page 151: ...y urządzenie obsługuje karty tego typu karty pamięci SD SDHC lub o tej pojemności 95 Szczegółowe informacje znajdziesz w instrukcji obsługi urządzenia Inne 1 Znikają wskaźniki a obraz na ekranie nie zmienia się i nie można wykonać żadnej operacji W takim przypadku należy wyłączyć zasilanie kamery a jeśli nie można go wyłączyć należy posłużyć się przyciskiem RESET wyjąć akumulator lub odłączyć zasi...

Page 152: ...otyczące użytkowania ª Uwagi dotyczące skraplania pary wodnej Po włączeniu kamery w sytuacji gdy doszło do skroplenia pary wodnej na głowicy lub na taśmie w wizjerze lub na wyświetlaczu LCD pojawia się wskaźnik skraplania 3 żółty lub czerwony a ponadto wyświetlony zostaje komunikat 3WYKRYTO WILGOĆ lub 3WYSUŃ KASETĘ tylko gdy w kamerze znajduje się kaseta W takim przypadku należy postępować zgodnie...

Page 153: ...ktromagnetyczne takich jak kuchenki mikrofalowe telewizory gry wideo itp W przypadku umieszczenia kamery w pobliżu telewizora lub na nim promieniowanie elektromagnetyczne może powodować zakłócenia obrazu i dźwięku Nie należy używać kamery w pobliżu telefonów komórkowych gdyż może to powodować zakłócenia obrazu i dźwięku Silne pole magnetyczne wytwarzane przez głośniki lub duże silniki elektryczne ...

Page 154: ...ry należy zawsze wyjąć akumulator Jeśli akumulator pozostanie podłączony do kamery będzie z niego pobierana niewielka ilość prądu nawet jeśli kamera jest wyłączona OFF Pozostawienie akumulatora w kamerze przez dłuższy czas może spowodować jego nadmierne rozładowanie i uniemożliwić ponowne naładowanie Akumulator należy przechowywać w suchym i chłodnym miejscu w miarę możliwości w stałej temperaturz...

Page 155: ...dzenie kamery i jej głowic Po użyciu taśmę należy przewinąć do początku i umieścić w pudełku chroniącym kasetę przed kurzem Pudełko należy przechowywać w pozycji pionowej Kasetę należy przechowywać z dala od silnych pól magnetycznych Przedmioty wykorzystujące magnesy takie jak naszyjniki czy zabawki mogą emitować nadspodziewanie silne pole magnetyczne które może powodować wykasowanie nagrań bądź w...

Page 156: ...ł światła automatyczna korekcja nie działa w przypadku występowania innych źródeł Poza zakresem skutecznego działania automatycznej korekcji balansu bieli obraz może mieć odcień czerwonawy lub niebieskawy Nawet w ramach podanego zakresu automatyczna korekcja balansu bieli może nie działać prawidłowo jeśli występuje kilka źródeł światła Należy wówczas skorzystać z funkcji ręcznej korekcji balansu b...

Page 157: ...iżej Konieczne jest wtedy ręczne ustawienie ostrości Wykonywanie zdjęć obiektów których jeden koniec znajduje się blisko a drugi koniec daleko od kamery Ponieważ funkcja automatycznego ustawiania ostrości działa w środku kadru często niemożliwe jest ustawienie ostrości obiektu zajmującego zarówno pierwszy jak i drugi plan Wykonywanie zdjęć obiektów znajdujących się za brudną lub zakurzoną szybą Ob...

Page 158: ...m sygnału wyjściowego S Video Wyjście Y 1 0 Vp p 75 Wyjście C 0 3 Vp p 75 Poziom sygnału wyjściowego audio wyjście liniowe 316 mV 600 USB Czytnik rejestrator kart port USB Hi Speed USB USB 2 0 Brak obsługi funkcji ochrony praw autorskich Zgodność z funkcją PictBridge Interfejs cyfrowy Gniazdo wyjściowe DV IEEE1394 4 stykowe Wymiary 78 5 mm szer k72 6 mm wys k136 0 mm dł bez wystających części Masa...

Page 159: ... tryb 16 9 WIELKOŚĆ ZDJĘCIA JAKOŚĆ ZDJĘĆ 8 MB 45 95 12 19 4 7 16 MB 100 200 29 46 11 18 32 MB 220 440 64 98 24 39 64 MB 440 880 130 200 51 81 128 MB 880 1760 250 390 99 155 256 MB 1760 3520 530 810 210 330 512 MB 3520 7040 1040 1600 410 650 1 GB 7040 14080 2090 3200 820 1290 2 GB 14080 28160 4250 6510 1680 2630 4 GB 28160 56320 8350 12780 3290 5170 WIELKOŚĆ ZDJĘCIA JAKOŚĆ ZDJĘĆ 8 MB 45 95 9 15 5 9...

Page 160: ...L VQT1A45 F1206Kk0 2500 A C Matsushita Electric Industrial Co Ltd Web site http panasonic net VQT1A45_POL book 160 ページ 2006年12月6日 水曜日 午前9時47分 ...

Reviews: