7
Auto Setup Function
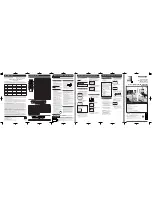
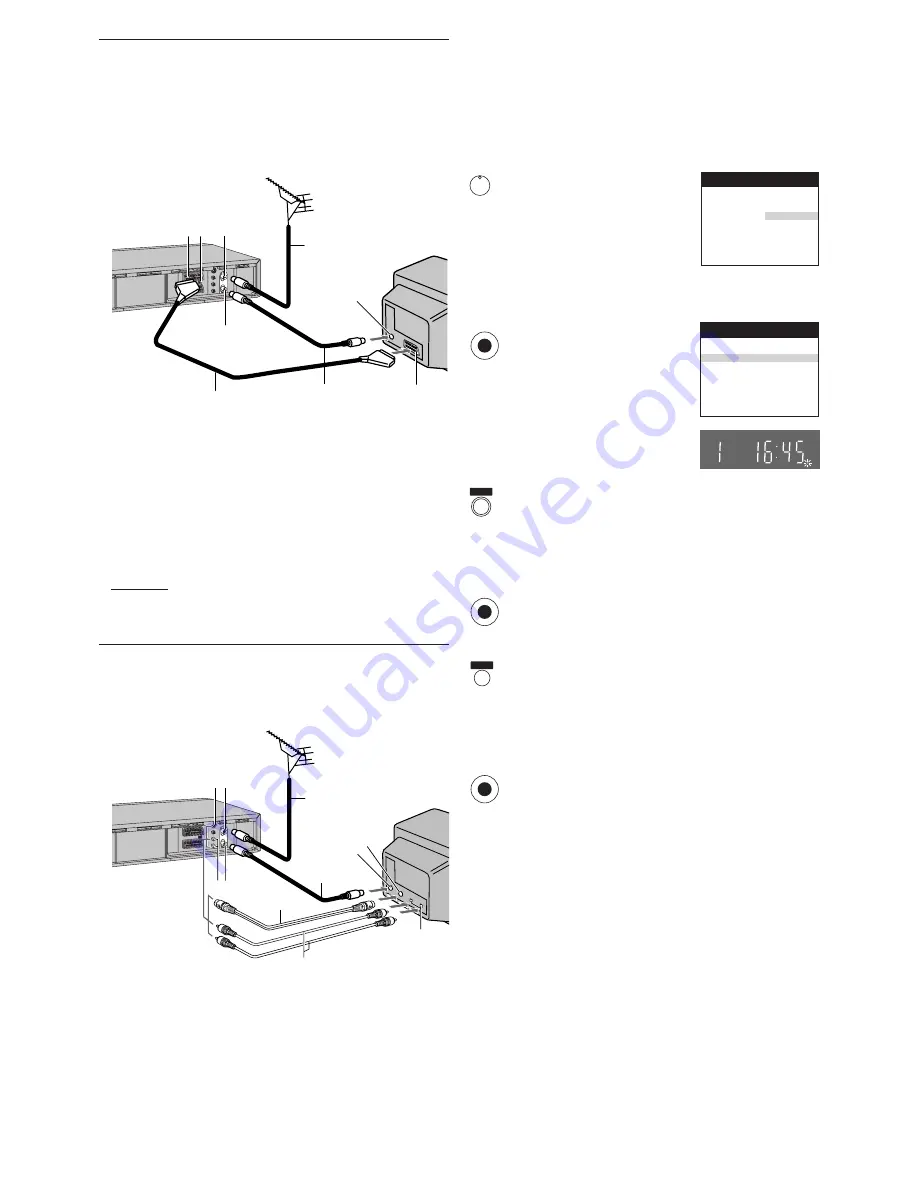
The Auto Setup function automatically tunes all available TV
stations and sets the VCR’s clock to the current date and
time.
– When [
Россия
] (Russia) is selected in the Country setting
menu, the names of TV stations may not be correctly
displayed and the Auto Clock Setting does not work.
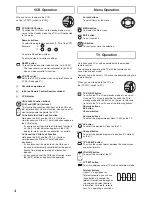
Press the [VCR-ON/OFF] button
to turn on the VCR.
The Country setting menu
appears on the TV screen.
Press the [Cursor] buttons
3421
.
Select the country where you are using the VCR.
Press the [OK] button.
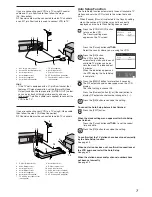
The VCR’s Auto Setup
automatically starts and tunes all
available TV stations and also
sets the clock. This takes about
5 minutes.
When the indication appears on
the VCR display, the Auto Setup
is complete.
Press the [MENU] button for more than 5 seconds.
The RF output channel number appears on the VCR
display.
The initial setting is channel 38.
Press the [Numeric] button [0] or [Channel] button to
display RF output channel number changes to [– –].
Press the [OK] button to conclude the setting.
To cancel the Auto Setup before it has finished
Press the [EXIT] button .
When the clock setting menu appears after Auto Setup
has finished
Press the [Cursor] buttons
3421
to set the correct
time and date.
Press the [OK] button to conclude the setting.
To confirm that the TV stations have been tuned correctly
by the Auto Setup function
See page 23.
When no station has been set, confirm all connections of
the VCR again and restart the Auto Setup
See page 24.
When the station names and/or channel numbers have
not been set correctly
See page 23.
Country
Deutschland
Česká Rep.
Magyarorsz
á
g
Polska
Россия
others
Panasonic VCR
EXIT
MENU
OK
1 2
3
4
5
6
7
8
9
10
11
Í
1
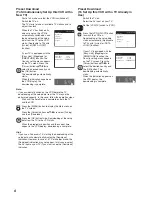
AV1 21-pin Scart socket
2
Normal/S-Video Output switch
3
Aerial Input socket
4
Aerial Output socket
5
Aerial (not supplied)
6
Aerial lead (not supplied)
0
7 TV (not supplied)
0
8 Aerial Input socket
0
9 21-pin Scart socket
10 RF Coaxial cable (supplied)
11 Fully-wired 21-pin Scart cable
(not supplied)
Country
Tuning
: others
: Ch
21
Auto-Setup
Panasonic VCR
OK
OK
If you are connecting your VCR to a TV using RF coaxial
cable and 21-pin Scart cable, then follow the steps.
(AV Connection)
RF Coaxial cable must be connected to watch TV channels
even if 21-pin Scart cable is used to connect VCR to TV.
Hint:
– If the TV set is equipped with a 21-pin Scart socket that
features Y/C signal separation, set the [Normal/S-Video
Output] switch on the rear panel to [S-VIDEO OUT] so that
you can play back with high picture quality and use a
fully-wired 21-pin Scart cable (not supplied) to connect the
VCR to the TV.
3
1
4
2
5
6
13
12
7
8
9
10
11
1
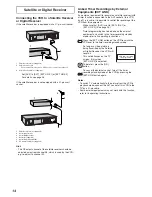
S-Video Output socket
2
Audio Output socket
3
Aerial Input socket
4
Aerial Output socket
5
Aerial (not supplied)
6
Aerial lead (not supplied)
7
TV with S-Video Input socket
(not supplied)
0
8 Aerial Input socket
0
9 S-Video Input socket
10 Audio Input sockets
11 Audio cables (not supplied)
12 S-Video cable (not supplied)
13 RF Coaxial cable (supplied)
If you are connecting your VCR to a TV using S-Video cable,
then follow the steps. (S-Video Connection)
RF Coaxial cable must be connected to watch TV channels.


