background image

Record mode

53

VQT0S76

Record mode

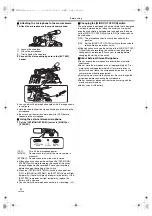
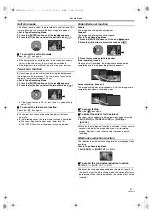
Check before recording

Check the following by trying recording before important events 
such as weddings in order to verify that the image recording 
and audio recording work properly and that you know how to 
use the movie camera.

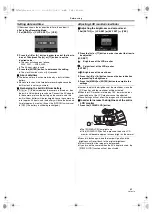
ª

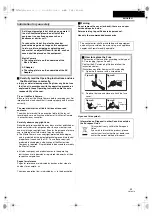
Holding the movie camera for recording

Normal recording.

When walking while recording, keep both eyes open so that 
you can see where you are going and what is happening 
around you.

Place the movie camera on your right shoulder and hold it 
firmly with both hands.

Hold the eyecup of the viewfinder as close as possible to your 
right eye.

Take a firm stance with the legs slightly apart.

For stable images, it is recommended to use a tripod 
(optional) whenever possible.

Low-angle recording.

Adjust the angle of the LCD monitor according to the position in 
which the movie camera is held.

If the movie camera is not held firmly in stable position, the 
picture in the LCD monitor cannot be watched properly.

For easier low-angle recording, the sub recording start/stop 
button and the sub zoom lever on the front of the movie 
camera can be used.

Recording from a high position.

For more stable pictures.

Stabilize the movie camera by resting your elbows on a table 
or another stable horizontal surface.

ª

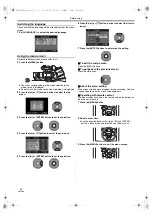
Check points

Remove the lens cap. (

-43-

)

(When the camera is turned on with the lens cap fitted, the 
automatic white balance adjustment may not function 
properly. Please turn the camera on after removing the lens 
cap.)

Grip belt adjustment (

-43-

Power supply (

-44-

Insert a cassette (

-46-

Setting date/time (

-49-

Adjustment of LCD monitor/viewfinder (

-49-

Getting the remote control ready (

-50-

Setting SP/LP mode (

-54-

)

ª

About auto mode

Set the [AUTO/MANUAL/FOCUS] switch to [AUTO], and 
colour balance (white balance) and focusing will be adjusted 
automatically.

Auto white balance: 

-74-

Auto focusing: 

-74-

Colour balance and focus may not be adjusted depending on 
light sources or scenes. If so, manually adjust the white 
balance and focus.

Scene mode setting (

-58-

White balance setting (

-59-

Shutter speed setting (

-60-

Iris/gain value setting (

-60-

Focus setting (

-60-

AUTO

MANUAL

FOCUS

VQT0S76_Eng.book  53 ページ  2005年7月21日 木曜日 午前11時48分

Summary of Contents for NV-MD10000GC

Page 1: ...使用前 請仔細閱讀本說明書 Before use please read these instructions completely VQT0S76 使用說明書 Operating Instructions 數位攝錄影機 Digital Video Camera Model No NV MD10000GC VQT0S76_TC book 1 ページ 2005年7月21日 木曜日 午後2時33分 ...

Page 2: ...和產品名稱都是各個公司的商標 或註冊商標 參照頁 參照頁頁碼的兩側標有短划線 例如 00 菜單操作流程用 表示 ª 警告 請勿卸下機身的前蓋 或後蓋 機身內沒有用戶可維修的部 件 需要維修時 請聯係授權的維修人員 請僅使用推薦的附件 如果看到此符號的話 由於本設備使用時會變熱 請在空氣流通的地方進行操 作 不要將此設備安置在狹窄的空間內 例如書櫃或類似 的地方 若想降低火災 電擊或產品損壞的危險 請勿將本設備暴 露於雨中 潮濕 滴水或濺水的環境中 並確保勿將盛滿 液體的物體 如花瓶 放在本設備上 攝錄影機 標牌位於攝錄影機下部 AC 適配器 標牌位于 AC 適配器的下面 電源插座應當安置在本設備附近 並便於連接 或者電源 插頭或電器耦合器保持在隨時可以使用的狀態 ª 如何更換保險絲 保險絲的位置根據 AC 電源線類型的不同而有所不同 圖 A 與 B 確保使用合適的 AC 電源線並遵照下列指...

Page 3: ...白搜索功能 17 放大 縮小功能 18 調節麥克風靈敏度級 18 自拍 19 逆光補償功能 19 夜視功能 19 肌膚柔和模式 20 長焦微距功能 20 淡入 淡出功能 20 消除風聲噪音功能 20 錄製供寬銀幕電視使用的影像 21 畫面穩定器功能 21 在不同情況下拍攝 場景模式 21 用自然色彩拍攝 白平衡 22 手動對焦調整 23 手動快門速度 光圈調整 23 重播模式 重播錄影帶 24 慢動作重播 逐格重播 24 變速搜索功能 25 在電視機上重播 25 編輯模式 複製到 DVD 錄影機或 VCR 中 配音 26 用 DV 電纜錄製 數位配音 27 配音 28 菜單 菜單列表 29 與照相有關的菜單 30 與重播有關的菜單 30 其他菜單 30 其他方面 指示內容 31 警告 報警指示 31 無法同時使用的功能 32 請求修理前 問題和解決方法 32 使用注意事項 34 術語解釋 ...

Page 4: ...平衡傳感器 22 3 錄影指示燈 30 4 遙控傳感器 13 5 鏡頭 6 鏡頭遮光罩 7 鏡頭遮光罩安裝鈕 勿在鏡頭罩前面安裝其他轉換鏡頭 鏡頭罩上沒有供安裝的底 座 當您打算將廣角轉換鏡頭 VW LW4307ME 選購件 MC 保 護鏡或濾光鏡組件 VW LF43WE 選購件 中的 ND 濾色鏡 時 首先 請鬆開鏡頭遮光罩安裝鈕 1 如果要使用 MC 保 護鏡或 ND 濾色鏡 可以將鏡頭遮光罩裝在濾色鏡上 當您重新裝回鏡頭遮光罩時 請對齊標記 然後擰緊鏡頭遮光 罩安裝鈕 1 在攝錄影機安裝了濾色鏡或其他轉換鏡頭的情況下 如果在錄 影中把 W T 手柄推向 W 圖像的 4 個角可能要變暗 漸 暈 詳細情況請參照附件使用說明書 必須將鏡頭罩一直安裝在攝錄影機上 以遮擋不必要的光線 8 模式開關 CAMERA VCR 10 17 24 9 方式選擇開關 AUTO MANUAL FOCUS 1...

Page 5: ... EJECT 9 34 直流輸入插孔 DC IN 7 35 DV 端子 DV 27 可將該端子連接至數位攝像設備 36 S Video 輸出插座 S VIDEO OUT 25 26 37 視頻輸出插座 VIDEO OUT 25 26 38 音頻輸出插座 AUDIO OUT 25 26 39 電源指示燈 10 40 錄影開始 停止鍵 17 41 關 開 開關 OFF ON 10 42 三腳架座 這是一個孔眼 用於把攝錄放影機安裝到可選的三腳架 VW CT45E 上 關於如何把三腳架安裝到攝錄放影機上 請仔 細閱讀使用說明書 由於 LCD 生產技術的限制 在取景器熒屏上 可能會有一些微小的亮點或者暗點 但這不 是故障 不影響拍攝的圖片 由於 LCD 生產技術的限制 在 LCD 顯示屏 熒屏上可能會有一些微小的亮點或者暗點 但這不是故障 不影響拍攝的圖片 13 14 15 16 17 19 18...

Page 6: ...長度調節器中 拉出此端頭 拉出的端頭長度距離肩背帶長度調節器要在2 釐米以上1 以 防止帶子滑出來 使用 LCD 顯示屏 可以在打開的 LCD 顯示屏上一邊觀看影像 一邊進行拍攝 1 一邊按 PUSH OPEN 鍵 一邊同時依箭頭所示 將 LCD 顯示 屏外撥約 90o 取景器將關閉 2 調整 LCD 顯示屏的角度 達到您滿意的程度 它能朝鏡頭方向轉動 180o 1 或者朝取景器方向轉動 90o 2 可以從菜單調整 LCD 顯示屏的亮度和色彩級別 如果強力打開或轉動 LCD 顯示屏 攝錄放影機可能會被損壞或 造成故障 當 LCD 顯示屏朝鏡頭方向轉動 180o 進行自拍時 LCD 顯示屏 和取景器會同時啟動 1 PUSH OPEN 1 180o 2 90o VQT0S76_TC book 6 ページ 2005年7月21日 木曜日 午後2時33分 ...

Page 7: ...池放到電池安裝座上 然後再把電源插頭牢牢 地插進去 ª 充電指示燈 點亮 充電正在進行 熄滅 充電已經完成 閃爍 電池過放電 過度放電 稍等片刻 指示燈將會點 亮 開始正常充電 當電池的溫度過高或過低時 CHARGE 指示燈閃 爍 電池的充電時間將比正常的充電的時間要長一 些 ª 連接到 AC 電源插座 1 把 AC 電源線連接到 AC 適配器和 AC 電源插座 2 把 DC 輸入線連接到攝錄影機上的 DC IN 插孔 3 把 DC 輸入線連接到 AC 適配器 AC 電源線的輸出插頭不能完全插入 AC 適配器的插口內 如 圖 1 所示 有一個空隙 由於電源線是專為攝錄放影機設計的 不要在其他設備上使 用本電源線 或者不要在本攝錄放影機上使用其他設備的電 源線 12 30 45 15 10 2005 12 30 45 15 10 2005 12 30 45 15 10 2005 12 30 ...

Page 8: ...下 可拍攝的時間將會變短 同時使用取景器和 LCD 顯示屏 並向前轉動 LCD 顯示屏進行 自拍時 使用 0 勒克斯夜視功能等 當使用本攝錄放影機時 LCD 顯示屏是用 POWER LCD 鍵 點亮的 電池在使用或者充電後 會變熱 使用時攝錄放影機的主要機 件也會變熱 這是正常的現象 隨著電池容量的減少 其顯示將發生變化 如果全部放電 將閃爍 PUSH OFF ON 提供的電池 7 2 V 1350 mAh A 1 h 30 min B 2 h 40 min 2 h 25 min C 1 h 20 min 1 h 15 min CGR D08S 7 2 V 800 mAh A 1 h B 1 h 50 min 1 h 45 min C 55 min 55 min CGR D16S 7 2 V 1600 mAh A 2 h B 3 h 45 min 3 h 30 min C 1 h 55 m...

Page 9: ...報警 也可能在磁頭或錄影帶上已經形 成了水汽凝結 此時不要打開錄影帶倉蓋 34 ª 當錄影帶倉不能露出時 完全關閉錄影帶倉蓋 然後再重新完全打開 檢查電池電量是否已經耗盡 ª 當錄影帶倉不能座合時 將 OFF ON 開關設置為 OFF 然後再設置為 ON 檢查電池電量是否已經耗盡 ª 插入 取出錄影帶 當錄影帶倉正在運作時 不要觸動任何部分 除 PUSH 標記 以外 當插入先前已經錄製過的錄影帶時 請使用空白搜索功能找出 您想繼續進行錄製的位置 如果在一個先前錄製過的錄影帶上 進行覆蓋錄製 一定要找到您想繼續進行錄製的位置 請關嚴錄影帶倉蓋 在關閉錄影帶倉蓋時 不能讓任何物品 如電纜 捲入到倉蓋 內 ª 防止意外擦除 如果打開了錄影帶上的防止意外擦除滑塊 1 朝 SAVE 箭頭方 向滑動 就不能在這個錄影帶上進行拍攝 當拍攝時 要關閉 錄影帶的防止意外擦除滑塊 朝 REC 箭頭方向滑動 O...

Page 10: ...帶重播模式 使用這個模式來重播錄影帶 使用螢幕顯示 按游標鍵中間的 進入 鍵 螢幕上將出現圖示 根據模式的不 同 每按一次顯示將如下所示進行切換 在錄影帶重播模式中 圖示將自動顯示在螢幕上 1 錄影帶拍攝模式 AUTO MANUAL FOCUS 開關設置為 AUTO 2 錄影帶拍攝模式 AUTO MANUAL FOCUS 開關設置為 MANUAL 3 錄影帶重播模式 OFF ON OFF ON CAMERA VCR 3 長焦微距 20 4 肌膚柔和模式 20 2 漸變 20 1 逆光補償 19 3 夜視 0 勒克斯夜視 19 4 拍攝檢查 17 4 白平衡 快門速度 光圈或增益值 22 1 選擇 調整 22 2 選擇 調整 22 3 重播 暫停 24 4 停止 24 2 回捲 回捲搜索重播 24 1 快進 快進搜索重播 24 OFF OFF OFF VQT0S76_TC book 10 ペ...

Page 11: ...設定選擇 4 按 3 或 4 鍵選擇子功能表 5 按 1 或 進入 鍵設定選擇 6 按 3 或 4 鍵選擇要設定的項目 7 按 進入 鍵確定設定 ª 退出菜單熒屏 按 MENU 鍵 ª 回到前一個熒屏 按 2 鍵 ª 關於菜單設置 錄製的過程中不會出現菜單熒屏 並且 當菜單熒屏出現時 不能進行拍攝 ª 用遙控器進行操作 菜單熒屏的變化與使用主機上的鍵子時是一樣的 1 按 MENU 鍵 2 選擇一個菜單項 用方向鍵 π 和 ENTER 鍵來代替主機上的游標 鍵 3 按 MENU 鍵退出菜單熒屏 MENU ENTER VAR SEARCH MENU ENTER VAR SEARCH MENU ENTER VAR SEARCH MENU VQT0S76_TC book 11 ページ 2005年7月21日 木曜日 午後2時33分 ...

Page 12: ...24 小時 電池就能驅動日期和時間大約 6 個月 即便 OFF ON 開關設置為 OFF 電池也會被充電 調整 LCD 顯示屏 取景器 ª 調整亮度及色彩級別 1 設置 設定 LCD 設定 或 EVF 設定 是 2 按 3 或 4 鍵選擇要調整的項目 LCD 設定 LCD 顯示屏的亮度 LCD 顯示屏的色彩級別 EVF 設定 取景器的亮度 3 按 2 或 1 鍵移動表示亮度的豎條指示 4 按 MENU 或 進入 鍵 完成設定 為了調整取景器的亮度 請關閉 LCD 顯示屏 取景器將會被啟 動 當 LCD顯示屏朝鏡頭方向旋轉 180 時 LCD顯示屏的亮度不能 調整 這些設置不會影響實際錄製的影像 ª 為了增加 LCD 顯示屏整體的亮度 1 按 POWER LCD 鍵 POWER LCD 指示燈點亮 如果按下 POWER LCD 鍵 整個 LCD 顯示屏的亮度就會比 正常情況下大約亮一倍左右 ...

Page 13: ... 之內 角度 約 向上 10o 向下 左 右 15o STOP OSD V REW STILL ADV DATE TIME VOL ZOOM REC PHOTO SHOT START STOP A DUB PLAY PAUSE FF W STILL ADV ENTER VAR SEARCH MENU T W 1 2 3 4 5 STOP OSD V REW STILL ADV DATE TIME VOL ZOOM REC PHOTO SHOT START STOP A DUB PLAY PAUSE FF W STILL ADV VAR SEARCH MENU ENTER T W 6 7 8 9 STOP OSD V REW STILL ADV DATE TIME VOL ZOOM REC PHOTO SHOT START STOP A DUB PLAY PAUSE FF W STILL A...

Page 14: ...作 請設置相同的遙控模式 遙控器僅限於室內使用 在室外或強光下使用 即使遙控器處 於可用範圍之內 攝錄放影機也有可能不能正常操作 處於 1 米以內時 可以在攝錄放影機的遙控感測器 LCD 顯示屏 一側 的旁邊進行操作 使用外部立體聲麥克風 ª 外部立體聲麥克風 可以將附帶的外部立體聲麥克風切換至立體聲或單聲錄音狀態 1 風聲抑制 麥克風電容器 2 Off On 狀態選擇開關 OFF MONO STEREO 15 3 電池檢查燈 BATTERY 15 4 WIND CUT OFF ON 開關 15 5 立體聲迷你插頭軟線 15 6 底座 15 7 底座鎖頭 15 ª 插入電池 1 從麥克風上拆下電池蓋 依箭頭 1 所示 擠按蓋子上的 標誌 並依箭頭 2 所示 滑動蓋子 2 如圖所示 首先插入電池的 j 極端頭 插入電池時 必須使 j 和 i 極面朝正確的方向 3 重新裝上電池蓋 當電池耗盡時...

Page 15: ...開關時 如果電池中仍有大量的電力 BATTERY 燈將會暫 時點亮 如果 BATTERY 燈未暫時點亮 請將電池換新 您可調節錄音用麥克風的靈敏度 18 ª 切換 WIND CUT OFF ON 開關時 該麥克風裝備了風聲抑制功能 這種設計雖然可遮斷風聲噪音 但是當風太大 而風聲抑制功能仍無法降低噪音時 請將 WIND CUT OFF ON 開關切換至 ON 以進一步減少風聲噪 音 OFF 一般情況下 應該在該位置來使用麥克風 ON 將 WIND CUT OFF ON 開關設定在該位置 可減少風 聲噪音或低頻噪音 儘管您可以在拍攝中改變 WIND CUT OFF ON 開關的設定 值 但可能會記錄下切換聲 在改變該開關的設定值之前 請 暫停拍攝 ª 關於外部立體聲麥克風 勿將殺蟲劑或揮發物噴灑在麥克風上 勿將麥克風存放在熱環境 約 60 oC 或以上 或潮濕處 約 80 或以上 尤其是勿將...

Page 16: ... LCD 顯示屏中 的畫面將無法得到正確地觀看 為了使低角度的拍攝已經容易 可以利用攝錄影機前面的次拍 攝開始 停止鍵和次變焦桿 從高處拍攝時 為了獲得更穩定的畫面時 請將手肘放在桌子或其它穩定的水平表面來穩定攝錄影機 ª 檢查要點 取下鏡頭蓋 6 如果在鏡頭蓋未取下的情況下打開攝錄放影機 自動白平衡 調整可能無法正常工作 請取下鏡頭蓋後 再打開攝錄放影 機 手柄帶的調整 6 電源 7 插入錄影帶 9 設置日期 時間 12 調整 LCD 顯示屏 取景器 12 準備好遙控器 13 設置 SP LP 模式 17 ª 關於自動模式 將 AUTO MANUAL FOCUS 開關設置為 AUTO 色彩平衡 白 平衡 和對焦將會自動調整 自動白平衡 37 自動對焦 37 根據光源和場景 色彩平衡和對焦可能不能調整 在這種情況 下 手動調整白平衡和對焦 場景模式設置 21 白平衡設置 22 快門速度設置...

Page 17: ...止鍵 開始拍攝 2 再次按拍攝開始 停止鍵 或次拍攝開始 停止鍵 暫聽拍攝 關於錄影帶的錄製時間 請參見 8 進行拍攝檢查 17 以確認拍攝的影像是否合乎要求 為了找出未錄製的部分 請進行空白搜索 17 ª 在錄影帶拍攝模式下熒屏上的顯示內容 1 已經流失的錄製時間 2 剩餘的錄影帶指示 ª 關於剩餘錄影帶時間在熒屏上的指示 剩餘錄影帶時間按分鐘顯示 小於 3 分鐘時 指示開始閃爍 在 15 秒或者更短的錄製期間內 可能不顯示剩餘錄影帶時間指 示或剩餘錄影帶時間指示不準確 有時剩餘錄影帶時間指示所顯示的剩餘錄影帶時間會比實際剩 餘錄影帶時間短 2 至 3 分鐘 檢查拍攝 被拍攝的最後的影像將被重播 2 到 3 秒鐘 檢查完畢後 攝錄放影機將設置為拍攝暫停 設置為錄影帶拍攝模式 1 在拍攝暫停時按 進入 鍵直到圖示 1 出現 2 按 4 鍵選擇拍攝檢查圖示 空白搜索功能 搜索已經錄製影像的最...

Page 18: ...集近處的聲音 設置為錄影帶拍攝模式 1 設置 進階功能 變焦麥克風 開 ª 關於變速變焦功能 當把 W T 桿推到頭時 可以從 1k 變焦到 10k 最多在 2 1 秒 內 變焦速度的變化取決於 W T 桿的移動量 變速變焦功能不能與遙控器及次變焦桿一同使用 調節麥克風靈敏度級 您可調節錄音用麥克風的靈敏度 1 設定 進階功能 麥克風聲量 自動 設定rAGC 或 設定 AGC Auto Gain Control 自動增亮控制 自動 將啟動 AGC 並自動調節錄音電平 設定 rAGC 可設定需要的錄音電平 也將啟動 AGC 以減 少音樂的失真量 設定 不會啟動 AGC 所以可進行自然錄音 用這樣 方法進行調節 使最大音量下的聲音也不會失 真 2 按 2 或 1 鍵增加或減少增益值的豎條數量 3 按 MENU 或 進入 鍵完成設定 調整增益值 這樣 的最後 3 條豎條不會亮起為紅色 否 則 聲...

Page 19: ...償就會被 取消 夜視功能 本項功能可使您拍攝暗處的彩色物體 使它在背景上突出出來 將攝錄放影機安裝到三腳架上 就可以拍攝到沒有振動的影像 只能使用手動對焦 所拍攝的場景看起來似乎是缺少了邊框 彩色夜視功能 可以把黑暗的地方拍攝得色彩明亮 0 勒克斯夜視功能 可以使用 LCD 顯示屏上的照明來拍攝完全黑暗的地方 設置為錄影帶拍攝模式 1 按 進入 鍵直到圖示 1 出現 2 按 3 鍵選擇夜視圖示 每朝上按一次 就會切換一次模式 OFF 彩色夜視功能 0 勒克斯夜視功能 OFF 3 在 0 勒克斯夜視功能的情況下 把 LCD 顯示屏轉向鏡頭一側 當 LCD 顯示屏翻轉時 強力 LCD 指示燈打開 熒屏亮起為白 色 一邊在取景器上觀看 一邊拍攝物體 LCD 顯示屏的光線可達到約 1 2 米或者不足 1 2 米 ª 取消彩色夜視功能 選擇夜視圖標直到夜視指示消失 如果在明亮的地方設置 則熒屏就可能...

Page 20: ...如果得不到更準確的焦距 請手動調整焦距 在下列的情況下 長焦微距功能會被取消 變焦的放大率變得低於 10k 操作 OFF ON 開關或者模式開關 淡入 淡出功能 淡入 影像和聲音漸漸出現 淡出 影像和聲音漸漸消失 設置為錄影帶拍攝模式 1 按 進入 鍵直到圖標 1 出現 2 按 2 鍵選擇漸變圖示 3 按拍攝啟動 停止鍵 開始拍攝 淡入 開始拍攝時 影像 聲音完全消失 然後漸漸出現 拍攝暫停 淡出 影像 聲音逐漸消失 影像 聲音完全消失後 拍攝停止 ª 取消漸變 再次選擇 指示 ª 選擇淡入 淡出的顏色 在漸變圖片上出現的顏色是可以選擇的 1 設置 設定 淡入淡出 白色 或 黑色 當選擇淡入 淡出功能時 在開始拍攝影像時需要花費幾秒鐘 的時間顯示出影像 此外 暫停拍攝也要花費幾秒鐘的時間 消除風聲噪音功能 這個功能可以消減在拍攝時吹入麥克風的風聲噪音 設置為錄影帶拍攝模式 1 設置 基本功...

Page 21: ...機抖動得很厲害時 當您追蹤著一個運動著的物體來進行拍攝時 在不同情況下拍攝 場景模式 在各種不同情況下拍攝影像時 此模式可自動將快門速度和光 圈設置為最佳值 設置為錄影帶拍攝模式 1 將 AUTO MANUAL FOCUS 開關設置為 MANUAL 2 設置 基本功能 場景模式 選擇所需要的模式 1 5 運動模式 這一模式的用途是拍攝運動場景或有快速移動的場景 2 肖像模式 這一模式的用途是使人物在背景中突出出來 3 低照度模式 這一模式的用途是使黑暗的場景拍攝得較為明亮 4 聚光燈模式 這一模式的用途是拍攝晚會上或劇院裡處於聚光燈下的目 標 5 海灘及雪地模式 這一模式的用途是在滑雪場和海灘等耀眼處拍攝影像 ª 取消場景模式功能 設置 基本功能 場景模式 關 或將 AUTO MANUAL FOCUS 開關設置為 AUTO 運動模式 對拍攝的圖片進行慢動作重播或重播暫停時 此模式可消除 攝...

Page 22: ...頭蓋後 再打開攝錄放影機 在同時設置白平衡和光圈 增益時 要先設置白平衡 只要拍攝條件發生變化 就要重新正確調整白平衡 ª 手動設置白平衡 在步驟 3 中選擇 然後 當整個螢幕為白色時 按 3 鍵 選擇 指示 ª 關於 指示閃爍的說明 選擇手動調整模式時 閃爍說明以前調整的白平衡被保存 此設置將被保存直到白平 衡被再次重新調整 當白平衡不能在手動調整模式下進行設置時 在手動調整模式下無法在暗處正常調整白平衡 在這種情況 下 要使用自動白平衡模式 在手動調整模式下設置時 設置完成後 將保持點亮 ª 關於白平衡感測器 白平衡感測器能在拍攝時檢測光源的類型 拍攝時不要遮蓋白平衡感測器 否則將無法正常工作 ª 關於黑平衡調整 這是 3CCD 系統功能之一 當白平衡在手動調整模式下設置時 自動調整黑色 當調整黑平衡時 熒屏將暫時變黑 1 黑平衡調整 閃爍 2 白平衡調整 閃爍 3 調整完成 點亮 A...

Page 23: ...光圈 ª 恢復自動調整 將 AUTO MANUAL FOCUS 開關設置為 AUTO 手動快門速度調整 由於重播影像的顏色和亮度會有變化 所以要避免在熒光燈 水銀燈或鈉燈下拍攝 如果手動增加快門速度 則靈敏度將降低 從而增益值會自動 升高 那將會增加熒屏上的雜訊 如果物體極亮或高度反光 在重播影像上會出現垂直的光線 但這不是故障 在正常重播時 影像的移動可能會不流暢 在極亮的地方拍攝時 熒屏的色彩可能會改變或閃爍 在這種 情況下 手動將快門速度調整到 1 50 或 1 100 手動光圈 增益調整 如果該值不能變為 OPEN 則無法調整增益值 如果增益值增加 則熒屏上的雜訊就會增加 根據變焦放大率的不同 光圈值可能沒有顯示 ª 快門速度的範圍 1 50 至 1 8000 秒 錄影帶拍攝模式 快門速度越接近 1 8000 就越快 ª 光圈 增益值的範圍 CLOSE 關閉 F16 F2 0 OP...

Page 24: ...bit 音頻 中檢查設置情況 當用 12bit 錄製或配音 並設置了 設定 12bit 音頻 混合 時 不管 音頻輸出 中設置是什麼 聲音將會以立體 聲重播 慢動作重播 逐格重播 設置為錄影帶重播模式 只能用遙控器進行慢動作重播 慢動作重播 如果影像是以 SP 模式錄製的 則將以正常速度的 1 5 重播 如果影像是以 LP 模式錄製的 則將以正常速度的 1 3 重播 1 在重播過程中 按遙控器上的 E 鍵或 D 鍵 如果慢動作重播持續 10 分鐘以上 重播將自動停止 10 分 鐘的慢動作重播相當於 SP 模式下重播 2 分鐘或者 LP 模式 下重播 3 分鐘 逐格重播 1 在重播過程中 按遙控器上的 鍵 2 按遙控器上的 E 鍵或 D 鍵 重播暫停時 朝 T 方向 正常方向 或 W 方向 相反方向 推動攝錄放影機的 W T 桿 或次變焦桿 也可進入逐格重播 如果持續推動該桿 則影像將連續逐...

Page 25: ...如果電視機上有 S 視頻端子 還要連接一根 S 視頻纜線 2 這樣就可以欣賞到更美麗的影像 2 打開本攝錄影機 將模式開關設定為錄影帶重播模式 3 選擇電視機的輸入頻道 4 按 3 鍵選擇 1 圖示開始重播 圖像和聲音都輸出到電視機中 5 按 4 鍵選擇 圖示停止重播 只要插入 S 視頻纜線 就必須也插入 AV 電纜 使用 AC 適配器可以免除電池用光的煩惱 ª 如果沒有影像或聲音輸出到電視機中 檢查插頭的插入深度是否足夠 檢查連接端子 檢查電視機的輸入設定 輸入開關 有關更詳細的說明 請查 閱電視機的使用說明書 ª 在電視機上顯示熒屏信息 在 LCD 顯示屏或取景器上顯示的信息 操作圖標 時間碼和模 式指示等 以及日期和時間也可以在電視機上顯示 1 按遙控器上的 OSD 鍵 再次按下該鍵可消除 OSD 信息 ENTER VAR SEARCH MENU VIDEO IN AUDIO IN ...

Page 26: ...2 這樣就可以複製到更清晰的影像 用可選的 DV 電纜進行連接 僅適用於有 DV 插孔的設備 2 打開攝錄放影機 設置為錄影帶重播模式 3 選擇電視機和錄影機的輸入頻道 4 按 3 鍵選擇 1 圖示開始重播 影像和聲音被再現出來 5 開始錄製 錄影機 6 按 4 鍵選擇 圖示停止重播 7 停止錄製 錄影機 有關更詳細的說明 請參見電視機和錄影機的使用說明書 不需要功能指示或日期 時間指示時 可以按遙控器上的 OSD 鍵 用以取消指示 用 DV 電纜連接攝錄放影機和錄影機時 這些指示不會出現 ª 攝錄放影機既沒有影像也沒有聲音輸出到電視機中時 檢查插頭的插入深度是否足夠 檢查連接端子 VIDEO IN AUDIO IN S VIDEO IN 1 2 VIDEOOUT DV AUDIO L R OUT S VIDEOOUT 2 L2 L2 S DV VQT0S76_TC book 26 ページ...

Page 27: ... 放像機 ª 取消拍攝待機狀態 當攝錄影機處於拍攝待機狀態時 按 4 鍵選擇 圖示 在複製過程中 不要插拔 DV 電纜 否則複製會無法正常完成 如果被複製的圖片 雙語視頻等 中含有主音和次音 重播時要 用 設定 音頻輸出 選擇需要的聲音 即使所用設備上配有如 IEEE 1394 等的 DV 插孔 在某些情況下 也可能無法進行數位複製 有關更詳細的說明 請參見所連接 設備的使用說明書 不管錄影機上菜單的設置是什麼 數位複製都要採用與重播錄 影帶相同的 音效選擇 模式進行 錄影機顯示屏上的影像會失真 但不影響錄製的影像 如果攝錄放影機錄製的圖片中含有版權保護信號 複製保護 則在重播時會有馬賽克圖案造成圖片失真 當輸入寬銀幕影像時 諸如菜單熒幕或操作圖標那樣的顯示被 水平拉長 圖片從 DV 端口輸入的時候 當按 進入 鍵時 操作圖示開始閃 爍而不是從螢幕邊上顯現 1 DV DV STOP V R...

Page 28: ... 音效選擇 12bit 如果設置 16bit 則在配 音後 拍照時錄製的聲音將被擦除 拍照時 設置 基本功能 拍攝速度 SP ª 重播用配音錄製的聲音 可以在用配音錄製的聲音和原來的聲音之間進行轉換 設置 設定 12bit 音頻 ST2 或 混合 ST1 只回放原來的聲音 ST2 只回放用配音添加的聲音 混合 同時回放原來的聲音和用配音添加的聲音 EXT MIC STOP V REW STILL ADV VOL PLAY PAUSE FF W STILL ADV W V REW STILL ADV VOL ZOOM REC A DUB PLAY PAUSE FF W STILL ADV T W A DUB STOP V REW STILL ADV VOL PLAY PAUSE FF W STILL ADV W A DUB STOP V REW STILL ADV VOL PLAY PAUS...

Page 29: ...1 數位變焦 18 變焦麥克風 18 麥克風聲量 18 日期 時間 30 初始設定 30 3 設定 淡入淡出 20 音效選擇 30 拍攝燈 30 顯示 30 遙控 14 操作音 30 LCD 設定 12 EVF 設定 12 節電 30 4 LANGUAGE 11 ª 錄影帶重播菜單 1 基本功能 日期 時間 30 2 進階功能 空白尋像 17 拍攝速度 17 拍攝待機 27 拍攝資料 30 重複播放 24 麥克風聲量 18 3 設定 12bit 音頻 28 音頻輸出 30 顯示 30 遙控 14 LCD 設定 12 EVF 設定 12 節電 30 4 LANGUAGE 11 VQT0S76_TC book 29 ページ 2005年7月21日 木曜日 午後2時33分 ...

Page 30: ...兩聲嘟音 暫停錄製時 兩聲嘟音四次 當插入的錄影帶的防止擦除滑塊設置為 SAVE 時 發生水汽凝 結時以及其他情況時 請查看熒屏上顯示的內容 ª 節電 關 當 5 分鐘內沒有進行任何操作 則自動設置為待機 模式 在待機模式下 閃爍 並且在按下拍攝 啟動 停止鍵後開始錄製所用的時間比平時要長 5 分鐘 當 5 分鐘內沒有進行任何操作 攝錄放影機將自動 關閉以保護錄影帶或防止電池用盡 當使用攝錄放 影機時 請再次打開 在下列情況下 即使設置了 節電 5 分鐘 電源可能也不 會關閉 連接到 AC 電源插座時 使用 AC 適配器時 將 DV 電纜連接到其他設備時 與重播有關的菜單 ª 拍攝資料 設置為 開 回放時將顯示錄製時採用的設置 快門速度 光 圈 增益值和白平衡設置 22 等 當 AUTO MANUAL FOCUS 開關設置為 AUTO 出現 AUTO 指示 如果沒有資料 顯示器上出現 如果...

Page 31: ... DUB 配音 28 A DUB 配音暫停 28 空白搜索 17 12bit 16bit 音頻錄音模式 30 音量調整 24 警告 報警指示 如果以下指示亮起或閃爍 請檢查攝錄放影機 確認性指示 Y 插入的錄影帶的防意外擦除滑塊位於 SAVE 位置 沒有插入錄影帶 0 內置電池的電量不足 12 自拍時出現警告 報警指示 將 LCD 顯示屏轉向取景器方 向 檢查警告 報警指示 REMOTE 選擇的遙控模式不正確 14 2END 在拍攝時錄影帶到達終點 攝像頭不乾淨 34 文本指示 3 檢測到露水 3 取出錄影帶 發生了水汽凝結 取出錄影帶 稍等片刻 錄影帶倉打開 時需要一定的時間 但這不是故障 34 電量不足 電池的電量不足 請進行充電 7 未插入錄影帶 沒有插入錄影帶 9 錄影帶結束 在拍攝時錄影帶到達終點 檢查拍攝標簽 攝像時錄影帶的防意外擦除滑塊處於 SAVE 位置 配音或數位複製時錄...

Page 32: ... 電池的工作時間會變短 0 電池是否快用壞了 電池有一定的壽命 根據使用情況 如 果即使電池充足電 工作時間仍太短 則電池已到壽命 不 能再用 5 即使打開電源 攝錄放影機也不能工作 攝錄放影機不能正常工作 0 請取出錄影帶 然後按復位鍵 34 如果仍不能恢復正常狀 態 請關閉電源 然後 大約 1 分鐘后 再次打開電源 6 無法取出錄影帶 0 打開錄影帶倉蓋時 電源指示燈是否點亮 9 一定要保證 電池和 AC 適配器連接正確 7 0 電池在使用時是否放電 請給電池充電 然後取出錄影帶 0 完全關閉錄影帶倉蓋 再重新完全打開 9 7 除取出錄影帶外 無法進行任何操作 0 是否出現水汽凝結 請等待直到水汽凝結指示消失 34 8 遙控器不工作 0 遙控器上的鈕扣型電池是否電量耗盡 請更換一塊新的鈕扣 型電池 13 0 對遙控器的設置是否正確 如果遙控器的設置與攝錄放影機 的 遙控 設置不一致 則...

Page 33: ...指示都消失了 重播 聲音 1 不能從攝錄放影機的內置揚聲器或耳機中重播聲音 0 音量是否太低 重播時 推動 W T 桿顯示音量指示並進行調 整 24 2 同時再現不同的聲音 0 是否設置為 設定 12bit 音頻 混合 如果設置為 音效選擇 12bit 並在已經錄製的錄影帶上進行配音 可 以聽到拍攝時的聲音以及後來的複製的聲音 如要聽單獨的 聲音 設置為 ST1 或 ST2 28 0 是否設置了 設定 音頻輸出 立體聲 並再現含有主 音和次音的圖片 設置為 L 可以聽到主音 設置為 R 可以 聽到次音 30 3 不能進行配音 0 錄影帶上的防止意外擦除滑塊是否打開 如果打開 設置為 SAVE 則不能進行配音 9 0 是否試圖對以LP模式錄製的錄影帶部分進行編輯 LP模式不 允許配音 17 4 進行配音時 原音被擦除 0 如果對用 16bit 模式錄製的內容進行配音 原音將被擦除 如 果希望...

Page 34: ...影帶上 1 取出插入的錄影帶 打開錄影帶倉大約需要 20 秒 這不是故障 2 關閉錄影帶倉蓋 靜置攝錄放影機 讓攝錄放影機冷卻或升 溫 使其達到環境溫度 當為黃色 3 時 無法使用錄影帶拍攝 重播模式 請將攝錄放影機靜置30分 鐘左右 當為紅色 3 時 電源指示燈閃爍 1 分鐘左右 然後攝錄放影機自動關閉 靜置攝錄放影機 2 至 3 小時 3 再次打開攝錄放影機 將它設置為錄影帶拍攝 重播模式 然 後檢查水汽凝結指示是否消失 特別是在寒冷的地區 濕氣可能會凍冰 在這種情況下 水汽 凝結指示消失所需的時間會更長 即使在水汽凝結指示出現前也要注意是否有水汽凝結 在不同的條件下 水汽凝結指示可能不出現 鏡頭或攝錄放影 機發生水汽凝結時 磁頭和錄影帶也會發生水汽凝結 此時不 要打開錄影帶倉蓋 當鏡頭有霧氣時 將 OFF ON 開關設在 OFF 在此狀態下靜置攝錄放影機 1 小 時左右 鏡頭溫度接近...

Page 35: ...濕 用力擰 幹 用它仔細擦拭攝錄放影機 然後再用軟的幹布徹底擦拭一 遍 攜帶攝錄放影機時不要摔落或碰撞 攝錄放影機受到強烈碰撞後會使殼體破裂 造成故障 不要使用汽油 稀釋劑或酒精清洗攝錄放影機 清洗前要拔下電池或從 AC 電源插座上拔下 AC 電源線 機體會褪色 表皮會剝落 要用軟的幹布擦掉攝錄放影機上的灰塵和指印 祛除頑固性的 汙漬時 要用水稀釋中性清潔劑後浸濕抹布 用力擰幹 用它 來擦拭攝錄放影機 然後再用幹布擦一遍 如果使用化纖防塵布 須遵守說明書的要求 不要用此攝錄放影機作監視用或用於其他商業用途 如果長時間使用攝錄放影機 內部溫度會升高 從而會造成故 障 本攝錄放影機不能用於商業用途 ª 關於電池 攝錄放影機所用的電池為可充電的鋰離子電池 這種電池對溫 度和濕度很敏感 溫度的影響會隨溫度的上升或下降而加劇 在低溫範圍內可能不出現完全充電的指示 或者也可能在開始 使用 5 分鐘後出...

Page 36: ...處 如果經 過 1 年或更長的時間未捲帶或回捲 錄影帶會因溫度和濕度造 成的膨脹或收縮而變形 捲繞的錄影帶會黏在一起 灰塵 直射的陽光 紫外線 和濕度都會損壞錄影帶 如果就這 樣使用 就會造成攝錄放影機和磁頭損壞 使用後一定要將錄影帶回捲到起點 將錄影帶放在盒子裏以防 止灰塵 並且要垂直放置 錄影帶要避開強磁場 磁性項鏈和玩具等帶磁性的東西所具有磁力之強超出想象 它 們會擦除所錄製的內容或者增大干擾 ª LCD 顯示屏 取景器 LCD 顯示屏 LCD 顯示屏變髒時 要用軟的幹布擦拭 在溫度急劇變化的地方 LCD 顯示屏上會出現水汽凝結 要用 軟的幹布擦拭 如果攝錄放影機處於非常寒冷的地方 剛打開電源時 LCD 顯 示屏會比平時暗 但隨著內部溫度的升高 其將恢復正常的亮 度 取景器 祛除取景器內的灰塵時 要先拆下取景器 如果灰塵難以祛 除 可以用水浸濕棉簽後清除 然後用乾棉簽擦拭取景器 清潔...

Page 37: ...的白色 攝錄放影機可以在其他顏色之間調整平衡 由於白色是所有顏色 光 的基準色 攝錄放影機如果能識別基 準色白色 就可以在自然色調下攝像 ª 自動對焦 自動對焦功能可使對焦鏡頭在攝錄放影機內自動前後移動 將 物體調到焦點處 自動對焦具有如下特點 進行調整 使物體的豎線看得更清晰 使具有較高對比度的物體處於焦點處 焦點只處於熒屏中心 由於這些特點 自動對焦在以下情況下不能正常工作 要用手 動對焦模式進行拍攝 拍攝的物體一端距離攝錄放影機較近 另一端較遠 由於自動對焦在影像的中心進行調整 所以無法對同時處於 前景和背景的物體進行對焦 拍攝的物體位於肮髒或有灰塵的玻璃後 由於焦點在髒玻璃上 所以無法對玻璃後的物體進行對焦 拍攝的物體被有閃光表面的物體或反射強光的物體所包圍時 由於攝錄放影機的焦點落在有閃光表面的物體或反射強光的 物體上 拍攝的物體會模糊不清 在低照度的環境中拍攝物體時 由於穿過鏡...

Page 38: ...m 標準照度 1 400 lx 最低所需照度 1 lx 彩色夜視模式 視頻輸出電平 1 0 Vp p 75 h S 視頻輸出電平 Y 輸出 1 0 Vp p 75 h C 輸出 0 3 Vp p 75 h 音頻輸出電平 線路 316 毫伏 600 h 麥克風輸入 麥克風靈敏度 s50 dB 0 dB 1 V Pa 1 kHz 立體聲微型插孔 數位介面 DV 輸入 輸出端 IEEE1394 4 針 外廓尺寸 約 216 mm 寬 k225 mm 高 k432 mm 深 不包括突出部分 質量 約 2000 g 不帶提供的電池 DV 錄影帶和鏡頭蓋 約 2120 g 包括提供的電池 DV 錄影帶和鏡頭蓋 工作溫度 0 oC 至 40 oC 工作濕度 10 至 80 AC 適配器 VSK0644 安全注意事項 外廓尺寸 70 mm 寬 k45 mm 高 k116 mm 深 質量 約 165 g 重...

Page 39: ...dashes either side of a number for example 00 The menu operation flow is indicated by in the description ª Warning Do not remove the cover or back there are no user serviceable parts inside Refer servicing to qualified service personnel Use only the recommended accessories If you see this symbol As this equipment gets hot during use operate it in a well ventilated place do not install this equipme...

Page 40: ...function 56 Night view functions 56 Soft skin mode 57 Tele macro function 57 Fade in fade out function 57 Wind noise reduction function 57 Recording images for wide screen TVs 58 Image stabilizer function 58 Recording in various situations Scene mode 58 Recording in natural colours White balance 59 Manual focus adjustment 60 Manual shutter speed aperture adjustment 60 Playback mode Playing back ta...

Page 41: ...ttach other conversion lenses in front of the lens hood there is no mount to be used for the attachment When you wish to attach the wide conversion lens VW LW4307ME optional MC protector or ND filter in the Filter Kit VW LF43WE optional first of all loosen the lens hood attachment knob 1 If the MC protector or ND filter is used the lens hood can be mounted on the filter When you attach the lens ho...

Page 42: ...terminal DV 64 Connect this to the digital video equipment 36 S Video output socket S VIDEO OUT 62 63 37 Video output socket VIDEO OUT 62 63 38 Audio output sockets AUDIO OUT 62 63 39 Power lamp 47 40 Recording start stop button 54 41 Off On switch OFF ON 47 42 Tripod receptacle This is a hole for attaching the camera to optional tripod VW CT45E Please carefully read the operating instructions for...

Page 43: ...ll it out more than 2 cm 1 from the shoulder strap length adjuster so that it cannot slip off Using the LCD monitor You can record the image while viewing it on the LCD monitor opened 1 Press the PUSH OPEN button and at the same time bring the LCD Monitor out about 90o in the direction of the arrow The viewfinder will go off 2 Adjust the angle of the LCD monitor as you prefer It can rotate up to 1...

Page 44: ... mount by aligning the mark and then securely plug it in ª Charging lamp Lights up Charging Goes off Charging completed Flashing The battery is over discharged discharged excessively In a while the lamp will light up and normal charging will start When the battery temperature is excessively high or low the CHARGE lamp flashes and the charging time will be longer than normal ª Connecting to the AC ...

Page 45: ...es when the viewfinder is used The times in parentheses indicate the recordable times when the LCD monitor is used The recordable time will become shorter in the following cases When you use both the viewfinder and the LCD monitor simultaneously while rotating the LCD monitor frontward to record yourself using the 0 lux night view function etc When you use this camera with the LCD monitor lit up b...

Page 46: ... not come out Close the cassette cover completely and then open it again completely Check if the battery has run down ª When the cassette holder cannot be housed Set the OFF ON switch to OFF then to ON again Check if the battery has run down ª Inserting removing the cassette When the cassette holder is in action do not touch anything except the PUSH mark When inserting a previously recorded casset...

Page 47: ...lay Press the ENTER button at the centre of cursor buttons and icons will be displayed on the screen Each press switches the display as follows depending on the mode In the Tape playback mode the icons will be automatically displayed on the screen 1 Tape recording mode AUTO MANUAL FOCUS switch is set to AUTO 2 Tape recording mode AUTO MANUAL FOCUS switch is set to MANUAL 3 Tape playback mode OFF O...

Page 48: ...the selection 6 Press the 3 or 4 button in order to select the item to be set 7 Press the ENTER button to determine the setting ª To exit the menu screen Press the MENU button ª To get back to the previous screen Press the 2 button ª About the menu setting The menu screen does not appear during recording And you cannot record when the menu screen appears ª Operating with remote control The menu sc...

Page 49: ...harged Adjusting LCD monitor viewfinder ª Adjusting the brightness and colour level 1 Set SETUP LCD SET or EVF SET YES 2 Press the 3 or 4 button in order to select the item to be adjusted LCD SET Brightness of the LCD monitor Colour level of the LCD monitor EVF SET Brightness of the viewfinder 3 Press the 2 or 1 button to move the bar indication representing the brightness 4 Press the MENU or ENTE...

Page 50: ... Set the button type battery with its i mark facing upward and get the battery holder back in place ª Remote control usable range The distance between the remote control and the camera Within approx 5 m Angle Approx 10o up and 15o down left and right STOP OSD V REW STILL ADV DATE TIME VOL ZOOM REC PHOTO SHOT START STOP A DUB PLAY PAUSE FF W STILL ADV ENTER VAR SEARCH MENU T W 1 2 3 4 5 STOP OSD V ...

Page 51: ...l is intended for indoor operation Outdoors or under strong light the movie camera may not operate properly even within the usable ranges Within a 1 metre range you can operate the remote control from beside the remote control sensor LCD monitor side of the movie camera Using the External Stereo Microphone ª External stereo microphone Supplied external stereo microphone can be switced to record so...

Page 52: ...ry with a new one You can adjust the microphone sensitivity for recording 55 ª Changing the WIND CUT OFF ON switch The microphone is equipped with a wind shield that is designed to cut down wind noise but when the wind is so strong that even the wind shield is not adequate to keep down the noise set the WIND CUT OFF ON switch to ON to further reduce the wind noise OFF The microphone should usually...

Page 53: ...asier low angle recording the sub recording start stop button and the sub zoom lever on the front of the movie camera can be used Recording from a high position For more stable pictures Stabilize the movie camera by resting your elbows on a table or another stable horizontal surface ª Check points Remove the lens cap 43 When the camera is turned on with the lens cap fitted the automatic white bala...

Page 54: ...erify that the image is recorded properly In order to find the unrecorded section carry out the blank search 54 ª On screen display in the tape recording mode 1 Recording time elapse 2 Remaining tape indication ª Concerning the remaining tape time indication on the screen The remaining tape time is indicated in minutes When it reaches less than 3 minutes the indication starts flashing During a 15 ...

Page 55: ...on When pushing the W T lever as far as it will go you can zoom from 1k to 10k in 2 1 second at the maximum The zoom speed varies according to the amount of movement of the W T lever The variable speed zoom function cannot be used with the remote control and sub zoom lever Adjusting the Microphone Sensitivity Level You can adjust the microphone sensitivity for recording 1 Set ADVANCE MIC LEVEL AUT...

Page 56: ...ou can record images free from vibration Only manual focusing can be used Recorded scene is seen as if frames were missed Colour night view function You can record dark locations brightly in colour 0 Lux night view function You can record completely dark locations with the light of the LCD monitor Set to Tape Recording Mode 1 Press the ENTER button until the icon 1 appears 2 Press the 3 button to ...

Page 57: ...rated Fade in fade out function Fade in The image and audio gradually appear Fade out The image and audio gradually disappear Set to Tape Recording Mode 1 Press the ENTER button until the icon 1 appears 2 Press the 2 button to select the fade icon 3 Press the recording start stop button Start recording fade in When you start recording the image audio disappeared completely and the image audio grad...

Page 58: ... Scene mode When you record images in different situations this mode automatically sets optimum shutter speeds and apertures Set to Tape Recording Mode 1 Set the AUTO MANUAL FOCUS switch to MANUAL 2 Set BASIC SCENE MODE select the desired mode 1 5 Sports mode To record sports scenes or scenes where there are quick motions 2 Portrait mode To make persons stand out against the background 3 Low light...

Page 59: ...ally Select in Step 3 Then while viewing a white subject on the entire screen press the 3 button to select the indication ª About flashing of the indication When the manual adjustment mode is selected Flashing indicates that the white balance previously adjusted is stored This setting is stored until the white balance is adjusted again When white balance cannot be set in the manual adjustment mode...

Page 60: ...ecording under fluorescent light mercury light or sodium light because the colour and brightness of the playback image may change If you increase the shutter speed manually the sensitivity lowers and accordingly the gain value increases automatically which may increase the noises on the screen You may see vertical lines of light in the playback image of a brightly shining subject or highly reflect...

Page 61: ...he settings in AUDIO OUT Slow motion playback frame by frame playback Set to Tape Playback Mode Slow motion playback can only be performed by using the remote control Slow motion playback If the image is recorded in the SP mode then it will be played back at a speed approx 1 5 the normal speed If the image is recorded in the LP mode then it will be played back at a speed approx 1 3 the normal spee...

Page 62: ...joy more beautiful images 2 Turn on this camera and set the mode switch to the Tape Playback Mode 3 Select the input channel on the TV 4 Press the 3 button to select the 1 icon to start playback The image and audio are output on the TV 5 Press the 4 button to select the icon to stop playback Whenever plugging in the S Video cable plug in the AV cable too Use the AC adaptor to free you from worryin...

Page 63: ...pe Playback Mode 3 Select the input channel on the TV set and recorder 4 Press the 3 button to select the 1 icon to start playback The image and sound are reproduced 5 Start recording Recorder 6 Press the 4 button to select the icon to stop playback 7 Stop recording Recorder For more information refer to the operating instructions for your TV set and recorder When you do not need functional indica...

Page 64: ...ing dubbing or the dubbing may not be completed properly If a picture bilingual video etc containing main sound and sub sound has been dubbed select the desired sound by SETUP AUDIO OUT on playback Even if you use a device equipped with DV terminals such as IEEE1394 you may not be able to perform digital dubbing in some cases For more information see the instructions for equipment connected Regard...

Page 65: ... Recording Mode When you want to preserve the original sound taken during recording set SETUP AUDIO REC 12bit to take pictures When set 16bit the sounds taken during recording are erased after recording with audio dubbing Set BASIC REC SPEED SP to take pictures ª To play back the sound recorded with audio dubbing You can switch between the sound recorded with audio dubbing and the original sound S...

Page 66: ...MA 58 D ZOOM 55 ZOOM MIC 55 MIC LEVEL 55 DATE TIME 67 INITIAL SET 67 3 SETUP FADE COLOUR 57 AUDIO REC 67 REC LAMP 67 DISPLAY 67 REMOTE 51 BEEP SOUND 67 LCD SET 49 EVF SET 49 POWER SAVE 67 4 LANGUAGE 48 ª TAPE PLAYBACK MENU 1 BASIC DATE TIME 67 2 ADVANCE BLANK SEARCH 54 REC SPEED 54 REC STDBY 64 REC DATA 67 REPEAT PLAY 61 MIC LEVEL 55 3 SETUP 12bit AUDIO 65 AUDIO OUT 67 DISPLAY 67 REMOTE 51 LCD SET...

Page 67: ... When about 5 minutes passed without any operation the standby mode automatically will be set In the standby mode blinks and it takes time more than usual to start recording after you press the recording start stop button 5 MINUTES When about 5 minutes passed without any operation the movie camera automatically turns off to protect the tape or to prevent the battery from running down When you use ...

Page 68: ...w 49 The warning alarm indication appears when you record yourself Turn the LCD monitor towards the viewfinder and check the warning alarm indication REMOTE An incorrect remote control mode has been selected 51 2END The tape came to the end during recording The video heads are dirty 71 Textual indications 3DEW DETECT 3EJECT TAPE Condensation has occurred Take out the cassette and wait for a while ...

Page 69: ...sage the battery has worn out and can no longer be used 5 The movie camera cannot be operated though powered up The movie camera does not operate normally Remove the cassette and then press the reset button 71 If normal conditions are not restored yet turn off the power Then about 1 minute later turn on the power again 6 The cassette cannot be removed Does the power lamp comes on when opening the ...

Page 70: ...hones 0 Is the volume too low During playback push the W T lever to display the volume indication and adjust it 61 2 Different sounds are reproduced at the same time Have you set SETUP 12bit AUDIO MIX If you set AUDIO REC 12bit and dub audio to a recorded tape you can hear the sound on recording and the sound dubbed at a later time To hear the sounds separately set to ST1 or ST2 65 Have you set SE...

Page 71: ...h the cassette cover closed to cool or warm it to the ambient temperature When 3 in yellow You cannot use the Tape Recording Playback Mode Leave the movie camera for about 30 minutes When 3 in red The power lamp blinks for about 1 minute and then the movie camera automatically turns off Leave it for about 2 to 3 hours 3 Turn the movie camera on again set it to the Tape Recording Playback Mode and ...

Page 72: ...ing causing it to malfunction Do not use benzine paint thinner or alcohol for cleaning the movie camera Before cleaning detach the battery or pull out the AC mains lead from the AC mains socket The camera body may be discoloured and the surface finish may peel off Wipe the movie camera with a soft dry cloth to remove dust and fingerprints To remove stubborn stains wring well a cloth that is soaked...

Page 73: ...ity may damage the tape Such usage may cause damage to the movie camera and the heads After use be sure to rewind the tape to the beginning put the cassette in the case to protect it from dust and store it upright Keep the cassette away from strong magnetism Apparatuses using magnets such as magnetic necklaces and toys have magnetic force that is stronger than expected and they may erase the conte...

Page 74: ...nce among the other colours Since white colour is the reference of all colours light the movie camera can record pictures in a natural hue if it can recognize the reference white colour ª Auto focus Auto focus automatically moves the focusing lens forward and backward inside the movie camera to bring the subject into focus Auto focus has the following characteristics Adjusts so that the vertical l...

Page 75: ...on 1 lx Colour Night View Mode Video output level 1 0 Vp p 75 h S Video output level Y Output 1 0 Vp p 75 h C Output 0 3 Vp p 75 h Audio output level Line 316 mV 600 h Mic input Mic sensitivity 50 dB 0 dB 1 V Pa 1 kHz Stereo mini jack Digital interface DV input output terminal IEEE1394 4 pin Dimensions Approx 216 mm W k225 mm H k432 mm D excluding the projection part Mass Approx 2000 g without sup...

Page 76: ...C VQT0S76 F0705Nm0 3000 A C Matsushita Electric Industrial Co Ltd Web site http www panasonic co jp global VQT0S76_Eng book 76 ページ 2005年7月21日 木曜日 午前11時48分 ...
Reviews: