background image

Getting Star

ted 

RQTV0115

13

13

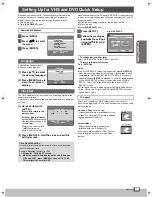
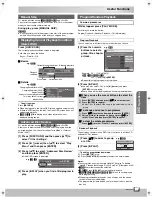
Setting Up for VHS and DVD Quick Setup

Make basic settings for VHS. These settings are retained in the 
memory until they are changed, even if the unit is turned off.

Select the unit viewing channel (or the AV input) on the TV.

Turn on the unit.

Press 

[VHS SELECT] 

(

l

8).

.........................................................................................................................................................................................................................

[1] 

Press [MENU].


..........................................................................................................

[2] 

Press [

34

] to select 

the menu.

..........................................................................................................

[3] 

Press [ENTER].

Select the language for these 
menus on screen displays.

..........................................................................................................

[1] Press [

34

] to select 

the desired language.

..........................................................................................................

[2]  Press [MENU] twice to 

clear the on-screen 
display.

The clock operates for at least 3 years on its backup system in the 
event of power failure.
After 3 years, clock back up can only be guaranteed for a maximum 
of 1 hour.

.........................................................................................................................................................................................................................

[1] Set each item with 

[

34


1

]. 

Press [

2

] to return to the 

previous item.

At the set time (H:M) point:

When 

[

34

]

 is kept pressed, 

the indication changes in 30 
minute steps.

There is no need to press 

[

34

]

 continuously.

This is a 24-hour clock.

.........................................................................................................................................................................................................................

[2] Press [MENU] to start the clock and exit the 

setting screen.

Make basic settings for DVD.The QUICK SETUP screen assists you 
to make necessary settings such as Menu Language (

l

37) and TV 

Aspect (

below).

Select the unit viewing channel (or the AV input) on the TV.

Turn on the unit.

Press 

[DVD SELECT]

 (

l

8).

.........................................................................................................................................................................................................................

[1] 

Press [SETUP].

..........................................................................................................

[2] 

Follow the messages 
and make the settings 
using [

342 1

] and 

[ENTER].

¬

To change these settings later

Select “QUICK SETUP” in the “Others” tab (

l

37).

¬

To return to the previous screen

Press 

[RETURN]

.

Notes:

The “QUICK SETUP” screen only appears by pressing 

[SETUP]


when the unit is turned on for the first time. If the settings are not 
completed in “QUICK SETUP”, the “QUICK SETUP” screen will 
appear whenever 

[SETUP]

 is pressed. To avoid the reappearance 

of the “QUICK SETUP” screen, or to abort the use of “QUICK 
SETUP”, select “NO” in the “Would you like to use QUICK 
SETUP?” screen.

All settings will return to default by selecting “Re-initialise Setting” 
in the “Others” tab. To reset the DVD QUICK SETUP, follow the 
above steps 1 and 2.

Select 

“4:3”

 (regular) or 

“16:9”

 (widescreen) to suit your TV.

If you have a regular 4:3 TV, you can also select how video on some 
discs are shown.

4:3 Pan & Scan

 (Initial Setting)

Widescreen software is expanded to fill  the 
screen of a 4:3 aspect TV (unless prohibited 
by the producer of the disc).

4:3 Letterbox

Widescreen software is shown in the 
letterbox style on a 4:3 aspect TV.

If you have a wide-screen TV (16:9), you can 
select the style with the TV’s screen mode 
function.

Common procedures

Language

Clock Set

Time Reset Function

If the clock is less than 2 minutes early or late, it can easily be 
reset to the proper time.

Example: Resetting the clock to 12:00

1)  Display the “CLOCK SET” screen.
2)  When the current clock display on the unit is between 

11:58 and 12:01, press [MENU] as soon as it is 12:00. 
This will reset the time to 12:00.

   VHS 

MENU

CLOCK  SET
TUNE

LANGUAGE

R PRESET

SYSTEM
OPT I ON
TAPE   REFRESH

SELECT :         , ENTER
END          :  MENU

SELECT :       
END          :  MENU

LANGUAGE

ENGL I SH

CLOCK


S

ET


S

ELECT

Y

M

D

H:M

2006

1

1

0 : 00

 : 

S

TART : MENU


TV Aspect

DVD Setup

English

Français

Deutsch

Italiano

Espanol

Portugues

QUICK  SETUP

to  select  and  press

ENTER

to


 return

RETURN

Nederlands

e.g. NV-VP60 GC 

4:3 Pan & Scan

4:3 Letterbox

VP60GCS.book  Page 13  Monday, March 6, 2006  3:23 PM

Summary of Contents for NV-VP60 Series

Page 1: ...ons DVD Player Video Cassette Recorder Model No NV VP60 Series Before attempting to connect operate or adjust this product please read these instructions completely Please keep this manual for future reference RQTV0115 1 ...

Page 2: ...Various Indications in On screen Display 22 Changing Audio 22 Playing Discs basic Play 23 DivX VOD Contents 25 Useful Functions 26 Starting Play from a Selected Item 26 Starting Play from a Selected Group 26 Quick Replay 26 Changing Play Speed 26 AV Enhancer 26 Picture Mode 26 Rotating Pictures 26 Manual Skip 27 Displaying Current Playback Condition Quick OSD 27 Advanced Disc Review 27 Program Ran...

Page 3: ...following cases The unit is brought from cold surroundings into a well heated room The unit is suddenly brought from cool surroundings such as an air conditioned room or car to a place which is hot and humid Note In any of the above mentioned conditions do not operate the unit for at least 1 hour This unit is not equipped with a dew sensor NV VP60GC Middle East model NV VP60GCS Asia Malaysia model...

Page 4: ...because of scratched or dirty video cassettes and operating the unit where the temperature is high or it is humid dusty etc Never use video cassettes that liquids have been spilled on or that are very badly damaged The heads will become dirty and the unit will malfunction ªInstalling the batteries Insert the batteries with the polarity and correctly aligned Notes The service life of the batteries ...

Page 5: ...form to specifications The unit cannot play other discs correctly Do not use irregularly shaped discs e g heart shaped as these can damage the unit DVD RAM that can be played on this unit are those recorded with DVD video recorders DVD video cameras personal computers etc using Version 1 1 of the Video Recording Format a unified video recording standard Remove the discs from their cartridges befor...

Page 6: ...tions specified and grouped into a play list on a DVD video recorder Content Covers tracks and pictures on HighMAT discs ªTo clean discs Wipe with a damp cloth and then wipe dry ªHandling precautions Do not write on the label side with a ball point pen or other writing instrument Do not use record cleaning sprays benzine thinner static electricity prevention liquids or any other solvent Do not att...

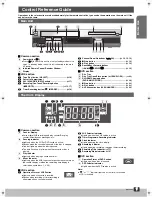
Page 7: ...counter Miscellaneous messages etc B Running Indicator Lights up when the VHS or DVD section is active Flashes when the cassette is paused or the disc is stopped One bar lights up when the disc is paused The bars flash one at a time when the cassette or disc is playing C Play Indicator Lights up when playing a cassette or disc D Minus Indicator Lights up when the VHS tape counter passes the zero m...

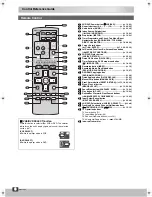
Page 8: ...l 38 15 Quick Replay button QUICK REPLAY l 26 16 Manual Skip button MANUAL SKIP l 27 17 Reset Return button RESET RETURN l 13 18 22 34 18 Menu Play List button MENU PLAY LIST l 13 20 28 19 Pause Slow button DPAUSE SLOW l 14 23 20 Play button 1PLAY l 14 23 21 Rewind Fast Forward Slow Search buttons 6 5REW FF SLOW SEARCH l 14 23 22 Input Select Cancel button INPUT SEL CANCEL l 34 38 23 VHS DVD Selec...

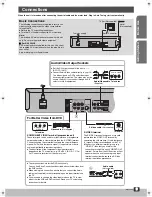
Page 9: ...cription of the component video input terminals depends on the TV or monitor e g Y PB PR Y B Y R Y Y CB CR Connect to terminals of the same colour Video cable Not supplied Television For Better Video from DVD These connections are for the DVD section only Carry out the Basic Connections described above to view video from the VHS section When making this connection ensure that you connect the Audio...

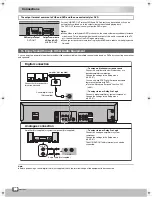
Page 10: ... terminal common to VHS and DVD and the one exclusively for DVD To Enjoy Sound through Other Audio Equipment DVD only terminal DVD OUT Output common to VHS and DVD VHS DVD OUT AUX IN L R R AUDIO L DVD IN VOLUME Amplifier Not supplied or system component Not supplied Audio cable Not supplied Connect 3 or more speakers for surround sound Amplifier Not supplied Digital connection Analogue connection ...

Page 11: ...g Í 1 use the numeric buttons to enter the two digit code Example 1 0 l 1 3 Check whether the TV can be operated properly Test by turning on the TV and changing channels Repeat the procedure until you find the code that allows correct operation When a manufacturer has multiple codes in the following chart try entering other codes if the TV operations cannot be performed properly and then select th...

Page 12: ...h Auto Tuning will stop halfway by turning the unit off pressing MENU playback or power failure If Auto Tuning stops halfway by turning the unit off playback or power failure Disconnect the mains lead and then reconnect it Turn on the unit Plug in Auto Tuning restarts To set the channels manually l 20 ªTo restart Plug in Auto Tuning Turn the unit on Make sure there is no video cassette in the unit...

Page 13: ...g SETUP when the unit is turned on for the first time If the settings are not completed in QUICK SETUP the QUICK SETUP screen will appear whenever SETUP is pressed To avoid the reappearance of the QUICK SETUP screen or to abort the use of QUICK SETUP select NO in the Would you like to use QUICK SETUP screen All settings will return to default by selecting Re initialise Setting in the Others tab To...

Page 14: ... and hold for 2 seconds or more Press 1PLAY to restart Rewind Fast forward while stopped Cue Review during play Jet Search Press these buttons in the stop mode Press STOP to cancel During playback press or press and hold these buttons If you press and hold these buttons playback restarts by releasing them During playback press these buttons twice You can increase Cue Review search speed Jet Rewind...

Page 15: ...ut you may need to do it manually if noise appears on a tape recorded on other equipment During play press rTRACKING V LOCK or sTRACKING V LOCK Repeat until the noise disappears Adjust the vertical to stop the picture jiggling while paused While paused press rTRACKING V LOCK or sTRACKING V LOCK Repeat until the jiggling stops To return to auto tracking Press both rTRACKING V LOCK and sTRACKING V L...

Page 16: ...ord in the S VHS with this unit It records in VHS You cannot change channels while recording You can change channels while the recording is paused When the recording is paused for more than 5 minutes the unit returns to stop mode You can watch another TV programme or play discs while recording The recording will not be affected ªTV 1 Press JCH or ICH to select the desired TV programme ªDVD 1 While...

Page 17: ...UT SEL to select the audio video source required 1 Press 1PLAY Find the recording start point 2 Press DPAUSE then press REC Put the unit in recording standby mode 3 Start play on the other equipment 4 Press DPAUSE to start recording To stop recording Press STOP You can delete all the contents of a video cassette the picture and sound data 1 Insert the cassette that you want to refresh and press ME...

Page 18: ...s not completed due to insufficient tape or cancellation by the user the programmed timer recording data will be cancelled from the memory by 4 A M two days later However if the timer recording function is activated at that time the programmed timer recording data will not be cancelled After you cancel the programmed timer recording data the current recording mode during the stop mode is displayed...

Page 19: ...nals can be searched for from both directions If you press either one of the buttons too many times you can correct the number of skips by pressing the opposite button The figure on the display decreases by 1 each time an index signal is located This feature may not work correctly if the marks are too close together Make recordings of at least 5 minutes Index signals are recorded in the following ...

Page 20: ... to skip during the selection of the programme positions 3 Press 34 to select AUDIO SYSTEM and then press 2 1 to select the broadcasting system BG PAL B G H SECAM B G I PAL I DK PAL D SECAM D K K1 4 Press 34 to select COLOUR SYSTEM and then press 2 1 to select AUTO The unit automatically distinguishes between PAL and SECAM broadcasts If the picture lacks of colour when AUTO is selected select MESE...

Page 21: ...SELECT OPTION NTSC INPUT SELECT NTSC PB SELECT OSD Items Settings Underlined items are the initial setting TAPE SELECT Set the length of tape you are using so the unit can show the correct remaining time l 22 AUTO E30 E60 E90 E120 E180 and E240 tapes E195 E195 tapes E260 E260 tapes E300 E300 tapes NTSC INPUT SELECT Select the colour TV system used to record NTSC signals AUTO NTSC 4 43 and 3 58 sig...

Page 22: ... Stereo Both the L and R indicators appear L The L indicator appears R The R indicator appears Normal Neither the L nor R indicator appears 3 Operation status display 4 Shows the time and tape counter Pressing VHS STATUS once makes the on screen display appear After that press the button repeatedly to change the display as follows Present time Tape counter Remaining tape time Present time During I...

Page 23: ...unction is active The unit memorizes the position when you press STOP ª Resume function Press 1PLAY once to start from this position Press STOP again to clear it Skip Press these buttons to skip chapters tracks or programmes Each press increases decreases the number of skips After skipping the unit returns to the previous state play or pause DVD VR If the marker is memorized the marker position is...

Page 24: ...mme 1 Programme 2 Play direction Inner section Outer section Blank Windows Media and the Windows logo are trademarks or registered trademarks of Microsoft Corporation in the United States and or other countries WMA is a compression format developed by Microsoft Corporation It achieves the same sound quality as MP3 with a file size that is smaller than that of MP3 MPEG Layer 3 audio decoding techno...

Page 25: ...tent that you purchased using the previous code If you purchase DivX VOD content using a registration code different from this unit s code you will not be able to play this content Authorization Error is displayed Regarding DivX content that can only be played a set number of times Some DivX VOD content can only be played a set number of times When you play this content the remaining number of pla...

Page 26: ...hs according to the disc being played back The user settings are invalid On the remote control this setting can be operate by using On Screen Menus l 34 For still and motion pictures except MPEG4 DivX This function does not work when AV Enhancer is turned On 1 Press FUNCTIONS and then press 34 to select Other Settings 2 Press 1 cursor then 34 to select Picture Menu and then press ENTER 3 Select Pi...

Page 27: ...played even if you programmed them The unit plays chapters in one DVD title or all tracks in a Video CD and audio CD at random 1 Press 34 to select a group or a title 2 Press 1PLAY To exit the program random mode 1 Press STOP twice 2 Press PLAY MODE repeatedly to select the normal mode Notes These functions do not work during HighMAT disc play To disable HighMAT change the setting to Play as Data ...

Page 28: ...mats still pictures other than JPEG i e TIFF or play the associated sound MPEG4 MPEG4 files must have the extension ASF or asf You can play MPEG4 data conforming to SD VIDEO specifications ASF standard MPEG4 Simple Profile video system G 726 audio system recorded with Panasonic SD multi cameras or DVD video recorders with this unit The recording date may differ from that of the actual date DivX Di...

Page 29: ...rsor to show the contents of the programme 3 Press ENTER to start play To clear the programme list Press RETURN ENTER or DIRECT NAVIGATOR Notes The Direct Navigator programme list displays up to 99 programmes Titles appear only if they have been entered You cannot change programme and disc titles You can play a play list l 6 created on other equipment such as a DVD video recorder 1 Press PLAY LIST...

Page 30: ...s RETURN Changing Soundtracks Subtitles and Angles Soundtracks Subtitles Functions 2 English 1 English 2 0 ch e g DVD V 2 Chinese 3 Malay 4 Thai On Off 1 English Functions Title 1 2 Chapter 1 1 Time 0 02 36 1 English 1 English Subtitle Angle 1 1 Other Settings to select and press Subtitle 1 English ENTER Can also use e g DVD V Changing the position and brightness of the subtitles During play 1 Pre...

Page 31: ...with 48 kHz at 96 kHz Sampling frequency l 42 WMA MP3 This feature reproduces the higher frequencies lost during recording to give you a sound closer to the original During play 1 Press FUNCTIONS and then press 34 to select Other Settings 2 Press 1 cursor then 34 to select Audio Menu and then press ENTER 3 Press 34 to select Multi Re master press 1 cursor and then press 34 to select Off 1 2 or 3 4...

Page 32: ...lect Yes and then press ENTER 6 Press ENTER To exit the menu Press RETURN Notes All Panasonic TVs that have progressive input are compatible Consult the manufacturer if you have another brand of TV The VHS video can not be progressive output The TV will be disrupted for a moment but this is normal Output from this unit is interlaced scanning if you have connected to the TV through VIDEO OUT or S V...

Page 33: ...kHz Up to 96 kHz When connected to equipment compatible with 88 2 kHz or 96 kHz Notes Signals from copy protected discs are converted to 48 kHz or 44 1 kHz Some equipment cannot handle sampling rate of 88 2 kHz even if they can handle 96 kHz Read your equipment s operating instructions for details Bitstream Initial setting for Dolby Digital and DTS Digital Surround Select if the equipment you conn...

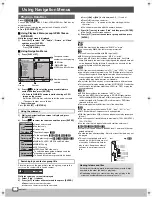
Page 34: ... may be shown for subtitles that are not displayed l 30 Marker VR To recall a marker recorded on DVD Video recorders Angle l 30 Rotate Picture l 26 Slideshow To turn on off slideshow To change the slideshow timing 0 30 sec B D A C A B Other Settings Play Speed l 26 AV Enhancer l 26 Repeat l 31 A B Repeat Except JPEG MPEG4 DivX When the elapsed play time is displayed Repeat a section between points...

Page 35: ... width of the television screen Auto The setting is automatically set to Shrink if the disc is recorded in 4 3 Aspect and automatically set to Zoom if the disc is recorded in 16 9 wide screen Shrink The 4 3 Aspect picture is shown in the centre of the television screen Zoom Enlarge using 4 3 Aspect and trim the picture on the edges Just Fit Zoom For motion pictures l 32 Press ENTER and select with...

Page 36: ...Ratings Now when you insert a DVD Video that exceeds the ratings limit you set a message appears on the TV Follow the on screen instructions Language code list Abkhazian 6566 Afar 6565 Afrikaans 6570 Albanian 8381 Ameharic 6577 Arabic 6582 Armenian 7289 Assamese 6583 Aymara 6589 Azerbaijani 6590 Bashkir 6665 Basque 6985 Bengali Bangla 6678 Bhutani 6890 Bihari 6672 Breton 6682 Bulgarian 6671 Burmes...

Page 37: ...rd Change Level Temporary Unlock Video DVD VR TV Aspect l 13 Choose the setting to suit your TV and preference 4 3 Pan Scan 4 3 Letterbox 16 9 Time Delay 0ms 20ms 40ms 60ms 80ms 100ms Still Mode Specify the type of picture shown when paused Automatic Still picture is displayed without being blurred or at high quality Field The picture is not blurred but picture quality is lower Frame The overall q...

Page 38: ...otected disc By pressing REC at dc channel during DVD playback the message COPYING OF THIS MATERIAL IS NOT ALLOWED appears on the TV screen You can copy programmes on a DVD RAM disc to a video cassette with One touch operation This function allows DVD RAM discs recorded by Panasonic DVD recorders to be copied Insert the disc containing the programme to be copied l 23 This function allows you to re...

Page 39: ...ect On for On Screen Messages 21 37 The menu is displayed in a different language Go to LANGUAGE in the VHS menu and select the desired language for menus Go to Disc in the Setup menu and select the preferred language for Menus 13 37 No sound Distorted sound Check the connections Check the volume on the equipment you have connected Ensure that the input settings on the other equipment are correct ...

Page 40: ...el or AV input is selected Also adjust the channel on the TV Also refer to the operating instructions for the TV 9 The picture shown on the TV is not normal The sides of the picture are cut off the picture is stretched horizontally or black bands appear at the top and bottom of the screen Go to Video in the Setup menu and change TV Aspect to suit your TV Turn off the zooming feature of your TV if ...

Page 41: ...t a video cassette inserted Insert a video cassette with an intact erasure prevention tab 16 18 PLEASE STOP THE TAPE TUNER PRESET has been selected during playback Stop the tape 20 PLEASE USE A CASSETTE WITH TAB REC or TIMER has been pressed without a video cassette with an intact erasure prevention tab Use a video cassette with an intact erasure prevention tab 4 NO TIMER RECORDING HAS BEEN SET TI...

Page 42: ...ter based information referred to as ID3 tag is stored The information of the track such as the title artist name etc can be stored here The information can be displayed on players supporting the ID3 tag when a track is played back However this unit cannot because it does not support the ID3 tag Interlace and progressive output The NTSC video signal standard has 480 interlaced i scan lines whereas...

Page 43: ...edia Audio Ver 9 0 L3 Not compatible with Multiple Bit Rate MBR 4 Exif Ver 2 1 JPEG Baseline files Picture resolution between 160k120 and 6144k4096 pixels sub sampling is 4 0 0 4 2 0 4 2 2 or 4 4 4 Extremely long and slender pictures may not be displayed 5 MPEG4 data recorded with the Panasonic SD multi cameras or DVD video recorders Conforming to SD VIDEO specifications ASF standard MPEG4 Simple ...

Page 44: ...Matsushita Electric Industrial Co Ltd Web Site http www panasonic co jp global p RQTV0115 1 F0106Ad1036 ...

Reviews: