background image

Playback Mode

-99-

:

Stop playing back

;

:

Pause playing back

When you select MPEG4 Playback Mode at 
Step 1 (NV-GS200 only)

File is numbered in hexadecimal.

When the object is moving fast or zoom 
operation is performed, picture may appear to 
be still or causes mosaic-pattern noise, but this 
is not a malfunction.

When you select MPEG4 Playback Mode at 
step 1, during playback, push the 
[

`

VOL/JOG

_

] Lever to display the volume 

indication until the volume Indication appears 
and adjust the volume. (

-95-

)

1

Folder File Number (When the picture is 
played back)
File Name (When the MPEG4 data is played 
back) (NV-GS200 only)

2

Picture Size (When the picture is played back) 
(

-113-

)

Playback time (When MPEG4 data is played 
back) (NV-GS200 only)

3

File Number

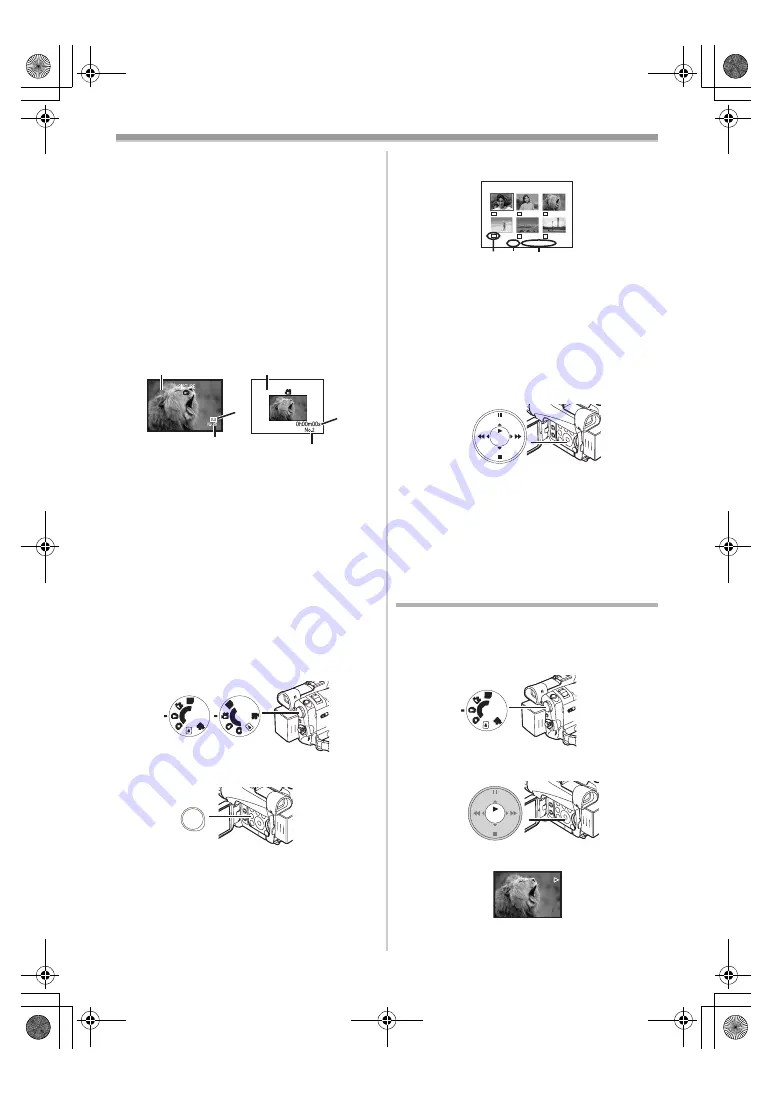
To Select a Desired File and Playing Back

1

Set the Mode Dial 

(39)

 to Picture Playback 

Mode or MPEG4 Playback Mode. (MPEG4 
Playback Mode on NV-GS200 Model only)

2

Press the [MULTI] Button 

(10)

.

100-0001

MPEG4

3

2

1

2

3

1

MOL-001.ASF

PC

S

D

PC

S

D

(39)

MULTI/

P-IN-P

(10)

The files recorded on the Card are displayed 
in Multi-Picture Mode.

1

Picture Size (When Picture Playback Mode is 
selected at Step 1)

2

File Number

3

Folder File Number (When Picture Playback 
Mode is selected at Step 1)
File Name (When MPEG4 Playback Mode is 
selected at Step 1) (NV-GS200 only)

3

Press the [

;

/

/

6

/

5

] Button to select a 

desired file.

The selected file is marked with a frame.

4

Press either the [ENTER] Button 

(17)

 or the 

[MULTI] Button 

(10)

.

The selected file is shown on the entire 
screen.

For other notes concerning this item, see 

-120-

Slide Show

The recorded still pictures in the Card can be 
played back like a Slide Show.

1

Set the Mode Dial 

(39)

 to Picture Playback 

Mode.

2

Press the [

1

] Button 

(17)

.

The [SLIDE

!

] Indication is displayed.

Each of the pictures are played back for 
several seconds.

PICTURE

1 2

3

No.25          100-0014

640

640

640

640

640

640

STILL

ENTER

FADE

i

s

PC

S

D

(39)

FADE

STILL

ENTER

i

s

(17)

SLIDE

120.200GC_eng.book  99 ページ  2004年2月25日 水曜日 午後5時38分

Summary of Contents for NVGS200GC

Page 1: ...rating plate is on the underside of the AC Adaptor use recording of certain material may be restricted The Movie Camera uses copyright protected technologies and is protected by the patented technologies and intellectual properties of Japan and the U S To use these copyright protected technologies authorization of the Macrovision Company is required It is prohibited to disassemble or modify the Mo...

Page 2: ...l Iris Adjustment 91 Manual Focus Adjustment 91 Using the Built in Video Flash 92 Red Eye Reduction Function 92 Digital Effect Functions 92 Playback Mode Playing Back a Tape 95 Finding a Scene You Want to Play Back 95 Slow Motion Playback 96 Still Playback Still Advance Playback 96 Index Search Functions 97 Playback Zoom Function 97 Playback Digital Effect Functions 98 Playing Back a Card 98 Slide...

Page 3: ...GS120 1 2 3 6 5 8 9 10 7 4 12 Light Bulb for Video DC Light VZ LL10E 13 Light Bulb for Video DC Light VW LL3E 14 Stereo Zoom Microphone VW VMH3E 15 Shoe Adaptor VW SK11E 16 Video Flash VW FLH3E 17 Tripod VW CT45E 18 Snow Rain Jacket VW SJGS200E 19 DV Cable VW CD1E 20 DV Editing Software with DV Interface Board VW DTM41E 21 SD Memory Card Application Software VW SWA1E TitleStudio software for title...

Page 4: ...7 Recording Lamp 80 28 Microphone built in stereo 85 87 29 White Balance Sensor 89 Remote Control Sensor 68 30 Lock Button 70 31 Lock Cover 70 32 USB Socket 110 33 Socket for Free Style Remote Controller with Mic REMOTE 81 Microphone Socket MIC When connecting an external microphone or audio equipment to this socket the built in microphone does not operate When connecting the Free Style Remote Con...

Page 5: ...Socket S VIDEO IN OUT 103 ª Remote Controller Using the wireless Remote Controller that is supplied with the Movie Camera most of the Movie Camera functions can be operated from a distance 57 Date Time Button DATE TIME 113 58 Indication Output Button OSD 104 59 Display Button DISPLAY 113 60 Reset Button RESET 128 61 Recording Button REC 107 62 Audio Dubbing Button A DUB 106 63 Direction Buttons fo...

Page 6: ... VAR SEARCH MENU P B ZOOM 72 73 78 81 82 79 80 74 75 76 77 83 84 85 86 87 88 87 Microphone Switch Button TALK 81 When the Free Style Remote Controller with Mic is connected to REMOTE Socket and the TALK Button is pressed the narration microphone is activated and the built in microphone on the Movie Camera is deactivated 88 Clip Insert the plug securely into the REMOTE Socket as far as it will goes...

Page 7: ...rns Do not recharge disassemble heat above 100xC or incinerate Keep the Button Type battery out of the reach of children Never put Button Type battery in mouth If swallowed call your doctor 10 15 15 15 29 INDEX INDEX SELECT STOP K L STILL ADV T W PAUSE STILL ADV 6 1 5 E D P B ZOOM 2 1 When the battery in the Remote Controller is replaced the mode is automatically reset to VCR1 Mode Power Supply ª ...

Page 8: ...SB0471 is supplied NV GS120 only The times shown in the table are approximate times The numbers indicate the recording time when the Viewfinder is used The numbers in parentheses indicate the recording time when the LCD Monitor is used In actual use the available recording time may be shorter The times shown in the table are for continuous recording at a temperature of 25oC and humidity of 60 If t...

Page 9: ...o the size of your hand 1 Detach the end of the Grip Belt 2 Adjust the length of the Grip Belt to the size of your hand 3 Reattach the Grip Belt ª To Use as a Hand Strap Using the Grip Belt as the hand strap makes it easier to handle and carry a Movie Camera It is more convenient to use with the Free Style Remote Controller with Mic 1 Open the Lock Cover 31 by holding the tabs on both sides 1 pres...

Page 10: ...run it through the Shoulder Strap Length Adjuster and pull it Pull it out more than 2 cm 1 from the Shoulder Strap Length Adjuster so that it cannot slip off Attach the other end of the Shoulder Strap to the other Shoulder Strap Holder in the same way Inserting a Cassette 1 Slide the OPEN EJECT Lever 38 toward the front and pull down to open the Cassette Compartment Cover 2 Insert a Cassette 3 Clo...

Page 11: ...on the Movie Camera When the Movie Camera is turned on with the Lens Cap on the Automatic White Balance Adjustment may not function properly Please turn on the Movie Camera after removing the Lens Cap ª How to Turn on the Power 1 Set the OFF ON Switch 43 to ON while pressing the button 1 The Power Lamp 41 lights up ª How to Turn off the Power 1 Set the OFF ON Switch 43 to OFF while pressing the bu...

Page 12: ...10 2004 48 PUSH OPEN 2 3 2 Adjust the LCD Monitor angle according to the desired recording angle The LCD Monitor can rotate a maximum of 180o 1 from the vertical position upwards and a maximum of 90o 2 to the downward direction Forcefully rotating the LCD Monitor beyond these ranges will damage the Movie Camera You cannot rotate the LCD Monitor when it is opened 120o angle Therefore do not rotate ...

Page 13: ...s displayed 2 Press the Button to select a desired Sub Menu Press the Button to display the highlighted item 3 Press the 5 Button to display the selected Sub Menu 4 Press the Button to select the item 5 Press the 5 Button to display the selected item 6 Press the Button to select the desired mode and press ENTER Button to determine the setting While a Menu is displayed you cannot record or play bac...

Page 14: ...ing Setup Sub Menu REC SPEED Recording Speed Mode 79 AUDIO REC Audio Recording Mode 79 SCENE INDEX Scene Index Mode 97 WIND CUT Wind Noise Reduction 87 ZOOM MIC Zoom Microphone 85 CINEMA Cinema like Format Recording 88 H SHOE MIC Hot Shoe Microphone This function reduces the low sound to avoid a wind noise when using the Stereo Zoom Microphone VW VMH3E optional 5 DISPLAY Display Setup Sub Menu DIS...

Page 15: ...Recording Speed Mode 79 AUDIO REC Audio Recording Mode 79 6 DISPLAY Display Setup Sub Menu DISPLAY Display Mode 113 DATE TIME Date and Time Indication 113 C DISPLAY Counter Display Mode 113 C RESET Counter Reset 128 REC DATA Camera Data If you set REC DATA to ON the settings shutter speed iris and white balance settings 88 etc used during the recordings are displayed during playback appears on the...

Page 16: ...ING SHTR EFFECT SELF TIMER FLASH RED EYE FLASH LEVEL PROG AE CARD RECORDING MENU CAMERA 6 LCD EVF Adjusting Brightness and Colour Level All of the items on the LCD EVF Sub Menu are the same as those on the LCD EVF Sub Menu of the TAPE RECORDING MENU 7 INITIAL Initial Setup Sub Menu AV JACK AV Socket 127 REMOTE Remote Controller Mode 68 REC LAMP Recording Lamp 80 BEEP SOUND Beep Sound 115 CLOCK SET...

Page 17: ...e the same as those on the LCD EVF Sub Menu of the TAPE PLAYBACK MENU 5 INITIAL Initial Setup Sub Menu All of the items on the INITIAL Sub Menu are the same as those on the INITIAL Sub Menu of the PICTURE PLAYBACK MENU SELECT NEXT MENU EXIT EDITING DISPLAY INITIAL LCD EVF ALL FILES FILE BY SEL MPEG4 PLAYBACK MENU DELETE Setting Date and Time Since the internal clock of the Movie Camera has a sligh...

Page 18: ... becomes 1 5 times longer than that of SP Mode Although the image quality does not decrease with the LP Mode recording mosaic pattern noise may appear on a playback image or some normal functions may be restricted The contents that are recorded in LP Mode are not completely compatible with other equipment Audio dubbing is not possible with LP Mode 105 Audio Recording Mode The sound quality of the ...

Page 19: ... off automatically To resume recording from this condition turn off then turn on the power again ª Recording Lamp The Recording Lamp 27 lights up during recording and alerts those being recorded that recording is in progress The Recording Lamp does not light up if the REC LAMP on the INITIAL Sub Menu is set to OFF AUTO MANUAL FOCUS 35 27 Recording on a Tape 1 Set the OFF ON Switch 43 to ON The Pow...

Page 20: ...hen press the PHOTO SHOT Button STILL ENTER FADE MENU i s 14 REC 83 87 ENTER FADE STILL i s 15 ª Progressive Photoshot When the æ Indication is displayed Progressive Photoshot Function works You can record still pictures as frame still pictures with higher quality by this function The Progressive Photoshot Function may not be activated depending on the function you use 113 To record still pictures...

Page 21: ...oes not appear in Manual Focus Mode P C SD 39 PHOTO SHOT 47 1 2 PHOTO SHOT 47 PICTURE NV GS120 1 Set the Mode Dial 39 to Card Recording Mode 2 Press the PHOTO SHOT Button 47 The Indication lights up in red Selecting the Size of Photoshot Images 2 sizes are available for Photoshot 1 Set CARD RECORDING MENU CARD PICTURE SIZE 1760k1320 NV GS200 1536k1152 NV GS120 or 640k480 Selecting the Quality of P...

Page 22: ...ded data can also be played back on Windows Media Player ver 6 4 and later STILL ENTER FADE MENU i s 14 PHOTO SHOT 47 When the Mode Dial 39 is set to Card Recording Mode you cannot record to the Tape 1 Set the Mode Dial 39 to Card Recording Mode 2 Press the Recording Start Stop Button 42 It takes 1 to 2 seconds to start recording During recording the Indication is lit in red 3 Press the Recording ...

Page 23: ...Lamp lights up 2 Set the OFF ON Switch 43 to OFF The Quick Start Recording Lamp remains lit START QUICK 40 ON OFF 43 3 Set the OFF ON Switch 43 to ON The Movie Camera will be ready for recording in approximately 1 7 seconds To Cancel the Quick Start Keep the QUICK START Button pressed for approximately 2 seconds and make sure the Quick Start Recording Lamp is not lit For other notes concerning thi...

Page 24: ...h the zooming operation the microphone s directional angle and sensitivity are varied for recording sounds 1tW 5tW 10tW T T T TELE MACRO 13 T MACRO T MACRO T MACRO PHOTO SHOT 47 42 Set TAPE RECORDING MENU RECORDING ZOOM MIC ON The Z MIC Indication is displayed For other notes concerning this item see 117 Digital Zoom Function This function is useful when you want to record close up shots of subjec...

Page 25: ...ess the Recording Start Stop Button 42 to start recording 3 Release the FADE Button 18 about 3 seconds after starting recording The image reappears gradually Fade Out Fade Out causes images and sounds to disappear gradually leaving a black screen at the end of a scene 1 Keep pressing the FADE Button 18 while recording The image fades out gradually 2 When the image is completely gone press the Reco...

Page 26: ...ht is within approximately 1 2 metre To Cancel the Night View Functions Press the COLOUR NIGHT VIEW Button repeatedly until neither the C NIGHT VIEW Indication nor the 0LUX NIGHT VIEW Indication appears For other notes concerning this item see 117 Soft Skin Function This enables you to record skin colours in a softer tone In order to get the best result avoid background colours similar to the skin...

Page 27: ...For recording scenes involving quick movements such as sports scenes 2 7 Portrait Mode For bringing up people clearly from the background 3 4 Low Light Mode For recording a dark scene brighter 4 Ω Spotlight Mode For recording a subject under a spotlight in a party theatre etc 5 º Surf Snow Mode For recording in a glaring surrounding such as ski slopes beaches etc To Cancel the Programme AE Functio...

Page 28: ...ing the recording condition and selects the closest hue setting This function is called Automatic White Balance Adjustment For light outside the functional Auto White Balance Adjustment range use the Manual White Balance Adjustment Mode FADE STILL ENTER i s 17 1 1 1 1AWB 1 3 2 4 1 2 3 1 Set the AUTO MANUAL FOCUS Switch 35 to MANUAL The MNL Indication appears 2 Press the ENTER Button 17 The AWB Ind...

Page 29: ... ENTER Button 17 until the Shutter Speed Indication appears 3 Press the 5 Button 16 or 6 Button 19 to adjust the shutter speed Range of Shutter Speed Adjustment 1 50 1 8000 s in Tape Recording Mode 1 4 1 500 s in Card Recording Mode NV GS200 1 25 1 500 s in Card Recording Mode NV GS120 The standard shutter speed is 1 50 s Selecting a speed closer to 1 8000 causes the shutter speed to be faster To ...

Page 30: ...o AUTO For other notes concerning this item see 118 Manual Focus Adjustment Focus can be adjusted manually for recording in a situation where auto focus may not function well 1 Set the AUTO MANUAL FOCUS Switch 35 to MANUAL The MNL Indication appears AUTO MANUAL FOCUS 35 FADE STILL ENTER i s 17 MNL 1 50 F2 0 0dB AUTO MANUAL FOCUS 35 2 Slide the AUTO MANUAL FOCUS Switch 35 to FOCUS The MF Indication...

Page 31: ...i the ßi Indication appears if it is too much set it to j the ßj Indication appears STILL ENTER FADE MENU i s 14 21 15 ENTER FADE STILL i s PHOTO SHOT 47 42 For other notes concerning this item see 118 Red Eye Reduction Function This function reduces a phenomenon which causes the subject s eyes to turn red when you record pictures with a flash such as built in Video Flash or Video Flash VW FLH3E o...

Page 32: ...this item see 119 ª Multi Picture Mode Strobe Multi Picture Mode You can capture and record 9 consecutive small still pictures 11 NEGA 12 SEPIA 13 B W 14 SOLARI Manual Multi Picture Mode You can manually capture and record 9 small still pictures 1 Set TAPE RECORDING MENU DIGITAL EFFECT1 MULTI 2 Set TAPE RECORDING MENU DIGITAL MULTI MODE STROBE or MANUAL 3 Press the MULTI Button 10 If MANUAL is sel...

Page 33: ... moving image of a new scene fades in the still image of the last recorded scene gradually fades out 1 Set TAPE RECORDING MENU DIGITAL EFFECT1 WIPE or MIX The WIPE or MIX Indication appears STILL ENTER FADE MENU i s 14 MULTI P IN P 10 WIPE WIPE WIPE MIX MIX MIX STILL ENTER FADE MENU i s 14 2 Press the Recording Start Stop Button 42 to start recording 3 Press the Recording Start Stop Button 42 to p...

Page 34: ...ever towards T to increase the volume or push the VOL JOG_ Lever towards W to decrease the volume The VOLUME Indication goes off after the adjustment is finished To adjust the volume with the Remote Controller press the T or W Button to display the VOLUME Indication Press the T Button to increase the volume or press the W Button to decrease the volume The VOLUME Indication goes off after the adjus...

Page 35: ... Resume Normal Playback Press the 1 Button 79 If the Movie Camera is left in the Slow Playback Mode for more than 12 minutes the Movie Camera switches to the Stop Mode to protect the video heads from excessive wear and tear Still Playback Still Advance Playback This Movie Camera is capable of still picture playback and frame advance playback 1 Press the 1 Button 79 2 Press the Button 76 The playba...

Page 36: ...utton 65 on the Remote Controller INDEX STILL ENTER FADE MENU i s 14 INDEX INDEX SELECT STOP K L V REW STILL ADV W s V PLAY PAUSE FF W STILL ADV 6 1 5 E D P B ZOOM 65 65 When the corresponding button is pressed once the S 1 Indication appears and searching for the subsequent scene marked with an index signal starts Each time the button is pressed after the start of Scene Index Search the indicatio...

Page 37: ...ADV W s V PLAY PAUSE FF W STILL ADV 6 1 5 E D P B ZOOM 79 2 Press the SELECT Button 66 on the Remote Controller and select WIPE or MIX 3 Press the STORE Button 67 at the moment you want to save as a still picture The B or C Indication appears and the image is saved 4 Press the OFF ON Button 68 in the scene in which you want to use the Wipe or Mix effect The scene changes as a result of the Wipe or...

Page 38: ...GS200 Model only 2 Press the MULTI Button 10 100 0001 MPEG4 3 2 1 2 3 1 MOL 001 ASF P C S D PC S D 39 MULTI P IN P 10 The files recorded on the Card are displayed in Multi Picture Mode 1 Picture Size When Picture Playback Mode is selected at Step 1 2 File Number 3 Folder File Number When Picture Playback Mode is selected at Step 1 File Name When MPEG4 Playback Mode is selected at Step 1 NV GS200 o...

Page 39: ... press the ENTER Button 17 then press the 5 Button 16 or 6 Button 19 to adjust the title contrast and press the ENTER Button 17 5 Press the 5 Button 16 or 6 Button 19 to adjust the colour and press the ENTER Button 17 The dark portion of the image is missing 1 and the colours of the bright portion change in order of black blue green cyan red magenta yellow and white after which the bright portion ...

Page 40: ...he Mode Dial 39 to Picture Playback Mode TITLE 1 USR00002 TTL STILL ENTER FADE i s PC S D 39 2 Set PICTURE PLAYBACK MENU EDITING DPOF SET YES VARIABLE When all images are not printed select ALL 0 3 Select a desired picture and press the ENTER Button 17 The selected picture is marked with a frame The number of prints set by DPOF 1 is displayed 4 Press the 5 Button 16 or 6 Button 19 to select the nu...

Page 41: ...L ENTER FADE MENU i s 14 FILE LOCK ENTER MENU EXIT 640 640 640 640 640 640 1 STILL ENTER FADE MENU i s 14 2 Select the file you wish to delete and press the ENTER Button 17 The selected picture is marked with a frame To erase 2 files or more repeat this step 3 Press the PHOTO SHOT Button 47 A verification message appears 4 Select YES and press the ENTER Button 17 The selected file is deleted from ...

Page 42: ...er than QCIF 176k144 are displayed in full screen Pictures smaller than QCIF pictures 176k144 are expanded about 3 6 times as large as the original size When setting to FULL pictures may be shown in mosaic like pattern depending on the file FORMAT WILL DELETE ALL FILES AND PRESET TITLES NO RETURN YES CARD FORMAT ENTER MENU EXIT STILL ENTER FADE MENU i s 14 MPEG4 MOL 001 ASF To Resume Normal Moving...

Page 43: ...tions Appear on the TV Screen Press the OSD Button 58 on the Remote Controller For other notes concerning this item see 121 ZOOM OSD DISPLAY DATE TIME RESET TITLE PHOTO SHOT START STOP 58 120 200GC_eng book 104 ページ 2004年2月25日 水曜日 午後5時38分 ...

Page 44: ...few seconds to record a picture to the Tape When recording to tape select the tape position before recording The picture will be recorded to the tape position when the PHOTO SHOT Button is pressed at Step 3 Photoshot index signals are automatically recorded Moving Picture MPEG4 cannot be recorded from a Card to tape NV GS200 only For other notes concerning this item see 121 Audio Dubbing You can a...

Page 45: ...to OUT PHONES When the line input is used you can dub audio while listening to the pre recorded sound from the speaker For other notes concerning this item see 121 INDEX INDEX SELECT STOP K L V REW STILL ADV T W s VOL r REC MULTI P IN P A DUB PLAY PAUSE FF W STILL ADV 6 1 5 E D P B ZOOM 62 76 Copying on an S VHS or a VHS Cassette Dubbing After connecting the Movie Camera and the VCR as illustrated...

Page 46: ... the BACK LIGHT Button 8 on the Movie Camera When recording on a card press the PHOTO SHOT Button or the Recording Start Stop Button 5 Press the Button 76 or Button 77 to stop recording Other Equipment 6 Press the Stop Button to stop playback For other notes concerning this item see 121 Using the DV Cable for Recording Digital Dubbing By connecting this Movie Camera to other digital video equipmen...

Page 47: ...ce 1 Set the Mode Dial 39 to Picture Playback Mode INDEX INDEX STOP K L V REW STILL ADV T W s VOL r REC MULTI P IN P A DUB PLAY PAUSE FF W STILL ADV 6 1 5 E D P B ZOOM 61 79 76 77 REC BACK LIGHT 7 8 PC S D 39 2 Connect the printer with the supplied USB Cable 1 USB Cable The PRINT Indication appears on the screen of the Movie Camera Highlighted Printable Blinking Printer is being recognized The PRI...

Page 48: ...ted on the printer 6 Press the 5 Button 16 or 6 Button 19 to select a desired number of prints You can set the number of prints up to 9 7 Press the ENTER Button 17 When you stop printing halfway Press the Button 18 Do not operate as follows during printing pictures cannot be printed properly Disconnecting the USB cable Removing the Card Switching the operation mode STILL ENTER FADE MENU i s 14 STI...

Page 49: ... PLUG IN POWER 32 3 When using as a Web Camera Set CAMERA or PLAYBACK USB FUNCTION WEB CAMERA When using with DV STUDIO Set CAMERA or PLAYBACK USB FUNCTION DV STUDIO It enters WEB CAMERA Mode or DV STUDIO Mode 4 Connect the supplied USB Cable to Socket 32 5 Start the Windows Messenger or DV STUDIO When using as a web camera it is not possible to record on a tape or a card or display a title You ca...

Page 50: ... the folder structure SD_VIDEO on NV GS200 Model only They have nothing to do with actual operations In the Card Recording Mode the Movie Camera automatically saves file numbers IMGA0001 JPG etc along with the images The file numbers are recorded with each image as a consecutive number When using the software without indication function indication data such as date are not displayed Depending on t...

Page 51: ... ª Back Light Mode 87 5 Sports Mode Programme AE 88 7 Portrait Mode Programme AE 88 PC 4 Low Light Mode Programme AE 88 Ω Spotlight Mode Programme AE 88 º Surf Snow Mode Programme AE 88 REC Recording 80 PAUSE Recording Pause 80 Self Timer Recording 84 When connecting the Free Style Remote Controller with Mic to REMOTE Socket and the TALK Button is pressed this indication appears 81 External microp...

Page 52: ...92 ßj Video Flash setting to j NV GS200 only 92 Red Eye Reduction 92 ª To Change the Counter Display Mode By changing C DISPLAY on the DISPLAY Sub Menu you can change the Counter Display Mode to Tape Counter Indication COUNTER 0 00 00 Memory Counter Indication MEMORY M0 00 00 and Time Code Indication TIMECODE 0h00m00s00f 75 By repeatedly pressing the DISPLAY Button on the Remote Controller you can...

Page 53: ...le with this Movie Camera CARD ERROR This Card is not compatible with this Movie Camera COPY INHIBITED Because the medium is protected by a copy guard images cannot be recorded correctly INCORRECT OPERATION The Recording Start Stop Button is pressed without connecting the USB cable to the PC in Picture Playback Mode CHECK CARD NV GS200 only You are attempting to record MPEG4 moving pictures record...

Page 54: ...you pause recording 2 Beeps for 4 times If you operate a wrong operation before or during recording ª Recording Check For Recording Check the recording speed mode SP LP must be the same as the mode used for the recording If different playback images will be distorted ª Recording on a Card Pictures with wide screen format signals cannot be copied When the colour of the screen changes or blurs adjus...

Page 55: ...PEG4 moving pictures when using line input or DV input the wide images are recorded in Longwise style MPEG4 moving pictures may not be recorded on the card formatted by other equipment e g PC ª Quick Start During the Quick Start Standby Mode a minute amount of electricity is consumed When the Movie Camera is left in the Recording Pause Mode for 6 minutes it will be turned into the Quick Start Stan...

Page 56: ...g the Night View Functions are not possible When using the Night View Function you cannot use the Built in Video Flash NV GS200 only White Balance cannot be set The shutter speed cannot be adjusted The Image Stabilizer Programme AE or Digital Effect Modes in EFFECT1 cannot be set When recording with the Night View Function it is recommended that you use the tripod The Night View Function makes the...

Page 57: ...um light If you are using Night View Mode 87 or Programme AE Mode 88 you cannot adjust the shutter speed Card Slow Shutter Mode NV GS200 only The subject may not be focused in dark scenes with less luminance or scenes with less contrast Buttons cannot be activated except the OFF ON Switch the Mode Dial and the AUTO MANUAL FOCUS Switch while the Movie Camera is focusing on the subject When you take...

Page 58: ...de Dial is operated the smaller picture disappears Titles cannot be inserted into the smaller picture Multi Picture Mode If the MULTI Button is pressed while self recording Mirror Mode 84 is used the still picture is displayed from the upper right corner of the screen but in reality the picture is recorded from the upper left corner as usual The quality of Multi images deteriorates slightly The to...

Page 59: ...irection and reverse direction Still Advance Playback forward direction and reverse direction or Playback with Zoom Lever NV GS200 only If you try to play back on other Panasonic cameras an MPEG4 recorded image for which the MPEG4 MODE was set to a mode other than ECONOMY this image will not be displayed and the indication PLEASE RE OPERATE AFTER PUSHING RESET BUTTON etc may appear This is not a m...

Page 60: ...u to IN OUT nothing will be shown on the TV screen except during playback Picture size may be displayed differently when playing back a Cinema picture on a wide screen TV with Playback Digital Effect We recommend you to set SCREEN on the DISPLAY Sub Menu to NORMAL when playing back MPEG4 on TV NV GS200 only ª Recording Pictures from a Card onto a Tape When recording the Card Image on a Tape its si...

Page 61: ...o wipe the camera body carefully Then wipe it again thoroughly with a soft dry cloth Keep the Movie Camera away from magnetized equipment such as a microwave oven TV video game equipment etc If you use the Movie Camera on or near a TV images or sounds may be disturbed due to electromagnetic wave radiation Do not use near cell phone because doing so may cause noise to adversely affect the picture a...

Page 62: ...CT or EJECT TAPE only when the tape is inserted appear In this case follow the procedure below Blink in yellow Dews are slightly adhering on the head or the tape Blink in red Dews are adhere on the head or the tape 1 Remove the tape if it is inserted It takes about 20 seconds to open the Cassette Holder This is not a malfunction 2 Leave the Movie Camera with the Cassette Compartment Cover closed t...

Page 63: ...protective function may operate and the Battery may become unusable for a while Be Sure to Detach the Battery after Use Be sure to detach the Battery from the Movie Camera If it is left attached to the Movie Camera a minute amount of current is consumed even when the Movie Camera power is off If the Battery is left attached to the Movie Camera for a long time over discharge takes place The Battery...

Page 64: ... Monitor In a place with drastic temperature changes condensation may form on the LCD Monitor Wipe it with soft dry cloth If your Movie Camera is extremely cold when you turn its power on the image on the LCD Monitor is slightly darker than usual at first However as the internal temperature increases it goes back to the normal brightness NV GS200 NV GS120 Viewfinder Do not direct the Viewfinder or...

Page 65: ...ng time of the Battery becomes shorter 124 Has the Battery worn out If the operating time is still too short even after the Battery is fully charged the Battery has worn out 2 The Battery cannot be charged If the DC Input Lead is connected to the AC Adaptor charging cannot be performed Disconnect the DC Input Lead Normal Recording 1 Recording does not start although power is supplied to the Movie ...

Page 66: ...t Mode the original sound will be erased If you wish to preserve the original sound be sure to select 12bit Mode at the time of recording 4 Sounds cannot be played back Although a Cassette with no audio dubbing is being played is 12bit AUDIO on the PLAYBACK Sub Menu of the TAPE PLAYBACK MENU set to ST2 To play back a Cassette with no audio dubbing 12bit AUDIO must be set to ST1 106 Is the Variable...

Page 67: ...moving subject 6 Recording a subject with little contrast Because the Movie Camera achieves focus based upon the vertical lines of an image a subject with little contrast such as a white wall may become blurry ª Time Code Time Code signals are data that indicate time measured in hours minutes seconds and frames 25 frames per second If this data is included in a recording an address is assigned to ...

Page 68: ... p 75 ohm C Input 0 3 Vp p 75 ohm Audio Input Level Line 316 mV 10 kohm or more Mic Input Mic sensitivity 50 dB 0 dB 1 V Pa 1 kHz Stereo mini jack USB Card reader writer function USB 2 0 compliant max 12 Mbps No copyright protection support PictBridge compliant Digital Interface DV Input Output Terminal IEEE1394 4 pin Video Flash NV GS200 only GN 5 5 Dimensions Approx 70 W k75 H k126 D mm Weight N...

Page 69: ...k32 H k91 D mm Weight Approx 110 g Weight and dimensions are approximate values Specifications may change without prior notice Power Source AC 110 240 V 50 60 Hz Power Consumption 19 W DC Output DC 7 9 V 1 4 A Movie Camera Operation DC 8 4 V 0 65 A Battery Charging 120 200GC_eng book 130 ページ 2004年2月25日 水曜日 午後5時38分 ...

Page 70: ... 11 5 10 13 16 MB 100 200 400 10 18 26 14 24 31 32 MB 220 440 880 25 41 58 33 55 69 64 MB 440 880 1760 53 88 121 71 115 144 128 MB 880 1760 3520 111 180 248 146 235 294 256 MB 1760 3520 7040 223 362 496 294 471 590 512 MB 3520 7040 14080 452 732 1003 595 953 1191 Maximum recording time of MPEG4 moving picture on an SD Memory Card optional NV GS200 only PICTURE SIZE 320k240 QVGA 176k144 QCIF MPEG4 ...

Page 71: ...C VQT0H96 F0204Re0 6500 A C Matsushita Electric Industrial Co Ltd Web Site http www panasonic co jp global 120 200GC_eng book 132 ページ 2004年2月25日 水曜日 午後5時38分 ...

Reviews: