background image

Summary of Contents for Omnivision PV-C1331W

Page 1: ...Combina_iom VCR Op tat_ng _nstr_ction8 ...

Page 2: ... _U_g_ _ and voltage Section 810 _ _ _J_ _ _ _ of the National Electnda_ ___ _ Cede ANSI NFPA 70 in I _ _ I _1 _ _ Canada part 1 of toe ___ Canadian Electdcot Cede ___ _ _ provides information _ _ _ _ regarding proper graund_ng Of the mast and supporting structure grounding Qfine lead in wire to an antenna diSCharge unit size of gmuedin19 penduct ors location of antenna dis toa_ge unit connection ...

Page 3: ...tte tapes that have been tested and inspected for use in 2 4 6 and 8 hour VCR machines be used This television receiver provides display of television closed captioning in accordance with 15 119 of the FCC rules FCC WARNING Any unauthorized changes or modifications to this equipment would void the user s authority to operate CAUTION TO REDUCE THE RISK OF ELECTRIC SHOCK DO NOT REMOVE COVER OR BACK ...

Page 4: ... PV C1321 PV C1341 LSSQ0282 PV C1331W PV C1351 w Batteries 2 AA To order accessories call toll free 1 800 332 5368 J 1 Open the cover 2 Insert batteries as marked 3 Close the cover Battery replacement caution Do not mix old and new batteries Do not mix alkaline with manganese batteries With Power ON press PLAY REPEAT on the unit for 7 seconds to deactivate the SELF DEMO Mode Repeat this to display...

Page 5: ...back a Tape 14 Record On a Tape 14 Copy Your Tapes Dubbing 15 TV Operation 16 Closed Caption System 17 TV Timer Features 18 Picture Adjustment 20 FM Radio 21 Timer Recording 22 Tape Operation 24 Special VCR Features 27 V Chip Control Feature 31 On Screen Display OSD 35 Warning and Instruction Displays 36 Unit Information 37 Before Requesting Service 38 Service Center List 39 Spanish Quick Use Guid...

Page 6: ...TRACKING UP DOWN TAPE POSITION Page 37 Page 25 COUNTER RESET NUMBERED Keys Page 26 Page 16 RAPID TUNE Page 16 D _ ADD DELETE Page 13 MUTE Page 16 SEARCH Page 24 CHANNEL UP DOWN Page 16 SELECT UP DOWN Page ACTION Page 12 STOP Page 14 VOLUME UP DOWN Page 16 SET BACKSPACE Page 13 PROGRAM Page 22 FASTFORWARD SEARCH Page 14 REWIND SEARCH pLAy Page14 Page14 REC CM ZERO Page 14 Page 26 PAUSE SLOW SPEED P...

Page 7: ... Jack I REC Indicator PROG TIMER Indicator Ughts during record ng _iF _ Lights when the unit is set for Rmer In Rec Pause or OTR _Recording It flashes when a mer Pause mode the _ Recording has been set with no tape nd ca or flashes inserted the clock is not set or the Pa e 14 tape is in motion g Page 22 ON TIMER Indicator Lights when the Remote Sensor On _mer is set Page 18 AC Power Plat When plug...

Page 8: ...ge term na s IN from ANT CABLE VHF UHF 1 2 Press POWER on the remote or unit When the unit is turns on the first time SELECT LANGUAGE screen appears 3 Press CH to select English OR Press CH to select Spanish EspaSol OR Press VOL to select French Franqais CHANNEL CLOCK AUTO SET screen appears If wrong language is set complete Reset all unit Memory Functions steps page 9 8 ...

Page 9: ...OLDOWN Press ACTION Key on the Remote to display SET CLOCK Menu screen Press to select the month and press _ to set In the same manner select and set the date year time and DST Daylight Saving Time 3 Press ACTION Key twice to start CLOCK and exit When moving unit to a new location or if mistake was made in the Initiat Setup section Make sure a tape is not inserted in the uni Turn tf_e un t Power o...

Page 10: ...the remote or unit When the unit is turns on the first time SELECT LANGUAGE screen appears Turn on your cab e box and set it to PBS PublIc Broadcast Station channel In your time zone If you use DSS receiver it must be turned off 10 3 Press CH to select English OR Press CH to select Spanish Espa_ol OR Press VOL to select French Fran_ais CHANNEL CLOCK AUTO SET screen appears If wrong language is set...

Page 11: ...dure on page 9 POWER ACTION M _o O D D oo Lee SELECT SET A CH UP v CH DOWN VOL UP 4 VOLDOWN Note to CABLE System Installer I This reminder is provided to call the CABLE Cable TV System Installers attention to I Article 820 40 of the NEC that provides guidelines for proper grounding and in particular specifies that the cable ground shall be connected to the grounding system of the building as close...

Page 12: ... antenna system TV or CABLE 4 Press AV to select AUTO SET then press After Channel AutoSet is finished Clock Auto Set will be performed Clock 1 Press A Y I to select CLOCK I 2 Press ACTION TIMEZONEADJUST appearsonlywhen auto clock is set 3 Press V to select MANUAL or AUTO CLOCK SET and press ForAutoClockSet select AUTOCLOCK SET thenpress CH_ 4 Press AV and press to select and set the month date ye...

Page 13: ...On Unit Youcan operate the menu screen using unit buttons To displaythe menu press STOP EJECT and REW to_ether withno tape inserted To exit the menu repeat above withor withouttape inserted untilnormalscreen appears Using V keys On Remote V_ CH Q Q On Unit CH UP CH DOWN VOLUME UP 41 VOLUME DOWN Whenever the menu or program screen is displayed CHANNEL UP DOWN function as A and VOLUME UP DOWN functi...

Page 14: ...ed Press REC to start recording To ed_ out unwanted portions press PAUSE SLOW to pauseand resume recording Youcannot viewanotherchannelduring recording Stop Press STOP One Touch Recording OTR Press REC repeatedly o _ 3o_ _o to set the recording _ _ length 30 min 4 hours 3_o 2 0o_ _ 30 The unit stops recording at a preset time PROG TIMER indicator lightson the unit After the unit has been in Res Pa...

Page 15: ...dby mode Standby mode Perform operation of steps 4 and 5 on both units at same time Press PLAY to start dubbing Press STOP to stop dubbing p _FJ_LOW G STOP Press PAUSE SLOW to start dubbing Press STOP to stop dubb ng rized exchanging l pying of copyrighted s may be copyright ent Method 1 Press CH V The display will change as follows 1 _2 _A3BL E TV Method 2 _ILINE I_ a Press ACTION for MAIN MENU b...

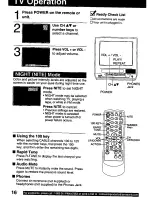
Page 16: ...g r v playing a tape or whi e n FM mode Press NITE to cancel Previous settings are restored NIGHT mode is canceled when power is turned off or power faiture occurs Using the 100 key When selectingCABLEchannels100 to 125 withthe numberkeys firstpressthe 100 key and then enterthe remaining two digits Rapid Tune Press R TUNE to display the last channelyou were watching Audio Mute Press MUTE to instan...

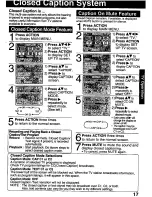
Page 17: ... MAiN MENU 1 Press AV_I to select q V I 2 Press ACTION to display SET UP IV screen 1 Press V to select CAPTION I Press to display CAPTION screen 1 Press V to select MODE 2 Press I_ repeated_ to setect OFF 1 Press Vto select CC ON MUTE Press repeatedlyto select desiredmode Ea_ pros of will change thedisplay as N _NO _ CAP C1 shown at left Tr_e caption maybe CAP C2 broadcastoverCAP C1 orC2 Press ACT...

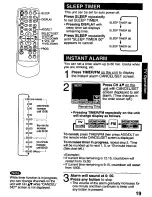
Page 18: ...CH03 CH125 _ See FM Radio on page c_ol F LAY 21 for instructions on t_F t_9 DFMtI _ _ how tOpreset FM stations 4 Press AT to select ALARM ON or OFF I I CH _ ON TIMER Indicator When ON Is selected an alarm will gradually increase in volume for one minute or unti_canceled by pressing any button including VOL To Make Corrections use V and I_ to move back and correct Press PROG to set ON TIMER ONTIMER...

Page 19: ... tff_ me0 00 I 60 00 Max j White timer function is in progress you can change channels on the unit w_thCH V while CANCEL SET screen is not displayed 2 Press CH V onthe with CANCEL SET screen disptayed to set alarm Timechangesin the ordershownleft Pressing TIMER FM repeatedly on the unit will change display as follows ___L_I _ r ___j_ To cancel press TIMEPJFM then press ADD DLT on the remote while ...

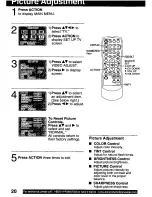
Page 20: ...elow right 2 Press 1 to adjust To Reset Picture Controls Press AV and to select and set NORMAL All controls return to their factory settings Press ACTION three times to exit 2O Picture Adjustment COLOR Control Adjust color intensity TINT Control Adjust for natural flesh tones BRIGHTNESS Control Adjust picture brightness PICTURE Control Adjust picture intensity by adjusting both contrast and color ...

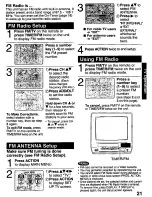
Page 21: ...y see FM Radio Setup _ Press ACTION to disptay MAIN MENU __ _ _i _ _ 1 Press V _ _ to select TV __l Press ACTION _ _ i_ 2 to display SET i _ UP TV screen 3 1 Press V to select FM ANTENNA 2 Press to select _NT INTERNAL or EXI For cable TV users EXTERNAL INT For antenna users whichever EXT sounds the best Press ACTION twice to end setup Press FM I V on the remote or press TIMER FM twice on the unit ...

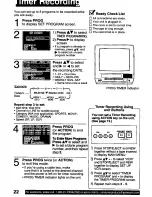
Page 22: ...pplicable SPORTS MOVIE COMEDY MUSIC DRAMA Speed SP LP SLP Press PROG or ACTION to end the program ToEnter MoreProgran_ Press V to select and to set a blank program number and then repeat step 3 5 Press PROG twice or ACTION to exit this mode If you re using a cable box make sure that it is tuned to the desired channel and the power is left on for timer recording PROG TIMER indicator lights on the u...

Page 23: ...LT Press PROG twice or ACTION to exit this mode 2 minutes before Timer recording is performed PLEASE PREPARE FOR TIMER REC appears and or the PROG TIMER Indicator flashes Be sure a cassette with record tab is loaded and the unit is in Stop mode If the start times of two programs overlap the lower numbered program will have priority If the start time for a Timer Recording comes up during a normal r...

Page 24: ...ch entry within 10 seconds or the Index Search mode will be canceled If Index Search is started very close to an index mark that index mark may not be counted in the search 24 Locates end point of recording for continuity Press SEARCH twice in Playback or Stop mode to display PROGRAM END SEARCH screen Press FF to start search Example of Program End Search operation PLAYBACK DIRECTION II T _ _ IIID...

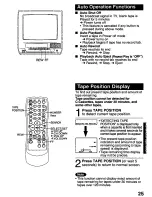
Page 25: ... VOL UP 1 VOLDOWN FF To find out present tape position and amount of tape remaining Tape pesiUon cannot be detected for C Cassettes tapes under 30 minutes and some other tapes Press TAPE POSITION to detect current tape position r_ a _ _ T DETECTING TAPE POSITION iSdisplayed only i when a cassette is first inserted m and it takes several seconds for correct tape position to appear I I The present t...

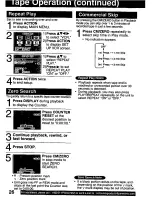
Page 26: ...ck mode you can skip over I to 3 minutes of recorded tape in just a few seconds Press CM ZERO repeatedly to select skip time in Play mode No indication appears tess 1rainSkip 2nd tess 2 minSkip L_lPress _ 3 minSkip Playback repeats when tape end is reached or unrecorded portion over 30 seconds is detected During playback you may also press PLAY REPEAT repeatedly on the unit to select REPEAT ON or ...

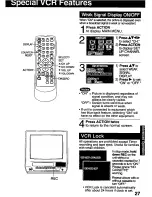
Page 27: ...e cleady visible OFF Screen turns solid blue when signal is absent or weak If unit is connected to equipment which has blue back feature selecting ON will have no effect on the other equipment Press ACTION twice to return to the normal screen REC All operations are prohibited except Timer recording and tape eject Useful for families with small children Instopmode hold down REC on the unitwitt out ...

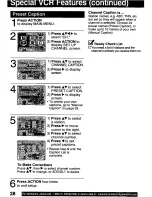
Page 28: ... list of stationsand the channel numbers you receive them on 1 Press V to select CHANNEL CAPTION 2 Press to display screen 1 Press V to select PRESET CAPTION 2 Press to display screen To create yourown captions go to Manual Caption on page 29 1 Press V to select a station 2 Press to move cursor to the right 3 Press Y to select channel number 4 Press to set preset captions Repeat step 5 untilthe Ca...

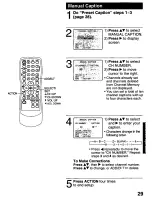
Page 29: ...ady set and channels deleted from Channel Memory are not displayed You can set a total of ten channel captions with up to four characters each _ANUA_ _A_T_ON 1 Press _ to select and to enter your caption Characters changeinthe followingorder A B C Z BLANK _ 9 2 1 0 _ _1 Press repeatedly to move the cursor to CH NUMBER Repeat steps 3 and 4 as desired TO Make Corrections Press V then to select chann...

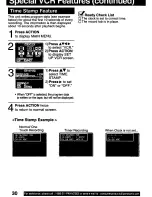
Page 30: ...ss Vd I_ to select VCR 2 Press ACTION to display SET UP VCR screen _PReady Check List liThe clock is set to correct time nThe record tab is in place 1 Press T to select TIME STAMP 2 Press I_ to set ON or OFF When OFF Ls selected theprogram data iswntten onthetape butwillnotbedisplayed Press ACTION twice to return to normal screen Time Stamp Example NormaV One Touch Recording Timer Recording When C...

Page 31: ...N to display MAIN MENU 2 1 Press AY to select TV 2 Press ACTION to display SET UP TV screen 3 1 Press V to select LOCK 2 Press to display screen 4 To Make Corrections Press 1repeatedly to move the cursor Press number keys to make the correction 1 Press number keys to enter your secret code 2 Enter same code again for confirmation Stop2 notnecessary when changingrating or secret code Take care that...

Page 32: ... Some movies such as old movies or foreign movies usually have no ratings SET CH UP v CH DOWN VOL UP 4 VOLDOWN 4 1 Press V to sel_t and I_ to set ratings to be b ocked See ratings chart right Press ACTION to red play LOCK menu and continuewithUS 3V PROGRAMS Ratings Setup nextpage Or press ACTION four times to ex t G P_ PG 13 i i R t t NC t7 I i X GENERAL AUDIENCE All ages _dmltted PARENTAL GUIDANC...

Page 33: ...frequent coarse language limited violence some suggestive sexual dialogue and situations PARENTS CAU RONED May contain sophisticated themes sexual situations strong language and more intense violence MATURE AUDIENCE May contain mature themes profane language graphic violence and sexual situations 3_ 1 Prese V to select VIEW NR PROGRAMS 2 Press to set YES or NO NR Not Rated PROGRAMS Some TV shows s...

Page 34: ...Control Enter your secret code ACCESS CODE in the Blocking Message screen V Chip Control is reactivated when power is turned off or power failure occurs Deactivate V Chip Control Enter your secret code steps 1 4 page 31 Then set US MOVIES and or US TV PROGRAMS to OFF using AV andl_ keys Ratings set on pages 32 and 33 and retained and will be in effect when V Chip Control is activated again _SELECT...

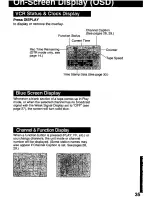
Page 35: ... a blank section of a tape comes up in Play mode or when the selected channel has no broadcast signal with the Weak Signal Display set to OFF see page 27 the screen will turn solid blue Illll o When a function button is pressed PLAY FF etc or you change channels the unit mode or channel number will be displayed Some station names may also appear if Channel Caption is set See pages 28 29 ...

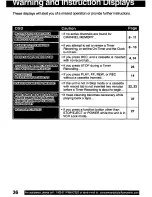
Page 36: ...REC and a cassette is inserted 4 14 with no record tab If you press STOP during a Timer 23 Recording If you press PLAY FF REW or REC 14 without a cassette inserted If the unit is not in Stop mode or a cassette with record tab is not inserted two minutes 22 23 before a Timer Recording is about to begin If head cleaning becomes necessary while playing back a tape 37 If you press a function button ot...

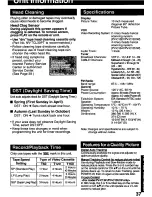
Page 37: ... Radio Band range General Power Source Power Consumption TelevisionSystem Speaker scanning system PV C1321 PV C1331W 4 rotary heads helical scanning system PV C1341 PV C1351W 1 track VHF2 13 UHF 14 69 Midband Ath_Jgh I 14 _ Suped and J through W 23 36 hy_abandAA E_ 37 r 4 LovVoand A 5 A I _ 99 Speda CABLE ct_ 5A 01 Uti_lband 65 94 t00 125 87 5 108 1 MHz 120 V AC 60 Hz Apm_ 4 0 w_s Powero_ EIA Stan...

Page 38: ...or CABLE is serrestly set p 8 11 Make sum cassette record tab is inlant P 4 Check that clock isset to currenttime and date Make sure DSS CABLE box ifused is lefton and tunedto channel to be recorded Set recordingStart Stop times correctly P 22 23 Timer recordingmay not be performed or continued if a power interruption of more than 1 minute occursbefore or during a Timer recording even after power ...

Page 39: ...Suite 102 Hollywood FL 33020 GEORGIA 8655 Roswell Road Suite 100 Atlanta GA 30350 ILLINOIS 9060 Golf Road Niles IL 60714 1703 Nodh Randall Road Elgin IL 60123 Pick up Drop off only MARYLAND 62 Mountain Road Glen Burnie MD 21061 MASSACHUSE n s 60 Glacier Drive Suite G Westwood MA 02090 MICHIGAN 37048 Van Dyke Avenue Sterling Heights M148312 MINNESOTA 7850 12th Avenue South Airport Business Center B...

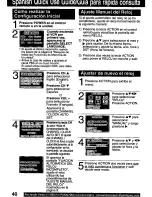
Page 40: ... terminado sevisuaJiza la pantalla s_juiente Si aparece la pantalla FIJACION AUTOMATICA DEL RELOJ INCOMPLETO ajuste el reloj utilizando los _Ajrocedimientos de USTE MANUAL DEL RELOJ mostrados en la p gina9 Si el ajuste automdtico del reloj no se ha completado ajuste el reloj manualmente de la siguiente manera 1 Presione la tecia ACTION en el control remoto para visualizar la pantalla dei men_ RELO...

Page 41: ...ver otro canal durante la grabaci6n Para parar Presione STOI_ El vldeograbador combinado deja de _rabar a una hora prefljada Grabacion de un toque Presione REC repetidamente para ajustar la hora de grabaci6n 30 min Graba_Jfl n0_al 0 30 b 1 00 4 horas C OQ _ 3 00 2 00 _ 1 30 _ Exhiba FIJAR PROGRAMAClON Presione PROG _ Exhiba TEMPORIZADOR _ _ 1 Presione AV _a _ para seleccionar F _ 2 Presione I_ par...

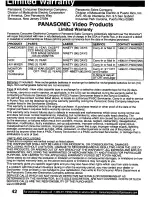
Page 42: ...ranty only covers failures due to defects in mateffals and workmanship which occur dudng normal use and does not cover normal maintenance including but not limited to video and audio head cleaning The warranty does not cover damage which occurs in shipment or failures which are caused by products not supplied by the warrantor or failures which result from accident misuse abuse neglect mishecdl ng ...

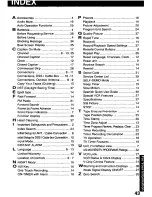
Page 43: ...arranty 42 Location of Controls 6 7 N NIGHT Mode 16 O 100 Key 16 One Touch Recording 14 ON TIMER with Alarm 18 P Phones 16 Playback 14 Picture Adjustment 20 Program End Search 24 Q Quality Picture 37 R Rapid Tune 16 Rec ord 14 Record Playback Speed Settings 37 Remote Control Buttons 6 Repeat Play 26 Reset Language Channels Clock 12 Reset unit 9 Reverse Search 14 Rewind 14 S Secret Code 31 Service ...

Page 44: ...tric Corporation of America One Panasonic Way Secaucus New Jersey 07094 Panasonic Sales Company PSC Division of Matsushita Electric of Puerto Rico Inc Ave 65 de Infanteria Kin 9 5 San Gabriel Industrial Park Carolina Puerto Rico 00985 Printed in U S A LSQT0344B 1200 0 ...

Reviews: