


Timer Programming using VCR Plus+
®
System (continued)
Timer Programming using VCR Plus+
®
System (continued)
1
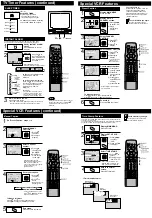
Display MAIN MENU.
Press ACTION*.
Display SET UP
CHANNEL screen.
1) Press
to select “CH.”
2) Press ACTION
to display.
Select CABLE BOX
SET UP.
1) Press
to
select.
2) Press
to display.
Select “YES” or “NO.”
1) Press
to
select “YES”
or “NO.”
2) Press to set.
Select Cable Box output
channel number.
1) Press
to
select.
2) Press
to enter.
• If necessary, refer to your cable
box manual.
• If you are using Audio/Video jack
connection for your cable box,
select and set “VIDEO OUT” as
the output channel.
2
3
5
VCR Plus+ and PlusCode are registered
trademarks of Gemstar Development
Corporation.
The VCR Plus+ system is manufactured
under license from Gemstar Development
Corporation.
Cable Box Setup
Process of Recording
Connection
Setup
Programming
4
If you select...
“YES”
Step 5.
“NO”
Press ACTION
Go to VCR Plus+ Channel
Setup.
ANTENNA : CABLE
AUTO SET
CHANNEL CAPT I ON
WEAK S I GNAL D I SPLAY : OFF
CABLE
BOX SET UP
VCR P l u s+ CH SET UP
SELECT : KEY
SET : KEY
END : ACT I ON KEY
SET UP CHANNEL
SET : KEY
SELECT : KEY
END : ACT I ON KEY
ARE YOU US I NG
A CABLE BOX?
YES
NO
NO
SET : KEY
SELECT : KEY
END : ACT I ON KEY
ENTER CABLE BOX OUTPUT
CHANNEL
01
01
M A I N MENU
CLOCK
C H
SET : ACT I ON KEY
SELECT : KEY
VCR
T V
EX I T
LANGUAGE
Broadcast
or Cable
Station
Name
1
Display MAIN MENU.
Press ACTION*.
2
3
5
VCR Plus+ Channel Setup
To Make Corrections
Press
and to move to error, then
to change,
or ADD/DLT to erase number.
VCR Plus+ Channel Setup is...
necessary to program the unit with local
channel information for proper VCR Plus+
operation.
Process of Recording
Connection
Setup
Programming
At first, do Channel Setup Preparations below right.
• Make each entry within 5 minutes or the unit will leave this mode.
• Once local channels have been programmed, they will stay in
memory, even in the case of a power failure.
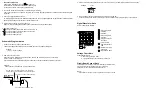
Channel
no. your TV
receives the
station on
Assigned
Guide
(VCR Plus+)
Channel no.
15
20
04
HBO
Nickelodeon
CBS
FOX
< EXAMPLE ONLY >
33
38
34
11
Channel Setup Preparations
To complete step 4 left, make a local
channel list (see example below.)
You will need the following:
• A normal TV and/or Cable stations line
up and the channel numbers your receive
them on.
• A list of Guide (VCR Plus+) channel
numbers for stations you receive (see TV
Guide and selected newspapers.)
1
Make a 3-column chart. In the left
column, write all station names you receive.
2
In the middle column, write each station’s
Guide (VCR Plus+) number.
3
In the right column, write the channel
number your TV receives the station on.
4
Notes
SET : KEY
SELECT : KEY
END : ACT I ON KEY
VCR P l u s
+ CH SET UP
GU I DE CH CABLE CH
01
01
— —
02 — —
M A I N MENU
CLOCK
C H
SET : ACT I ON KEY
SELECT : KEY
VCR
T V
EX I T
LANGUAGE
Display SET UP
CHANNEL screen.
1) Press
to select “CH.”
2) Press ACTION
to display.
Select VCR Plus+ CH
SET UP.
1) Press
to
select.
2) Press
to display.
Enter VCR Plus+ channels.
1) Press to
move cursor to
right column.
2) Press
to
change the
CABLE CH
number.
3) Press to set.
4) Press
to
scroll up/down
the GUIDE CH
column.
• Repeat step 4 until list is complete.
End the setup.
Press ACTION three times.
ANTENNA : CABLE
AUTO SET
CHANNEL CAPT I ON
WEAK S I GNAL D I SPLAY : OFF
CABLE BOX SET UP
VCR
CR
P l u s+ CH SET UP
H SET UP
SELECT : KEY
SET : KEY
END : ACT I ON KEY
SET UP CHANNEL
To Make Corrections
Press repeatedly to delete the PlusCode programming number.
VCR Plus+ System Programming
Process of Recording
Connection
Setup
Programming
Use normal Timer Recording steps if:
• a program PlusCode programming
number is not listed.
• program, such as a sporting event, may
run over scheduled stop time.
• You can obtain unlisted PlusCode
programming numbers by calling 1-900-
454-7587. Call costs approximately $.95
per minute.
• Avoid overlapping program times.
• If you’re using a cable box, make sure
that it is turned to the desired channel
and the power is left on for timer
recording.
• Timer programs memory capacity is 8.
To add more programs, please first clear
other programs.
1
Display SET PROGRAM
screen.
Press PROG/VCR+.
Select VCR Plus+
PROGRAMMING.
1) Press
to
select.
2) Press to
display.
Enter PlusCode
programming number.
1) Press
NUMBERED
keys.
2) Press
PROG/VCR+
when finished.
Set Record Frequency.
1) Press
to
select.
2) Press to set.
Set Category and
Record speed.
1) Press
to
select.
2) Press to set.
2
3
6
7
Check list before you begin.
The clock is set to correct time.
VCR Plus+ System Setup is complete.
4
5
Notes
SET : KEY
SELECT : KEY
END : PROG KEY
SET PROGRAM
T I MER PROGRAMMING
OGRAMMING
ON TIMER
VCR P l u s + PROGRAMMING
OGRAMMING
SELE CT
CATE
ATEGORY
28
28 TUE 12
12:00
00P 12
12: 30
30P 69
69
DATE START STOP CH
PBS
SP
SELECT : KEY
SET : KEY
END : PROG / ACT I ON KEY
- - - - - - - - -- - - - - - - -- - - - - - -
CATEGORY : N / A
CANCEL : ADD / DLT KEY
SELECT 1 - 8 : KEY
ENTER : KEY
END : PROG / ACT I ON KEY
P DT START STOP CH SPD
1
28
28 12
12 : 00
00 p 12
12 : 30
30p 69
69 SP
SP
2 -- -- : -- -- : -- -- --
3 -- -- : -- -- : -- -- --
4 -- -- : -- -- : -- -- --
Select desired type:
• Categories N/A (not applicable), SPORTS, MOVIE, COMEDY
MUSIC, or DRAMA
• Speed SP, LP, or SLP
To Make Corrections
Press to move the cursor and
to make the correction.
ENTER PLUSCODE NUMBER
END : PROG KEY
US I NG 0-9 KEYS
VCR Plus+ SYSTEM
ONCE
DA I LY (MON-FR I )
WEEKLY
END : PROG KEY
VCR Plus+ SYSTEM
SET : KEY
SELECT : KEY
End programming.
Press
PROG/VCR+
(or ACTION.)
Exit this mode.
Press PROG/VCR+
(or ACTION) twice.
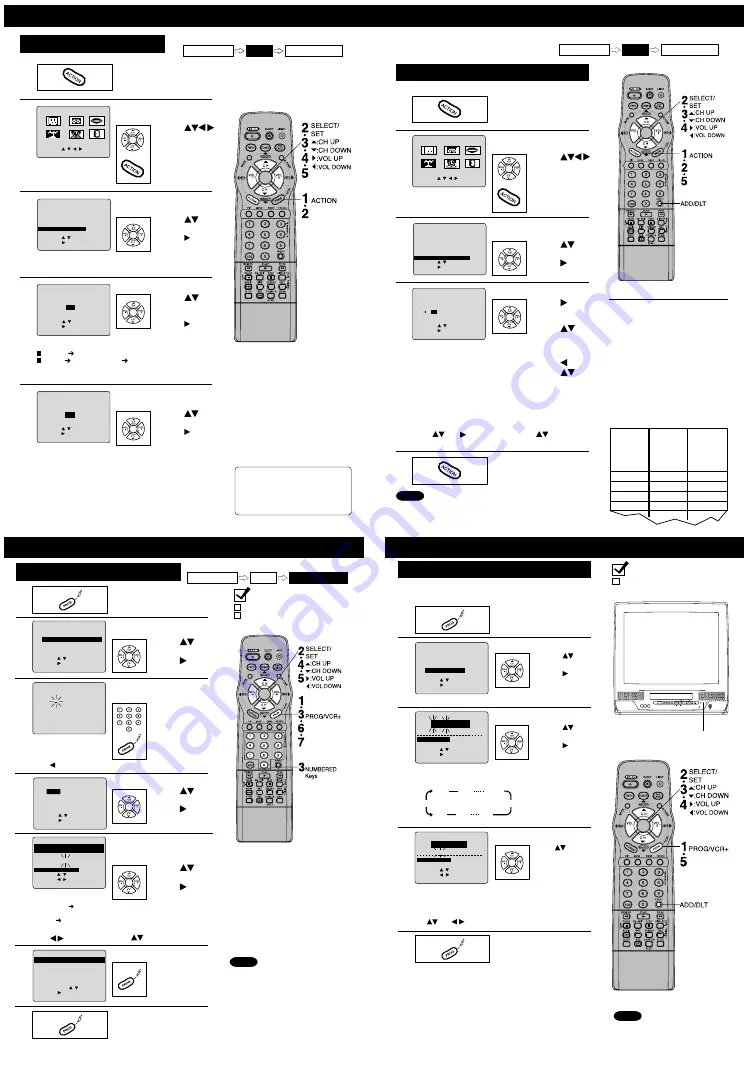
• PROG TIMER indicator lights on
the unit.
TV Timer Features
VIDEO IN
VIDEO IN
L-AUDIO IN-R
L-AUDIO IN-R
POWER
POWER
VOL
VOL
CH
CH
STOP/EJECT
STOP/EJECT REW/
REW/
PLAY/REPEAT
PLAY/REPEAT FF/
FF/
REC
REC
TIMER/FM
TIMER/FM
ACTION
ACTION
REC
REC ON TIMER
ON TIMER PROG TIMER
PROG TIMER
SET : KEY
SELECT : KEY
END : PROG KEY
SET PROGRAM
T I MER PROGRAMMING
VCR P l u s + PROGRAMMING
ON TIMER
ON TIMER
1
Display SET PROGRAM
screen.
Press PROG/VCR+*.
Select ON TIMER.
1) Press
to select.
2) Press to
display.
Set the ON-TIMER TIME.
1) Press
to
select.
2) Press
to set.
• Make sure a tape is
inserted if Playback
mode is selected.
• See “FM Radio” for
instructions on how
to preset FM
stations.
2
3
5
ON-TIMER with Alarm
• ON-TIMER mode selection order
ON TIMER indicator
Check list before you begin.
The clock is set to correct time.
This unit can be set to automatically power on in one of 3 modes (TV,
Playback, or FM radio.) You can also combine the On-Timer with a one
minute alarm that gradually increases in volume.
To Cancel ON-TIMER set,
Repeat steps 1 and 2. Then, press ADD/DLT to clear the time in
step 3. Now, press PROG/VCR+ to end.
“ON TIMER END” appears on-screen for a few seconds.
If no button on the remote or unit (including
a button used to turn off the alarm) is
pressed within 60 minutes after unit turns
itself on, it will turn itself back off.
4
Note
Set ON TIMER.
Press PROG/VCR+.
•
“
ON TIMER SET
”
is displayed.
• ON TIMER indicator lights on the unit.
Set Alarm.
Press
to
select “ON” or
“OFF.”
ON T I MER
SE
SELE CT ALARM
ALARM
6:00
00AM
AM CH
CH08
08
SET : KEY
SELECT : KEY
END : PROG KEY
ALARM : ON
CANCEL : ADD / DLT KEY
ABC
FM1
PLAY
CH01
CH125
FM8
FM9
CH02
CH03
When “ON” is selected,
an alarm will gradually increase in volume for one minute or until
canceled by pressing any button (including VOL
+ -
.)
To Make Corrections,
use
and
to move back and correct as necessary.
ON T I MER
SE
SELE CT HOU
OUR
6:--AM CH
AM CH --
SET : KEY
SELECT : KEY
END : PROG KEY
ALARM : ON
Summary of Contents for OmniVision PV-C2780-K
Page 8: ...Fig 1 3 Fig 1 4 8 ...
Page 26: ...Fig D5 6 1 2 1 Notes in chart 26 ...
Page 29: ...6 2 2 Inner Parts Location Fig J1 1 29 ...
Page 30: ...6 2 3 EJECT Position Confirmation Fig J1 2 30 ...
Page 31: ...6 2 4 Grounding Plate Unit Full Erase Head and Cylinder Unit Fig J2 1 31 ...
Page 44: ...6 3 CASSETTE UP ASS Y SECTION 6 3 1 Top Plate Wiper Arm Unit and Holder Unit Fig K1 1 44 ...
Page 81: ...81 ...
Page 85: ...11 2 MECHANISM BOTTOM SECTION 85 ...
Page 86: ...11 3 CASSETTE UP COMPARTMENT SECTION 86 ...
Page 87: ...11 4 CHASSIS FRAME SECTION 1 87 ...
Page 88: ...11 5 CHASSIS FRAME SECTION 2 88 ...
Page 89: ...11 6 PACKING PARTS AND ACCESSORIES SECTION 89 ...


