6.1. MECHANICAL ADJUSTMENT
Refer to the Service Manual for R4-Mechanism Chassis for PV-
Model (Order No. MKE0401000C1).
6.2. ELECTRICAL ADJUSTMENT
6.2.1. TEST EQUIPMENT
To do all of these electrical adjustments, the following
equipment is required.
1. Dual-Trace Oscilloscope
Voltage Range: 0.001 V to 50 V/Div.
Frequency Range: DC to 50 MHz
Probes: 10:1, 1:1
2. Isolation Transformer (Variable)
3. VHS Alignment Tape (VFMS0003H6)
4. TV monitor
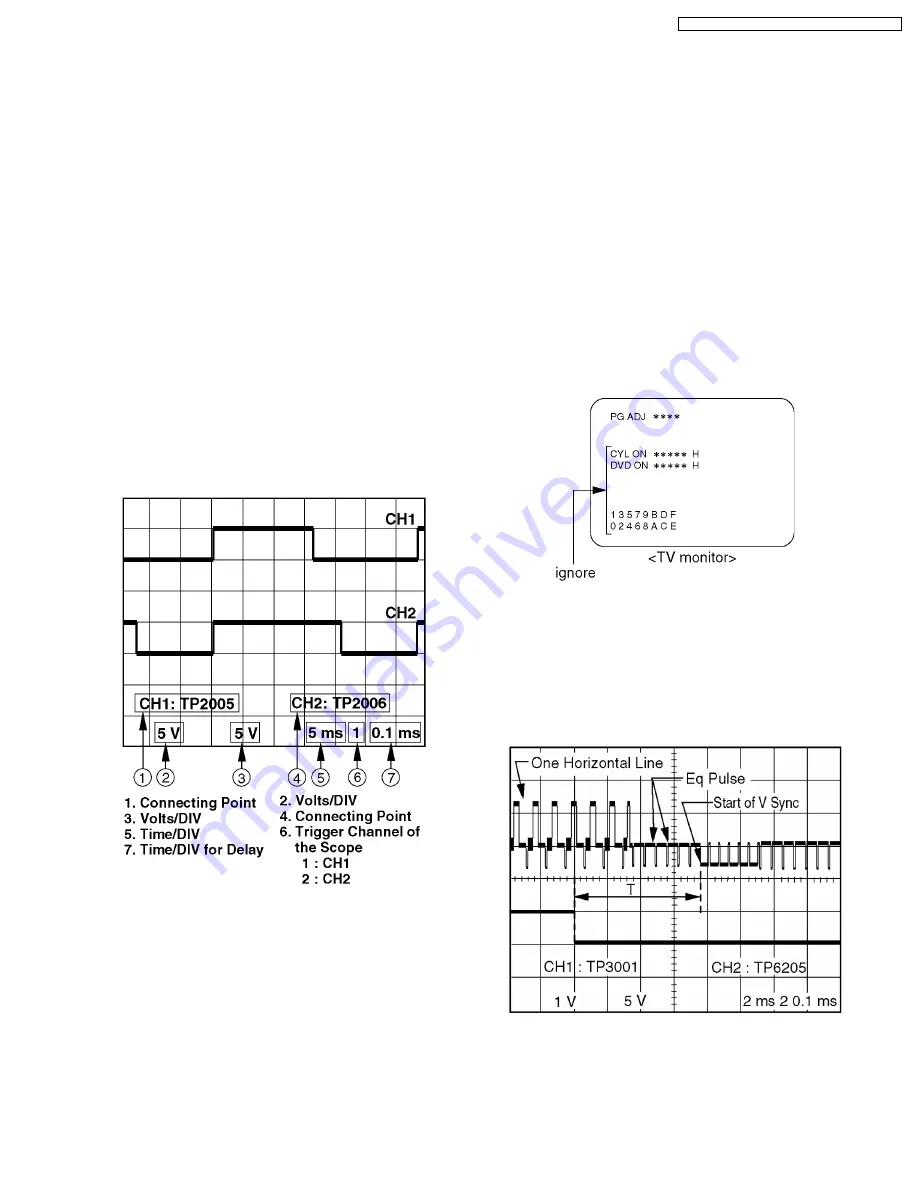
6.2.2. HOW TO READ THE ADJUSTMENT
PROCEDURES
Fig. E1
6.2.3. EVR (Electronic Variable Register)
ADJUSTMENT WITH THE REMOTE
CONTROL
This unit has electronic technology using I
2
C Bus concept.
The PG SHIFTER ADJUSTMENT is adjusted by using "On
Screen Displays" and the remote control instead of adjusting
mechanical controls (VR).
6.2.4. PG SHIFTER ADJUSTMENT
Purpose:
Determine the Video Head Switching Point during
Playback.
Symptom of
Misadjustment:
May cause Head Switching Noise and/or Vertical
Jitter.
Test Point :
TP3001 (Main C.B.A.),
TP6205 (Main C.B.A.)
Specification:
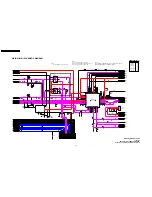
T = 6 H ± 0.5 H (0.38 ms ± 0.03 ms)
Mode :
SP Playback
Equipment :
Oscilloscope,
VHS Alignment Tape (VFMS0003H6),
TV monitor
1. Insert the VHS Alignment Tape. Enter service mode by
pressing and holding FF and CH DOWN buttons on VCR
together for more than 5 seconds.
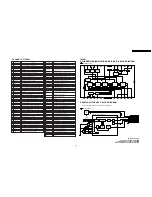
2. Play back SP mode. Then, press 100 button on the remote
to enter EVR PG SHIFTER ADJUSTMENT mode. PG
ADJUSTMENT screen will appear on the TV Monitor.
Fig. E2
3. Connect the channel-1 scope probe to TP3001 and the
channel-2 scope probe to TP6205. Used TP6205 as a
trigger
4. Adjust value so that the trailing edge of the head switching
pulse is placed 6 H ± 0.5 H (0.38 ms ± 0.03 ms) before the
start of the vertical sync pulse by pressing CH UP and CH
DOWN buttons on the remote.
Fig. E3
6 ADJUSTMENT PROCEDURES
25
PV-D4735S / PV-D4745 / PV-D4745S / PV-D4745S-K
Summary of Contents for OmniVision PV-D4745
Page 2: ...2 PV D4735S PV D4745 PV D4745S PV D4745S K ...
Page 10: ...Fig 1 3 2 10 PV D4735S PV D4745 PV D4745S PV D4745S K ...
Page 19: ...Fig C2 19 PV D4735S PV D4745 PV D4745S PV D4745S K ...
Page 23: ...Fig D2 23 PV D4735S PV D4745 PV D4745S PV D4745S K ...
Page 48: ...PV D4735S PV D4745 PV D4745S PV D4745S K 48 ...
Page 58: ...PV D4735S PV D4745 PV D4745S PV D4745S K 58 ...
Page 59: ...10 EXPLODED VIEWS 10 1 MECHANISM SECTION 59 PV D4735S PV D4745 PV D4745S PV D4745S K ...
Page 60: ...10 2 DVD SECTION 60 PV D4735S PV D4745 PV D4745S PV D4745S K ...
Page 61: ...10 3 CHASSIS FRAME AND CASING PARTS SECTION 61 PV D4735S PV D4745 PV D4745S PV D4745S K ...
Page 62: ...10 4 PACKING PARTS AND ACCESSORIES SECTION 62 PV D4735S PV D4745 PV D4745S PV D4745S K ...


