2-25
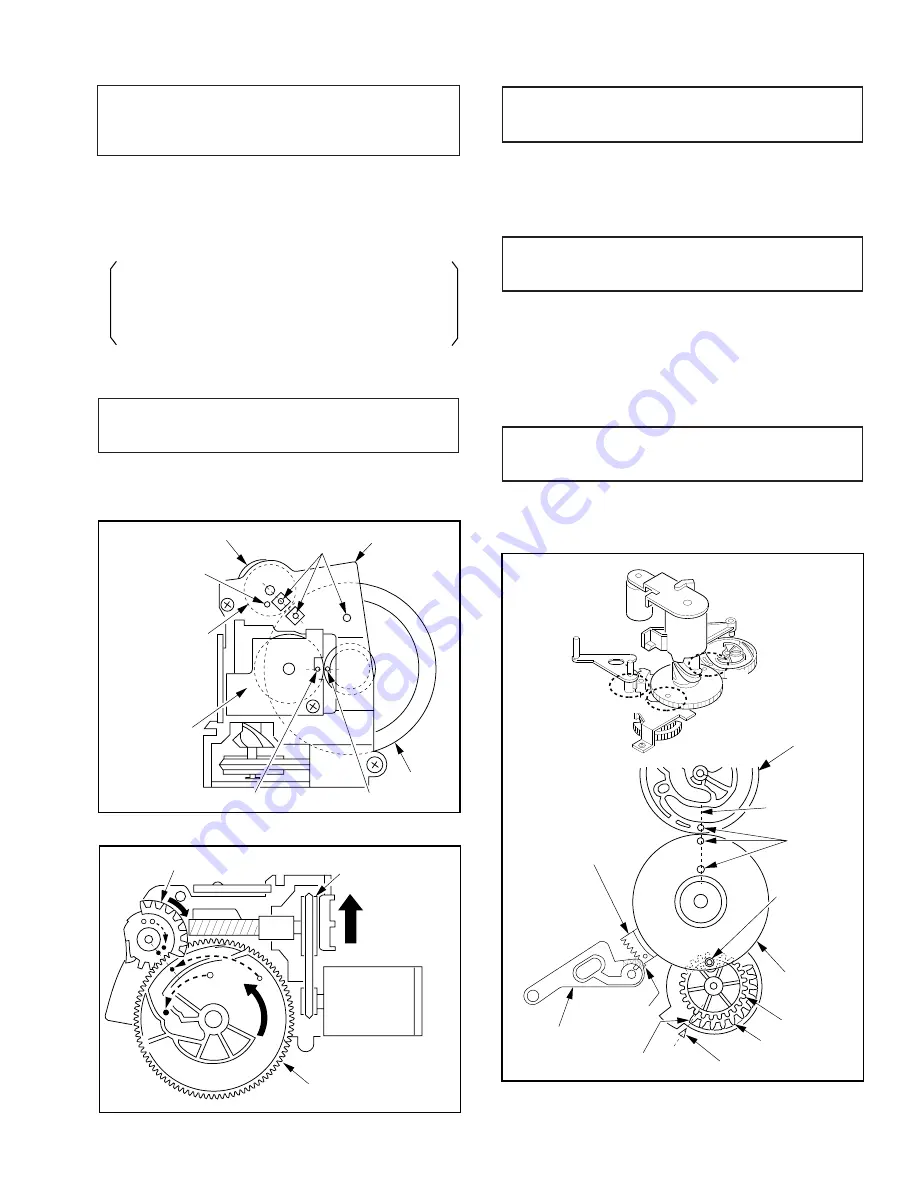
Cam Gear
Holes
Indentation
Mode Select
Switch
Link Gear
Geneva Gear
Hole
Motor Bracket
Indentation
Loading Pulley
Cam Gear
Geneva Gear
Turn the
Loading Pulley
(ALIGNMENT 3)
CAM GEAR, LINK GEAR AND GENEVA
GEAR
1. First, install the Geneva Gear, then the Cam Gear as shown
in Fig. A4.
2. Turn the Loading Pulley of the Motor Block Ass'y in the
direction shown by arrow in Fig. A5 so that the holes on the
Geneva Gear and Cam Gear are aligned with holes on the
Motor Bracket as shown in Fig. A4, A5.
Alternate method :
First, align the hole of the Cam Gear with the hole of the
Geneva Gear as shown in Fig. A5.
Then, carefully install the Cam Gear and the Geneva Gear
together onto the Motor Bracket.
3. Install the Link Gear so that the holes are aligned with the
holes on the Geneva Gear and Motor Bracket.
(ALIGNMENT 4)
MODE SELECT SWITCH AND CAM GEAR
1. Install the Mode Select Switch so that the indentation on the
Mode Select Switch aligns with the indentation on the Cam
Gear. Refer to Fig. A4.
Fig. A4
Fig. A5
(ALIGNMENT 5)
P5 SECTOR GEAR AND P5 ARM UNIT
1. Install the P5 Sector Gear.
2. Install the P5 Arm Unit so that the last tooth of the gear is
just outside the teeth of the P5 Sector Gear as shown in
Fig. A6.
(ALIGNMENT 6)
PINCH LIFT CAM AND LINK GEAR
1. Install the Motor Block Ass'y.
2. Confirm that the last tooth of Geneva Gear aligns with the
triangle mark on chassis.
3. Install the Pinch Lift Cam so that the through hole on the
Pinch Lift Cam is aligned with the hole on the Link Gear as
shown in Fig. A6.
If not, perform alignment 3 and 4.
(ALIGNMENT 7)
SECOND CAM GEAR AND PINCH LIFT CAM
1. Install the Second Cam Gear so that the hole on the
Second Cam Gear is aligned with the holes on the Pinch Lift
Cam as shown in Fig. A6.
Fig. A6
P5 Arm Unit
P5 Sector Gear
Pinch Lift Cam
Link Gear
Second
Cam Gear
Holes
Align the
three Holes
Last Tooth
Through Hole
Alignment 5
Alignment 6
Alignment 7
Triangle Mark
Last Tooth
Geneva Gear
Summary of Contents for OmniVision PV-M1326
Page 42: ......
Page 43: ......
Page 44: ......
Page 45: ......
Page 46: ......
Page 47: ......
Page 48: ......
Page 49: ......
Page 50: ......
Page 51: ......
Page 52: ......
Page 53: ......
Page 54: ......
Page 55: ......
Page 56: ......
Page 57: ......
Page 58: ......
Page 59: ......
Page 60: ......
Page 61: ......
Page 62: ......
Page 63: ......
Page 64: ......
Page 65: ......
Page 66: ......
Page 67: ......
Page 68: ......
Page 69: ......
Page 70: ......
Page 71: ......
Page 72: ......
Page 73: ......
Page 74: ......
Page 75: ......
Page 76: ......
Page 77: ......
Page 78: ......
Page 79: ......
Page 80: ......
Page 81: ......
Page 82: ......
Page 83: ......
Page 84: ......
Page 85: ......
Page 86: ......
Page 87: ......
Page 88: ......
Page 89: ......
Page 90: ......
Page 91: ......
Page 92: ......
Page 93: ......
Page 94: ......
Page 95: ......
Page 96: ......
Page 97: ......
Page 98: ......
Page 99: ......
Page 100: ......
Page 101: ......
Page 102: ......
Page 103: ......
Page 104: ......
Page 105: ......
Page 106: ......
Page 140: ......
Page 141: ......
Page 142: ......
Page 143: ......
Page 144: ......
Page 145: ......
Page 146: ......
Page 147: ......
Page 148: ......
Page 149: ......
Page 150: ......
Page 151: ......
Page 152: ......
Page 153: ......
Page 154: ......
Page 155: ......
Page 156: ......
Page 157: ......
Page 158: ......
Page 159: ......
Page 160: ......
Page 161: ......
Page 162: ......
Page 163: ......
Page 164: ......
Page 165: ......
Page 166: ......
Page 167: ......
Page 168: ......
Page 169: ......
Page 170: ......
Page 171: ......
Page 172: ......
Page 173: ...Printed in Japan R...


