2-9
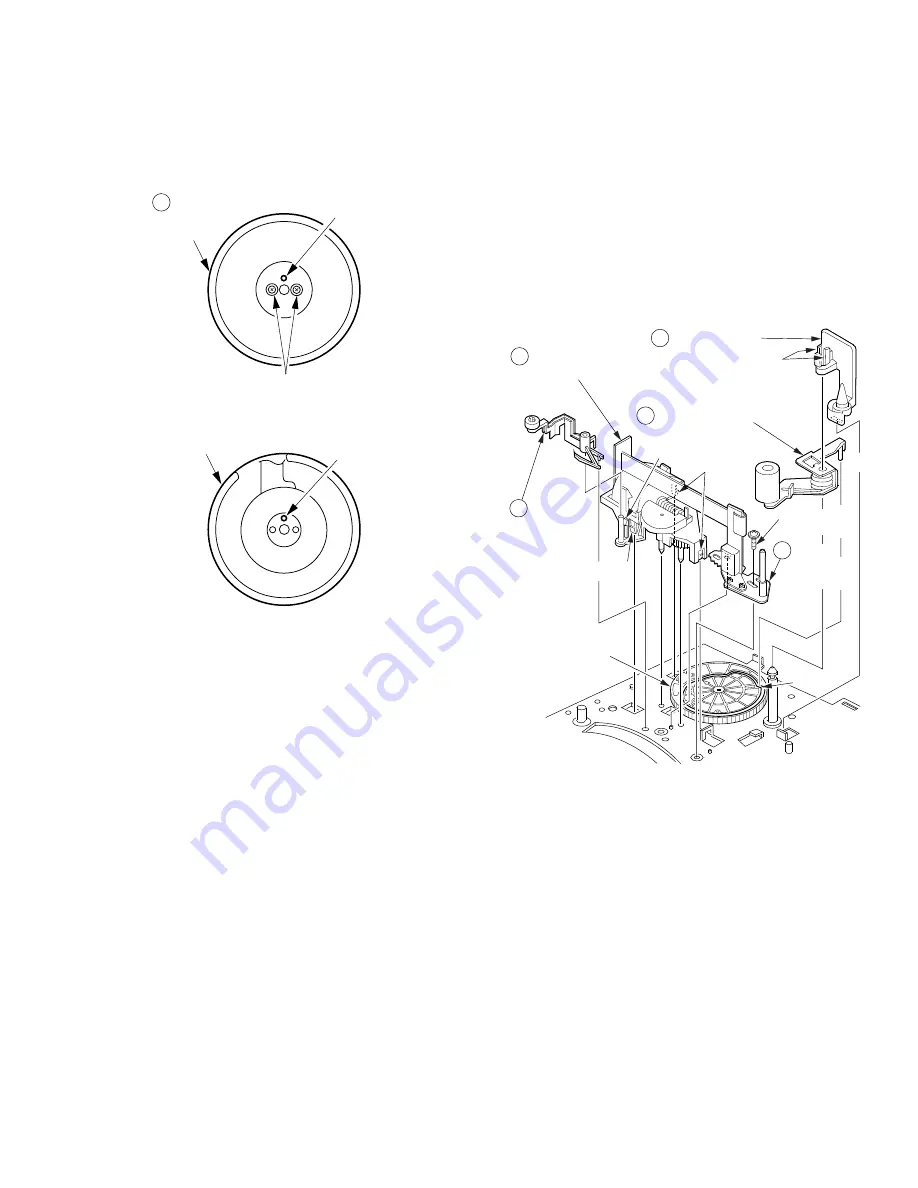
Groove
Locking Tab (B)
Note:
Depending on the VCR model, there may or may not be a
Cleaner Arm Unit.
Please refer to "Exploded Views" or "Replacement Parts
List."
Main Cam Gear
Locking
Tabs (B)
Locking Tabs (A)
4 Pinch Arm Unit
Pin
3 Opener Piece
5 Motor
Block Ass'y
Screw with
Washer (C)
6 Audio
Control
Head Unit
Locking
Tab (L)
40 Cleaner
Arm Unit
Lower
Cylinder
Hole
Indentation
Screws with Washers (B)
2 Upper
Cylinder
Unit
Upper Cylinder Unit
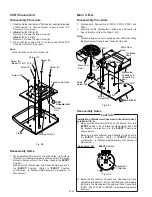
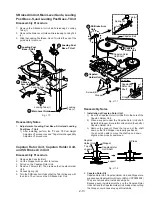
Disassembly Procedure
1. Remove 2 Screws with Washers (B).
2. Carefully lift the Upper Cylinder Unit from the shaft.
Fig. J3
Note:
Use extreme care when removing or replacing the Upper
Cylinder Unit. Do not touch the Video Heads during servicing.
Reassembly Notes
1. Use extreme care when removing or replacing the Cylinder
Unit. Do not touch the Video Heads during servicing.
2. Alignment of Upper Cylinder Unit
1) When installing, make sure that the hole on the Upper
Cylinder is aligned with the indentation on the Lower
Cylinder.
2) After installing, perform the "Tape Interchangeability
Adjustment" procedures.
Opener Piece, Pinch Arm Unit, Motor Block
Ass'y, Audio Control Head Unit, and Cleaner
Arm Unit
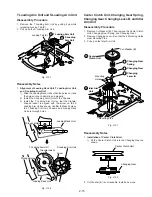
Disassembly Procedure
1. Remove the Opener Piece by pulling it upward while
releasing 2 Locking Tabs (A).
2. Pull up on the Pinch Arm Unit.
3. Release 3 Locking Tabs (B) and remove Screw with
Washer (C). Then, remove the Motor Block Ass'y and
Audio Control Head Unit.
4. Remove the Cleaner Arm Unit by pulling it upward while
releasing Locking Tab (L).
Fig. J4
Reassembly Notes
1. Installation of Audio Control Head Unit
1) Install the Audio Control Head Unit before Motor Block
Ass'y.
2) After installing, perform the "Tape Interchangeability
Adjustment" procedures.
2. Installation of Pinch Arm Unit
1) Install the Pinch Arm Unit so that the Pin of Pinch Arm
Unit fits in the groove of Main Cam Gear.
Summary of Contents for Omnivision PV-M1378W
Page 5: ...1 3 ...
Page 6: ...1 4 ...
Page 7: ...1 5 ...
Page 8: ...1 6 ...
Page 60: ......
Page 61: ......
Page 62: ......
Page 63: ......
Page 64: ......
Page 65: ......
Page 66: ......
Page 67: ......
Page 68: ......
Page 69: ......
Page 70: ......
Page 71: ......
Page 72: ......
Page 73: ......
Page 74: ......
Page 75: ......
Page 76: ......
Page 77: ......
Page 78: ......
Page 79: ......
Page 80: ......
Page 81: ......
Page 82: ......
Page 83: ......
Page 84: ......
Page 85: ......
Page 86: ......
Page 87: ......
Page 88: ......
Page 89: ......
Page 90: ......
Page 91: ......
Page 92: ......
Page 93: ......
Page 94: ......
Page 95: ......
Page 96: ......
Page 97: ......
Page 98: ......
Page 99: ......
Page 100: ......
Page 101: ......
Page 102: ......
Page 130: ...Printed in Japan ...

