25
Timer Operation
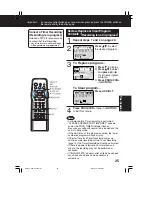
Repeat steps 1 and 2 on page 24.
1
CANCEL : ADD / DLT
SELECT 1 - 8 :
ENTER :
END : PROG / ACT I ON
P DT START STOP CH SPD
1 day
day 9
9 : 00
00p 12
12 : 00
00a
08
08 SP
SP
2 8 10 : 00a 12 : 00p 125 SP
3 10 8 : 00p 9 : 00p 10 SP
4 SU 9 : 00p 10 : 00p L LP
8 SAT
SAT 9:00
00P
P 12
12: 00
00A 08
08
TODAY
CATEGORY : MOV I E
----------------------------------------------
DATE START STOP CH
ABC
SP
SE
SELE CT
START
START DAT
ATE
SELECT :
SET :
END : PROG / ACT I ON
P DT START STOP CH SPD
1
-- --
-- -- : --
--
--
-- : --
--
--
-- --
--
2 8 10 : 00p 12 : 00a 125 SP
3 10 8 : 00p 9 : 00p 10 SP
4 SU 9 : 00p 10 : 00p L LP
SELECT 1 - 8 :
ENTER :
END : PROG / ACT I ON
Press PROG/VCR+ twice (or ACTION)
to exit this mode.
2
3
To Replace program...
To Clear program...
4
Press
to select
the desired program.
1) Press to display.
2) Press
to select
and press or
to set new program
contents.
3) Press PROG/VCR+
(or ACTION).
Cancel a Timer Recording:
(Recording is in progress)
Hold down STOP for a few seconds
to cancel the Timer Recording.
• Any future daily or weekly recordings
will be performed as programmed.
Press ADD/DLT.
Review, Replace or Clear Program
Contents : (Recording is not in progress)
*Important:
if a remote control button does not work when pressed, press the COMBO button on
the remote and try the button again.
• 2 minutes before Timer recording is performed,
“PLEASE PREPARE FOR TIMER REC” appears
and/or the PROG TIMER Indicator flashes.
Be sure a cassette with record tab is loaded and the
unit is in Stop mode.
• If the start times of two programs overlap, the lower
numbered program will have priority.
• If the start time for a Timer Recording comes up
during a normal recording or One Touch Recording
(page 14), the Timer Recording will not be performed.
• If there is a power interruption of more than one
minute, the recording may not be performed or
continued.
• If “INCOMPLETE” appears after all items have been
set, check all entries and make necessary
corrections.
Notes
C2061- P24-25 Timer rec
00.12.14, 5:33 PM
25
Summary of Contents for OmniVision PV-Q1311
Page 9: ...Fig 1 4 Fig 1 5 9...
Page 23: ...5 2 IC TRANSISTOR AND CHIP PART INFORMATION 23...
Page 27: ...Fig D4 Fig D5 27...
Page 31: ...6 2 2 Inner Parts Location Fig J1 1 31...
Page 32: ...6 2 3 EJECT Position Confirmation Fig J1 2 32...
Page 33: ...6 2 4 Grounding Plate Unit Full Erase Head and Cylinder Unit Fig J2 1 33...
Page 84: ...84...
Page 88: ...11 2 MECHANISM BOTTOM SECTION 88...
Page 89: ...11 3 CASSETTE UP COMPARTMENT SECTION 89...
Page 90: ...11 4 CHASSIS FRAME SECTION 1 90...
Page 91: ...11 5 CHASSIS FRAME SECTION 2 91...
Page 93: ...Model PV C2011 PV C2021 PV C2031W VV 2001 PV C2061 93...
Page 111: ...R4591 ERDS2TJ681T CARBON 1 4W 680 111...
Page 113: ...R6009 ERJ6GEYJ102V MGF CHIP 1 10W 1K 113...
Page 135: ...R6032 ERJ6GEYJ102V MGF CHIP 1 10W 1K 135...


